Application with plasticine
Children at two years old do not yet know how to hold scissors and brushes in their hands. But their children's hands easily roll plasticine balls. Exciting activities to make colorful fruits bring joy to the process.
After all, beautiful stucco pictures are created right before your eyes. Such crafts last a long time, so they are suitable for decorating play corners.
Stores sell applique kits at prices starting from 58 rubles. The set for the little ones includes four pictures with fruits, multi-colored plasticine, and stacks.
As a backup option, you can use: thick cardboard, disposable plastic plates, yogurt or sour cream lids. Using a felt-tip pen, draw the outlines of fruits familiar to children. The following actions accompany the display:
- Small pieces are plucked from plasticine.
- Roll balls and stick them to the base.
In older preschool age, coloring books are often used for creativity. Silhouettes are cut out from the book and glued onto cardboard. Then they roll the balls and stick them to the outline pictures. Children are also taught to use several colors of plasticine in one craft.
Theoretical nuances
Applique is a type of productive activity that is based on the creation of plot compositions from paper, fabric, natural material, glued or sewn onto a thick cardboard or paper (rarely wooden) backing.
Paper appliqué in the preparatory group is complicated by cutting out bends and curls, including along diagonal lines
The goals of applique classes, while being the same for working with preschoolers of any age, in the preparatory group have a number of features:
- the development of highly coordinated movements of the muscles of the hands helps children master the skill of writing;
- stimulation of the skill to concentrate and manage one’s activities;
- assistance in complicating the mechanisms of thinking with images (at 5–6 years old, children composed coherent descriptions of their crafts, and in the preparatory group they learn to fantasize about a topic, breaking the plot into fragments, a kind of “series”);
- consolidating the skill of completing a task according to a model, that is, the priority way of working in the lower grades;
- the practice of orientation in space in the process of arranging the details of the composition within the boundaries of the substrate;
- speech development (kids learn to come up with stories based on crafts, using not only simple sentences, but also complex and complicated phrases);
- cultivating the ability to evaluate one’s own activities and the work of one’s comrades.
In the preparatory group, developing the skill of working both together and just side by side continues
Tasks aimed at achieving these goals include:
- the practice of creating subject and plot compositions from nature and from imagination (that is, individual objects, for example, “Bookmark”, and combinations of objects within the framework of a general scene, for example, “Swans swim in the pond”);
- developing the ability to combine different types of techniques in one craft (for example, in the work “Food”, children make vegetables in a cut-out form, a plate in a flat form, and cutlery in a silhouette form);
- practicing cutting out parts that differ in shape and size;
- the practice of cutting out symmetrical elements from a sheet of paper folded in half, as well as paired parts from a sheet assembled with an accordion;
- familiarization with cut-out decor, when the decorations of the elements are not glued on, but cut through (for example, “Snowflakes”);
- developing the ability to share responsibilities while performing a task in a group or pair;
- nurturing a sense of color, proportionality of composition, measures in the use of decorative elements (beads, buttons, etc.);
- stimulating interest in creating stories on nature and fairy tales;
- training the skill of reflection (older preschoolers not only say whether they like their craft or not, but also justify why).
New appliqué techniques for children 6–7 years old
In general, at 6–7 years old, kindergarten students systematize all the skills that they have previously mastered. But still the emphasis in the work is on:
- the ability to use scissors to cut out elements by eye, observing proportions (for example, vegetables and fruits), silhouette and ribbon appliqué (the difficulty of cutting out such details lies in the fact that the child, when cutting out individual details, for example, the outlines of the paws and tail of an animal, holds a complete image of the image in the head, coordinating the movement of the hand with the imaginary form);
- drawing up plot pictures (for example, based on fairy tales), as well as compositions that are as close to realistic as possible (still lifes, landscapes);
- developing the skill of making markings on paper, using a stencil, template, carbon paper, sketching against the light, by eye, or by folding the sheet;
- developing the ability to compose a composition from several elements, evenly placing them on a substrate and thinking through the decorations of each (for example, when making a “Country House” craft, children not only convey all the details of the real picture - a fence, a vegetable garden, paths, etc., but also they come up with decorations for the house itself - tiles on the windows, carvings on the railings at the entrance, etc.);
- practicing a broken type of appliqué to create clouds, sea foam, etc.;
- complication of color combinations (children practice combining elements of more than 4-5 shades within one plot).
In the preparatory group, children continue to experiment with the shape of the substrate
Circle applique
The first paper products that even three-year-old children can make are fruit appliques from multi-colored circles. Riddles, songs, counting rhymes, sayings and proverbs on the topic will help to interest the kids.
Creative activity will not be boring if you make a note that reflects what goals you need to achieve:
- Talk about the benefits of the fruit.
- Learn how to glue round shapes using glue.
- Fix shapes and colors.
- Instill neatness.
Preschoolers do not yet master concepts and think only in visible, concrete images. Therefore, for practicing applique, visual material is prepared: apples of three colors of different sizes on a plate. Adults also cut out blanks from paper:
- A white circle with a radius of 20 cm is for the base.
- Yellow, red and green circles are for fruits.
With children, they look at each apple on the plate, analyze the sizes and differences. They offer to capture them by accurately laying out colored circles on the base.
Then they begin the practical part: they are introduced to the simple technique of paper appliqué. They show how to smear parts and press them onto paper using a napkin.
Autumn. Applications - Gifts of autumn. Application "Sunflower" using seeds
Publication “Gifts of Autumn. Application "Sunflower" using..."
Evening is an amazing time when the whole family gets together and unsuspecting parents find out that they need to bring autumn crafts to the kindergarten for tomorrow. Are you now also making crafts on the theme “Gifts of Autumn” for school or kindergarten? After all, in schools and kindergartens...
Image library "MAAM-pictures"
Summary of a lesson on volumetric appliqué in the preparatory group “Autumn Tree” Summary of a lesson on application, preparatory group. Theme: Autumn tree. Target. — Make an applique using mixed media, using paper cut out according to a template. - Continue to introduce new techniques, tearing paper, circling according to the template. Tasks. 1….
Broken applique “Autumn Forest”. Photo report While walking with children, we observe seasonal changes in nature in the fall. We teach children to distinguish trees and shrubs in autumn color. Identify tree names and leaf colors. Together with the children, we collect bouquets of colorful autumn leaves and fruits, examine them,…
Application using pumpkin seeds “Autumn Tree” Surely in the fall everyone pays attention to trees. This also applies to kindergarten students.
In order to strengthen their understanding of the seasons, you can offer to make an applique. Goal: Making an autumn tree applique using pumpkin seeds….
Autumn. Applications - Collective application “Portrait of Autumn” in the preparatory group
Article “Collective application “Portrait of Autumn” in the preparatory ...”
Collective applique “Portrait of Autumn” Purpose: making a three-dimensional applique from leaves cut out according to a template from colored paper. Tasks: Creating a portrait from paper leaves. Improve the ability to work with scissors.; Select leaves by color, size, shape, cut...
Application “This is the beauty that autumn gives us”
Autumn is rich in colors. But this year the trees are still green. So far, on the birch trees in our kindergarten territory there are only a few beautiful bright yellow branches. This is the beauty we saw with the kids. Then they shook the branch and caused the leaves to fall. The children tried to catch...
Making an autumn card using the cut-out appliqué technique in the senior group
On September 23, at MBDOU kindergarten 60 in Belgorod, in the senior compensatory group “Sunny Bunnies” No. 10, a lesson on artistic and aesthetic development was held. Making an autumn card using the cut-out appliqué technique. Goal: creating a broken applique from...
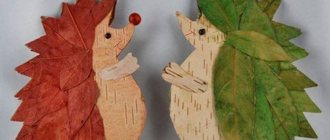
Application in the senior group “Autumn Hedgehog” for International Hedgehog Day Master class on the application “Autumn Hedgehog” was completed for World Hedgehog Day. Materials for the master class: a set of white cardboard, a set of colored paper for children's creativity, a template for the image of a hedgehog's body, a template for leaves, a simple pencil, a ruler, scissors, glue...
Pages: …
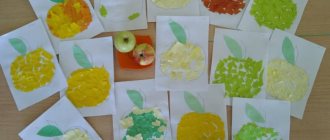
Broken applique
At 4 years old, a child is introduced to mosaic techniques and taught how to create pictures from pieces of torn paper. Autumn themes that are understandable at this age: vegetables and fruits. Children are given templates of an apple, pear, plum, and orange. Then they are shown the procedure for making the craft:
- Contours are drawn on a landscape sheet.
- Tear the paper into small pieces.
- Spread glue on the leaves and stick pieces of green paper on them.
- Color the tails of the fruits with a brown or black pencil.
- Apply glue to the apple. Glue pieces of red paper first along the contour, and then fill the entire middle with them.
- Step 5 is repeated with pear, plum and orange.
The work is decorated with a colored border. Cut out 4 strips 1 cm wide and glue along the edges.
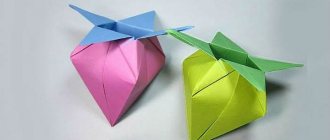
Vase with Flowers
Let's consider the option of a combined application as a craft for March 8th for the preparatory group.
To complete this you will need: cardboard, colored paper, buttons, glue, scissors. Children work on ready-made cut out flower details.
STEP 1. We attach the vase template to a sheet of colored cardboard, trace it and cut it out.
STEP 2. Glue the resulting vase to cardboard of any color.
STEP 3. Next, the children gradually collect and glue the flowers, starting from the largest to the smallest petal.
STEP 4. Place buttons in the centers of the flowers.
If desired, you can decorate the vase.
The gift is ready!
Volume applique
Preschoolers are taught about the technique of volumetric appliqué at an older age. With the help of adults, they learn skills that will be useful to them in labor lessons at school.
In junior grades, children are asked to perform the composition “Fruits on a Plate.” For crafts, stock up on cardboard, a set of multi-colored paper, templates, hard glue, pencil, scissors, and felt-tip pens. The application is performed in the following sequence:
- Two squares of different colors are cut out of cardboard, one for the background, with a side of 20 cm, the other for the frame.
- A yellow sheet of paper is folded in half twice. A pear template is applied to the workpiece and the outline is drawn with a pencil. Cut along the line and get 4 parts.
- Step 2 is repeated using your own color of paper for plum, apple, kiwi and orange.
- Fold all the parts of the fruit in half, ironing the fold lines.
- Apply glue to the first part of the pear. Two halves of the second and third parts are glued to it, aligning the fold lines in the center. Spread the last part and glue it to the glue-free halves.
- Step 5 is repeated with the apple, plum, kiwi and orange parts.
- A plate is cut out of paper according to a template.
- Glue it on cardboard, and on it - voluminous fruit.
- Draw branches with a brown felt-tip pen and decorate them with leaves.
- The work is placed in a frame: the applique is glued onto colored cardboard.
The plate is decorated with an ornament, pattern or flowers from circles prepared using a hole punch.
Caterpillar
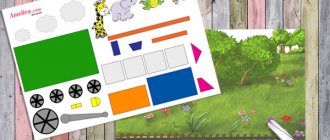
Let's take a closer look at how to make a caterpillar from bottle caps.
You need: colored paper, colored cardboard, scissors, glue, markers, 5 bottle caps. The photo shows an option made from chestnuts, but the same thing can be made from bottle caps.
STEP 1. Using a template, cut out a large sheet from a sheet of green cardboard.
STEP 2. Draw the leaf veins.
STEP 3. Glue the lids to the sheet.
STEP 4. Cut out circles with a diameter slightly larger than the lid, and glue them to the top of the lid.
STEP 5. Add the caterpillar's face and legs.
STEP 6. Decorate the work according to your own wishes. This work is ready!
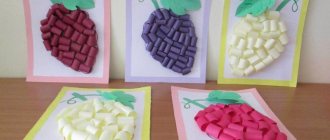
Fruits made from colored accordion paper
Applique fruits in a vase or vegetables on a plate as a kitchen decoration is one of those interesting ideas that delight children. Making such crafts from colored accordion paper is a useful form of creativity for developing fine motor skills.
Preschoolers of the preparatory group aged 6–7 years will cope with the task. Materials and tools that will be useful for creativity: double-sided colored paper, cardboard, a simple pencil, felt-tip pens, scissors, hard glue, a compass and a ruler.
How to make apples
To make 1 fruit, cut two strips 5 cm wide and 21 cm long. 2 accordions are folded from green, yellow or red blanks according to the instructions:
- On the narrow side, make a fold forward, 5–7 mm wide.
- Use your finger or pencil to smooth the fold line.
- The workpiece is turned over and a fold of the same dimensions is made again.
- Steps 1 and 2 are repeated with each strip until accordions are formed. Then they are glued together, spreading the narrow edges. The result is a tube 5 cm high.
Now the tube is placed vertically on the table and pressed with your palm on top. At the same time, hold the craft with the other hand, otherwise you won’t get a flat, round shape. A cardboard circle of the same color, but 1–1.5 cm smaller in size, is glued onto it.
The top is decorated with an even smaller piece, similar in shape to the slice of an apple, cut out from light yellow or beige paper. Seeds are drawn on it with a felt-tip pen. The applique is completed by gluing a green leaf.
How to make pineapples
All fruits follow the same pattern:
- Accordions are made from two strips of colored paper.
- Spread the narrow edges and glue them together.
- Press the tube with your palm.
- A smaller circle is glued to a flat round base.
- The applique is complemented with details characteristic of the fruit.
For example, for a pineapple, a green Christmas tree with a long top is cut out of cardboard. The yellow circle is glued to the accordion from the front side, and the Christmas tree turned upside down is glued to the back side.
Complete the applique by drawing intersecting lines on the yellow round center.
How to make other fruits
The technique of folding paper accordions allows you to make all sorts of round-shaped fruits or berries. For example, a lemon applique consists of three parts:
- The accordion is the basis.
- The white circle is the middle.
- Yellow drops are slices.
For the cherry, a red circle and a branch with leaves are cut out, and the watermelon is decorated with a red center, gluing it to a green accordion.
Literature on the topic to help the teacher
Notes on application nodes for the preparatory school group “summer fantasies”
When choosing a technique and type of application on a specific topic, it will be useful for the teacher to familiarize himself with the following manuals:
- Boychenko O., Starikova E. Development of creativity in applique classes // Preschool education - 1989.
- Dubrovskaya N.V. Application from natural materials, M.: 2011.
- Komarova T.S. Visual activities in kindergarten: Education and creativity, - M.: Pedagogika, 1990.
- Kazakova T.S. Visual activity and artistic development of preschool children, - M.: Pedagogika, 1993.
- Kazakova T.G., Lykova I.A. Fairy-tale image in fine art or “Bring the fairy tale to life” // Preschool education. – 2005.
- Kozhokhina S.K. We grow and develop with the help of art, - St. Petersburg: Rech, 2006.
- Lykova I.A. Visual activities in kindergarten, - M.: “Karapuz - didactics”, 2006.
To compile lesson notes on application, the following materials will be informative:
- Program “From birth to school” / (edited by N. E. Veraksa, T. S. Komarova, M. A. Vasilyeva, - M.: Mozaika-Sintez, 2014.
- Komarova T. S. Visual activities in kindergarten. Preparatory group for school. – M.: Mosaic - Synthesis, 2014.
- Tsirulik N.A., Prosnyakova T.N. Lessons in creativity, - Samara: Fedorov Corporation, Publishing House "Educational Literature", 2004.
Lessons on applique in the preparatory group are an important element of the creative development of children. In addition, children like this type of activity, it helps expand their understanding of the world around them, trains fine motor skills and helps form ideas about working in a team. In other words, the application in the system of working with children 6–7 years old has extensive methodological potential.
Fruits in quilling style
Twisting narrow strips into spirals is a labor-intensive process, but understandable to older preschoolers. Fruit slices are made using the quilling technique.
Materials that will be useful for creativity: colored paper, disposable cardboard plate, glue. Tools: pencil, ruler, scissors, toothpick.
How to make kiwi slices
For 1 slice, cut 8 green strips 0.5 cm wide and 30 cm long:
- Alternately twist onto a toothpick with a spiral.
- They are formed into drops by squeezing one part of each shape with your fingers.
The center of the kiwi is made from a white strip of the same width and length. A tight roll is made from it, loosened slightly, and then flattened with the palm of your hand.
Last step: 4 brown strips are glued together with one long strip. A ring is made from it, which is glued to the base. Inside, fix a white center in the center, and green drops around them, placing them in a circle.
How to make orange slices
Cut strips of white, yellow and orange paper:
- Combine the yellow and white stripes into one.
- Screw onto a toothpick, starting from the yellow end.
- Form a triangle - squeeze the spiral in three places with your fingers.
- Glue the blanks together to form an orange slice.
Three orange stripes are combined into one strip and pasted around the triangular blanks.
Looking through photos of children's crafts, you might think that stunning still lifes are created by young talents.
Paper fruits made using different techniques are simply impressive in appearance.
I want to decorate the walls of my apartment with appliqués and decorate the New Year tree. And also give as a gift to relatives and friends from the whole family.
Literature on the topic to help the teacher
When choosing a technique and type of application on a specific topic, it will be useful for the teacher to familiarize himself with the following manuals:
- Boychenko O., Starikova E. Development of creativity in applique classes // Preschool education - 1989.
- Dubrovskaya N.V. Application from natural materials, M.: 2011.
- Komarova T.S. Visual activities in kindergarten: Education and creativity, - M.: Pedagogika, 1990.
- Kazakova T.S. Visual activity and artistic development of preschool children, - M.: Pedagogika, 1993.
- Kazakova T.G., Lykova I.A. Fairy-tale image in fine art or “Bring the fairy tale to life” // Preschool education. – 2005.
- Kozhokhina S.K. We grow and develop with the help of art, - St. Petersburg: Rech, 2006.
- Lykova I.A. Visual activities in kindergarten, - M.: “Karapuz - didactics”, 2006.
To compile lesson notes on application, the following materials will be informative:
- Program “From birth to school” / (edited by N. E. Veraksa, T. S. Komarova, M. A. Vasilyeva, - M.: Mozaika-Sintez, 2014.
- Komarova T. S. Visual activities in kindergarten. Preparatory group for school. – M.: Mosaic - Synthesis, 2014.
- Tsirulik N.A., Prosnyakova T.N. Lessons in creativity, - Samara: Fedorov Corporation, Publishing House "Educational Literature", 2004.
Lessons on applique in the preparatory group are an important element of the creative development of children. In addition, children like this type of activity, it helps expand their understanding of the world around them, trains fine motor skills and helps form ideas about working in a team. In other words, the application in the system of working with children 6–7 years old has extensive methodological potential.
Photos of applications in the form of fruits
Examples for the younger group
The leading place among handicraft lessons for children 2-3 years old on the topic of vegetables is canning.
At the preparatory stage, it is worth discussing with the children what vegetables they would like to see in their future creations.
After that, they can independently choose what they have voiced among pre-prepared templates and glue it to the base. A jar cut out of cardboard is suitable for it.
Examples for the older group
For older children, the application becomes more complicated due to the additional use of mosaics or adding volume. The following will demonstrate step-by-step instructions on how to make a vegetable applique in the tear-off style.
This craft looks unusual and provides the child with the opportunity to break out of the strict boundaries of cutting.
- A sheet of cardboard is used as a basis. On it, using a simple pencil, you can draw the silhouettes of any vegetables that you would like to see in your work.
- Take paper of the colors that are characteristic of the selected vegetables. For carrots - orange, for potatoes - brown, for tops - green, and so on. Each leaf is manually torn into small squares.
- The resulting pieces fill the space in the sketches. And they are glued on with glue.
- Ready!
Such work will look no less beautiful, but more accurately, if the parts for the mosaic are not torn by hand, but cut with scissors.
A voluminous craft is a little more difficult to make, but children can easily cope with it if they put in a little effort. Thus, a voluminous carrot can be created by folding a long orange strip of paper in half. Form a sharp corner on one side and leave the joint rounded on the opposite side. To which the green tail will remain glued.
You can also use another method. To do this, you need thick paper or cardboard rolled into a cone. Then cover the top with orange crepe paper.
And cover the round hole with green paper, in the center of which several short strips of green crepe paper will remain glued.