Children of any age can make applique animals. As a rule, children are very interested in such crafts. You just need to choose the right level of difficulty for each age group of children.
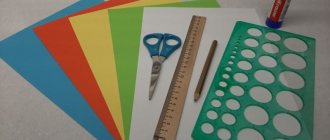
To make all applications you will need the following tools and materials:
- stationery glue or glue stick,
- simple pencil,
- ruler,
- scissors,
- cardboard,
- colored paper of various colors,
- multi-colored felt-tip pens or markers
- ready-made paper templates.
Animal applications for children under 3 years old
For very young children, flat animal applications made from geometric shapes - circles, ovals, triangles, rectangles and squares - are suitable. At the same time, this will allow you to get acquainted with these figures in a playful way and learn how to work with them.
Before working with your child, all elements should already be cut out of paper. It is advisable to show the child a drawing of the finished application and, naming the figures on it, invite him to choose similar figures from several different ones. Draw the child's attention to the importance of color.
Next, tell us in what order you need to assemble the applique and show how to apply the glue correctly. You need to start working with animals that are well known to the child, for example, a dog, a cat or a bird.
In the future, it will be possible to offer the creation of images of other domestic and then wild animals. It is important to focus the baby’s attention on the distinctive features of each animal that make it recognizable.
For younger children, the application should consist of large parts and a small number of elements, so that children do not lose interest in the process.
Features of appliqué classes in the preparatory group of kindergarten
By the age of 6–7 years, the child handles scissors well and easily cuts out simple shapes along the contour. He can connect dotted lines or dots with a continuous line, and draw simple elements for use in appliqué. In accordance with the skills of pupils of this age, the program requirements become more complex. The teacher needs to direct the children’s imagination to create plot applications. The child should accompany the process of gluing the prepared parts with verbal comments. The game moment turns on: we not only learn how to create a craft, but at the same time we compose a story.
Kinds
Pupils of the preparatory group must master the following appliqué techniques:
- Creation according to the model. The child can trace the templates suggested by the teacher, cut them out and create a picture similar to what they saw. Students are offered several samples on a given topic and are given the opportunity to combine creation techniques and compositional elements.
- Silhouette applique. It involves the same actions as in the previous paragraph, but the template is more complicated, the work turns out to be more labor-intensive and painstaking. For ages 6–7 years, this type of application is interesting when there is a plot-role factor in the creative process.
- Creating a symmetrical figure or a series of symmetrical figures. These are the actions of folding a sheet of paper and cutting out half of the image. For older preschoolers, tasks in this technique should be as complex as possible: the outline for cutting should have nuances, punctures or slits must be made inside the image.
- Broken applique. Used when working in mixed media. For example, in the form of a broken appliqué, an imitation of bird feathers or the fur of fur-bearing animals is created.
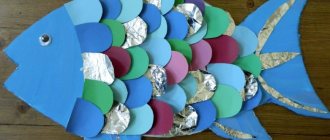
- Overlay applique. Also used in mixed media: to depict fish scales, snake skin, bird plumage.
- Modular application. This is work with elements of the same shape, but of various sizes and colors. The parts can be bent and one of the halves can be glued to the base (then the second half will go beyond the plane, creating a three-dimensional image). Module parts can be placed on top of each other during the gluing process.
- Collage. Not just an image of an object is created; in the process of creativity, the child comes close to the world of art. Collage involves working with various materials, shapes and has a carefully thought-out composition, color scheme and often a plot component.
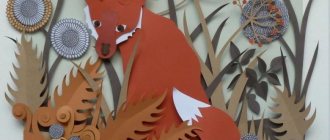
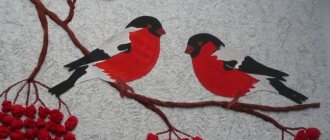
Photo gallery: examples of applications of different types on the theme “Domestic and wild animals”
Creating a direct applique based on a sample using various materials Modular applique: circle-shaped elements were used to create the image Silhouette applique, combining elements of simple design and plot design
The application is based on symmetrical cutting of image objects. The task in the preparatory group involves cutting out complex pictures with small details and slits
Collage applique involves the use of a variety of materials (buttons, lace, natural material, beads, pieces of fabric)
Multi-layer applique: parts are glued on top of each other in such a way that a three-dimensional image is obtained
Materials used
There are no restrictions on the materials used to create applications. Fine motor skills at this age are so developed that pupils skillfully handle even bulk materials made from small particles (semolina, sawdust, colored sand).
Sawdust was used to imitate dog skin
Unusual materials should be used more and more often so that children do not lose interest in this type of creativity. The process becomes especially interesting when household materials act as applique details - so familiar in everyday life, but unexpected as a component of an object of art. This is what is most often considered garbage: wrappers, candy wrappers, foil, metal or plastic lids, etc. As well as food materials: cereals, pasta of various shapes, coffee beans, dried barberries, cloves, cinnamon sticks, even popcorn, crackers, dryers.
Photo gallery: examples of using waste and food materials to create crafts
Application from grains and cereals Seeds were used to imitate hedgehog needles
Using pasta as a material for appliqué Using candy wrappers as a material to create imitation fish scales
Using popcorn to create an applique
Application from plastic bottle caps
Paper creation
What about paperwork? Of course, in the preparatory group it is also possible to create paper applications. But the teacher should definitely remember that the children spent several years honing their skills in working with scissors and glue, creating pictures and their first stories with this material. However, paper material is not only cardboard and a set of colored paper! Pupils aged 6–7 years willingly continue working with well-known material. When preparing a lesson on creating a paper application, the teacher should follow several recommendations:
- Paper materials are varied. To create, we can use newspaper and magazine paper, wallpaper paper, wrapping and packaging paper, plain and themed napkins, tracing paper, graph paper, parchment, postcards, various cards, used tickets, etc.
- The use of other papermaking techniques when creating parts for appliqué. Let's talk about them in more detail.
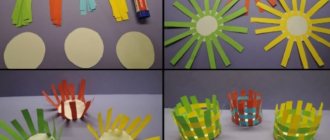
Weaving is one of the oldest forms of creativity. Pupils can weave a simple braid from paper strips and connect strips of different colors together. They are also woven from paper tubes, in which case the process requires more time (the tubes must be prepared in advance). There should be several separate lessons on weaving. Having mastered the technique of simple (satin weaving), students will be able to create elements for use in appliqué.
Photo gallery: using wicker parts when creating an applique
Slots are made in the base through which strips of paper are pulled
An example of using weaving to create an animal image
An example of using weaving to create an animal image Examples of using weaving to create an animal image
Examples of using weaving to create an animal image
The nest is made using simple weaving technique
Origami is a Japanese art form, a technique of folding paper figures. Understanding the basics of origami in childhood perfectly develops fine motor skills and prepares the hand for writing. The child gets acquainted with the principles of geometry, uses the terms “point”, “line”, “angle”, “right angle”, etc. However, mastering the work in the origami technique requires thorough immersion, this must be taken into account when drawing up calendar and thematic planning for the year: To create origami figures, you need to highlight several activities. After the students have worked out how to make animal figures in origami classes, they can conduct a lesson on creating collective works using appliqué.
Photo gallery: diagrams and templates of simple animal figures using the origami technique and examples of their use
Origami diagram
Origami diagram
Origami diagram
Origami diagram Origami diagrams Origami scheme
Application with origami elements
Application with origami elements
Application with origami elements Application with origami elements
Application with origami elements
Application with origami elements
Application with origami elements
Quilling is the process of twisting paper strips using a special tool or a simple pencil. Round or oval elements are created from spirals, from which an image is created by gluing the parts onto the base. You can cut paper strips for quilling yourself, or you can purchase ready-made sets of various colors and widths. It is recommended to conduct 1-2 separate lessons on quilling, the result of which can be small appliqué postcards. The lesson on creating a collective applique assumes that each student will be assigned an agreed number of parts from paper spirals to create, then together the children will glue the twisted elements onto the base.
Photo gallery: quilling details available for creating crafts, examples of working with them
The main element of quilling
Instructions
Quilling element
Instructions
Applique with quilling elements Applique with quilling elements
Application with quilling elements
Paper art is a technique for creating elements from paper napkins by soaking and then rolling. Roll between palms. From napkin strips you can make flagella, from which you can roll up various shapes (leaves, circles, spirals, etc.), and from squares you can make balls. This technique involves gluing elements from napkins onto a surface for further decoration (boxes, wooden frames, vases, etc.). Applications with such flagella and balls should be made on a base made of thick cardboard. Parts must be painted; the paper base may become deformed.
Photo gallery: creating elements and pictures from paper balls
The process of creating elements Prepared material for creating an image Applique of flagella twisted from strips of napkin
Applique made from balls rolled from pieces of napkin Applique made from balls rolled from pieces of napkin
Paper animal applications step by step
Children in the middle group can be asked to make an applique of the following domestic and wild animals from scratch:
cat
You can offer to make a cat for the youngest children who are just learning to work with scissors.
First, you need to invite the child to choose the color of the future cat and draw on paper of that color a head - a circle, a body - an oval, ears - triangles, paws - elongated rectangles and a tail - an arc.
Then you need to cut them out and assemble them into a finished animal on a sheet of thick paper or cardboard. In conclusion, draw the muzzle.
Piglet
The piglet is made in the same way as a cat. But for recognition, in addition to the pink color, the body needs to be made thicker and more voluminous, and the legs thinner and smaller. They should end in hooves.
You need to glue a white or red circle - a snout - onto the muzzle, and make the tail curl. Older children can make this voluminous craft from rolled paper.
Dog
For small children, it is better to print out a dog template. The animal on it can be of any breed, in full face or profile, or just a close-up portrait. You just need to follow the rule - the smaller the child, the larger the parts.
The template must be cut into separate parts, traced around them like patterns on paper of the desired color and cut out. Then glue the cut out parts onto a sheet of thick paper or cardboard and draw a face, eyes and mustache.
Cow
The youngest children need to be given ready-made parts for gluing. Older children can draw them according to a template and cut them out themselves, as well as make a composition of several cows grazing in a meadow.
We need to draw children's attention to the fact that one of the most recognizable features of a cow is its large contrasting spots.
Lion cub
For the lion cub you will need yellow and orange paper, plastic eyes and a template. You need to trace according to the template on yellow paper and cut everything out according to the template. Then cut a wide strip from the orange one and cut it crosswise into narrow “noodles”, not cutting through the strip all the way.
Next, take a circle of yellow paper that will serve as the head, and stick a cut strip of “noodles” onto it around the perimeter on the back side. Glue the lion cub's tail to a piece of cardboard first, then the body, front paws and finally the head. Glue on the eyes, draw a muzzle and mustache.
Penguin
The little penguin is suitable for children of the middle group. To create it you will need black, white and orange paper. From black you need to cut out a large oval for the body and elongated triangles for the wings.
From white - a small oval for the chest and a circle for the head. The orange one has a triangular beak and flippers. All parts must be well glued to the base.
Dragon
To make a dragon you will need green and some yellow paper. On the red one you need to draw 4 large circles using a template and cut them out. Then fold each circle in half and cut. And fold each half in half, the colored side inward.
Glue together quartered circles in pairs to form a book. Glue it with the “cover” pages to a sheet of paper. The result is the body of a dragon. Using the template, draw and cut out a head with a neck and a tail from red paper. Glue them on opposite sides of the body.
Using the neck template, draw and cut out a semicircular strip from yellow paper. To turn it into the comb of our dragon, cut out the cloves in its upper part. Cut out several yellow circles.
Glue the comb to the neck, and the circles all over the dragon's body, including the neck and tail. Draw the eyes and teeth of the dragon.
Application “Domestic and wild animals”
Pupils were introduced to the topic “Domestic and wild animals” during classes on the surrounding world in the junior and middle groups. They know the classification of animals, to what extent certain ones depend on environmental conditions, and how they adapt to existence. They know the habitats of wild animals, some behavioral features, which animals are herbivores and which are predators. They can tell no less about domestic animals: those who live on a farm, and about pets in city apartments. Repetition and consolidation are most successful when calendar and thematic planning for the year is compiled in such a way that a return to the topic of animals occurs first in a lesson on cognitive and speech development. Pupils, together with the teacher, systematize previously acquired knowledge, develop oral speech skills, and develop an attitude towards an attentive attitude towards the surrounding world, including animals, towards a healthy lifestyle with the maximum harmony with nature in the modern world. And later, in planning, a creative activity is organized on the same topic: drawing, modeling, creating panels or appliqués.
If an individual form of work is chosen, then students can be asked to make several animals on one basis or complete several crafts per lesson if a simple appliqué technique is used. It is preferable for children of this age to use a group form. The teacher divides the children into groups of several people, and then the students independently distribute the actions necessary to create the application.
Preparing a teacher for a lesson
To make the lesson interesting and useful, you need to think in advance about the manner in which it will be held and what goals and objectives are desired to be achieved. First of all, it is necessary to select motivating material to lead the children to the topic and further immersion in the creative process. Options for the initial stage of the lesson :
- Conversation with students, answers to questions, stories from personal experience. Speech skills and thought processes develop, and memory is trained.
- Fairy tale. Perhaps the teacher will ask the students to remember tales about wild animals and try to retell one or two in a concise manner. To develop listening skills, the teacher tells a short story about animals. An example of a fairy tale about pets: “In the Village”: Once upon a time there were two friends Petya and Roma. Petya lived in the city, and Roma lived in the village. And Petya decided to go and visit Roma in the village. When Petya arrived, Roma decided to show him the farm. They went to a clearing and saw a cow there. -Who is this? - Petya was surprised. -This is a cow. It produces tasty and healthy milk. And from milk they make sour cream, cottage cheese and even delicious ice cream. And the cow also has very tasty meat. The boys went further and saw a horse. “Who is this?” Petya asks again. -This is a horse. It helps transport heavy loads and produces delicious milk called kumiss. After walking a little, the boys saw sheep nibbling the grass. “And these are sheep,” explained Roma. “They have very warm wool, from which they knit mittens and socks.” The boys came into the yard and saw the chickens. “What kind of birds are these?” asks Petya. - These are chickens. They lay eggs. And chicken soup is the most delicious and healthy soup in the world. Petya looked around and saw a dog. -And I know this. This is a dog. She guards the house. “That’s right,” said Roma. And the boys went home. Roma's mother fed Petya delicious chicken soup and gave him warm milk. Petya really liked it in the village. (Author: Nurtdinova Aisylu)
- Reading poems about animals. It is recommended to use musical accompaniment to complete the task of developing aesthetic taste and a sense of beauty (playing audio recordings in the background or using a projector to view a presentation with audio accompaniment).
- Use of visual material. Posters “On the farm”, “In the forest”, “At the zoo”, books about animals with illustrations, viewing slides or cards.
Photo gallery: examples of visual motivating materials
Poster
Poster
Poster
Poster
Poster
A set of magnetic cards (for the board)
Lesson notes
The outline should reflect the stages of the lesson, indicating the approximate time for each, the materials and tools used, what goals and objectives were set and whether they were achieved, and an analysis of the work done (what was successful and what was not) is required.
Note plan:
- Goals and objectives
- Tools and materials
- Step-by-step progress of work: organizational moment 3–4 minutes, discussion of the topic and order of actions 5 minutes, preparation of elements 14–15 minutes, gluing parts onto the base 4–5 minutes, demonstration of work, summing up 3–4 minutes
- Reflection
Example of a summary: applique from cotton pads
- Goal: making an application on a given topic. Objectives: improving fine motor skills, developing imagination and aesthetic taste, developing discipline and accuracy.
- Tools: scissors, glue with applicator, brushes and paints, felt-tip pens. Materials: cardboard or felt base, cotton pads.
- Organizational moment: the teacher welcomes the children, informs them about the purpose of the lesson, names the tools and materials. Discussion: students are invited to view a presentation on the topic “Domestic and wild animals” followed by answers to questions. The purpose of the conversation is to review the classification of animals. Next, he voices the task for applied activities: “Select one or several animals and independently create its image using the appliqué technique from the proposed materials.” Preparation of elements by students (painting disks in the desired color, cutting disks into smaller elements, folding disks to create a three-dimensional image). Gluing parts onto the base. Demonstration of works. Summing up: the teacher thanks the children for their interest in the topic and the work done, and especially praises the most successful crafts.
- Reflection: what difficulties arose during the lesson, what in the notes needs improvement, whether the goals and objectives were achieved.
Animal appliques made from accordion paper
It’s just as easy to make animal appliqués from accordion paper. First, children need to be explained how to fold an accordion out of paper. This application will be interesting in the middle group and is suitable for the theme of domestic or wild animals. There are several ways to make such crafts:
- An accordion fan. If you glue an accordion on one side, you get a fan. The easiest way to make a hedgehog is based on it. The paper fan will represent a body with needles. To its base you need to glue a semi-oval made of paper with a drawn muzzle and two legs to it from below.
- Accordion circle. By gluing two fans together, we get a circle. It can act as a body for a pig, a mane for a lion or a face for appliqué of any other animals. The missing body parts need to be glued to it.
- Straight accordion. It will serve as a body to which you can glue the head, legs and tail - you will get an applique of any wild or domestic animals. You just need to choose the desired color of paper and add a face to the finished application.
Volumetric animal applications
There are several ways to make a three-dimensional paper applique:
- Strip applique. To use this method, you need to glue the animal’s body together from narrow strips, like a flashlight. And glue a paper head, legs and tail to it. You can make a whole exhibition of works on such an application in the senior group - for example, on the topic “Animals of the North”. You can invite children to make one of the following animals: deer, wolf, polar bear or owl.
- Cone applique. Cone-based applications are perfect for developing children's imagination. For example, for children in the preparatory group, you can suggest a theme for the application “Animals of hot countries.” Children can make a tiger, lion, giraffe, elephant or crocodile. The cone can act as a head, torso, or any other part of the body. For younger children, the cutting of the cone should already be ready, and a sample should be provided for copying.
- Cylinder applique. The scheme is the same as in the previous versions, but this craft is easier to make. Plus, absolutely any animal can be made this way.
Modular origami compositions
A module is one assembly unit of a composition. From different sheets you fold triangles and connect them, getting a head, torso, limbs, etc. It is clear that crafts are becoming much more complex and realistic.
What animals can be made from paper in the style of modular origami is up to you. Even a huge dragon, where each scale is a separate module. Preparing modules is a boring routine, so not many people are ready to work on complex figures, especially children.
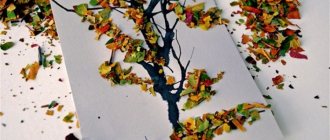
Animal leaf appliques
In this type of application, the selection of material is important. It is best to store leaves in the fall - then there is an opportunity to collect material of various shades, especially warm tones. The leaves need to be straightened and placed between the pages of a large format book.
They must remain there until completely dry, otherwise the leaves will curl. It is better to collect leaves together with children, simultaneously explaining to them where each tree is and telling them about them.
Working with leaves is practically no different from working with paper, except that dry leaves are quite fragile and they do not stick well. Application of leaves develops the child's imagination.
He learns about the properties of natural materials and learns to work with them, compares the shape and color of various objects.
Fabric animal appliques
Fabric appliqués are usually used as decoration for clothing or other textiles. They can be made by older children who are familiar with the technique of sewing by machine or by hand.
The principle of operation is the same as for paper, except that such an applique is sewn on rather than glued, and when working with loose fabrics it is necessary to overcast the edge.
The design is transferred to dark fabrics not with a pencil, but with a piece of soap. You can use contrasting threads to “draw” the face or highlight the outline of the animal. The child will be happy to wear something decorated with his own hands.
Applications of animals from cotton wool
Cotton wool is a good material for applique, perfectly conveying animal hair. To work with it, children need to draw the outline of an animal.
It needs to be filled with cotton wool close to the texture of the fur of a particular animal: for a sheep - with lumps, for a dog - with narrow hanging strips, etc. If desired, this “wool” can be painted.
It is quite possible to simply cut out some of the elements from paper and stick them on.
Crafts for kindergarten
We put it out as a separate item for your convenience. In the garden they love nature themes such as “Golden Autumn” or “Spring has come!”, so forest animals that you have made before at home or in additional classes will be useful for you and your child.
IDEA! Advice for busy parents: assemble the finished figures into a composition on a thick sheet of paper, add seasonal attributes (yellow leaves, pine cones, flowers, twigs, cotton wool snow, etc.) and the standard masterpiece for the garden is ready.
Animal applications using quilling technique
Quilling is an application of increased complexity. The work consists of gluing narrow strips of paper, usually folded in the form of spirals, onto cardboard.
First, the outline of the animal is glued, and then it is filled from the inside with curls of the desired shade. This technique is good because it successfully imitates the texture of animal fur or bird feathers.
All children, without exception, love creativity. Therefore, appliqué is one of the most interesting hobbies. Children work with her with great pleasure both in kindergarten and at home. Not only is it a wonderful leisure activity for a child, but it also develops his imagination.
Quilling
The technology refers to a variety of applications, but of increased complexity. The work is small and painstaking, so it is suitable for preschoolers and primary schoolchildren.
The essence of quilling: you need to cover a graphic image of an animal on a base sheet with “curls” of thin ribbons. Quilling paper is sold in office supply stores.
The method is interesting because it very successfully imitates the texture of wool or feathers, if you take on animal crafts.