The importance of fine motor skills for child development
Much research has been devoted to the importance of fine motor skills for human development. They all confirm that making small movements with the hands and fingers stimulates the speech centers of the brain. And successful mastery of speech, in turn, contributes to the child’s communication skills, successful establishment of social connections and the formation of conceptual thinking.
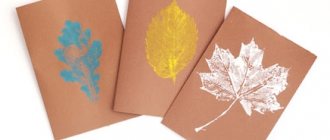
Finger drawing
In general, fine motor activity is associated with the cognitive development of a child’s psyche. This is especially true for children 3–4 years old, since at this age the child’s social environment and horizons expand sharply, he begins to interact daily not only with parents and close relatives, but also with his peers, teachers, kindergarten workers and other adults.
Reference. “The 3-year-old crisis” or “the crisis of negativism” is an age stage in the development of a child, manifested by such behavioral characteristics as stubbornness, obstinacy, and protest. Successful overcoming of this period is facilitated by the development of the child’s speech skills.
When a child’s wishes do not coincide with his real capabilities, he finds himself in a situation in which he is forced to learn to negotiate. A parent and a three-year-old face the difficult task of reaching a compromise. It is much easier to achieve mutual understanding when the child has sufficient speech and is able to express his needs and experiences.
The help of drawing may not seem obvious at first glance, but scientific research and long-term teaching experience confirm the effectiveness of this method. In addition, the psychotherapeutic effect of drawing has long been known, thanks to which conducting a thematic lesson with elements of art therapy will help a child overcome the tension and anxiety associated with a crisis period.
Drawing techniques for children of the second younger group
There are quite a few types and techniques of drawing available to children aged 3–4 years. Below are the most interesting and useful of them.
Finger drawing
This simple and fun technique is ideal for introducing fine art. It is quite simple to implement, gives the child freedom of action and is easy to master in a playful way. For the first time, you can try leaving fingerprints on paper using different colors. Once the child understands the meaning of this action, you can allow him to draw with his fingers at his own discretion.
Important! The teacher must first demonstrate this method himself. After the child has shown interest, he is invited to do the same. If the baby does not demonstrate readiness, the lesson should be postponed.
Once this technique is mastered, you can use it to create narrative drawings. To do this, before class, outline images of the sun, a balloon, a house or other objects are drawn on sheets of paper with a marker. Then the children are asked to use their fingerprints to fill the space inside the finished drawing.
Drawing with palms and fists
Once the finger technique is mastered, children can easily move on to drawing with their palms. An adult needs to be creative and think through the plot of the drawing in advance. The handprint can be the rays of the sun, some animal, flower, tree or house. After the paint on the paper has dried, eyes, ears, leaves or other elements that make the drawing recognizable are drawn in with felt-tip pens.
Drawing with palms
Drawing with stamps and signets
Drawing stamps can be purchased at art stores or made independently from natural materials, cardboard, foam sponge, cotton swabs, even potatoes or cauliflower. This technique makes a special impression on children due to its simplicity of execution and spectacular results. At the first stage, you can let children master the use of a stamp in a free form, and then offer a plot drawing.
Stamps
Blotography
This method will introduce the child to the properties of paints. Applying watery blots and streaks to the paper will reveal an interesting mixture of colors. At this moment, you can draw the child’s attention to the fact that two different colors, when mixed, can give a third, completely new one. You can also experiment with thickness - apply streaks and splashes first with liquid and then with thicker paint. After the drawing has dried, using felt-tip pens or pencils, you can shape the blots into an image of space, landscape, season (for example, if yellow and red colors predominate - autumn, blue and white - winter).
Blotography
Monotype
An effective technique that creates symmetrical patterns. A sheet of paper is folded in half and paint is applied to one half in the form of blots, or, if the plot is thought out in advance, along the contour outlined in pencil. Then the paper is folded, smoothed with the palm of your hand and straightened. The resulting print is allowed to dry, after which the necessary contours and elements are drawn in with felt-tip pens. It is so easy to depict objects such as a butterfly, an airplane, a book.
Monotype
Dots and lines
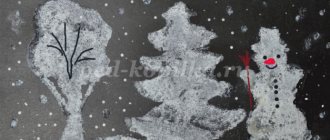
For this type of drawing with children 2–4 years old, use pencils or wax crayons. Mastering dots and lines will prepare the child to build more complex compositions from them on a sheet of paper. You can pay attention to different types of lines - straight, wavy, zigzag, and then use them to depict sea waves, hills, mountains on paper. Using the dots in the picture, you can try to depict rain, snow, flowers, sand. In this way, the child is introduced to the landscape and asked to depict spring or winter using simple lines and dots.
Waves
Tracing and painting
Children are given or offered a choice of templates in the form of pets, toys, dishes, and vehicles. The templates are outlined and painted over with paints or pencils.
Independent learning of English with children from scratch
To conduct the lesson you will need the following materials:
- The basis for drawing is paper, cardboard for making small drawings; For finger painting or drawing with your palms, it is convenient to use whatman paper or the back of the wallpaper.
- Colored pencils, markers, crayons, gouache, watercolors, brushes, sippy cups with water.
- Stamps, seals, homemade stamps from scrap materials.
- Oilcloths, sponges, wet wipes, aprons, rags, soap.
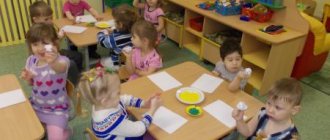
Drawing in the younger group requires an individual approach to each student. This is a new and difficult activity for the child, in mastering which he needs constant support and assistance from the teacher. Any criticism should be avoided, regardless of whether the desired result is achieved. At each stage of the lesson, it is necessary to pay attention to each child and help to cope with the difficulties that arise.
Important! At the age of 3–4 years, children can already understand and follow short, understandable instructions, so the introductory and demonstration part of the lesson is conducted by the teacher for the whole group.
GCD for drawing in the second junior group on the topic “Cockerel - golden comb”
Goal: To become familiar with the “Drawing with Palms” technique.
Tasks:
- Learn how to make a palm print on a piece of paper.
- Develop paper orientation.
- Develop creative skills.
- Cultivate a love for animals and empathy for the character.
Demonstration materials:
- illustrations for the fairy tale “The Cockerel is the Golden Comb”;
- audio recording of a fairy tale.
Handouts: gouache, brushes, sponges, napkins, cotton swabs, sippy cups with water, paper, oilcloths, aprons.
Preliminary work:
- listening to an audio recording of the Russian folk tale “Cockerel - the Golden Comb”;
- solving riddles about the cockerel.
| List of professions | Regulatory issuance procedure |
| Builders | signal form; gloves; PPE for face and ears; Vibration reduction products |
| Drivers | mittens; warm suit; safety shoes |
| Loaders | overalls; gloves; jackets; trousers. |
| Sales staff | headscarves; gloves; robes |
| Agricultural employees | gloves; shoes; mittens. |
| Electrical workers | dielectric special gloves; safety shoes; headdress; outerwear; thermal underwear for dielectrics. |
How to teach your child to use a pencil or pen correctly
Cockerel
Cockerel
Cockerel
Instructions for making the drawing “Cockerel - golden comb” using the palm painting technique:
- A sheet of paper is placed horizontally in front of the child.
- Using a sponge, the central part of the palm and thumb are painted yellow.
- The remaining fingers are colored red, green, blue and orange.
- The hand should be held in front of you with the thumb up, and the remaining fingers spread wide.
- The palm is pressed firmly onto the paper.
- Use napkins to wipe off the remaining paint from your palms.
- A cotton swab is dipped in black paint and placed in the middle of the thumbprint - this is the eye of the cockerel.
- The clean end of a cotton swab is dipped in red paint and a beard and comb are drawn with a poke.
- The beak is painted on with a thin brush.
- If desired, the drawing is complemented by other elements - sun, grass, roost for a cockerel.
Important! The leading activity of children aged 3–4 years is play, so it is advisable to include it in drawing classes in the 2 ml group.
Card index of games for children 3 years old
A card index of games has been developed for children aged 3 years during drawing classes in kindergarten.
Game "Magic Colors"
Goal: to introduce children to the features of color mixing.
Materials: colored cards, “+”, “-”, “=” cards.
Move: an example is shown, made up of cards: red + blue = purple; green+red=brown.
Children solve them using paints on paper.
Game "Aquarium"
Goal: learn the names of colors.
Material: fish made of cardboard of various colors, cards - aquariums with outline drawings of fish in the corresponding colors.
Progress: according to the teacher’s instructions, children select fish to the contours in the aquarium.
Game "Matryoshka"
Goal: to consolidate knowledge about the main styles of Russian painting.
Move: there are images of nesting dolls on the board. Children take turns trying on their version of a painted sundress.
Game "Duck and Ducklings"
Goal: improve spatial orientation skills.
Materials: cardboard ducks and ducklings, image of a pond.
Progress: the children are given the task of making the path of the duck to the ducklings, and then to the pond.
Game "Winter Fun"
Goal: consolidate knowledge about winter.
Materials: image of a winter landscape, templates for winter clothes and shoes, winter games items.
Progress: with the help of a winter landscape, the teacher updates knowledge about winter. Children are invited to choose from templates items related to winter and winter games: felt boots, mittens, hats, sleds, skates, hockey sticks.
Summary of a drawing lesson in the first junior group “Introduction to pencils”
— Guys, look at the colorful boxes I have. What do you think is in them? That's right, these are colored pencils.-I have drawings drawn with such pencils (the teacher shows different drawings and invites the children to find the drawn toys, flowers and other objects in the group)
- So, we got acquainted with pencils. But we need to draw our sun on something. What else do we need? Look around.
- Of course, it's paper. Look what she is like? That's right, white. But it is not only white (shows multi-colored paper).
- My friends, in order to make it easier for you to draw the sun, we will play with you.
Outdoor game "Sun"
Children hold hands and walk in a circle, at the command of the teacher, the children make the circle either narrower or wider.
- Guys, well done! And now we’ll try to touch the sun, do you think it’s possible to do this? What does the sun look like? That's right, on the ball. (the teacher gives each child a ball)
— Antosha, what color is your ball? (you can ask each child). Give your balls a good feel. What are they? Smooth, round. It’s as if you and I are holding the sun in our hands.
The sun looks out the window,
It shines into our room.
We will clap our hands -
We are very happy about the sun.
- Guys, now everyone will draw a sun for themselves. What color will we paint the sun? That's right, yellow. (the teacher shows how to hold a pencil correctly). Remember, kids, you can’t play around with pencils: throw them, poke them at someone, chew them or break them. First, let's try to draw the sun in the air. And now, on your pieces of paper (the teacher helps each child to correctly take a pencil and draw a circle, not forgetting to praise everyone’s attempts).
- Great, guys! But look, our sun is sleeping. To wake him up, we need to draw rays of light for him. Let's try to draw straight lines in the air. Great! Now let’s draw the rays of the sun. Great! (the teacher monitors the correctness of the children’s work techniques)
“We don’t put too much pressure on the pencil, otherwise the paper may tear and our sunshine will be ruined.”
- What wonderful drawings we made! When you've finished drawing, you need to clean up our assistants. Pencils should always be tidied up in boxes or cups, otherwise they may get lost and we will have nothing to draw bright and beautiful drawings with. Now you and I will hang our suns on our stand for drawings, they will delight us today, and in the evening you will take them home and show them to your dads and moms.