Organization of the process of painting with finger paints
The drawing process itself is very exciting, so don’t forget about the precautions:
- dress your child in clothes that you don't mind getting dirty
- put on a bib or apron, there are special aprons for creative activities
- use a large sheet of paper, preferably Whatman paper or a piece of wallpaper, so as not to limit the child
- if you will draw on the floor, put oilcloth underneath
- transfer some of the paint you will use to other containers so that the child does not use all the paint at once, which is exactly what he will do if you give him the whole jar; can be transferred into lids or toy dishes
- prepare wet wipes or a wet cloth
It is better to start drawing when the child is in a good mood, so that he associates drawing only with positive emotions.
How to prepare a place for drawing?
- Watercolor paints are pre-diluted with water, creating a paste-like mass.
You cannot take materials with an expired expiration date for children's art lessons. They can cause allergic reactions in a child!
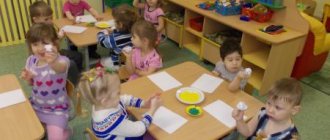
- It is better to pour the paint into saucers. It is difficult for a child to carefully pick up the required amount of coloring composition with his finger. It is much easier for babies to place their palm completely in a flat container.
- It’s good if there is a small vessel with warm water nearby. It allows your child to wash their hands when the color changes.
| The baby should not be left alone while drawing., otherwise he will definitely taste all the colors. The same applies to art lessons using semolina. During classes, you need to make sure that the child does not accidentally inhale semolina . While drawing, infants and one-year-old children enjoy tapping and clapping their palms on the surface to be painted. It is useless to expect a child to be able to engage in creative activities without getting their clothes dirty. Apart from the artist himself, everything within a one-meter radius will be painted, including his parents. Therefore, it is better to immediately allocate a place for studying, which will then be easy to clean . An oilcloth-covered floor is ideal for drawing with children aged 1 to 3 years. |
The first lessons are conducted like this:
- To begin with, you can give your child a few flowers. 3-4 main ones are enough.
- A small album sheet of paper is completely unsuitable for drawing with your palms. Here you will need a large sheet of Whatman paper or a piece of wallpaper.
- The child should be dressed in clothes that you don’t mind, or, if the room is warm enough, stripped down to panties. The young artist will definitely get dirty and try to depict something on himself.
A child’s first steps in art will resemble paintings by abstract artists.
There is no point in asking your child to complete certain tasks. He will not be able to draw accurately, because he does not yet control his own hands well enough. At the age of one to two years, a child can draw with his fingers on semolina scattered on a tray . The material for drawing can be pre-tinted and scattered into different jars. Before class, the cereal is poured out in small slides on different edges of the tray, and the child is asked to mix it like sand with his palms. Then run your fingers along the resulting multi-colored surface, leaving a mark. Invite the child to repeat the action.
With a child over 2 years old, playing with visual aids can be a little more complicated.
At the beginning of the lesson, the plane is covered with unpainted material. Then the mother shows the child how to draw lines with her fingers, and then with a stream of colored semolina. For this purpose, colored cereals are poured into rolled paper bags , in which a small hole is left at the bottom.
You can paint with children using any available means:
- Crumpled paper.
- Toothbrushes.
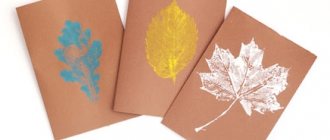
- Natural material (leaves, twigs, blades of grass).
- Pieces of fur.
- Cotton buds.
- Scraps of fabric.
One-year-old children are not able to draw perfectly even geometric shapes and complex objects. A child's drawing consists of a set of dashes - lines, scribbles and spots.
The more often a child draws, the more complex and interesting his work becomes.
Precautions when finger painting with children from one to three years old
You can only draw with kids who taste everything using paints that are safe for their health.
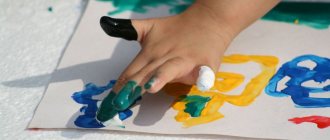
How to create with your fingers
Fingerprints resemble a brush stroke. Finger and palm typing can be used as a basis for creating various characters. Before starting work, the little ones are shown on a sheet of paper how to put dots and make lines. The baby tries to touch the paint with the tip of his finger.
Note! To change the color of the dye, the child will need to wash his finger in water and wipe it.
Creative work in non-traditional techniques can have any topic. Many finger painting ideas for children can be found in the world around us. You can come up with a variety of ideas for such work. For the youngest children - a yellow round chicken, red berries and so on.
When kids have practiced poking small areas with their fingers and filling them evenly, you can give them a more difficult task:
- draw large objects with your fingers;
- lay the prints along the steep curl.
A difficult task for children is to arrange their fingerprints in a circle from the center (this is how the spots on the tail of a turkey or peacock are located). This method can be used to decorate any round object, starting from the center and moving in a circle to the edges of the circle.
Note ! Older children are interested in more complex drawings.
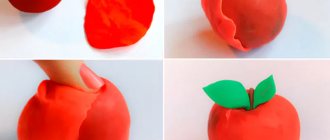
To get a larger print, they press their finger to the surface of a sheet of paper and roll it over. Next you need to figure out what you can turn this resulting oval silhouette into. Using a felt-tip pen or pencil, they will complete the color masterpiece to whatever their imagination tells them - seasons, flowers, funny animals and many other funny images.
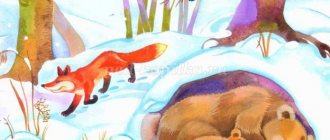
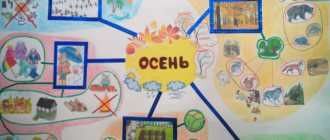
Drawing on the theme “Autumn”
Ideas for finger and palm painting
Children know how to see beauty. Palm printing is one of the favorite lessons of preschoolers, which takes them into the world of bright and amazing images. This exciting process is like a fun game - children are liberated and reveal their creative potential.
Non-traditional drawing lessons help to achieve a high artistic understanding, develop a sense of color and composition, the transition of one shade to another.
The technique of the work process is simple: the child dips his hands in paint or paints them with a brush, and then leaves a print on a piece of paper.
Note ! Different groups of children's institutions use different drawing techniques: techniques for adding details, the level of complexity of compositions, artistic creation of entire multi-color paintings with fingers.
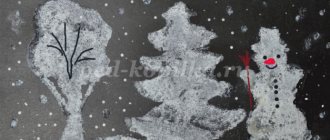
Using the large stroke technique you can create beautiful landscapes. With your fingers it is easy to make not only prints, but also smeared lines (for example, hedgehog needles).
Blurred lines
The branches of the Christmas tree are obtained by drawing your fingers on both sides of the trunk, the fence is obtained by straight lines. Spiral lines create the silhouette of a blooming rose - the theme for a beautiful card for mom on March 8th.
Finger painting for children is a very useful hobby that provides an opportunity to diversify a child’s life. The sooner a child begins to engage in unconventional drawing, the faster he will develop.