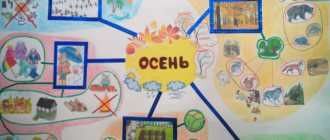
Autumn motifs in the works of children
You can make working on a craft interesting for children if you take into account their capabilities. Therefore, I will try to show the works according to age level. I'll start with our work. For the tree, I rolled plasticine balls, and my son flattened it and drew a pattern on the leaves with a knife.
View this post on Instagram
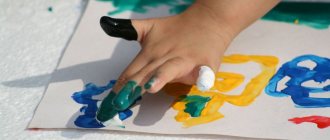
Inspired by the bright fish, we made another picture of the autumn Dnieper from plasticine. We also printed out a coloring book and painted for about an hour. fingers trained. All our games and activities #daynotes_play #what to play with a child #what to do with a child #developmental #crafts with children #modeling from plasticine #modeling with children #drawing for children #painting from plasticinePublication from Elena Selivanova (@daynotes.ru) Oct 12, 2021 at 10:10 PDT
Vegetables fruits
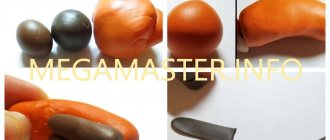
3-year-old child can easily handle kneading plasticine. No matter how he does it, the resulting figurine can be recognized as a carrot or tomato, cucumber, pear, etc. What will the little one create? Ideas will appear on their own, looking at the color of the product and its shape. A couple of additional touches, and the naturalness of the design cannot be disputed!
Pumpkin
Carrot
Apple and pear
Basket with vegetables
Author of works on Instagram
Caterpillar
But a caterpillar is several circles gathered together and attached one after the other. To give strength to the structure, place all individual fragments on a toothpick. And, if you want the caterpillar to be flexible, put the balls on a needle and pull it along the thread. When all the parts are assembled, cut the thread at the needle itself, and embed its tip in plasticine.
You can, as this master class , make a caterpillar rainbow.
And don’t forget about the design of the face and the paws! By the way, here the circles are simply attached to each other. And this option is also suitable.
Painting-applique “Autumn in the forest”
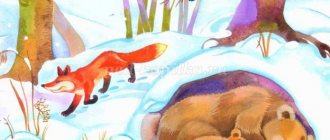
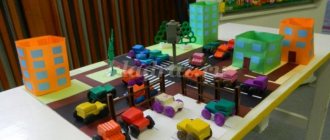
Older children want to show their talent more fully. For example, preparatory group in a kindergarten can start making a real autumn meadow, where mushrooms grow and animals run around.
This is the kind of application we will make too.
- In the middle of the leaf we make a tree trunk. We select the shape and color. For example, birch can be white and slightly curved.
- Branches extend from the trunk.
- To make our tree more like a birch tree, we make “spots” by pressing holes (not through holes) with a small object.
- You can complement the picture with several black spots.
- We tear off the “leaves” from the yellow plasticine and glue them around the branches.
- It's autumn, which means there are also a lot of fallen leaves on the ground.
- Mushrooms grow around. They have a semicircular cap and short legs.
- There is a Christmas tree next to the birch tree. Glue a semicircle at the bottom. We divide this “skirt” into strips with a special knife. And so on for each top ball.
- There must be a hedgehog near the mushrooms. It is made like a droplet, only the nose is slightly turned up.
- Separate the part where the hedgehog has needles and draw many, many stripes.
- The hedgehog is already with the harvest. Glue a small fungus onto its needles.
- The bunny is standing by the Christmas tree. It has a head with long ears, a body, legs and a tail.
- Autumn heavy clouds and flying birds complete the picture.
- Author of the master class
Of course, if it is difficult for the baby to do something from this, you can skip this detail.
Painting "Autumn"
Such a picture can be done by children from 3 years old, however, if the child is assiduous. But 4-5 year olds can easily cope with this task.
Of course, it will be much easier if mom helps roll the balls.
Author on Instagram
More painting ideas from the Internet
Pictures enlarge by click
Abstract of OOD on modeling in the first junior group “Autumn leaf fall”
Elena Kan
Abstract of OOD on modeling in the first junior group “Autumn leaf fall”
Purpose of the lesson : to continue to introduce children to plasticine and its properties.
Tasks:
Educational
1. Form elementary ideas about natural phenomena (leaf fall);
2. Continue learning to pinch off small pieces of plasticine from a piece;
3. Press your index finger on the plasticine ball, attaching it to the base;
4. Place the balls at an equal distance from each other.
Developmental
1. Develop fine motor skills;
2. Develop visual and auditory perception; attention;
3. Develop the ability to navigate on a plane.
Educating
1. Contribute to the creation of an emotionally positive background for children in the classroom;
2. Develop an interest in working with plasticine.
Sculpting techniques: Pinching, rolling, pressing
Material:
1. Plasticine mixed in yellow-red colors;
2. Sheet A4 1/2;
3. Tape recorder;
4. Artificial tree (without leaves);
Integration with other educational areas.
1. Music: Song-dance “Let’s take a walk.” Music An. Alexandrova. Words by N. Frenkel.
2. Communication: listen carefully to the teacher.
3. Health-saving: we continue to teach children to blow. “Try to blow a leaf off your palm.”
4. Game. “Rain and Sunshine” - Play “We Walk and Dance.” Russian folk melody. Arranged by M. Rauchwerger.
Progress of the lesson.
Educator.
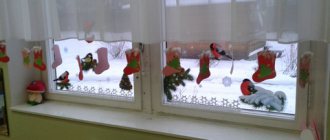
Guys, go to the window, look how beautiful it is, the wind is blowing, and the leaves are quietly spinning and falling to the ground. This natural phenomenon is called “leaf fall.”
Come on, we'll play with you. Form a circle around our tree. Here are some leaves for you. Place the leaves on your palm. You will now be blown away. You need to blow the leaves off your palm. (Children blow on leaves).
Educator.
This is how the leaves fell in our group, it became as beautiful as in our area. Guys, now let’s put together a bouquet of leaves and remember our song - “Let’s take a walk in our own garden.” (The teacher makes a bouquet of leaves and places it in a vase).
Educator.
What a beautiful bouquet it turned out to be, Well done!
Now let’s sit down at the tables and listen to me carefully. Near you lie leaves with painted trees. Do these trees have leaves? Empty? Let’s give each of your trees a beautiful outfit. Do you agree?
Look how I will do it. I pinch off a tiny piece. I put this piece on our tree (I lift the leaf, the plasticine rolls off). Oh, it's falling, what should I do? (Answers, actions of children).
That’s right, so that our lumps don’t fall, we need to firmly press this lump onto the leaf with our finger. (Teacher presses down a few more pieces of plasticine). Like this!
Now, try to dress up your tree.
Who decorated their tree? There is a napkin next to you, wipe your hands. I will post your work on the board.
What a good job we did! We are well done! It's time for us to play. The game is called "Sunshine and Rain". When the sun is shining, what do the children do? That's right, they're walking. And when does it rain? The children are hiding. We will hide under an umbrella. (We play 3-4 times)
Guys, everyone managed to do their work. Well, let's go to the board and see what we got.
Leaf fall! Leaf fall!
The entire park and garden are covered!
Multi-colored carpets,
Spread out under your feet! (Aleynikova L.)
How beautiful! You like! ... work evaluation.
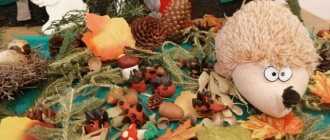
Plasticine and natural materials
Snail
For 4-year-old it is not difficult to cope with such a small structure.
- Roll out the plasticine into oblong droplets.
- On one edge of the “droplet”, which is thicker, use a needle or thin stick to draw a smile and eyes. This is the head. Make tendrils from small twigs on top of it.
- Place the blank on the leaf and glue it.
- Place a walnut or chestnut on top.
If such crafts are made in kindergarten , then it is advisable to prepare natural materials in advance. Clean it and show the little one what can be built from it.
Hedgehog
For a 5-year-old it will not be difficult to make such a design.
- Its main part is the plasticine body (wide part) and the head (narrow part) of the hedgehog.
- On the head we make a nose and eyes.
- We insert seed needles into the wide part.
Full information will be in the video .
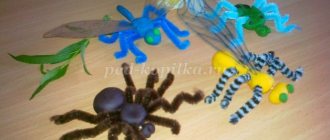
Butterfly
Our baby is entering 1st grade , and it’s time to set more complex and interesting tasks for him. For example, this!
- You only need to sculpt 3 separate fragments and connect them. These parts resemble a snowman. The same principle: a small part, a larger part and a larger part.
- The main task is to lay out the leaves like a fan, or rather, two fans turned in different directions. These are butterfly wings.
- It would be correct to do this on a plasticine backing. Secure each individual leaf with plasticine to the previous ones.
- And place our 3 fragments on top in the middle.
At 6-7 years old, a child can easily cope with the choice of colors and shape of wings.
Modeling is a type of creativity that can be drawing, modeling, and design. The main thing is freedom and imagination.
Allow your little ones to fantasize and they will make wonderful crafts! And then you can show us off these works!
Be sure to take a look at the articles where we made flowers from leaves, paintings, and other crafts! Better yet, subscribe and then replenish your library with the most useful articles that will help your baby develop!