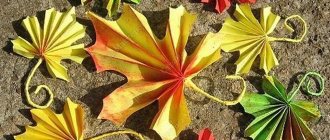
The national folk toy is the heritage of our ancestors, passed on to us through the craft skills of the masters of the past. This is a unique combination of folk, arts and crafts and artistic creativity.
Toys usually differ in their type, what materials they are made from and how they are made. It can be considered very important that the toy is directly connected with the household and labor details of a person, with religious customs and rituals.
Figures of people, animals and objects are part of the educational process and social adaptation to the lives of children.
Symbolism of Russian folk crafts
Our toy is not only colorful, and its images delight both children and adults, but also carries symbolism. The crafts of living beings or objects made from clay or wood contain meaning. Each figure carries its own information from the past:
- The rooster symbolizes sunlight. Apparently because this bird wakes up before everyone else and informs the world about the arrival of a new day.
- The goat is a symbol of fertility and unpretentiousness.
- The rocker is a symbol of balance in the family. And since it was mainly female representatives (girls, girls, women, grandmothers) who carried water with a rocker, the mistress of the house had to be responsible for the family balance or harmony.
- An ax is a symbol of protection from diseases and other troubles.
Wooden toys
Toys sawn, planed or assembled from various elements are best made from hard wood:
- Apple tree,
- pear,
- oak,
- birch,
- pine (any conifer).
In addition to measuring tools and a pencil, you will need:
- hacksaw,
- plane,
- hammer,
- screwdrivers,
- glue gun
To connect the structural elements you will need:
- nails,
- screws,
- wood glue,
- silicone glue.
If crafts are made by cutting, then soft varieties of trees will be required. Basswood is a great wood to cut. For this work you will need wood carving tools:
- knife,
- straight and semicircular chisels,
- gravers (narrow semicircular chisel).
Clay toy
To work with this material, you need to understand what kind of clay there is, and there are two types: mountain and polymer.
Mountain or natural clay has several colors depending on the presence of iron, minerals and salts:
- Red. Holds temperature perfectly. In nature it is brown in color with a greenish tint.
- Blue. It contains many minerals and salts. A very good cosmetic product.
- White. The most affordable of natural clays. In nature it has a dirty dark gray color. It turns white after firing.
The artificial material for modeling is polymer. It has very important properties: heat resistance and ductility.
This type of technologically new material may require firing after modeling and may have the ability to harden on its own.
To work with this interesting product you may need the following accessories:
- Stable and level table.
- A cloth for wiping hands.
- Gloves if you suddenly have to mix the clay yourself.
- Apron.
- Small knife: stationery or pocket knife.
- Molds for applying patterns. They can not only be factory-made, but also be made from improvised materials.
- “Sandpaper” from zero to five.
- Rolling pin for rolling out clay. Any housewife can find it.
- Decorating products.
DIY craft
Both professionals and beginners in needlework can create a beautiful product. You just need to put in a little effort, patience and perseverance.
Crafts on a Russian-folk theme are often created from scrap materials and simple tools. If you know how to sew or knit, you can make dolls, characters from Russian folk tales, and amulets.
The basis is made:
- Made from material stuffed with cotton wool,
- Straw,
- Mattings,
- Tree.
The top is decorated with sewn and knitted clothes, hair made from threads and yarn. From leftover yarn and fabric you can sew bright patchwork rugs, blankets, and sofa cushions.
It’s easy to make a matryoshka doll or a Dymkovo toy from clay or plasticine. It is better to use polymer clay for the product. It holds its shape well and does not crack when drying. With the children, paint the finished craft with bright ornaments and cover the top with a layer of varnish.
Make three-dimensional pictures from salt dough or plasticine: scenes from Russian fairy tales, nesting dolls, fairy-tale characters. Stick the details of the painting onto a board, dry it, and paint it.
Matryoshka
This Russian doll is no less popular than Barbie. And doing it yourself will not be difficult.
From cardboard
To make a matryoshka doll from cardboard you will need:
- Red cardboard.
- Set of multi-colored paper.
- Markers.
- Scissors.
- PVA glue or glue stick.
- A simple pencil.
Making the preparation:
- Draw a blank on the wrong side of the cardboard and cut it out.
- We make a scarf from yellow paper (or any other color you like). To do this, place the blank on a colored sheet and trace only the upper part.
- Cut out the scarf and paste it onto the top of the matryoshka doll.
- We cut out a circle from white paper and heat this circle onto the top of the future matryoshka doll. Next we draw the face.
Decorate the nesting doll with a flower:
- Cut out a square from colored paper.
- Fold it diagonally several times.
- Using scissors, round off the ends.
- We unfold the flower and heat it onto the matryoshka doll.
Crafts Russian hut
Making this craft is not so easy and children will not be able to cope with the task on their own.
To create a craft, you will need a small and shallow box, glue, a stationery knife, natural wood film, double-sided tape, plasticine, scraps of material, multi-colored threads, brown cardboard, watercolor paints, brushes, felt-tip pens or pencils.
The box must be cut so that only 2 walls remain. Use a utility knife to cut out the windows.
We cover the inside of our house with paper. If you don't have sticks on hand, you can make them from cardboard, but the logs shouldn't be too thick. We also cover it with film. We need them to decorate the walls from the outside.
Now you can start decorating the hut and creating interior items. The first thing we do is make a Russian stove. We have already discussed how to make it above.
We make pieces of furniture from cardboard: a table, chairs, a chest and something else. We need plasticine to create dishes. We hang curtains, make rugs and bring everything into the house.
To keep the hut from being empty, make dolls. Russian folk crafts will fit into any interior and will be an excellent gift.
Beaded birch
To make this craft you will need:
- Green beads.
- Wire thickness from 0.3 mm to 1 mm.
- Threads.
- Alabaster.
- PVA glue.
- Acrylic paint and brush.
Getting the job done.
- We put beads on the wire and twist them into a loop. You need 15 such blanks.
- We connect the branches together.
- We form the trunk.
- We take any container.
- We dilute alabaster with glue and water in the following proportion: 2 tbsp. spoons of alabaster, 1 tbsp. spoon of glue, dilute with water, leave everything for 12 hours.
- We paint the branches of the trunk with this solution.
- Apply black paint to the dry white paint.
Craft ideas based on children's fairy tales
There are a huge number of ideas for creations on fairy-tale themes; you can depict individual characters, as well as entire scenes. Crafts can be either flat in the form of paintings or three-dimensional with small sculptures.
Plasticine Alyonushka and little brother goat
Based on the fairy tale “Sister Alyonushka and Brother Ivanushka,” where the main characters were the girl Alyonushka and her brother, who turned into a kid, you can make a composition from plasticine.
To create a picture you need to take colored cardboard of blue or cyan color, indicating the sky:
- Prepare in advance an image of Alyonushka and Ivanushka, turned into a kid, so that you can visually see the picture.
- To make panels, take plasticine of different colors or salt dough. If you take the dough, then prepare more paints and brushes in advance.
- Looking at the picture, you sculpt the figures of the characters.
If you are making a craft from colored plasticine, then the colors are selected in accordance with the picture.
If you decide to sculpt figures from salt dough, you need to make the material itself. To do this, take flour, salt and cold water. Water 200 ml, flour 300 ml, salt 300 gr.
If you plan to make a very small product, then you can take fewer ingredients, the main thing is to maintain the proportions, the same amount of flour and salt, and less water. The dough should have the consistency of plasticine.
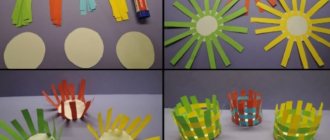
Rocker with buckets made from popsicle sticks
Based on the famous fairy tale “Emelya and Pike,” you can create an interesting composition with wooden ice cream sticks, depicting a rocker and buckets:
- You need to make two small tubes, glue thick cardboard so that you get a small roller. Cover them in a circle with ice cream sticks on top.
- Cut narrow strips from pieces of leather or thick brown fabric and tie them around the bucket in two places, top and bottom.
- Next, you need to make a rocker from a piece of leather cut in a semicircle.
- Wrap the leather with wire and secure the edges of the wire to the edges of the buckets so that the composition looks holistic.
- You can make “legs” underneath the buckets - attach a wire tightly wrapped in a spiral, and you can wrap a rope around it on top for greater aesthetics. And at the bottom, fashion bast shoes from brown plasticine or colored salt dough.
Paper bun applique
You can make a simple applique out of colored paper even with the youngest children. To do this, you need to stock up on paper glue, colored paper, cardboard, brushes and scissors with rounded edges if you are doing this with a child:
- You can take a picture from the fairy tale Kolobok for help and try to reproduce this picture from colored paper.
- Cut out the bun itself in a circle from yellow paper and create surrounding objects - a Christmas tree or a tree, a green background that will represent the grass and the house from where the bun escaped.
- Initially, you can take blue cardboard so as not to cut out the sky background separately.
- Glue everything with paper glue. It is better to spread the glue with a brush so that there are no unevenness on the application. It will be interesting for the child to do this work, because he will see how a whole picture comes to life from ordinary pieces of paper.
Pasta bun
A three-dimensional Kolobok figurine can be made from a food product - pasta. No matter how unusual it may sound, you can make a lot of different products from pasta, not only edible ones:
- To make a Kolobok, you need to inflate a medium-sized balloon to make it easier to create a ball shape.
- Next, it’s a matter of technique, you need to take pasta, preferably in the form of stars or flowers, and good quality glue that can glue such products together - PVA glue or superglue.
- Then the pasta is glued together in the shape of a ball until it forms a hemisphere.
- When the Kolobok is almost ready, you will need to burst the ball and pull it out until the entire space is sealed.
- Next you need to add the ball shape. You can glue eyes, a nose and a mouth cut out of colored paper to the finished bun.
- This work can decorate your kitchen or child’s nursery.
Craft “Frog Princess” made from salt dough and colored paper
The next work on the basis of which the craft will be made is “The Frog Princess”. The composition will be voluminous from salted dough, the recipe for which is described at the beginning of the article. Colored paper will be used here.
Before making this composition, it is better to read this fairy tale with your child so that he can imagine who the frog princess is and why she is famous.
To create a three-dimensional figure, it is better to take images of the frog princess to make it easier to recreate the shape:
- The backing for the composition should be made of blue cardboard - this will be water.
- It is better to cut out the water lily leaf under the frog from a thick green sheet of paper.
- Before sculpting, you need to prepare acrylic paints, with the help of which the main character will be painted.
- Frog parts are molded separately from salt dough, and a figurine of a sitting frog is molded from them.
- The frog's body is painted green, the belly is a light yellow tint.
- An arrow, which was shot by the famous Ivan Tsarevich, is placed in the frog's legs.
- A crown is attached to the head of the “princess”. A reed made of colored green paper is glued around the edges of the island with a figurine.
- Characteristic reed inflorescences are made from toothpicks and plasticine.
You and your child will love the resulting scene; it will bring an element of a fairy tale to the children's room.
Volumetric craft on the theme of the fairy tale “Turnip” made of cardboard
You can make almost an entire “theatrical” scene for the Russian folk tale “Turnip”. Based on the famous work, the whole family tried to pull a turnip out of the ground, and only the mouse was able to exert maximum impact, and thanks to it, the turnip succumbed.
To make the work, you need to take thick cardboard, preferably from an old box. On this substrate, make an impromptu vegetable garden - cut out grass from green paper and glue brown paper to represent the ground.
The turnip itself and the characters can be cut out of cardboard, made into cardboard stands in the form of cones and placed in the sequence in which they are described in the work. Or sculpt them from plasticine.
You can create an environment near the characters - sculpt a house and attach trees cut out of cardboard. It turns out to be a whole “live” scene.
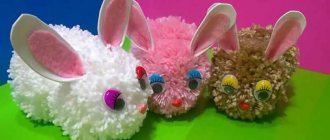
Winter hut made of cotton swabs
A winter hut made from cotton swabs will be a very interesting and beautiful product, especially during the New Year holidays.
For production you will need hygienic cotton swabs, glue and cardboard.
This house is made according to the principle of making a house from matches. The sticks are folded parallel to each other:
- A small drop of glue is applied to the place where the cotton wool begins to run out.
- Next, sticks are placed on top, positioned perpendicular to the first sticks. They are held together using glue, thus creating the entire house.
- After the frame is created, the roof is made.
- You can make it up by putting the sticks next to each other and gluing them together with the body. But it is very difficult and you need a lot of glue to keep the sticks in place. You can simplify the situation and fold a thick sheet of paper in half, it will represent the roof.
- Cotton swabs are glued tightly to each other on top of it. The beautiful snow-white house is ready!
On top you can decorate it with rhinestones, rain, beads, snowflakes or stars and the holiday atmosphere will enter your home along with this beautiful craft.
Miracle tree made of buttons
A Magic Tree made of buttons can become a beautiful picture that decorates any, even the most modern and fashionable apartment. In many fairy tales there are good helpers - magic trees. You can recreate the same helper and talisman for your family from ordinary buttons.
You can depict it on a uniform background, or you can create an all-season look using colored cardboard or colored paper. To do this, you need to take a large A3 sheet and visually divide it into four parts with a pencil. Next, cut out 4 different backgrounds from colored paper for winter, spring, summer and autumn.
Glue the colored rectangular pieces onto the surface, it will be divided into several parts. Then you can cut out a tree trunk in the middle from brown construction paper, or you can paint it with acrylic or any other thick paints.
Then buttons are selected according to the color of the season: for winter - blue, white and light lilac, for spring - light pink, light green, light yellow. For summer - bright and dark green and for autumn - orange, red and bright yellow. They will represent the leaves of the tree.
Next, the buttons are glued evenly in accordance with the time of year on the background. The result is a very bright and unusual picture, reflecting the changing seasons.
Pushkin Goldfish made of beads
Well, what would we do without the fairy tales of the great Alexander Sergeevich Pushkin. A wonderful and unusual character in his tales is the goldfish. You can try to create it together with your child.
If you have the skill of beading, you can weave it, but with children it is better to use a simpler option, making the craft by gluing it onto a flat surface. For production you will need: blue or light blue cardboard, yellow, orange and golden beads, PVA glue:
- On cardboard with a pencil you need to draw the silhouette of a fish.
- Next, use orange beads to lay out the main body of the fish, then the tail can be depicted with yellow beads and the tip of the tail highlighted in gold.
- The upper fin should be larger in size, it can also be made by combining two colors - yellow and golden.
- On the head of the fish, mark it with black or dark blue beads, or better yet, with a button for its eyes. It should be larger than the main beads from which the picture is made.
- On the sides of the fish, cut out algae from colored cardboard and place them on the sides.
The finished painting can be framed, it will be a very beautiful “fairy-tale” work.
Folk themed rag dolls
To bring such a doll into the world we will need:
- Fabric size: forty by fifteen centimeters (white, variegated and plain).
- A small “rag” for an apron, ten by eight centimeters.
- We will use the yarn to make hair.
Stages of making a doll:
- We make the body. Place padding polyester on a piece of white fabric and fold the fabric in half.
- Head. We make a twist at the end and secure it with thread.
- Hands. Fold the fabric in half and tie the edges.
- We fasten the body and arms with thread. Using thread we make a cross-shaped pattern on the chest. This will connect the arms and body. We wrap her belt. We tighten the thread.
- Create an underskirt. Folds form on plain fabric. We fasten the skirt with threads. We put a skirt on the doll
- Attach an apron and belt. We tie the fabric for the apron with a thread to the front (front) part of the doll.
- Making hair. We wind the yarn onto thick cardboard in several layers, then cut the yarn from one edge. Align the bun and secure it to the head.
The above examples are not all that is in the tradition of making “Russian folk toys”. With this article I wanted to attract as many people as possible to the study of native traditions, rituals and the history of Russia in general.
Clay crafts
Pottery was a useful and profitable craft. The main dishes were made from clay. Along with dishes, potters sculpted all kinds of clay toys. Then the making of clay toys became a separate craft. Entire families practiced it. In the 19th century, there were about 40 families of toy makers in Dymkovskaya Sloboda.
Toy craft
Several traditions of clay toys are still known: Dymkovo, Abashevskaya, Kargopol, Filimonovskaya. Each tradition has its own distinctive features in shape, color and ornament.
Dymkovo toys are characterized by lush frills on the skirts of young ladies or on the tails of birds. The ornament is dominated by geometric patterns. Red, yellow, blue, blue, green are the main colors for painting toys.
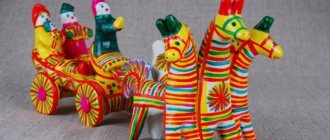
Filimonov toys are mainly whistles. Among the figurines there are many riders on horses with long necks, and all kinds of birds. A distinctive feature is the geometric pattern, mainly crimson, also yellow, blue, and green. A characteristic element of the pattern is a stripe.
Clay crafts have gained popularity in Russia. They were more often used for interior decoration than for children's games. The figurines were given the meaning of a talisman. It was believed that a bird brings happiness, a horse brings a rich harvest, and bear cubs with a barrel full of honey symbolize goodness.
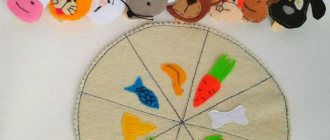
Master class: Dymkovo toy
It’s best to start getting acquainted with the Dymkovo toy with a simple figurine of a pet goat, horse or lamb. A master class on creating Russian folk crafts with step-by-step instructions will help a beginner make a cute lamb on his own.
For creative activities with children, you can use plasticine instead of clay. Replacing clay with plasticine will simplify and speed up the process.
The lamb figurine consists of several parts:
- torso;
- neck;
- heads;
- legs;
- ears;
- horn.
The torso is molded from one piece of plasticine slightly smaller than the size of a fist. First, roll the ball between your palms. Then it is rolled out into a short roll.
The head and neck are sculpted from one piece, which is thinner at one end. The piece is bent so that the narrow end forms the figure's head.
The legs are made from thinner rollers. Roll out two long pieces. They are cut in the middle in a stack at an angle. This is done for the convenience of connecting the leg blanks to the body.
In conclusion, all that remains is to sculpt the small details: the ears, bangs, tail and horns of the lamb. Craft ears are molded from 2 small balls of plasticine. They are flattened with your fingers and you get 2 cakes. I wrap each cake in a funnel.
The bangs are made from two thin “sausages”, which are connected into a short braid. The tail is short. Simply roll it out of a small roller and sharpen the end. The horns are long. It is necessary to roll out two long rollers of medium thickness.
The final stage is connecting the parts. First, connect the legs and torso. Then all the details of the head: ears, bangs, horns. They apply the neck and head to the body. Don't forget the tail.
After completing the sculpting of the figures, they begin painting. The first stage is priming with white water-based paint. Apply several layers. The figurine is painted in the Dymkovo tradition with gouache or acrylic paints.
The main element of the ornament is symmetrical circles of different diameters. Yellow, red, blue are an excellent choice of colors for painting a lamb. Ears, bangs and tail are painted black. The eyes, nose and hooves are painted with the same color. The horns are covered with yellow paint.