Application “Chicks in the nest”
To make this craft you will need cardboard, colored paper, cotton wool, glue, pencil and scissors.
In progress:
- draw parts of a tree – trunk and branches – on a sheet of brown paper;
- cut out the drawn parts and glue them onto a sheet of colored cardboard;
- Leaves are made from green paper and glued to the branches;
- For the nest, cut out a semicircle from brown paper and attach it to any tree branch. To imitate twigs and blades of grass, from which birds usually make nests, the same brown paper is cut into thin strips, folded in the shape of an accordion, unfolded and glued to the semicircle of the nest;
- form small cylinders from cotton wool - these will be chicks;
- cut out beaks and eyes from colored paper and attach them to the body;
- All that remains is to plant (glue) the chicks into the nest and the craft is ready.
The implementation of such an application can be completely entrusted to the baby, guiding his actions. You just need to take care of safety when working with scissors.
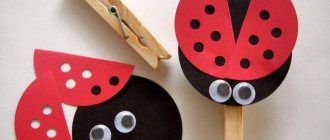
Butterflies
Everything ingenious, as you know, is simple! So, from an ordinary clothespin and two napkins of different colors, you can make a beautiful butterfly, and then decorate curtains or flower pots with it.
To do this, you need to place a smaller one on a larger napkin so that the butterfly’s wings look more elegant and believable.
Crafts for kids: ideas on how to make cool crafts with your own hands (125 photos and videos)- Crafts for boys: 130 photos of original and beautiful options for creating stylish and beautiful crafts
- Plasticine crafts for children - video + 135 photos of beautiful options for creating original crafts
Gather the napkin in the middle and place it in a clothespin - the body of the butterfly. Draw a face on a clothespin, cut out antennae from colored paper and glue them to our beauty’s head.
Owl
Such a toy can become a worthy exhibit for a crafts exhibition in a kindergarten. In this case, you will need an ordinary pine or fir cone, which is probably in the arsenal of every family with a child, multi-colored pieces of felt, glue and scissors.
In progress:
- make an owl's face and wings from brown (black, gray) felt. To do this, you must first draw them with a pencil and then cut them out;
- From felt of a different color, cut out 2 sets of circles of 3 colors each, and each subsequent one should be slightly smaller than the previous one. Ideally, make the smallest circle white, because this will be the white of the eye. For the other 2, you can choose a color of your choice (blue, green, yellow, blue, etc.);
- glue the eyes to the muzzle, placing small circles on top of large ones. The pupils are made from buttons or cut out of black felt;
- for the beak, a yellow or red triangle is cut out of the same material;
- attach the wings and muzzle to the cone. The owl is ready.
Making such a toy will not require much time and will certainly bring pleasure to the child.
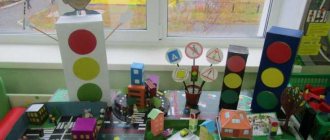
Exhibition of game models
Conducting methodological days and organizing exhibitions of joint creativity between children and teachers are necessary and useful forms of methodological work with young teachers in preschool educational institutions. The purpose of such events is to stimulate young teachers to improve their professional and pedagogical skills. In building No. 2 of MADOU d/s No. 155 of the city of Tyumen, an exhibition of game layouts ended its work on such a methodical day, at which teachers of senior and preparatory groups shared their experience of creating with preschoolers layouts of various natural zones as part of the educational project “Natural Zones of the Earth” and talked about the possibilities of their use in developing the director's play of older preschoolers.
The teacher of the “Yolochka” preparatory group, Elena Yurievna Marenina, spoke about the technology for creating the “Journey through the Desert” model,
what materials were used,
how children can participate in creating the layout.
Preparatory group teacher Marina Aleksandrovna Prikhnenko first discussed with the children what inhabitants of the deep sea could be placed on the model
after which we started work
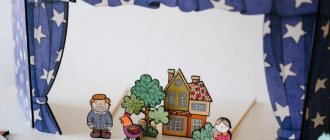
This is what the Seabed layout looks like:
“The Nature of the Tundra” was depicted in an interesting way.
As part of this methodological event, Marina Aleksandrovna also introduced her colleagues to the experience of designing children’s creative works made of plasticine in the form of sea depths.
Senior group teacher Perevezentseva Nadezhda Hristova told young teachers about options for creating models “Winter Forest of Our Region”, “Inhabitants of Antarctica”
It took teacher Natalia Vladimirovna Popova and the pupils of the senior group “Romashka” a lot of time to make the “Steppe” and “Ancient Inhabitants of the Earth” models, but both the children and the teacher were happy with the result.
Text.docx (19.93 KB)
During the joint discussion, teachers noted that play is the leading activity of the preschool period, the main content of children's life. While playing, the child communicates with other children and learns about the world around him, learns to search, think and create.
At each stage of preschool childhood, play has its own characteristics. Thus, in the lives of older preschoolers, a new form of story-based play—director’s play with small toys—occupies a large place. But in order for it to develop, kids need an attractive play space. Such a space could be a layout.
When playing with models, the child creates an imaginary situation and plays one or more roles. Simulates real situations or social relationships in a playful way. Layouts can have different themes, but in the process of using them several tasks are solved:
• consolidation and generalization of children's knowledge on a particular topic;
• activation of the lexical vocabulary;
• development of logical thinking, memory, attention, imagination, fantasy;
• development of general and fine motor skills of the hands;
• development of communication skills.
The event contributed to:
- familiarizing young teachers with the technology of creating game layouts;
- expanding the possibility of using them in director's games for preschoolers;
- creating a “piggy bank” of methodological findings.
Author: Tatyana Pavlovna Krasovskikh, senior teacher at MADOU kindergarten No. 155 in the city of Tyumen (building No. 2)
We invite teachers of preschool education in the Tyumen region, Yamal-Nenets Autonomous Okrug and Khanty-Mansi Autonomous Okrug-Yugra to publish their teaching materials: - Pedagogical experience, original programs, teaching aids, presentations for classes, electronic games; — Personally developed notes and scenarios of educational activities, projects, master classes (including videos), forms of work with families and teachers.
Why is it profitable to publish with us?
1. “Kindergartens of the Tyumen Region” is an officially registered specialized media outlet at the federal level. 2. The activities of the editorial office are supported by the Department of Education and Science of the Tyumen Region 3. We issue a “Certificate of Publication” in the media. 4. The document has a unique number, is entered in the register, has the original seal of the editorial office of the online publication and signature. 5. “Certificate of publication” in the media is sent to the author in both paper and electronic versions.
Details >>>
Sample “Certificate of publication of author’s methodological material in the media.”pdf
From the editors of the online publication “Kindergartens of the Tyumen Region” All authors of reports in the “Preschool News” section, which are published under an editorial agreement with a preschool educational institution, can order a Sample “Certificate of Publication in the Media”.pdf Go to the order form >>>
If you are a preschool teacher in the Tyumen region, Yamal-Nenets Autonomous Okrug or Khanty-Mansi Autonomous Okrug-Yugra, you can publish your news material. Apply for a one-time publication of a report, design and send a “Certificate of Publication in the Media.” (Paper or electronic version).
At the end of the academic year, the editors select the most successful works and, together with the Department of Education and Science of the Tyumen Region, encourage the authors with valuable gifts and letters of gratitude.
Share
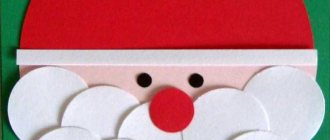
Snowman made of cotton pads
The New Year is just around the corner, and what New Year's holiday could be complete without winter crafts for kindergarten? The process of making a snowman is quite simple, so your little one can easily handle it. Of course, not without prompting from parents.
In the process of making crafts:
- Draw rectangles on paper of two colors and cut them out. These will be houses;
- glue future houses to a sheet of colored cardboard (preferably blue);
- the windows are cut out of paper of a contrasting color, and the roof is made from half a cotton pad;
- cut out a tree trunk from brown paper (it is better for parents to do this) and place it behind one of the houses;
- snow, the crown of a tree and the body of a snowman are made from cotton pads (as in the picture);
- cut out of colored paper and glue a scarf and a cap, eyes and a carrot nose to the snowman. The nose, mouth and hands are drawn with a felt-tip pen.
The snowman is ready. The picture can be supplemented with snowflakes cut out of paper or painted with white paint.
Master class “Tree” for layout
The layout contains deciduous, coniferous trees and shrubs. Let's take a step-by-step look at how to make a deciduous tree with a lush crown.
Materials and equipment
- stranded wire,
- polymer glue or titanium,
- tassel,
- acrylic paint,
- stationery knife,
- sponge,
- gouache,
- pliers,
- side cutters.
Execution steps
1. Using side cutters, cut a piece up to 15 cm in size from the wire. Cut the braid to the middle by about 7-8 cm.
2. We release the wire from the insulation and divide each bundle into 3 parts.
3. Form the crown of the tree. You can twist each part of the wiring using pliers, but you can do it well with your hands.
And again we divide the wiring. Thus, the branches of our tree decrease in thickness and increase in number. We give the branches a beautiful bend.
4. Paint the wood with acrylic paint.
5. For the foliage of the tree, use a gouache-painted sponge.
Each piece is glued to the branch with instant glue “Crystal”.
The result is a rather lush crown.
This is what the finished trees look like:
Snowman made from a sock
A great option for overly busy parents. By spending just a little time, you and your child can make a beautiful winter craft from scrap materials.
To do this you need:
- cut off the top of the sock to the heel (preferably white) and make a bag, gathering it into a bun and tying it tightly on one side;
- fill the bag with soft material, for example, padding polyester, and separate the body from the head, tying the snowman in the right place with thread. You can make a snowman more stable if you use any small grain as a filler;
- The snowman's hat and scarf can be made from paper or colored fabric, and the nose, eyes and mouth can be made from multi-colored beads.
The cheerful snowman for kindergarten is ready. To complete the look, you can sew colored buttons to the body.
Cute hedgehog
Even the smallest children can make a hedgehog from a pine cone and plasticine on their own. To do this, you need to roll up the cone-shaped face of the hedgehog and connect it to the sharp end of the cone.
On the muzzle, make two black balls for the eyes and one larger one to form the tip of the animal’s nose.
From four sausages we make stable legs for the hedgehog, and for beauty, you can put an apple or a mushroom, also molded from plasticine, on the back. The snorting prickly hedgehog is ready!
Craft "Forest"
To complete this craft, you need to try hard. But the result is worth it.
In progress:
- prepare 4 spruce or pine cones: 2 are painted brown, and 2 are painted green;
- make the base of the craft, for which a thin layer of cotton wool is glued onto a sheet of thick cardboard (this will be snow);
- 3 rectangles are cut out of thick brown cardboard and cylinders are made from them (tree trunks and stumps);
- secure the workpieces on the prepared base;
- The legs, muzzle and antlers of a deer are made from solid wire, wrapped in brown paper or thread of the same color and attached to the body;
- The head and wings of an owl are made from white paper and attached to the body;
- green cones are attached to the trunks - these will be Christmas trees.
You can simplify the process by installing Christmas trees without “trunks”. It will also turn out beautiful.
Craft house made from natural materials
Any natural materials are suitable for making crafts. Hot glue is best for joining parts together.
The base for the walls is made of thick cardboard. Cut out 4 squares and connect them with tape. Glue reed brushwood to each side. The resulting frame is attached to a sheet of cardboard with hot glue.
For the roof, cut out 2 triangles from cardboard with an allowance of 1 cm at the base of the triangles. They are used as pediments. Glued to the frame of the house.
A cardboard crossbar is glued to the top of the gables. Then slopes are attached to the roof - 2 rectangles of suitable size.
Different materials are used to decorate the roof. These can be dried reed inflorescences, moss or cones. The scales are separated from the cones. They are cut into a diamond shape and glued with hot glue to the roof slopes like tiles.
Finally, cut out the windows and door from cardboard and glue them to the appropriate place.
Plasticine snail
Crafts made from plasticine are easy and beautiful. If you choose the right color of the material, the toy will turn out bright and interesting. How to make a craft for kindergarten from light plasticine, further in the article.
In progress:
- make an oval cake from green plasticine and form a leaf out of it;
- a “sausage” (snail body) and a ball (head) are made from pink plasticine;
- a thicker sausage is formed from blue plasticine and rolled up like a shell;
- connect the fragments of the snail and place it on a green leaf.
They make horns, eyes and a mouth, as in the photo.
Master class “Bench in miniature” for layout
Our model has a fence and a bridge made of popsicle sticks and paper parasols. And of course, every park should have benches for rest, which is what we will do now.
Materials and equipment
- toothpicks,
- polymer glue or titanium,
- tassel,
- acrylic paint (for painting bench legs),
- any thread for knitting,
- wire,
- pliers,
- hot gun.
Execution steps
1. We tie the toothpicks together at both ends; you can coat the knots with glue to make them stronger.
2. In this way we attach 15-16 toothpicks.
3. Using wire, we use pliers to form the bends of the legs of our bench.
4. Using a hot gun, glue the bench legs and base together.
A tree and benches take their place on our park layout for a kindergarten:
In order not to forget the page address and share with friends, add it to your social network:
More interesting:
Tags: Garden crafts
Attention! It is better to write urgent questions in the comments on the website (form at the bottom of the page) or, better yet, directly by email. There are no notifications about comments from the VKontakte form! This form is more for feedback. 
Discussion: 2 comments
- Olga:
March 24, 2021 at 08:37 pmHello! Thank you very much for publishing the master classes. How beautiful, talented, just super. I find a lot of new things to learn from you. You are WELL DONE!!!
Answer
Larisa:
March 25, 2021 at 03:28 pm
Thank you very much, Olga! Your feedback is very valuable to us. It's very nice when readers are happy. But reasonable criticism is also welcome