Today, the assortment of stores offers a large number of various educational games. But when it comes to buying such a game for our little one, we often face several problems. Firstly, the majority of games are aimed at older children. Secondly, it is not always possible to find a game of the type we would like, so that it corresponds to the interests of our child. Thirdly, the prices for such toys are often not affordable for everyone. But one game is not enough for a child; he needs to develop in different directions. But you can easily make a series of simple educational games yourself, spending very little time and money on it.
Such games are unique and exclusive. They keep the warmth of a mother's hands and are made specifically for her baby. And if you allow the baby to take part in their production as much as possible, then the games will bring double benefits and will be even more interesting to play. So, moms, let's get to work!
For children from one to three years old
Crafts that develop fine motor skills will play an important role in thinking, the ability to analyze and reason. When it comes to babies who have only recently begun to walk independently, it is important to consider that their perseverance is minimal.
And the ability to correctly hold and manipulate a pencil or scissors in your hands or sculpt figures from plasticine is so rare in everyday life that it is equated to something especially admirable. That is why kids make crafts under the close supervision of an adult.
The goal of an adult when doing joint needlework is to guide, give an idea and provide the necessary tools and materials. During the work, an adult must not only show what and how to do, but also discuss all the actions performed. At the same time, clearly stating all the names and names of the processes.
You can forget about thorough correctness, evenness and beauty when working with one-year-olds. The main thing is that this form of communication brings positive emotions to both, and there is a desire to continue.
On the Internet you can find many photos of educational crafts, the sight of which will inspire you to create them. In this case, a wide variety of materials are used, ranging from leaves, twigs, paper and to specialized paraphernalia.
DIY educational toys: Development of fine motor skills.
I offer a selection on the topic “Toys for the development of fine motor skills.” Toys that you can make with your own hands. All the photographs below are our creations with my daughter.
Let's start with toys and aids that do not require special skills:
1. “Box of cereals” - took a shoe box, small shovels, rakes, a shaving brush, containers with cereals (we have semolina, millet, rice), cut out geometric shapes from cardboard and attached “handles” to them - lids from plastic bottles. You can sprinkle it, draw on cereals, bury small toys, learn to “write” letters and numbers with your finger, etc.
2. Continuing the theme of using shoe boxes - “Box with lids” . We kept our first cars in such a box for a long time. The child practices screwing and unscrewing the caps; you can also include learning colors (screw them according to color). We made it like this: a shoe box, self-adhesive film (we made an applique), cut necks from plastic bottles (screwed into the lid from the inside), caps from plastic bottles for screwing on.
3. “Feeding piggy banks” - from plastic bottles and jars you can make piggy banks that children will be happy to “feed”. We have a pig (I covered it with felt, but we could have covered it with self-adhesive tape), and the very first ones were animals made from jars of finger paints (here, in addition to fine motor skills, we went through who eats what).
4. Games with clothespins (and for older children, with paper clips) - these are easy to make from paper or cardboard.
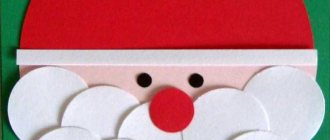
5. “Plasticine pictures” , or rather blanks for reusable drawing with plasticine - simply printed out the pictures and laminated them in the online printing salon. Now you can “draw” with plasticine (white peas for fly agarics, black peas for ladybugs, apples on an apple tree, a fence in front of the house, etc.)
6. “Home sandbox.” A home sandbox has a lot of advantages: you can play with it all year round, you don’t have to worry about your child’s health (outdoor sandboxes are very popular with cats, and at home the sand from the quarry is calcined), sand helps adults relax too, and I personally really like sand therapy (read in the Internet).
7. Finger puppets. You can sew them, or you can make them out of paper.
You will need sewing skills to make the following toys:
8. “Tugs and tugs” - there can be a lot of options for their execution, we made one for our car seat. I sewed different textured, multi-colored scraps, ribbons, and laces with beads. And I sewed an owl toy for my little niece.
9. Iskalochki - toys made of fabric with a transparent window, filled with beads/rice and small parts. Children go through the treasure hunt and look for the treasures hidden in it. There are many options on the Internet, here is our turtle.
10. Toys with fasteners. There are various designs: matryoshka dolls, educational cubes, books, rugs. Personally, I like the rug option the most, because it is very practical - it’s convenient to take it with you to nature, to the country house, to the beach.
I hope this collection is useful to someone.
For children from three years old
Most children start kindergarten at three years old.
At this age, they are already more independent, since they can do a lot themselves: draw specific objects, cut out elements with straight sides. Fine motor skills are already quite well developed. In this regard, they are able to cope with more complex crafts. Difficulties may arise in the first stages, but each time it will turn out better. Movements will become more harmonious and confident.
Educational crafts for kindergarten can be made from various materials: paper and cardboard, plasticine, glitter and small beads, feathers, pine cones and acorns. Working with small elements will help in the future with practical issues, such as tying shoelaces, fastening buttons on a blouse, and so on.
Do-it-yourself teaching aids for kindergarten
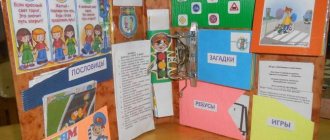
Application of the universal psychological aid “Lukomorye” in the subject-spatial environment of a mixed-age group of preschool educational institutions
Taking into account the project “Features of organizing educational activities in a mixed-age group” and in order to implement one of the objectives of the project to develop a developmental subject-spatial environment in a mixed-age group of preschool educational institutions, taking into account the peculiarities of the organization and content of educational activities, I recommend enriching the group environment with a universal psychological guide “Lukomorye” "
Didactic manual "Lukomorye"
Aimed at developing the mental functions and emotional sphere of preschool children.
Tasks:
- Promote the formation of cognitive processes - perception, memory, attention, thinking, speech.
- Promote the development of precision finger movements.
- Encourage the child to work according to the teacher’s instructions.
- Promote the development of the emotional sphere and the formation of the child’s communication skills.
Category of participants: children from 4-7 years old.
Form of work: individual and/or subgroup.
The manual is multifunctional, it can be placed in any area of the group, and can be used both vertically and horizontally.
In a horizontal position, up to eight people can be used simultaneously. You can create a single picture, work on different parts of the manual in different directions. Several children can work in the crown space at once. When working with the manual, the principle of learning from simple to complex is observed.
The manual performs several functions: educational, developmental, correctional and diagnostic.
Working with the manual is built on the principle of developmental education. Seeing the example of older children, younger children more easily master the program material. The opportunity to exchange opinions and impressions during classes allows children to gain diverse knowledge. Working in pairs, older children teach younger ones.
Using the manual, you can assess the level of knowledge and skills of children, form subgroups of children taking into account mental and psychological characteristics, and plan activities with different levels of complexity.
Work with the didactic manual in a subgroup is carried out on the principle of team play, thereby developing a sense of responsibility and a desire to help each other. Older children try to be an example for younger ones - they show their knowledge, skills, and ways of completing tasks. This makes it possible to increase the effectiveness of learning and creates in children the feeling that together they can solve any problems more easily.
The manual allows you to diagnose the emotional state of children at the beginning of the lesson and at the end, the level of self-esteem, features of peer assessment of each other and joint work. The manual promotes the development of the emotional sphere and the formation of communication skills of preschoolers.
Working with a didactic manual allows the teacher to find an individual approach to each child, taking into account the desires and interests of the child himself. The manual can be used to correct mental processes in preschool children; it promotes the development of imagination and creativity.
I suggest starting classes with an introduction:
Guys, I invite you to the magical land of Lukomorye. Here you can do everything yourself. Weave the sun, clouds and even a tree from threads, rubber bands and laces yourself. The tree is not simple, but magical! And it’s not leaves that grow on it, but geometric figures, pictures, pebbles and even moods. What an extraordinary country! I suggest you go on a magical journey soon.
The lesson can begin with the ritual of entry. “Look at our country. What's missing here? Right. The tree has no crown. Let's do it ourselves. Let’s take a magic ball and use a wonderful thread to form the crown of our tree.” The teacher shows how to work, and the child continues independently. If there are several children, then each takes part in the formation of the crown in turn. After 2-3 lessons, children are given the opportunity to shape the crown as they wish.
List of games: Which figure is missing. Which picture is gone. Find the extra figure. Find the extra picture. Continue the series. Name it in one word. Arrange by size. Name your neighbor. Follow the instructions. What geometric figure does the pebble resemble? Fill in the geometric shapes. Lay out a geometric figure from parts. Lay out the outline of the figure. Orientation in space. The words are the opposite. Not a similar figure. Magic rubber bands. Magic thread. Fill out the form. My mood. Portray the emotion. Replace the emotion. Collect the emotion. Tree of friendship.
This is just a small list of games that can be used using the Lukomorya manual, and teachers can expand the scope of its application.
In general, the didactic manual “Lukomorye” promotes the harmonious all-round development of children of different age groups.
For children from 6 years old
For older children who skillfully handle scissors and other tools, we can offer educational crafts made from felt. This type of work is especially interesting.
At the same time, something special is created, not similar to other copies. This could be a Christmas tree toy, a puppet theater or a stand on the kitchen table. Such a creation can serve the creator for a long time or become a practical gift for a friend.In the process, skills in working with scissors are consolidated, interaction with a needle, thread and additional materials develops. It also trains fine motor skills at a higher level, improves artistic taste and improves patience and perseverance.
Toddler quiz
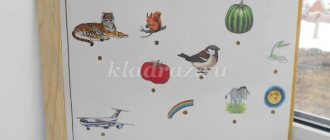
The main thing in this educational game is the spinning arrow. Cut it out of thick cardboard. Then make a hole in the center of the cardboard sheet and insert a screw into it. Screw the nut onto the screw, put the arrow on top and tighten with another nut. Do not tighten the top nut too tightly so that the pointer can rotate freely. The playing field is ready. Place cards in a circle with objects depicted on them (animals, flowers, fruits, furniture, clothes, etc.). Now rotate the arrow and see which picture it points to. Let the baby say what is drawn in the picture. In addition, you can tell something interesting about this subject.
You can teach letters or spellings in the same way. If the arrow points to a familiar letter, the baby names it. If the letter is not familiar, you name it. You can turn the arrow one by one and name the letters one by one. The cards can depict numbers, colors, geometric shapes, dog breeds and anything else you want to introduce your baby to. For older children, complicate the task a little by asking them to name the material from which the object in the picture is made (this is a glass, it is made of glass) or, say, the benefit that pets bring (this is a cow, it gives milk).
In order to activate the baby’s speech, place photographs in a circle showing the baby doing different activities. Let the child explain what he is doing in this or that photograph: “This is Lisa stroking her pussy. This is Lisa at the zoo. This is Lisa and grandma..."
Tips for successful work
Before you begin your chosen work, you should listen to the following tips:
- Prepare all required materials in advance.
- Scissors for children should first of all be safe, so they are suitable only with rounded ends.
- Consider protecting your work surface. It is better to cover it with oilcloth, and put special plastic boards for modeling.
- When painting with paints, you should make sure that the water is not very cloudy. After completing the drawing, it is good to cover the paints to prevent them from drying out, and wash your hands well.
- When sculpting, if there is no goal to dry the material, you need to wrap it in a suitable material: clay - in a piece of damp cloth, plasticine - in plain paper.
- Markers should be stored with their caps tightly closed.
- It is good to sharpen pencils with a sharpener.
Safety first!
It's important to keep safety in mind when creating your own toys. Checklist of things to remember:
- size of toys: the smaller the child, the larger the toy should be
- for children under 3 years of age, removable parts are undesirable (if they exist, they must be very large)
- Babies put everything in their mouth, the surface should be smooth, no sharp edges or corners, and no toxic (or even washable) paints
- ribbons and ropes - only short ones that cannot be wrapped around an arm, leg, or neck; also make sure they are firmly attached to the toy
- toys should not tear or break
Magic handkerchiefs
Cut a cup-sized hole in the lid of any suitable plastic container (or cardboard box) and tape or sand it to remove any sharp edges. Fill the container with various colored scarves, handkerchiefs, wide ribbons, and long shreds. These can be fabrics of different textures and colors. Let your baby pull them out through the hole and put them back in.
Homemade building blocks
Small boxes (for tea bags, cereal, soap, etc., as well as toilet paper and paper towel rolls) make great lightweight, large building blocks. Fill the boxes with newspaper or crumpled kraft paper to make them durable, wrap them in a bright cover, and seal everything tightly so that pieces of wrapping and tape cannot be torn off. This is a huge potential - you can get a wide variety of blocks for playing and building in any quantity completely free of charge!
And, of course, wonderful cubes can be sewn
!
Baby's first book
Make your own soft educational book for your child by sewing together parts of clothes that your baby has already outgrown (with buttons, fasteners, pretty elements, pockets and other details).
You can also make paper
book by cutting out photographs from magazines and gluing them onto sturdy cardboard.
You can leave the cardboard sheets with pictures individually or collect them all in a file folder. You can print out photos of your family, pets, and places around your home to personalize the book
so your little one will recognize familiar objects and places and be happy!
Home rattle
Place a handful of rocks, rice, pasta, or anything else that rattles in a small Pringles can (or similar) or just a plastic bottle, tape the lid tightly, and you've got yourself a big rattle. Make sure that the tape is pressed tightly against the can so that it cannot be snagged or torn off.
And if you sew a cute case for such a rattle, then no one will be able to guess what it is based on!
Drum
An empty bottle, a plastic container with a lid, or a tin can and a wooden spoon (if you don't have a suitable stick) make a great drum.
Sorter
Bottle caps and caps make great toys. Cut out several different shapes on one side of the box, making some larger than others. Give your child a few small stoppers and caps (play with supervision as these are small toys). Your baby will soon discover that some objects fit through the holes, while others are too big or the wrong shape.
You can also make an excellent color sorter with Lego cubes (preferably large ones): prepare several boxes with slots (you can use them to make funny hungry monsters), each box is a certain color, put a mountain of cubes next to it, and let the child sort them by color:
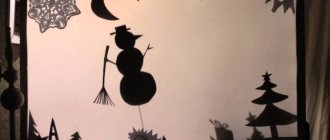
Snowball
Fill a small bottle or plastic jar 3/4 full with water and add 2-3 handfuls of glitter. Close and seal the lid tightly and let your child shake the toy. That's very beautiful!
Crispy sock
Stuff a sock with crisp wrapping paper and tie a knot. The child can crunch, making funny sounds. Plus, this is a great way to repurpose lost socks that are left without a pair!
Rattle bracelet
Punch a hole in the center of several plastic bottle caps and tie them together with an elastic band to make a bracelet. A simple rattle, very light.
Home stacking cups
Collect plastic lids from various containers to make your own stacking kit. Hairspray, shaving foam, vegetable oil and milk bottles have lids of different sizes. Wash well before use (and do not give to a child too small, play with supervision).
Fun textures and colors
Make large textured blocks by gluing various fabrics and materials onto wooden blocks (or cardboard boxes stuffed with newspaper). Exploring different textures, colors and patterns is a great way to develop your baby.
Clicking toys
Old keyboards or calculators are a treat for little ones, especially when they hear that wonderful clicking sound! Make sure the keyboard is not broken, has no sharp edges, and that the buttons are firmly in place. At the same time, you can learn letters and numbers this way!
Laundry basket or large box
Laundry baskets (or large cardboard boxes) are the best cars to sit in ( sometimes even with your cat!
). Pushing them around the house may not be easy, but your baby's laughter will be worth your time and effort.
Sensory package
You will only need about five minutes to make this toy. Just squeeze the hair gel into a plastic zip-lock bag ( with a secure lock!!!
) and throw in some plastic or rubber creatures (such as fish and amphibians). Fasten it, you can even seal the clasp for security. Children love the tactile sensations of such a toy.
Skittles
Plastic bottles, preferably 2-liter ones, are ready-made wonderful skittles, no worse than store-bought ones. You can create a neat little bowling set with a selection of bottles and any ball. Bottles can be painted in different colors (paint on the inside to make it safe, a long brush and acrylic paint is most convenient), and then at the same time in the game we will learn to distinguish colors. For heaviness, you can pour a little sand into the bottles.
Finger toys
If you don't know how to sew, you can just glue the pieces together.
You can create real miracles with leftover fabric, felt and a few other supplies (buttons, thread, yarn).
These toys are really quick and easy to assemble, you can use your imagination to create a whole zoo of puppet animals, funny families, dinosaurs, aliens.
With these toys you can entertain your child for hours on end!
Glove monsters
Soft old gloves can easily be transformed into these adorable monsters (or animals, whatever you prefer). They're soft, plus they're a way to put old or lost mismatched gloves to good use. The baby himself can help you create them.
Mini vegetable garden
A plastic container (for example, from wet wipes) is an excellent basis for a mini-vegetable garden or flower garden. Pour soil into the container, show your child how to plant seeds and spray the soil with a spray bottle. Observe the germination and growth of plants.
Examples
Below are several options for educational crafts for children of different ages. They can be performed both at home and in a kindergarten group.
DIY DIDACTICAL MATERIAL (GAMES, MANUAL, LAYOUTS) for children with disabilities
| DIDACTIC MATERIAL with your own hands (GAMES, MANUAL, LAYOUTS) Prepared by a teacher of the highest category: Monaenkova Lyudmila Viktorovna |
Didactic game “Catch a fish”
Software tasks:
• develop coordination of hand movements, • develop strong-willed personality traits (patience, perseverance, perseverance), • consolidate certain mathematical knowledge in children of different age groups in a playful way, • practice coordinating words in phrases and sentences when working together with a teacher, • intensify child's speech.
Speech material:
aquarium, fish, fishing rod, fish live here, fish, caught, count how many fish, many, few, who has more, well done.
Progress of the game.
All the fish are placed in a box (aquarium). The teacher shows the children how to use a fishing rod and remove fish from the fishing rod. Hands out fishing rods to the children and the children catch fish. When there are no fish left in the aquarium, he offers to count who caught the most fish. The child who has the most wins.
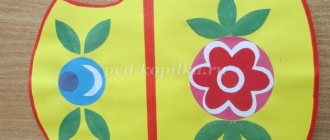
Didactic game “Funny Clothespins”
Software tasks:
Teach children to recreate the missing details of an object using improvised material - clothespins, develop motor skills of fingers through action with other objects, the ability to distinguish and name colors, tactile sensations, visual perception and attention.
Speech material:
Let's play, look at the picture, who (what) is this? name of objects, what is missing? clothespin, what color? red, yellow, green, blue, white, take it, do it this way, the same, right, wrong, beautiful, well done.
Progress of the game.
The teacher examines with the children a picture depicting a whole object, then offers a picture of the same object, but with some details missing (tail, paws, rays, etc.) and offers to supplement the object with the missing parts using clothespins.
Didactic game "Fun Fishing"
Software tasks:
to form children’s understanding of the properties of water: water is transparent; develop fine motor skills of the fingers, dexterity, curiosity.
Speech material:
There is water there, take a net, catch toys, whoever has more (less) caught it, well done.
Game description
Children take out objects with a net and name the object. The one who gets the most items wins.
Didactic game
“Where is the water hidden?”
Software tasks:
consolidate children's understanding of the properties of water: water can be solid, liquid, or in the form of steam. Develop thinking, imagination, ability to analyze and draw conclusions independently.
Speech material:
where is the water hidden? Icicle, flower, snow, rain, steam, faucet, water there.
Game description
Children look at the pictures and find where the water is hidden.
Didactic game “Collect beads”
Software tasks:
- consolidate children's knowledge about primary colors and their shades, be able to group objects by color;
- develop sensory perception;
- form hand-eye coordination based on actions with objects.
Speech material:
collect beads, what color? Beautiful, well done.
Game description
The teacher invites the child to collect beads.
LAYOUT
“WHAT TIME OF DAY?”
SOFTWARE TASKS:
- learn to navigate the parts of the day;
- determine parts of the day by external main features;
- correlate parts of the day with main activities;
- determine the parts of the day at the current moment, correlate the parts of the day with the image in the picture.
Speech material:
What time of day? Morning, afternoon, evening, night, they did exercises, studied, walked, played, watched TV, slept.
LAYOUT
"SEASONS"
SOFTWARE TASKS:
- Strengthen the ability to determine the time of year based on the characteristic natural phenomena of the current season.
- Learn correctly, correlate the time of year with the desired picture.
- To foster in children a cognitive interest in the natural environment.
Speech material:
what time of year: winter, spring, summer, autumn, why, leaves are cold, frost, snowing, warm, leaves are blooming, birds have arrived, warm, hot, many flowers, fruits are ripening, children are swimming, yellow and red, leaves are falling, it's raining.
LAYOUTS
"WILD ANIMALS",
"PETS"
SOFTWARE TASKS:
- To strengthen in children the ability to classify animals into domestic and wild according to their habitat.
- To acquaint children with the way of life of animals near humans and in the wild forest, to acquaint them with the characteristic features of the appearance and habits of animals.
- To cultivate in children a cognitive interest in objects of living nature, to develop a caring attitude towards animals, a desire to observe and care for animals.
Speech material:
domestic animals: cow, cat, dog, pig, sheep, ram, horse, live near the house, near a person, cat lives in the house, dog lives in the kennel, cow, horse, pig, ram, sheep, live in the barn; wild animals: bear, wolf, fox, hare, squirrel, hedgehog live in the forest, squirrel lives in a hollow, fox, hedgehog in a hole, bear in a den, hare under a bush.
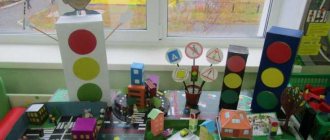
Didactic game “Collect a picture”
according to traffic rules
Software tasks:
practice design, the ability to compose a whole image from individual elements; consolidate the understanding of the rules of safe behavior on the roads; develop perception, thinking; cultivate independence, the ability to complete the work started; introduce new concepts into children's vocabulary.
Speech material:
collect a picture, a road, a house, a tree, a passage, a sidewalk, cars, a traffic light, this is possible, this is not possible.
Game description:
playing out various traffic situations.
Didactic game “Collect a picture”
SOFTWARE TASKS:
introduce children to road signs; learn to put a whole from parts; develop logical thinking, memory, attention.
Speech material:
Fold the picture, help, true or false.
Description of the game.
On the table in front of the children are cut-out pictures depicting road signs. Children participating in the game are asked to put together a picture from parts so that they get a whole image. The child who first collects the cut picture wins.
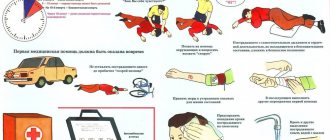
TRAFFIC LAYOUT WITH A SET OF THEMATIC OBJECTS
LAYOUT "GARDEN AND VEGETABLE VEGETABLE"
SOFTWARE TASKS:
- fix the name of vegetables and fruits;
- consolidate the concepts of garden and vegetable garden;
- development of mental operations in children (analysis, synthesis, generalization and comparison);
- expansion of active vocabulary.
Speech material:
What is this? this is a garden, this is a vegetable garden, apples, pears, plums, lemons, fruits grow in the garden, carrots, cabbage, onions, tomatoes, cucumbers, vegetables grow in the garden.
DIDACTIC MANUAL
“ACCUSSION OF CHILDREN WITH FOOD PRODUCTS AND THEIR PROPERTIES”
SOFTWARE TASKS:
- Develop primary natural science concepts, observation, mental operations (analysis, comparison, generalization, classification).
- Introduce children to nutrients: salt, sugar, cereals and its varieties. semolina, millet, pearl barley, rolled oats, buckwheat, rice.
- Teach children active actions for a comprehensive examination of the objects being studied: examining, feeling, determining the taste (using didactic games such as “Wonderful Bag”, “Guess the Taste”).
- In the process of experimentation, replenish children's speech with words denoting sensory signs and properties of the objects being examined (color, shape, size).
- Strengthen the ability to actively use practical experience in gaming activities using the algorithm model.
Speech material:
cereals, semolina, millet, pearl barley, rolled oats, buckwheat, rice, salt, sugar, sweet, salty, pasta, small, large, soft, hard, poured, dissolved, not dissolved, cooked.
ALGORITHM - INSTRUCTIONS
“LET’S COOK PORRIDGE FOR A DOLL”
CARDS-SCHEMS
ORTHOPEDIC MAT
Goal: massage the foot, activate blood circulation, strengthen the ankle joint and form a physiologically correct arch of the foot, develop coordination of movements and maintain overall health.
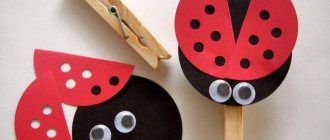
Shark made of clothespins and paper
Necessary materials:
- pin;
- colored paper;
- glue gun;
- toothpick;
- felt-tip pen.
Progress:
- Cut out two parts from blue paper: the upper part of the shark and the lower part. Draw an eye on the top.
- Cut out a small fish from orange paper. One that fits in a shark's mouth.
- Cut a small stick from a toothpick and glue an orange fish to its top. And glue the free part of the stick to the edge of the inside of the lower part of the shark.
- Take a clothespin and glue blue parts to its ends to make a shark. It turns out that when the clothespin is opened, the shark will begin to open its mouth, and the fish will try to escape. But when closed, it will again be eaten by predatory fish.
Toys from other scrap materials
Even if you do not have handicraft skills, know that almost any little thing “living” in your home can be turned into an educational toy. And we will tell you little secrets about how to make a toy with your own hands literally from garbage.
At the age of three months, the baby already develops an interest in the objects around him, and the little one actively tries to study them. At this age, he simply needs toys that develop hearing, vision, fine motor skills and attention.
Find out more about how to develop a baby at 3 months
Of course, such toys can also be purchased in stores (their selection is huge), but a toy made by the loving and caring hands of a mother is much more important for the baby, because in addition to its developmental functions, it contains a charge of the mother’s positive energy and protects the baby on an invisible level.
Hair band bracelet
The simplest thing you can do is a rattle or a bracelet for your baby.
We take a hair tie (it should be wide enough), sew large multi-colored buttons, tiny soft toys, bells, beads onto it... You can sew different “spare parts” onto one bracelet, or you can make several so-called themed bracelets (for example, animals , colors, shapes). It is very important to use only “reliable” parts and sew them tightly.
Touch screen
It’s not easy to come up with sensory toys with your own hands from scrap materials; it’s even more difficult to interest a child in them. But this option will surprise and delight you. This beautiful craft is easy to make and most kids will probably love it.
Please note: Your child's safety should be your highest priority. This thing is not a traditional educational toy, but a plastic bag with gel and small objects. You don't want your child to put this in their mouth, do you? Do not leave your child unattended while he is busy with this homemade product. Control it all the time!
For the craft you will need:
- freezer bag with a zipper with a side of 20-30 cm;
- hair gel;
- scotch;
- small objects without sharp corners: figurines, balls, beads, buttons, sparkles, etc.
Fill the bag with hair gel. It can be colorless or colored. If you wish, you can tint the colorless gel yourself with food coloring. Place your small items in the liquid bag. Squeeze out as much air as possible when sealing the bag. The edge with the fastener must be properly sealed with tape. For reliability and to give the craft an aesthetic appearance, you can cover all edges with tape.
A one-year-old baby is ready to see cool toys in anything - from a hat to a sock, so, from his point of view, the house is full of fun and entertainment, you just don’t always know what to look for. As a toy for children over 1 year old, you can offer many different trinkets that are literally at your fingertips.
Find out more about games for 1 year old children
Touch boards
They are great for developing baby's hand-eye coordination and can teach many other things too. You can place items on them such as zippers and buttons, a mirror, a light switch, some rug samples and anything else that they would love to touch. Secure all your sensory items to the board, and then mount the board itself to the wall.
Shoe box sorter
A very simple toy to make - a home sorter. We take a shoe box, wrap it in beautiful paper or fabric, cut out holes of various sizes and different shapes in the lid (based on what items you will put in the box (cubes, balls, coins, pencils)).
Big box house
Paint a large appliance box to turn it into a magical castle. For girls it is better to use pastel colors, for boys - bright and light. This way the child can play prince or princess. Place something soft inside the box, such as pillows.
Magic jars and containers
Plastic containers and jars of baby food, coffee and tea with lids can become drums that will be so interesting to bang on. You can also put small objects in them and even play hide and seek - hide a picture or toy in one of several containers, and let the baby guess where the object is.
Balloon from Pringles cans
Sorting marbles into colorful tubes is an ideal activity for 11 to 12 month olds. During this period, children learn to manipulate small objects: lift, play, suck, shake, roll, lower.
Thanks to this toy, the child will learn:
- distinguish and correlate colors;
- manipulate balls or pom-poms;
- will master the concepts of inside and outside (as the ball appears after passing through the pipe).
As you can see in the image, the toy is quite simple, but it can become very attractive for a long time.
Required material:
- cardboard box of suitable size;
- colored paper (six colors);
- balls or pompoms of the same color as the colors of the paper;
- wrapping;
- 4 Pringles potato cans;
- stationery knife;
- scissors;
- glue.
Cut off the bottom of each can and cover them with colored paper. Cut the cardboard box so that the balls, when passing through the pipe, end up in its niche. Cover it with wrapping or any other paper. On the inside front side, glue strips of colored paper to match the colors of the tubes. This is not necessary, but will help your child better match the colors when the balloon or pom pom comes out. Secure the tube jars to the box.
Cave
You will need:
- thick cardboard from a box;
- large sheet of paper;
- glue gun
Step-by-step instruction:
- Cut out three elements from cardboard: a free-form base and two curved arcs of different sizes.
- Place the arcs perpendicular to the base and secure with hot glue.
- Crumple the paper and cover the resulting structure with it, leaving an entrance on one side.
- The voluminous, spectacular craft is ready. You can place animal figures inside, placing them on a pile of straw or on pebbles.
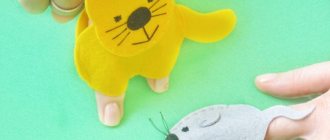
Mouse from a sleeve
Required tools and materials:
- sleeve;
- cardboard;
- colored paper;
- paints;
- glue;
- scissors.
Progress:
- Paint the bushing gray and let dry. This will be the body of the little mouse.
- Cut out ears and paws from gray cardboard.
- Make cuts in the sleeve to fix the cardboard elements in them.
- Cut an oval out of pink paper and glue it to the base. This will be the tummy.
- All that remains is to draw the eyes with eyelashes, a nose and two teeth.
Educational crafts for kids can be good helpers in studying many topics. For example, when studying shapes, you can make a chest of drawers from matchboxes and label each one with a certain meaning: circle, triangle, square. Then cut out these shapes from colored cardboard. This way the child will learn not only to cut out the simplest shapes, but also to sort them correctly.
Walking walkers
Walking games with cubes and chips are a constant hit in children's board games. But all the games that you can buy are not suitable for little ones who cannot count to six. But if your little one already distinguishes between one and two, you can easily modify any game. Make a new cube with one dot on three faces and two on the other three faces. Such a cube will allow you to play any purchased game, because you will only need to move one or two steps forward, and the baby will cope with this. But it will be even more interesting if you and your child come up with and make your own game. Its topic depends on the interests of the baby. Maybe it will be an underwater odyssey, maybe a rally, or perhaps fun adventures with your favorite cartoon characters. On a sheet of paper (it’s better if it’s large), draw a path with circles (they can be made using a stencil). This is your main path. Now design the playing field as you wish. You can draw by hand. You can paste pictures from old books or read children's magazines. If you don’t want to spend too much time thinking about it, buy stickers with cartoon characters. Little princesses will surely love this homemade game about their favorite Barbie doll. Fortunately, there are plenty of stickers with it on sale. And if you spend a little more time and make task cards, the game can become truly exciting. To do this, buy a pack of paper (preferably cardboard) for notes and on each piece of paper write some task: guess a riddle, answer a question, recite a poem, depict some animal using pantomime, etc. If your child is actively interested in mathematics, the assignments can be mathematical. If you are learning to read right now, these could be games with letters, syllables and words to read. It would be good if all the tasks were somehow related to the plot of the game. Now we mark some circles on the playing field with a colored felt-tip pen. When a chip lands on any of them, the player takes a card out of the pack and completes the task. Or maybe you can come up with a collage game based on family photos about your family's adventures? Or a game about the baby himself, about his daily routine? Believe me, this kind of fun will be your favorite, much better than any, even the most wonderful and colorful store-bought one. Here are some more simple ideas for walking games.
For the treasures! This unusual and exciting game is very easy to make. It will not only entertain you on a rainy day, but will also help your child master basic counting. Paint a white sheet of paper (preferably a larger one) in two colors: one third yellow (this is the sandy shore) and two thirds blue (this is the sea). Along the sea, parallel to the shore, draw 10-12 blue wave lines. Mark the “port” on the side of the sea far from the shore. This will be the starting line. For the game you will need small shells, pebbles, and coins. Scatter them on the “shore” (these are treasures). Now you need to glue a paper cube with points from one to three (opposite faces contain the same number of points.) The pieces in the game will be boats (the inside of matchboxes). You can paint them and make paper sails on masts using toothpicks that can be stuck into a piece of plasticine. So, let's start the game. The players' ships line up at the right time. We roll the dice one by one and move the required number of waves. Having reached the shore, we load one of the “treasures” into the boat and return to the port in the same way. And then we set sail again. At the end of the game, we count our trophies and determine the winner. This fun competition game is especially fun to play with a group of kids or the whole family.
Fun colors. If your baby is learning about color right now, make alternating circles of six colors on the playing field. The cube, accordingly, must have colored edges. Whichever color appears on the die, move the chip to that circle. First, the baby will learn to match identical colors, and then remember their names. Next to the colored circles, you can draw objects of the corresponding colors: yellow chicken, red tomato, green cucumber, etc.
Boring English. The walking game will also be a good helper in learning English words. Just stick all kinds of pictures on the playing field one after another (you can use the same stickers or magazine clippings), throw the dice and move the chip along them. Whichever picture they stopped at, they named the word in English. You can learn Russian (Ukrainian, English) letters in the same way. Draw circles with letters on the playing field. We stopped at a letter and remembered its name.
“Moo-moo,” “woof-woof.” There may also be pictures with animals on the playing field. The chip stops on the dog - the baby says: “woof-woof.” They hit the bear and growled menacingly. For an older child, ask them to name the animal or tell something about it: wild or domestic, where it lives, what it eats, what kind of fur it has, tail, ears, etc. In this way, you can get acquainted not only with animals, but also with plants, transport, dinosaurs, dog breeds, in a word, with everything that arouses the child’s interest.
Photos of educational crafts
0