Types of puppet theaters and materials
Any parent can create their own home theater. You can also involve a child in this matter. Surely in this case the process will be more fun, and the baby will be busy.
For work, something that many people will definitely have at home is suitable. Even some waste materials will come in handy, so don’t rush to scrap them.
It could be:
- Disposable plastic tableware,
- Felt,
- Boxes of different shapes and sizes,
- Colored paper/cardboard,
- Rolls of paper towels, foil or toilet paper
What types of dolls are there?
- Stationary
- On hand
- Finger
Paper
Paper is one of the simplest and most accessible materials for creating crafts on the theme of puppet theater.
Sock theater
Sock characters are funny, because on a long neck they only have a head with an opening mouth. Geese, snakes and fantasy characters are made from socks.
Interesting theater-themed crafts can be made from plastic spoons, empty plastic cans and much more. Competition at school
School crafts on a theater theme can be made using different techniques.
Option 1
A three-dimensional applique is suitable for a school competition.
You will need:
- colored paper and cardboard;
- velvet fabric;
- glue, stapler.
Progress:
- Print the facade of the Bolshoi Theater and the ballerina.
- Fold the A4 sheet in half, stick a printout of the facade on the top, decorate with columns made of paper (screw it onto a tube).
- Decorate the inside of the folded sheet with velvet, and stick a ballerina figurine on top.
Option 2
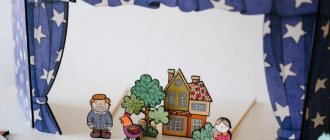
A miniature theater with your own hands will attract the attention of spectators who will examine the crafts.
You will need:
- small rectangular box;
- fabric, twisted cord;
- chenille wire;
- plasticine, threads;
- decor – voluminous stars, sparkles.
Progress:
- Decorate the box as a stage. To do this, cut off one of the wide sides of the box to create a stage. The inside is covered with white paper, the floor is made brown or green.
- A small horizontal curtain is placed above the fabric stage; the side parts of the curtains are decorated with fabric. The folds are draped and secured with a twisted cord. They also cover the top of the box to disguise the connection between the fabric and the cardboard.
- The body of the characters is made of plastic, plasticine, self-hardening mass; arms and legs are made separately from the same materials. They are attached to the figurine with chenille wire. Threads are attached to all parts of the figurine, which are led up into the wings, where they are secured. The result is a puppet figurine.
Option 3
Many schoolchildren are interested in origami. This is an excellent material for creating crafts for a competition.
You will need light green, blue and purple stripes, a ready-made mask, glitter glue, and acrylic paints.
Progress:
- Design a mask. Draw the eye in black and the mouth in blue. Around one eye, make fancy patterns of blue and purple colors. Add glitter.
- Roll paper into rolls and make petals.
- Place a mask on the base—a sheet of cardboard—and place rolls and petals around it. Decorate with sparkles.
Option 4
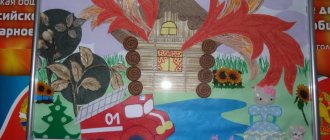
Almost every home has a lot of scraps; they will be useful to make a bright panel on a theatrical theme.
Having determined the plot, they make a full-size diagram of the future panel and select scraps of different colors and textures. Elements are cut out from them and sewn on by hand or by machine.
The combination of flat and three-dimensional elements on a panel looks interesting; knitted or sewn parts are suitable for this.
Option 5
High school students will love the collage idea. The frame is used as a basis, the backdrop is covered with canvas.
The frame can be:
- made of wood, narrow or wide;
- antique tinted;
- baguette with patterns, painted gold.
The frame is decorated with old theater posters, programs, printed faces of actors, masks, and dried flowers. The edges can be decorated with fabric curtains.
First way
You will need:
- Paper or cardboard,
- Cereal box/desired size,
- Plastic straws,
- Wooden sticks,
- Glue,
- Scissors,
- Paints,
- Pencils.
Progress:
- On thick paper, depict the characters of the chosen fairy tale or story.
- After they are cut out, glue tubes or sticks on the inside.
- The box will act as a stage, so you will need to cut out the "screen" or one of the larger sides.
- A slot is also made in the lower part. Prepared figures of heroes on sticks should be inserted there.
Such a theater is either installed on a stand or hung around the neck thanks to a ribbon attached to the box.
Competition in kindergarten
Kindergartens often hold competitions, including on the theme “theater”.
Option 1
Most kids aged 3 years and older love to make things out of Lego pieces.
Lego is also useful for creating crafts on the theme of “theater” with your own hands.
You can build a stage and place puppet actors on it:
Another option for using Lego is to make a shadow theater.
Progress:
- You will need Lego elements, a Duplo Lego plate, a white A4 sheet, and a flashlight.
- Use Lego pieces to make a small stage, decorated with decorative elements, with side columns.
- Place a sheet of paper between the columns.
- Behind the sheet, make another scene on which the characters will be displayed.
- Place the flashlight so that the light falls on the figures.
The theater is ready for performance!
Option 2
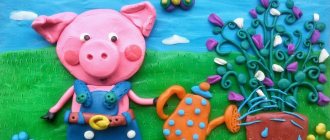
Children aged 4-6 years will be happy to make theatrical appliqué from paper and scrap materials. The application is dedicated to the heroes of the fairy tale “The Three Little Pigs”.
Progress:
- Prepare materials - sheets of multi-colored cardboard, scissors, glue, as well as straw and sticks.
- Cut out 3 piglets from pink cardboard.
- Cut out templates of 3 houses from white cardboard. Each house should be decorated differently. Cover one with straw, the other with sticks, the third with bricks cut out of brown cardboard. Don't forget to make the windows and doors out of blue cardboard.
- Glue the parts onto a sheet of bright cardboard. The work is ready!
Option 3
A box from which you can make a stage screen will come in handy. Video to help solve this problem:
Option 4
You will need a picture frame, colored cardboard, scissors, thread, glue.
The characters of the chosen fairy tale are cut out of cardboard - they will be flat. You can decorate them by making hair out of threads and gluing ready-made eyes. The characters are fixed in a frame, it is decorated in the spirit of a fairy tale - trees, flowers, a hut are glued to the sides.
Option 5
For kindergarten you can make an applique from paper “Theater Masks”:
- Cut out the outline of the face from sheet A4.
- Bend it in the middle and cut it - you get a protruding nose.
- Make slits for the eyes.
- The child can paint the mask himself to his liking.
You can make a Venetian mask using cardboard. A cardboard mask can be decorated with beads, sequins, and shiny ribbons. The nose will be a cork from a plastic bottle.
Option 6
If you paint flat stones with acrylic paint, you get a stone theater.
Second way
As a base for the characters' bodies, either homemade paper tubes or ready-made paper towels or toilet paper are used.
Depending on whether the doll will fit on your hand or on your finger, the size itself is selected. The scene is also made out of the box, as in the previous version.
This craft can be made for kindergarten or for some event.
How to make characters for a children's home theater?
Who will be an actor in a theater at home for children? Of course, children and you! But as an actor you will need fairy-tale characters to play with. There are three options:
- Use regular toys. But this option, oddly enough, is rejected by the children themselves.
- Make masks for yourself and your children and turn into fairy-tale characters yourself.
- Make theatrical puppets yourself. The process can turn into a fun time for the whole family.
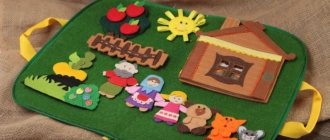
Ideas for hand-made fairy-tale characters:
- Mitten dolls made of colored felt. These dolls fit on your hand and are ideal for a screen in a doorway. Mitten dolls are easy to make yourself. Colored ribbons and buttons are used as decoration.
- Finger puppets. They are made in the same way as mitten characters (can be knitted from yarn), only in smaller sizes, as they are put on the fingers.
- Paper dolls. You can buy ready-made sets in the store or print them from the Internet. For stability, such characters are glued to matchboxes or small plastic cups. Recommended for tabletop children's theater.
- Volumetric dolls. They are made from plasticine, salt dough, papier-mâché, and can be combined with fabric. It will take time to make them, but they will be the most expressive and interesting characters.
You can read more about making dolls here: https://portalrebenka.com/detskaya-komnata/masterim-domashnij-kukolnyj-teatr-svoimi-rukami-ot-a-do-ya.html
Or here: https://www.maam.ru/detskijsad/kukolnyi-teatr-svoimi-rukami-ochen-prosto-i-bystro.html
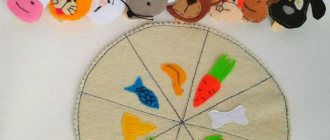
Felt finger puppets
Here we will talk about felt crafts for elementary school on the theme of theater. This dense material will allow you to create many detailed and at the same time simple dolls. They are usually the right size for a finger theater.
To make them you will need:
- Felt in several colors
- Threads, needle,
- Scissors,
- Glue,
- Paper and cardboard.
Finger Theater
This type of theater in kindergarten is the simplest and is suitable for all children, since the kids themselves can take part . The process begins with choosing a fairy tale. Children, starting from two years old, already remember many fairy tales and can retell them.
Creating doll characters begins with drawing the characters on a sheet of paper. There are no limits to a child's imagination here. You can also use ready-made templates for fairy-tale characters, but what the children themselves drew will be more valuable to them.
Glue what the children drew onto a paper finger tube. You can simply apply a drawing of the head of a fairy-tale character onto a conical tube. If the finger theater is flat, then it is necessary to cut out two holes in the doll blank for the child’s fingers, which will actually be the legs of the fairy-tale character.
Option with puppets
- To do this, you need to prepare a sketch in advance. There should be several elements: a large main part, hair, clothes, handles, and for animals - a muzzle.
- The next stage is transferring the pattern onto felt. Colors can be chosen to suit your taste or the child's wishes. So in photos of various theater-themed crafts you can often see pink bunnies or multi-colored cats.
- Next, once all the parts are cut out, it is better to carry out a test assembly. Thanks to this, it will be possible to correct possible errors or remove inaccuracies in a timely manner.
- The final assembly of the character should begin with the main part, adding other elements to it. You can fasten them either by sewing or using a glue gun.
Hand puppets for home theater
Felt doll
Will need
- Sketch of a puppet toy.
- Two sheets of felt, A4 size.
- Small pieces of colored felt.
- Thread and needle.
- Glue gun.
- A sheet of thin cardboard.
We start work by creating a pattern. To do this, draw the sketch onto a sheet of cardboard and cut it out. You will get the main pattern of the figure and individual small details: eyes, muzzle, palms, tummy, ears. The number of details depends on the choice of sketch of the puppet hero.
Then we transfer all the details onto felt. We select the color scheme according to our taste or the content of the fairy tale. The hare can be white, gray or pink, and the fox yellow or orange. If you are doing a craft with your child, let him choose what color the characters in your play will be.
We cut out the parts and pre-assemble the toy, placing all the parts in the places where they should be. If the result is satisfactory, we begin the final assembly. First, we make one main piece out of felt. We sew on all the parts that can be sewn. We sew with a buttonhole stitch. We glue small parts with a glue gun. We put all the parts together in accordance with the sketch.
If the toy has ears, we attach them last. To do this, we fold the two main parts with the right sides facing inward. We apply the ears in such a way that the edges of the part coincide with the edges of other parts, and the tips of the ears look inward. We sew all the details along the edge with a buttonhole stitch and turn the toy inside out. The glove puppet is ready, and the ears will stick out funny on the top of the head.
Sock puppet
Original dolls are made from ordinary children's socks.
To make it you will need a sock, cardboard, a small skein of thick thread or yarn, pieces of fabric for the mouth, sewing thread and buttons, and a glue gun. You can take a sock in a plain color or with a pattern, polka dots or stripes - all this will create the image of a future toy.
We make a blank for the mouth from cardboard. To do this, fold a cardboard rectangle 7 cm wide and 20 cm long in half. We round the corners along the width. From the fabric for the inside of the mouth we cut out a blank according to this template.
Trim the toe of the sock. We cut off the edges along the edge of the workpiece. Glue the cardboard blank inside the sock using a glue gun. At the same time, we fold the edges of the fabric onto the cardboard. Glue the fabric interior on top.
Making a hairstyle for the puppet. Take thread or yarn and wrap it around your hand several times. Tie in the middle and cut the ends. If you spread your fingers wide, you will get a long hairstyle. Sew the hairstyle to the sock.
Let's make eyes. We take two buttons and sew them to the sock, overlapping one on top of the other. You can use ready-made eyes or ones drawn and cut out of cardboard. You can complement the image with any details, make eyes from balls of cotton wool or add decorative elements.
Decoration and background
- Prepare in advance a diagram according to which the scene will be created in the future.
- The cut out elements are sewn onto the front side of a thick sheet of A4 felt.
- The next step is to sew together 2 sheets: a blank with decor and a felt backdrop.
- Cardboard is inserted between two fabric sheets for compaction. It should protrude a few centimeters. This strip is folded to form a stand.
Shadow play
One of the famous and interesting types of puppet theater. The main focus is on the silhouettes of the dolls, so the main challenge is to make the characters recognizable through their outlines.
A short master class on creating crafts related to shadow theater will help you organize an exciting performance at home.
Everything for a child's development
We offer two master classes on making a shadow theater for children at home. You will learn how to make a screen and actors for a theatrical performance from light and shadow with your own hands, get acquainted with the theater of manual shadows, download templates for figurines of fairy tale heroes and find useful tips for working with shadow theater.
Shadow theater helps children get acquainted with theatrical activities in a fun way, develop speech, show imagination, encourage children to actively interact, communicate, etc. Theatrical performances can be performed with children of all ages, both in a group and individually.
(Links are provided in the text for reference.)
Lego Shadow Theater
We present a step-by-step master class with photographs on how to make a shadow theater from Lego Duplo or its analogues.
Necessary materials:
- Lego Duplo constructor (My-shop.ru, on Ozone: activate the discount promo code OZONBDJ91B )
- Lego Duplo building plate green (My-shop.ru, on Ozone: activate discount promo code OZONBDJ91B )
- A4 sheet of paper
- phone with a flashlight function or other light source.
How to do
Build the frame of a theater stage from red blocks and adjacent turrets from multi-colored bricks.
Source: lego.com
Place a white sheet of paper between the structures.
Build a stage behind the screen and use the blocks to make a phone stand. Place the light source in front of the paper sheet.
Decorate the theater and prepare the actors for the performance.
Turn on the flashlight on your phone and start the show.
Shadow theater "The Gruffalo" out of the box
Create a shadow theater with your own hands based on the popular book by Julia Donaldson “The Gruffalo” (Labyrinth, My-shop.ru, on Ozone: activate the discount code OZONBDJ91B ). “The Gruffalo” is a fairy tale in verse for adults to read to children. A little mouse walks through a dense forest and, in order to escape from a fox, owl and snake, invents the terrible Gruffalo - an animal who loves to eat foxes, owls and snakes. But can a resourceful mouse outwit all the hungry predators? After all, he knows very well that there are no Gruffalos... Or do they?
Source: domesticblissnz.blogspot.ru
Necessary materials:
- printable hero templates (download here);
- A4 paper;
- black cardboard;
- wooden skewers;
- scotch;
- glue;
- cardboard box;
- scissors.
How to do
1. Download and print templates with characters for the shadow theater. Glue onto black cardstock.
2. Cut out the figures and glue a wooden skewer to each.
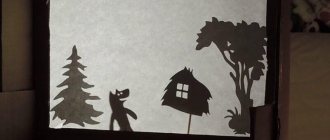
3. We make a screen (screen) for a shadow theater.
Lay the box flat. On the large rectangular parts of the box, draw a frame, stepping back 1.5-2 cm from the edges. Cut along the marked lines.
4. Assemble the box in its original state, but with the colored side facing inward.
WE RECOMMEND ON LABYRINTH.RU 5. Take a sheet of white A4 paper and cut it to the size of the box. Cut out a rectangle of the same size from black cardboard.
6. Cut out trees from black cardboard and glue them onto a white sheet.
7. Glue the paper to the inside of the box as shown in the photo below.
8. Make a slot at the bottom of the box for the figures.
9. Secure the screen to the edge of the table with tape.
10. Install the lamp at the back at a distance of 2-3 meters from the screen. For clear shadows, the light must fall directly and not from the side. Be sure to warn your child to be careful around the hot lamp.
The shadow theater is ready! Turn off the lights, invite an audience and perform a shadow show.
WE RECOMMEND:
Shadow theater on OZON.RU (when ordering, enter promotional code: OZONBDJ91B for a +300 RUR discount on your first order).
Hand shadow theater
Hand shadow theater is one of the simplest types of shadow art. To equip it you will need the most common items - a table lamp and a screen - a large sheet of white paper or cloth. If the room has light walls, a theatrical performance of light and shadow can be shown directly on the wall.
The pictures show how you can use your hands to create silhouettes of animals, birds, and people. With practice, you can bring the shadows to life and show your own story.
Tips for working with shadow theater:
- You can start introducing children to shadow theater at the age of 1.5-2 years. The first classes should be held as a theatrical performance, when the roles are played by an adult, and the children act as spectators. After the child understands the rules and traditions of theatrical art, he can be included in the game as a participant in the action. Children play and voice roles, learn texts and poems. At first, trust small, simple roles. Then gradually make it more difficult.
- Cardboard figures of shadow theater actors should be black, then they will be contrasting and noticeable on the screen. To make your own figures, use curly stencils. If you plan to reuse your homemade figures, we recommend laminating them.
WE RECOMMEND
- To ensure clear shadows, place the light source behind and slightly to the side of the screen. The light source will be a regular table lamp or flashlight.
- The size of the shadow on the screen depends on the distance from the figure to the lamp. If you bring the figure closer to the screen, its shadow will become small and clear. If you place it further away, the shadow will increase in size and the contours will be blurred.
- To ensure that the decorations do not move during the performance, attach them to the screen itself using tape or paper clips.
- What paper, tracing paper or a white sheet are perfect as a screen. The smaller the screen you use, the thinner and more transparent it needs to be, and the brighter the light source you need.
- In order to create a theatrical atmosphere, you can draw a poster, tickets and even arrange an intermission.
WE RECOMMEND:
Board game “Shadow Theatre. Theater on the table" (Labyrinth).
“Shadow Theater” is a unique educational play set with which you can organize an unusual theatrical performance at home! Contents: - theater screen (260 x 246 mm) - phone stand - figurines of fairy-tale characters - 28 pcs. (height up to 14.5 cm);
Templates for shadow theater
We offer to download and print templates of fairy tale heroes and other templates for shadow theater (pdf files).
Set “6 fairy tales”: “Kolobok”, “Teremok”, “Ryaba Hen”, “Turnip”, “Fox and the Hare”, “Masha and the Bear”.
Decorations for the set “6 fairy tales”. Allows you to additionally stage 2 more fairy tales: “The Fox with a Rolling Pin” and “The Fox and the Wolf.”
Fairy tale "Zayushkina's hut."
Fairy tale "The Three Little Pigs".
Animals and birds: dog, eagle, squirrel, hedgehog, bear, hare.
Domestic farm animals.
Animals, birds, fish.
Dinosaurs.
Source: adventure-in-a-box.com
Fairy tale "Little Red Riding Hood".
Fairy tale "The Princess and the Pea".
Fairy tale "The Fox and the Crane".
Fairy tale "The Three Little Pigs".
Undersea world.
**************************************** ****************** We recommend the game set “Shadow Theatre” (My-shop.ru, Labyrinth).
You have a portable “Shadow Theater” in your hands! It has everything, like in a real theater: stage, light, decorations, actor figures, posters, tickets. And also, two scripts with a detailed description of how to conduct performances: based on the English song “The House That Jack Built” and based on the fairy tale by Alexander Sergeevich Pushkin “The Tale of the Fisherman and the Fish”. Strengthen the stage! Install the lights! Put up decorations and lights! Collect the figures! Rehearse the performance! Hang up the poster! Hand out your tickets and the show can begin! **************************************** ******************
SIMILAR ARTICLES:
- fine motor skills,
- finger games,
- templates
Stage 1. Scene
Materials:
- Medium size box
- Ruler,
- Scissors,
- Pencil,
- Paper,
- Glue or stapler
- You need to get a large rectangle from the box. One of the main sides should be without folds. The outline of the screen is drawn on it, with an indentation of five centimeters from the edges. The resulting rectangle is cut out.
- The size of the paper sheet should be larger than the resulting hole. The screen is glued on the back side. Additionally, it is secured with a stapler for strength.
Stage 2. Heroes
Necessary:
- Pencil,
- Cardboard,
- Scissors,
- Glue or stapler,
- Straws,
- Tubes or wooden sticks
1. The silhouettes of the characters are transferred to cardboard and then cut out along the contour. They must be recognizable, with characteristic features or shapes. The scenery is created in the same way.
2. The cut out elements are attached to sticks with glue or a stapler.
Non-standard theater
In addition to standard and popular children's crafts, you can arrange your own performance using non-standard materials.
An original solution would be disposable utensils made of plastic or wood, in particular spoons. Selected characters are pasted or drawn on them, and decorated as desired. By the way, it is better to use acrylic paints for painting.
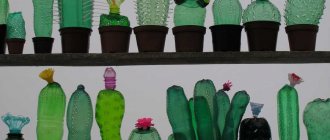
Yogurt jars, as well as plastic bottles of interesting and unusual shapes. They, like dishes, can be painted or covered with colored paper. In addition, you can make mini-scenes with decorations from bottles and arrange small stories there.
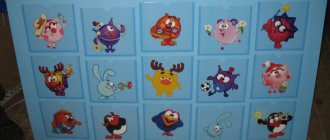
Smeshariki from disks
Recently, Smeshariki from the popular Russian cartoon has become increasingly popular. They are reflected in many types of art and crafts. To make Smeshariki from disks with your own hands, you will need:
- computer disk;
- scissors;
- glue;
- colored paper.
To do this you will need a regular blank, which is no longer needed. From thick colored paper, cut out eyes, legs, arms, ears and other body parts that are needed for the selected character.
DIY scene
To fully understand how to make a full-fledged theater-themed craft, all that remains is to create a stage. It is an important part of the production because it is where the action takes place.
- The simplest and fastest option is a plain fabric used to cover the doorway. A horizontal cut is made in the center for the dolls.
- The next simple way to build a home stage is to place two chairs with their backs facing each other and cover them with fabric.
Previously, the option of using cardboard boxes was considered. It is time consuming and requires more effort, but the results are definitely worth it.
- A frame is formed from several boxes by laying them out like bricks.
- There should be a window in the center, which will be curtained with fabric.
- For the background, all the folding parts and 2 walls of one of the boxes are cut off. A rectangle is cut out at its bottom.
- The walls are fixed in a certain way, in an angular position. This is done specifically for stability.
- Small cylinders are fixed at the folds. They will not allow the structure to develop during the presentation process.
- When the base is ready, it's time to add decorations.
Dolls
Fairy tale characters are made from a variety of materials. It is possible to focus on finger puppets or make individual figures. Doing this activity will help develop the baby’s speech and imagination.
It is not difficult to make such products. Do-it-yourself patterns for dolls for the puppet theater. A fairy tale is pre-selected, and then you need to think about how to make the main characters.
For one doll, two blanks are cut out and sewn together. Then they are decorated. If it is planned that the finger characters will be worn by a child, they should be made in the appropriate sizes.