Types of applications
Before you start learning how to make beautiful appliqués with your own hands, you should understand what types of this technique exist.
- Mosaic applique - first the contours of the image are drawn, then parts of geometric shapes and different sizes are glued inside it.
- If you twist colored paper into a spiral, the technique is called quilling.
- For symmetrical applique, before cutting out the part, the paper blank is folded in half.
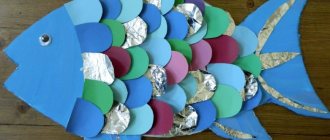
- A multi-layer applique is one that is created from parts of different sizes, small ones are glued onto large ones.
- If you trace the palm and use this figure as a base, you will get a palm applique.
Videos on the topic
This video presents very interesting facts about birds. For example, we learn that the linguistic abilities of parrots are at the level of a six-year-old child. The small bird hummingbird is capable of flying backwards. The fastest of all birds is the Peregrine falcon, its record is 200 km/h. And the vulture bird flies the highest - once a plane met it at an altitude of 11 thousand km. The fastest bird is the ostrich (70 km/h). There is a bird that has no wings at all - it is a kiwi that lives in New Zealand. The golden eagle has the most excellent vision: it is able to spot a mouse at a distance of 1.5 km, and a rabbit even 3 km away.
This video gives you the opportunity to admire the most beautiful birds on the planet.
Video on the topic “Studying the voices of birds”
Application classes on the theme “Birds” in the senior group are always exciting. An applicative image is more conventional than a drawing, so children can fully unleash their creative imagination. Such activities are also educationally useful - they teach children to take care of birds and notice the beauty of living nature.
Owl creation technique
- Take cardboard - it will be the base.
- Glue a twig cut from colored paper.
- Now paint the background with paints, you can paint with your fingers.
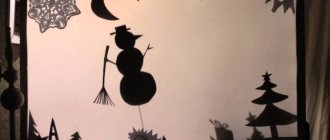
- Glue clouds, moon and other background elements as you wish.
- Using the templates, trace the outline of the owl on the branch with a pencil.
- Tear off pieces of paper and glue them inside the outline.
- Make a second layer on top of the first.
- You can draw the eyes and beak with felt-tip pens or make them out of colored paper and glue them on.
Paper plate craft
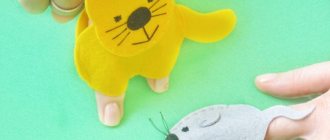
How to make such a bird craft? Disposable plates are taken. They are painted with the necessary paints and eyes are drawn on their surface, and a paper beak is also placed. The bird's wings and tail are best cut out of paper or made from real bird feathers.
You can also stretch a thread near the bird’s eyes, by which you can hang it, for example, on a chandelier, to then take wonderful photos of the bird’s crafts.
Firebird
The process of creating such a craft perfectly develops the imagination, because the character is magical and very bright.
- To make the head and body, cut out a ten-centimeter square piece from colored paper.
- Form a square into a triangle and bend along the larger side.
- Now expand the square - it is divided into four sectors.
- To get the body of the bird, glue both edges overlapping.
- The belly is the larger side, and the smaller side is the back.
- To create a chic ponytail, cut nine nine-centimeter strips - curl them or leave them straight.
- Glue three stripes to the back, six will serve as material for making wings also on the back.
- You can also make both the tail and wings using the palm technique.
- You can cut out eyes and other small details from colored paper or draw them.
- Attach the bird to the background on a branch of colored paper, decorate the background by painting it and gluing parts from colored paper.
Class notes
| Author's full name | Title of the abstract |
| Gladkova L.I. | "Birds at the Feeder" Educational objectives: learn to depict a bird using the tearing method, consolidate knowledge about the structure of birds. Developmental tasks: enrich preschoolers’ knowledge about the life of birds in winter. Educational tasks: cultivate a caring attitude towards birds. Integration of educational areas: “Artistic creativity”, “Cognition”, “Communication”, “Socialization”, “Health”. Demo material: pictures of birds, audio recording “Bird Voices”. Handout: colored paper, glue, brushes, napkins, felt-tip pens. Progress of the lesson: At the beginning of the lesson, an audio recording of “Bird Voices” is played. Children determine who they belong to. The teacher invites the children to guess riddles about birds:
The teacher leads the children to the fact that all these birds are wintering birds. There is a discussion going on: why they are called that, what they eat in winter, how we can help birds, what food the titmouse, sparrow, and magpie especially like. The teacher reads the poem “Feed the birds in winter,” and then invites preschoolers to imagine themselves as birds and say words of gratitude to the people who feed them. Physical school is carried out:
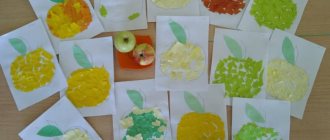
The teacher invites the children to use appliqué to depict the birds that have flown to the feeder. Each child has a bird template that they must “color” using cut out appliqué. Finger gymnastics “How many birds” is carried out:
Independent activity of children. Analysis of works. |
| Balabina O.A. | "Fairytale Bird" The teacher shows preschoolers a model of a tree on which toy birds are sitting. The guys call them. The teacher draws the children's attention to the fact that one bird is not like the others - it is fabulous. What indicates this is being discussed (brighter plumage, unusually shaped crest, painted tail). Then the children tell what common features the fairy-tale and real birds have (head, body, wings, tail, beak, eyes). Then the teacher asks the children to remember in which fairy tales magic birds appear (“Ivan Tsarevich and the Gray Wolf”, “The Firebird and Vasilisa the Beautiful”, “The Little Humpbacked Horse”). The teacher shows the preschoolers slides depicting fairy-tale birds, and then asks the children to use their imagination and decorate the silhouettes to make a beautiful fairy bird. Relaxation is carried out to the musical accompaniment of “Transformation into a fairytale bird”: The teacher demonstrates how to cut out a symmetrical silhouette of a bird without a tail. Please note that only the body can be glued, and the head and neck will be slightly bowed - this will give the image life. The children design the shape and color of the feathers according to their wishes. The more unusual and colorful the bird is, the more joy it will bring. Finger gymnastics “Small Birds” is carried out:
Productive activities of children. Analysis of works. |
| Uzunyan A.N. | Christmas tree toy “New Year’s Cockerel” The teacher asks a riddle about a rooster:
The teacher informs the children that the Year of the Rooster is approaching and tells interesting educational information about this bird. This poultry is bold and cheerful, although it has a peculiar character. The rooster also has unique abilities: he can remember up to a hundred chickens or people, and his cry can be heard two kilometers away. Roosters and hens are capable of worrying about each other and feeling sad. In addition, preschoolers will be interested to know that roosters and chickens are descendants of dinosaurs. Next, the children are invited to decorate the Christmas tree that stands in the group with a cockerel, which they will cut out of colored paper and then decorate with applique details. Practical part of the lesson. |
| Adodina S.B. | "Penguins on an Ice Floe" (collective application) The teacher tells the children that today she had a wonderful dream - she found herself in a magical land. Everything there is white and very cold. And in this country she saw an amazing bird and asked a riddle:
It was Styopa the penguin who was in trouble. His family lived on a large ice floe, but the curious Stepa wanted to take a walk to find out what was happening on other ice floes. When he returned, he did not find his family - they sailed on an ice floe into the ocean. Styopa cried a lot. And the teacher asks the children to help the penguin - to portray his family. The body shape and coloration of the penguin are discussed. A physical education session is held:
Independent activity: Each child makes a penguin, glues it onto a paper ice floe, and then glues their craft onto the panel. |
Crafts made from dry leaves
To create a firebird from dry leaves, prepare dry leaves, a glue gun, paint, and a sheet of cardboard.
- For the background, paint cardboard or use colored cardboard.
- Spread the paper and carefully arrange the leaves, and then color them.
- Now dry the leaves. Apply hot glue to the cardboard and glue colorful leaves.
- To do this, there must be an adhesive layer on the cardboard sheet, as well as spot-applied glue on the leaves.
- First, form the shape of a tail, then a larger leaf that stands out in shade - this will be the body of the firebird.
- Paws and eyes can be made from colored paper or cardboard.
- The magic bird is ready!
Migratory birds
Materials you will need:
- Sheet of cardboard,
- colored paper,
- And also scissors
- Paints and glue.
Operating procedure:
- A piece of cardboard is the sky.
- Color it or get a colored one.
- Cut out clouds from white cardboard and glue them to form a background.
- Draw and cut out the birds and then glue them to the cardboard.
- Draw the details - eyes, feathers, beak, and also add trees and other elements as desired.
Feather birds
Feathers also make great bird crafts! For example, a craft made from a pine cone, paper and feathers will be an excellent interior decoration.
In order to make such a craft, we will need:
- Cone;
- Multi-colored feathers;
- Thick paper for making the head and paws;
- Glue gun.
Before starting work, the pine cone must be dried in the oven for 20-30 minutes. This will get rid of excess moisture and insects inside.
The dried cone can be painted with paints, or you can leave the natural color and texture. We glue the cut out parts of the paws to the bottom of the cone, and also glue the head to the pointed end of the cone. You can glue toy eyes to your head, or you can draw them yourself. Now all that remains is to attach the feathers. We carefully place them on glue. The more feathers there are, the more magnificent the bird’s “hair” will be.
Related article: Flower beading: patterns for beginners with photos and videos
There is also another way to make a bird from feathers.
We will need:
- 2 sheets of cardboard (white and any color);
- Glue;
- Scissors;
- Feathers.
Cut out the silhouette of a bird from white cardboard. In our case, this is the firebird. The silhouette, starting from the tail, must be covered with feathers. You can stick them on top of each other. Then we glue the cutout with feathers to colored cardboard. The painting can be framed and will be a great decoration for any room in your home!
Chickens
In order to make a craft with the image of funny chickens or other poultry, take a sheet of colored cardboard, cotton pads, a brush with paints, as well as glue and plasticine.
- The entire cotton pad will play the role of the head, as well as the body of the bird; if you separate half of the disc, you will get wings or a tail. Pre-paint them with paints and then glue them to the cardboard.
- All other elements (paws, eyes, beak) can be made from plasticine.
- To create a goose or chicken, you need to make a printout with a picture of a bird, and also stock up on a piece of cotton wool and PVA glue.
- Roll cotton balls to fill the image.
- You can also add colors to your work - paint some elements if necessary, add details.
- This way you will get a bird with plumage, the effect of which is created by cotton wool.
Bird applications for different age groups of children
The most effective way to show how to work with appliqué is by using the example of poultry - children encounter them most often, if not in real life, then in pictures in books, in alphabet books, on blocks, etc. so it will be easy for even kids to imagine a duck or a cockerel.
To work in the younger group, you should prepare cotton pads, sheets of colored cardboard, plasticine, paints and brushes, as well as glue and scissors with “blunt” tips.
The head or body of a bird is made from a whole disk; disks cut in half will serve for the wings or tail. These parts are glued to the cardboard in the appropriate order and painted. Paws, beak, comb and beard, and eyes are made from plasticine.
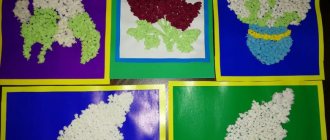
A little more complex work can be done in the middle group. To do this, you need to print out images of birds in advance, prepare cotton wool, PVA glue, felt-tip pens and paints.
First, the contours of the body, head, wings and tail are outlined with a felt-tip pen. Then small balls are rolled out of cotton wool and glued inside the outline with glue. When the entire image is filled, the cotton wool can be painted. Parts can also be made from plasticine.
An even more difficult application should be offered to children in the preparatory group. To do this, you will need rooster and hen templates, thick white sheets, paints and brushes, colored paper and napkins of different colors, scissors, a hole punch and glue.
The operating procedure is as follows:
- first you need to paint a white sheet with paints, depicting the sky, the sun, grass on it, and leave it to dry;
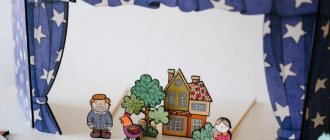
- a house, a roof, a fence is depicted on colored paper, after which the details are cut out and pasted onto the dried drawing;
- the cockerel and hen are carefully cut out along the contour on the template;
- napkins are torn into small pieces, from which lumps are rolled up - they can be used to glue the breasts of birds, the head;
- Confetti is prepared from colored paper using a hole punch - circles are glued like feathers on the wings and tail;
- the beard and comb of the cockerel are painted over with red paint;
- The birds are glued to the base.
The joint work of groups of different ages will look great - a large poultry yard made of appliqués made on a large sheet using different methods and materials.
Working on the image of an owl is also perfect for collective creativity. Adults should only draw the body of the bird along with the head on a large sheet of paper.
Each child should be given the task of making a feather for a bird. There is no need to dictate exactly how this should be done - let the children use their imagination. The finished feathers are collected into a tail and glued to the base.
Now you can start decorating the body and head - someone should roll balls of cotton wool or use a hole punch to make confetti from multi-colored paper, someone should stick on the decor, someone would paint the details, someone would sculpt a beak and paws from plasticine.
Cockerel and hen
- Take a white sheet of paper, a brush with paints, images with a pre-printed chicken and cockerel, colored paper, napkins of different colors, and you can’t do without a hole punch, glue and scissors.
- Prepare your future background: for this you need to paint a white sheet of paper and draw on it the background elements that you come up with.
- Illustrate the earth as well as the sky in your work.
- You can use colored paper to create images of a house, fence and other details.
Now cut out the birds.
- You can move on to decorating the characters of the craft - cut out feathers from colored paper, twist lumps from a napkin, a hole punch will be useful for making confetti.
- Glue the resulting plumage, now you can glue the birds to the background.
- If you wish, you can create a large work in a group, which will include an entire poultry yard.
There are many techniques for creating applications with images of birds. Using those presented in this article, you will create unique paintings that will decorate your child’s room, and the process of creating this masterpiece will give him a lot of positive emotions.
Also, all these techniques can be safely used for classes in kindergarten, all of them will develop the imagination of children and teach them to be neat, and will give them experience in running their own small project.
Specific options for compositions within the theme “Birds” in the senior group
An application on the theme “Birds” can be offered to students in the senior group at any time of the year. So, for example, in the fall it could be variations on the theme of poultry: “Golden Scallop Cockerel”, “Chicken”, “Duck with Ducklings”, etc. As for the cockerel, such work can be done on the eve of the New Year, and the theme can be identified, like “Cockerel is a New Year’s toy . In the fall, you can also organize a lesson on the topic “Birds fly south”; it is best to design it as a group work.
In winter, it is advisable to offer the children a collective composition on the theme “Birds at the feeder” (this could be titmice, sparrows, bullfinches or various birds). In the spring, an individual work “Birdhouse” , on which you can plant a mischievous starling.
Since April 1 marks International Bird Day, this will be a great opportunity to conduct an applicative lesson on this topic. Children can make birds that they have not considered before - an owl, a stork, a swan, a swallow, a crow and many others.
In general, as for the collective composition in the senior group, the teacher should pay enough attention to it - the joint result is always richer in content and color design. There are two forms of work here - the whole group and several subgroups. The value of this type of activity is that it unites preschoolers with a common goal and all children are interested in the overall result.