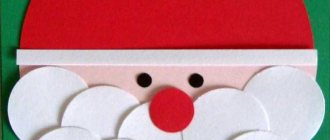
Simple crafts from plasticine
Children aged 1–2 years can easily roll balls, flatten them with their fingertips and glue them to pictures. Little hands cope with wax plasticine, heated in mother’s hands.
Adults and children perform simple crafts in a circular motion:
- Multi-colored balls for the Christmas tree.
- Grains for chickens.
- Sunflower seeds.
- Leaves for flowers.
- Black dots for the back of the ladybug.
- Wheels for a car.
The second technique that young children learn is how to make thin sausages. The plastic pieces are rolled out between the palms with straight movements. The results of the work are used as zebra stripes or rungs on stairs.
We sculpt plasticine figures with children from 1 to 2-3 years old
Rating: 5/5 (4)
We all sculpted from plasticine. Some with pleasure, others because that’s what the mother and teacher wanted. In our time, plasticine was hard, the color palette was the same, and heating it on a radiator was considered a crime.
Today, plasticine is so diverse that even a 2 or 3 year old child can sculpt from it; for him it will be an exciting fun and educational game. Is this activity useful, how to engage a little one in it, what can be sculpted from plasticine with children 1, 2 and 3 years old, what templates to choose, how to organize a place for classes - we’ll figure it out now.
The benefits of plasticine modeling for children
Many young mothers have heard about the benefits of exercising with plasticine. Here's how they're useful:
- Development of fine motor skills. The fine motor center in the cerebral cortex is located near the speech center. By stimulating the first one with modeling, you develop the second one. Children who put on a lot of stuff before the age of 5 never see a speech therapist.
- Development of tactile sensitivity. Plasticine has its own texture, which can be easily changed. The baby will learn to recreate the textures of different objects by feeling.
- Developing mindfulness. The baby will sculpt what you show him in the picture or make yourself. Starting with simple things like a ball, you can move on to more complex ones. The baby will convey the shape and texture of the sample object, and attention to detail will appear.
- Perseverance. During a period of active growth, it is difficult to sit a child down for 5-10 minutes; he wants to move. However, changing the shape of plasticine will easily occupy him during this time and instill in the baby the concept of perseverance.
Plasticine worm
A poem or a fairy tale about a worm will help get kids interested in modeling. Adults come up with their own stories or find material in books. They also prepare a background of flowers, trees, and grass for applique. In the picture they draw a bend line for a plasticine craft. Then the kids are taught to make a worm with their own hands:
- Identical balls for the body are rolled from the pink pieces.
- Flatten with fingertips.
- Glue to the line, overlapping the circles.
Now they roll one ball for the head, two smaller ones for the eyes. The mouth is made using a stack. All parts are attached in place. After class, the children are praised for their diligence and told that they have created a beautiful applique.
Step-by-step plasticine modeling lesson for 2 year olds
It is very easy to work with children of this age, because they will repeat everything after you.
Don't choose complex shapes; start with balls and squares. Making a ball step by step is very simple:
- Buy soft honey plasticine in advance, which does not need to be heated in your hands for more convenient modeling. If this is not the case, then you can take a regular one, but let it stand for a few minutes in the sun.
- Let the baby tear off any piece of plasticine. We tear ourselves off too.
- We show by personal example how to roll it in your palms so that it takes the shape of a ball.
- Let him make several balls, and your task is to make a cone for them, in which he will put them and you will get ice cream. The child is happy, but what else is needed?
Don't choose complex shapes, start with balls and squares
To make a square, the resulting ball must be pressed with your index finger and thumb on several sides. This will not be difficult for a child, the main thing is to teach him to control the force of pressure.
Plasticine caterpillar
The principle of making the second craft is similar, but only the balls are made from green pieces. They also additionally make an elementary pattern - holes in circles. The background for the applique can be borrowed from the fairy tale “Apple House”.
It tells that a caterpillar lived in a red apple, and a bee flew to visit it. In the evenings they sat together on a branch and watched the sun go to bed. The picture will be clear, because 2-year-old children are already very familiar with these characters.
Modeling from plasticine for the middle group in kindergarten: ideas
Nowadays it is very fashionable to involve parents in education in kindergarten, and most often this is a general activity in drawing or modeling. And in the last version, parents cannot come up with anything to show in class.
If your baby is in the middle group, the following ideas will be useful to you:
- snail - a rope rolled into a spiral, the end of which will be the muzzle, and the spiral will be its house;
- flowers;
- flat houses, the formation technique of which is similar to drawing with plasticine;
- trees;
- any animals;
- fly agarics (they cause the greatest delight in children 3-4 years old);
- gun, machine and other simple equipment.
Plasticine flowers can consist of basic shapes
Interesting! To determine exactly what the children will be interested in, ask them about it, but at least a week before the lesson, because the answers will vary, and you will need to choose from a large number of several. And if you start sculpting right away, some of the children will be unhappy.
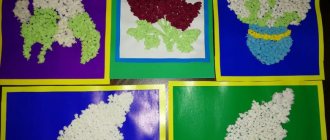
Plasticine mosaic
Children know what a mosaic is and how to play it from the age of three.
Therefore, it is not difficult for them to understand how to fill silhouettes from the inside with plasticine balls.
- Adults can only prepare templates for drawing and visual material in the form of pictures.
- The difficulty of appliqués made from small pieces is that the manufacturing process takes a week.
- But such a drawback does not affect the mood of preschoolers; their interest in the craft does not disappear.
Plasticine butterfly
Making an applique for children will not seem tedious or boring if the sketch is not completed immediately, but several days in advance. During the first lesson, roll out a lot of multi-colored balls, which are glued on gradually.
- First on the upper wings of the butterfly, and then on the lower ones.
- As a basis, you can use drawings with contours from coloring books.
- Additionally, a part for the body is made in the form of a thick sausage.
- Draw the antennae with a pencil or felt-tip pen.
The mosaic craft looks so colorful and beautiful that you want to keep it. For this purpose, cover the surface with decorative varnish and hang it in a frame on the wall.
Plasticine flowers
A master class on making this craft will teach you how to create flowers from two types of plasticine mosaics: flat buttons and round balls. Prepare for the lesson:
- Plasticine in three colors.
- Ballpoint pen body.
- Sketch of a flower on light cardboard: using a simple pencil, draw a stem in the form of two lines, a leaf, a round center, 4-5 petals.
Then they begin to create miniature flat parts, shaped like buttons. They fill the stem, leaf and petals of the flower, trying not to go beyond the contours and not leave gaps.
- Knead green and red plasticine until thin cakes are obtained.
- Using the body of the pen, circles are squeezed onto them, which are then glued into place.
For the center of the flower, roll out balls of yellow pieces. And the outline of the petals, if desired, is highlighted with plasticine thread: the syringe is filled with soft plastic material, which is squeezed out of the hole with a piston.
Plasticine painting from flagella
A subject or subject picture with plasticine flagella looks much more realistic than a simple applique. Thin sausages are rolled out from pieces between the palms or squeezed out using a syringe.
The second method is beyond the capabilities of younger preschoolers, so adults make such preparations themselves. And the children twist them into a spiral or snake and glue them onto cardboard.
Craft materials:
- Outline illustration from a coloring book. You can also draw your own design on cardboard by hand or using templates.
- Soft plasticine in the desired colors.
- Medical syringe with a volume of 5–10 ml.
- Container with hot water.
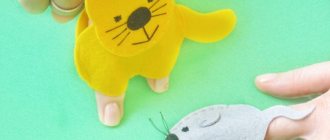
Kitty
For creativity, we prepare plasticine of two colors. We cut a large piece of plasticine of the main color into pieces, as shown in photo 8. Roll out a sausage from a large piece and bend it into an arc - this will be the body and legs of the kitten. (photo 9)
Roll a smaller piece into a ball and attach it to the body, forming a head. (photo 10) Roll out the next largest piece into a long thin sausage - a tail, attach it to the arc on the side opposite to the head. (photo 11)
We pinch the plasticine at the top of the head and pull it out slightly, forming an ear. We do the same for the second ear. (photo 12) Roll two small balls and attach them in the eye area. (photo 13)
Using a stack, a toothpick or a knife, we divide the front and hind legs into two parts vertically.
Master Class
- The first thing they do is prepare the flagella. The syringe is filled with pieces of plasticine and pressed with a piston.
- Place horizontally in hot water for five minutes or heat in the microwave.
- The syringe is taken out and plasticine threads of the required length are squeezed out.
- Children are given cardboard with an outline and flagella for laying out the picture.
Round figures (apple, cherry, flower centers) are filled according to the same pattern. First, the end of the flagellum is glued in the center. Then they twist it in a spiral, filling the entire space. On all non-round silhouettes (pear, leaves), thin sausages are glued in the reverse order: from the contour line to the middle or in a zigzag, trying not to leave gaps.
Flat and volumetric applique
Three-dimensional pictures on cardboard are created from molded parts, flagella and mosaics. The background is drawn with pencils, watercolors or made from plasticine using the smearing technique.
The most interesting topics for children are: “Birds and Animals”, “Nature”, “Based on Fairy Tales” and “Underwater World”.
Features of plasticine
Plasticine is a very elastic material that even a small child can handle. Modern plasticine is very soft and pliable, it does not need to be softened first, it comes in a wide variety of colors, and is also absolutely safe for children.
There is also ball plasticine, which looks like small balls; products from them are unusual and without significant defects. From plasticine you can mold:
- Animals, birds, insects;
- Various fairy-tale characters and little men;
- Cabins and transport;
- Flowers and trees;
- Various sweets;
- Cartoon characters;
Undersea world
In one craft, children are introduced to all the modeling techniques and discover the secrets that the seabed of the seas and oceans keeps.
- Waves and sand are drawn on a thick sheet or cardboard with wax crayons.
- The background is painted over with watercolors and dried.
- A yellow piece of plasticine is flattened into a cake, and dents are made with the blunt end of a pencil. The first sea plant is ready.
- Mix two colors, for example, blue and green, and roll a long flagellum. Glue to the base from bottom to top in a zigzag pattern.
- Or the sausage is squeezed with fingers on both sides, as is done when making dumplings.
- Another option is to glue green leaves on both sides to a thin sausage. Lines are drawn in a stack - veins. This is how three types of algae are obtained.
- Multi-colored corals look like a flat circle with uneven edges and through holes. A stack and a cocktail straw will help in this matter.
- The starfish consists of simple parts: a round center and 4 rays in the form of thick sausages with sharp ends. Connect them together, level the surface and make indentations with the sharp end of a skewer.
- Two types of shells are made from flagella, twisting them in a spiral and zigzag.
- For the jellyfish, roll 5-6 long sausages, a flat oval and a short flagellum for the body.
- All figures are glued to the background, starting to decorate the background with tall plants and algae.
The underwater world is populated with fish, which are sculpted from individual parts: the body is a circle or oval, the fins and tail are flat figures of arbitrary shape, the eyes are a round mosaic.
Snail
For work you will need plasticine of 3-4 colors. The ratio of the sizes of the pieces of plasticine should be approximately the same as shown in photo 1. From the largest piece we roll out a long thin sausage, from a smaller piece we roll out a thick sausage (photo 2). We roll the long piece in a spiral into a circle (photo 3).
This element can already be a finished craft - a figurine of a snail. All that remains is to slightly stretch the edge of the sausage with your fingers and bend it forward, forming a head (photo 4). You can invite your child to perform a more complex version of the snail. The sculpted part in the form of a spiral remains; it will be a snail shell. Now we return to the thicker sausage - it will be the body. We lift one edge up and bend it, forming a head. We attach a shell to this part (photo 5).
Roll out two small thin sausages and make antennae for the snail. We make two elements in the form of balls, place them on the head of the snail and slightly flatten them - the eyes are ready. Making these small parts can cause difficulties for your child, in which case help him cope with this task.
Crafts from plasticine on glass
Plasticine applique under glass in a photo frame will last for a long time. Children like this approach to the results of their work.
Miniature crafts are also made in plastic yogurt or sour cream lids:
- Using a black marker, draw the outline of the picture, either by hand or using templates.
- Spread plasticine over the inner surface, starting with small parts.
- The background is also filled with plastic material or appliqué is done on colored cardboard.
The glass with the craft is inserted into a frame. In this case, the plasticine should be inside. A catalog with photos of plasticine applications will tell adults what to do with their little fidgets.
Modeling classes, like other types of creativity, are carried out according to the principle “from simple to complex.”
This way, the child can easily master all the techniques for creating interesting crafts and prepare their hands for mastering writing. Kneading plasticine in your hands is also useful for adults: for therapeutic purposes to prevent strokes.
Useful tips
Before you learn how to make a craft from plasticine, you need to familiarize yourself with some points. Useful tips will greatly help beginners in this exciting business.
- If you don't have a special board for modeling, you can use a piece of cardboard or something hard, wrapping it in cling film.
- Instead of a rolling pin, you can use a small bottle of warm water.
- A special knife can be replaced with a knife from a set of plastic utensils.
- Instead of stacks, you can take any available materials - caps, buttons, lids, rulers, etc.
- To create thin bundles, a regular syringe is suitable.
In addition, plasticine products can be decorated with various beads, buttons, colored sand and salt, cereals, and natural materials. The photo of plasticine crafts clearly shows how you can decorate the finished product.