Preview:
Artistic creativity - modeling
Modeling lesson in the preparatory group “Visiting the Chef”
Theme "Professions"
Purpose of the lesson: To form and consolidate in children an understanding of the various tools of labor in certain professions (cook). Objectives: Educational:
1. To consolidate children’s knowledge about the profession of a cook. 2. Teach children to create crafts of individual objects, for example, pots and spoons. 3. Continue to teach children to convey the basic properties and size relationships of objects. 4. Learn to convey the shape of objects when sculpting, using the techniques of rolling, pressing, flattening, and attaching parts of plasticine to the product. 5. Learn to name the tools used by the cook.
Educational:
1. Cultivate interest in the modeling process. 2. Foster independence. 3. Cultivate accuracy in work. 4. Develop the ability and desire to work in a peer group.
Material: Children's set of plastic utensils, real spoon and pan, colored plasticine, modeling boards, modeling knives, stands for crafts.
Progress of the lesson: 1. Organizational moment.
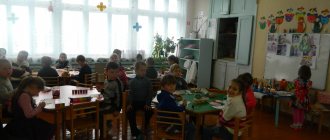
The children are sitting at their tables. The teacher lays out items from the children's set of dishes on the table and the children take turns taking them. Educator: “Take one object each and tell me what it is.” Children call. Educator: “That’s right, well done!” Then everyone looks at these objects and passes them to each other. Everyone names the items the cook uses.
2. Repetition of previously covered material on the topic “cook profession”. The teacher asks to talk about how utensils are used in the kitchen. Children take turns telling how a cook uses this or that item in the kitchen. The teacher draws attention to the pan and spoon. Then he compares them with real objects and says that today in class we will sculpt a pan and a spoon from plasticine.
3. Phys. minute “It’s cold for the bunny to sit.”
4. Modeling. The teacher distributes plasticine, boards and knives for plasticine to all the children and shows a saucepan with a lid and a plasticine spoon that he made himself, i.e. sample. Children should be able to make the same crafts. Children take plasticine and begin to work (some independently, and some with the help of a teacher). Children sculpt, and the teacher provides individual assistance. Periodically monitors other children.
5. Generalization and comparison. After finishing modeling, children compare their work with the work of the teacher and the work of their peers. The teacher asks the children to name the object they sculpted. He asks to name again the profession of those people who use the pan and spoon.
6. Summing up the work. The teacher says that everyone did well today, everyone was getting older and everyone worked well in class. All crafts are exhibited at a work exhibition for parents. Now you can thank everyone and ask those on duty to help put away the materials for the lesson.
Svetlana Mikhailovna Lychkovskaya
Summary of a modeling lesson in the preparatory group “Necessary professions”
Summary of a modeling lesson in the preparatory group
«Required professions
»
Goals :
Strengthen and expand ideas about professions
, people's work;
Foster respect for working people;
Strengthen the ability to write a short story about a thing made by human hands;
Encourage sculpting objects using familiar sculpting
.
Equipment :
Plates depicting industrial enterprises; salt dough, blue clay, plasticine, boards, stacks, napkins.
Lesson notes for junior group 1 on the topic “Introduction to professions.” Profession: doctor
Summary of the lesson in the first junior group “Katya the doll got sick”
Author: Natalya Vladimirovna Merzlyakova, teacher of the “Solnyshko” kindergarten, Municipal Educational Institution “Ynyrginskaya Secondary School”, Choisky district, Altai Republic. Description : this lesson can be used in working with children in kindergarten. This material will be useful and interesting for kindergarten teachers. The attractiveness of this activity lies in its accessibility, short-term nature, effectiveness, informational and emotional richness. The advantage of developing this lesson also lies in the fact that in our rural areas, the implementation of this outline is included in the immediate environment of the children. Goal: to create conditions for students to form concrete, visual ideas about the medical profession. Objectives: Educational: To introduce children to the profession of a doctor. Learn to pronounce the sound a clearly. Training in skills of working with plasticine. Developmental: Tell what people do in this profession, what tools help them in their work. Develop speech, observation, and intelligence. Educational: To instill in children a sense of gratitude and respect for the work of others. Integration of educational areas: physical development, cognitive development, artistic and aesthetic development, speech development, social and communicative development. Equipment: Katya doll, thermometer, phonendoscope, spoon in a glass for examining the throat, syringe, vitamins, laptop, plasticine. Preliminary work: reading poems and stories, looking at paintings about professions, excursion to the medical office, observations, conversations.
Progress of the lesson:
The teacher draws the children’s attention to the fact that Katya’s doll is nowhere to be found. The children look for the doll and find it lying on the crib. The teacher conducts a dialogue with the doll Katya: “Katenka, why are you lying down? It’s time to get up and have fun playing with our children.” - I’m sick (simulates coughing - cough-cough-cough).
Game "Calm the doll." The teacher takes the doll in his arms and rocks it, reading the poem: The doll has been crying in the morning, It’s time to calm down. Rock the doll and sing a lullaby to it: “a-a-a.” Children take turns playing out the situation, the teacher makes sure that they clearly pronounce the sound a. The teacher sympathetically addresses the children: “Katenka didn’t listen, didn’t wear a scarf for a walk yesterday, and that’s why she got sick.” What should be done? — Treat the doll Katya. Educator: who can help Katya? (children's answers).
The teacher puts on a white coat. - Guys, today I will be a doctor and treat Katenka. What does it mean to treat? (children's answers). That's right, to treat means giving medicine, looking at the throat, giving injections. - Come on Katya, I’ll listen to you. The doctor has a special tube (shows) to listen to breathing and how the heart beats. The teacher listens to the doll and accompanies his actions with the words: breathe, don’t breathe. - Now let's look at the neck. It's not scary. You need to open your mouth wider and say: a-a-a (looks). Yes, the neck is red. Everything is clear, Katya has a cold. — We need to take her temperature. Guys, who knows how to measure Katya’s temperature? (pupils' answers). Help me, Masha, please give me a thermometer. The temperature is slightly elevated.
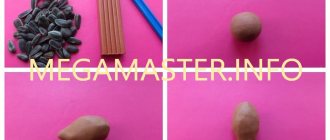
- Katya needs to be given an injection. Who knows what injections are made with? (children's answers). That's right, with a syringe (the teacher gives an injection). - Guys, there is no need to be afraid of injections. After all, every child is vaccinated against various diseases in order to get sick less. Educator: And now I will write out a prescription: what should be given to the patient. -Who is our patient? (children's answers). - That's right, Katya doll. A sick guy is someone who is sick or who has something in pain. - So, hot tea with raspberries and honey, hot milk. Dress warmly, tie a soft scarf around your neck. Take vitamins. The teacher takes out a jar of vitamins and turns it over. - Oh, I’m out of vitamins. How about we make some vitamins for Katya ourselves? The students, together with the teacher, approach a table on which the objects necessary for modeling are laid out - modeling boards, pieces of yellow plasticine. Modeling “Vitamins” The teacher, on behalf of the doll, invites the children to take a little break. Watching an electronic exercise for the eyes on a laptop: “Be healthy.” — What vitamins? (children's answers). Show us how we will make vitamins. Demonstration of sculpting technique - using palms, circular movements. Finger game “Professions” There are many noble professions. Connect the fingers of the right hand with the thumb. Both useful and pleasant. Connect the fingers of your left hand with your thumb. Cook, doctor, painter, teacher, salesman, miner, builder... Consistently connect the fingers of both hands with the thumb. I don’t name everyone at once, clench and unclench your fists. I suggest you continue. - Now I’ll put your vitamins in a jar. How many vitamins are in a jar? (children's answers). — Are the vitamins large or small? (small). —Who did we make vitamins for? For what? (children's answers). - Guys, you did great today! Now let's give Katya a treat. - Katya, here are some vitamins for you. Now our Katya will be healthy. I also want to give you vitamins so that you don’t get sick either. The teacher quietly takes out a jar of vitamins and treats the children. - Guys, now you can play with the Katya doll. At the end of the lesson, children independently play the game “Doctor”.
We recommend watching:
Entertainment for children of the preparatory group on the topic: Professions Summary of a lesson on cognitive development in the senior preparatory group of a preschool educational institution on the topic: “Everything p Summary of educational activities in the senior group on the topic: Professions Game in the senior group of the kindergarten “What? Where? When? on the topic: “Professions”
Similar articles:
Poems about professions for preschool children. Senior group
Conversation about medical workers with preparatory group children
Lesson notes for the middle group. Doctor - dentist
Lesson summary for the middle group “Profession cook”
Lesson notes for the senior group. Who is treating us
Sample notes for modeling classes in the second junior group
Detsky sad.Ru >> Electronic library >> Family and children >> Children's creativity >> Source: N. B. Khalezova, N. A. Kurochkina, G. V. Pantyukhina.
“Modeling in kindergarten” Moscow, “Enlightenment”, 1978 OCR Detskiysad.Ru Modeling dryers
Program content. Teach children to sculpt dryers: divide the clay into small parts, roll out the pieces with straight hand movements, connect the ends of the clay cylinder, placing them on top of each other and pressing; develop independence in completing tasks. Equipment. A bunch of real dryers, clay, boards for modeling, several ropes on which the molded dryers will be strung. Methodology of conducting the lesson. In the morning, Parsley comes to the group and brings gifts for the children - a bunch of dried bread. The teacher invites the children to consider how small, round, and toasty they are. There are many of them - a whole bunch. The children are given dry bread, they look at it and taste it. The teacher informs the children that today in class they will be making dryers. At the beginning of the lesson, the teacher again shows the children a bunch of dryers, asks them to look again at which dryers are round, and that each has a hole in the middle so that they can hang the dryer on a string. Children trace the shape of the dryer in the air with their finger and say: “Round, round.” Then the teacher shows how to sculpt the dryer and performs the actions at a slow pace, accompanying them with explanations: he plucks off a little clay with his right hand, puts a piece on his left hand and rolls it out. When a long strip is obtained - a cylinder, he connects its ends with both hands and presses. After repeating the explanation, he invites the children to start working. During the lesson, the teacher helps each child if necessary. At the end of the lesson, he collects the molded dryers, strings them together on a string and says: “That’s how many round, small dryers we made today! How beautiful they are! Everyone tried! Let’s give dryers to our dolls.”
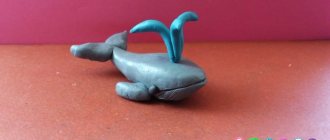
Modeling a bunny
Program content. Teach children to portray a toy bunny: divide the clay into three parts, roll two balls (large for the body, small for the head), roll out a long cylinder and bend it (these are the ears); learn to connect parts by pressing them. Foster activity and independence. Equipment. Toy (roly-poly bunny), clay, boards, shelves. Methodology of conducting the lesson. The teacher examines the bunny with the children, draws attention to the fact that it is a funny and cheerful toy (he touches it, it swings and rings). Children look at its parts: the body is a ball, the head is also a ball, only smaller, the ears are long, like columns. “Who knows,” asks the teacher, “where we will start sculpting a bunny? That's right, from the body. How to roll a big ball for the body?”, he offers to show everyone. Children imitate the rolling motion. “You also need to roll a small ball for the head,” adds the teacher. - You already know how to do this. And I’ll show you how to mold the ears.” The teacher takes the smallest part of the clay, puts it on his left hand and rolls it out with his right hand, bends the resulting cylinder, then shows how to attach the ears to the head. During the lesson, the teacher helps those who are experiencing difficulties. At the end of the lesson, he approves of the children’s work, notes their independence, shows them the most interesting toys, then offers to put all the hares on the shelf: “This is a store, there are toys in it.”
Gingerbread making
Program content. Continue to teach children to modify the shape of the ball - flatten the ball with their palms to obtain a gingerbread disk; learn to decorate a uniform using a signet and a straw; to foster creativity and independence in children. Equipment. Real gingerbread cookies, clay, boards, stamps and tubes for applying patterns, a large tray where children can put gingerbread cookies. Methodology of conducting the lesson. The teacher shows the children a gingerbread and asks how they can make a gingerbread from clay. If anyone answers, you can ask him to show it to all the children. If children are in difficulty, then the teacher shows and explains. He separates some of the clay and rolls it into a ball, then places it on his palm, and slightly flattens it with the other so that the gingerbread is not thin. Invites the children to make a lot of gingerbread cookies. Before the end of the lesson, those who completed the task can be given signets and asked to decorate the gingerbread cookies. Then the teacher asks the children to put all the gingerbread cookies on a beautiful tray so that in the evening they can show their mothers how beautiful the gingerbread cookies turned out.