Winter house
The white sheet is torn into small pieces - this will be snow. This activity is great for developing fingers. Ready-made house templates are printed and cut out. The house is pasted onto the main background, the roof is decorated with cotton wool. Nearby, snowdrifts are created with cotton material.
And at the final stage it is decorated with a previously prepared paper snowball.
Products made from cotton wool
Cotton wool discs have a good texture for making winter applique pictures. And thanks to the light shade, you can create a snow woman and snowdrifts from them. Circles are very popular in preschool institutions.
Corrugated paper
Winter applique senior group can include corrugated paper. Ready-made winter-themed templates are pasted over with pieces of multi-colored paper. Embossed paper should be cut with scissors rather than torn. The material is glued using PVA glue.
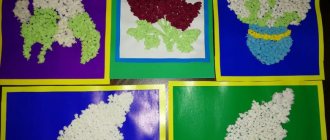
Green paper is perfect for creating Christmas trees. The material is finely chopped and glued to a light base. After drying, triangular shapes are cut out of the sheet. The parts are glued onto cool-colored cardboard to form a tree.
Snow and snowdrifts are painted on with white paint. Using a hole punch and light paper, create falling snow.
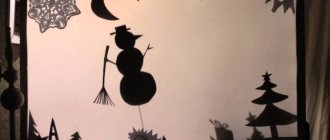
Composition “Winter's Tale”
To create it you will need:
- a sheet of white cardboard;
- cotton wool;
- scissors;
- PVA glue;
- colored paper.
Cut out 3 Christmas trees of the same size from green paper. Bend each tree in half vertically.
Glue the side of another tree to one bent side of the tree, then the remaining tree so that you get a three-dimensional tree with 3 sides.
Tear the cotton wool into small thin pieces and carefully glue them over the entire area of the cardboard so that it looks light and airy, do not press it down.
Carefully glue the green Christmas tree onto the cardboard on top of the cotton wool.
Roll 3 balls of cotton wool, different in volume - this will be a snowman blank. Glue a smaller ball of cotton wool to the larger ball, and then the smallest ball.
Cut out all the parts for the snowman from colored paper and glue them on. Glue the snowman figure to the cardboard not far from the Christmas tree.
Using this principle, make 2-3 more Christmas trees and several snowmen, so that the composition is voluminous and lush in appearance.
This option will be an excellent craft on the theme of a winter fairy tale for school, as well as as home decor. There are a lot of options on the Internet for creating crafts on the theme of a winter fairy tale. You can take any of them as a basis and add some of your own elements, in which case the craft will be much more original and interesting in appearance.
Application for younger groups
Melted snowmen can easily be made with small children. The younger group cuts out on their own, because the work does not require accuracy. Next, the figures are glued onto colored paper.
A simple mitten applique is also good for the preparatory group. A mitten figurine is cut out of thick cardboard in advance, and a snowflake is cut out of a snow-white sheet. The two parts are secured to each other and the work is ready.
Preparatory group. Senior preschool age. Children 6-7 years old
Application “Anti-stress snowman” for the preparatory group 6–7 years old
Making appliqué non-traditional techniques is very exciting for children, especially if these are their favorite toys. Children today don't play much of what we played. And in order to be on the same wavelength with them, we need to understand and accept the interests of children. So we decided to make one of...
Summary of educational activities on the application for children of preparatory age “Snowman” Municipal budgetary preschool educational institution Yanovsky kindergarten No. 31 Summary of educational activities on artistic and aesthetic development “Snowman”
(preparatory age)
Prepared by: Akimova A.Yu. Lesson notes on artistic and aesthetic development...
Craft "winter"
A technique for depicting a winter landscape using small balls and a glass will be very entertaining for a child. To work, you will need several balls and a cylinder-shaped object, such as a cup.
A colored sheet is placed in the container, and the balls are dipped in white paint. Painted figures are poured into a glass and covered with a lid. Shake well and you will get a colored sheet with white streaks.
Note!
How to decorate a Christmas tree for the New Year 2021 with your own hands: TOP-200 photos of the best ideas, choice of color, toys and style
- How to make a New Year's toy - beautiful and interesting ideas for New Year's toys. DIY instructions for beginners + 100 photos
How to make snowflakes: TOP-160 photos of the best ways to create snowflakes from different materials. Simple work plans for children
By analogy, you can experiment with colors. Parts for appliqués are cut from finished sheets.
MAGAZINE Preschooler.RF
Summary of an open lesson on appliqué in the senior group “Winter-Winter”Winner of the all-Russian competition “The most popular article of the month ” JANUARY 2018
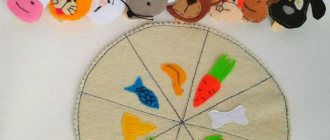
Goal: To teach children to create an applicative image of a winter landscape on a cardboard plate.
Tasks:
- Teach children to correctly place appliqué parts on a circle (cardboard plates)
- Improve skills in working with scissors, glue, and brush
- Create conditions for experimenting with artistic tools, with various materials (brushes, dabbing, dry poking, cotton swabs, white paper, cotton wool)
- Develop a sense of shape, color, rhythm
- Foster independence and initiative in work
Progress of the lesson.
Music by A. Vivaldi “The Seasons” (winter)
Troika, troika arrived. The horses in that trio are white. And in the sleigh sits Queen Belokozha, white-faced. As she waved her sleeve, she covered everything with silver.
That's right, guys. This is winter. Look at the posters, paintings. What a beauty! This year Winter came late. He doesn’t want to give a white outfit to the earth and trees.
Let's play. Suddenly Winter will send us white snow.
Game "Cold Words"
Winter, frost, refrigerator, snow, ice cream, blizzard, cold, snowdrift, ice, blizzard.
Well done, children! They came up with good words for Winter.
How many winter months are there? What are their names?
Now let's play the game “December, January, February”
December - hands up
January - forward
February - omit.
How attentive and smart you are!
Guys! Many artists loved to depict winter. They choose very beautiful or somewhat unusual views of nature.
But the beauty of nature can be conveyed not only with colors, music, words (A.S. Pushkin “Winter Morning” ), but also with the help of paper. Yes Yes.
What is the name of the art when images are created from paper? (Applique) Today you and I will also turn into artists and create. Let's create a winter landscape from paper. Now let's rest a little.
Fizminutka
A blizzard blows over the fields, over the mountains, over the forests. Look to the right, to the left. Bullfinches are sitting on the branches. (flapping their “wings” ) It’s very cold in winter. The birds want to go home (squat) We will feed the bullfinches (sprinkle food) It will be more fun for the birds (jump in place, clapping your hands)
Examining a sample
Based on what form we will create a winter landscape today? That's right, based on a circle (cardboard plate).
- What is in the center of the plate? (house) What parts does it consist of? What colour is he?
- What is located to the left of the house, what is shown on the right?
- What is the best way to arrange these details on a plate?
- What colors of paper do we use?
Now let’s prepare the handles for appliqué.
P/g "Winter walk"
1, 2, 3, 4, 5 (we bend our fingers) We went for a walk in the yard (we walk along the table with our fingers) We sculpt a snow woman, (we “roll” a snowball) We fed the birds with crumbs, Then we rode down the hill (we move with the index finger of our right hand on the left palm) And they were also lying in the snow (shake off palms) Everyone came home in the snow, ate soup and went to bed.
Teacher's explanation
First, we cut out the elements we need for our work. We lay out the house.
- What color is the house?
- We will make a house from a rectangle and a triangle.
- Which elements do we have first, and which ones later?
- What will we use as snow? (cotton wool + napkins)
- How will we cut down the trees?
Independent activities of children
The teacher prompts, corrects, and helps those children who need help.
Lesson results
What did we do in class today?
What did you like most?
| Next > |
Snow collecting machine
Boys will appreciate the snow blower. To make this craft you will need colored paper, a cardboard sleeve, cotton wool and bubble wrap. To create a background, the air film is painted with white paint. The material is tightly fixed on the blue sheet.
When the paint is dry, the car applique is placed on the background. The transport bucket can be made from a cut bushing. Cotton wool is used to imitate snow.
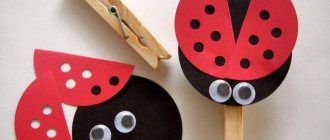
Hat with mittens
An applique is created from winter accessories. To make the details more realistic, they are decorated with pom-poms made from cotton wool. You can decorate the mittens with felt, bugles or beads.
Polar bear
Foam board, which is easy to work with, can be used to create applications. The parts are cut out using the template and glued together. The tail is glued to the product and you can make a pendant from the bear by fixing a light braid on the product.
Tissue paper polar bear
The original craft was made from tissue paper. It is thin, folds well and is very easy to use (doesn't cut your fingers). However, if you don’t find one in the house (which is very likely), you can use a similar packaging option. When buying new equipment, you can find white thin paper inside the box; you don’t have to throw it away right away. Also for work you will need a 0.5 liter plastic bottle, white paint, and a skein of black thread. Instructions:
- Take a disposable paper plate, which is then painted white.
- Next, the bottom of the bottle is cut off, about 5-6 cm.
- The cut bottom is glued in the middle of the plate. It also needs to be painted white.
- The bottom is the nose of the composition; by measuring out a little space, eyes are made from black skeins of thread, and they are also glued to the plate.
- Next, the plate is completely covered with glue until it sets - sprinkled with scraps of tissue paper.
What paint to use is up to everyone to decide for themselves; the standard is gouache. The main thing is not to leave the composition near the battery to dry. Due to the high moisture content, the work will appear crumpled. A black bear nose can be made from a pompom.
Forest and trees
Branches are glued onto a colored sheet. You can create an imitation of snow using cotton wool or fur. And with the help of cut rain or silver beads it is easy to depict snowflakes. On the finished sheet you can draw trees, placing a tubercle with cotton wool between them, and you will get a den.
Note!
How to make a snowman with your own hands: reviews of the best ways to create a snowman. Simple work schemes and step-by-step master class for children (130 photos)
- Crafts for the New Year 2021: TOP 110 photos and step-by-step instructions for creating New Year's crafts from scrap materials
- Snowman made of cotton wool - TOP-170 photos of original ideas. Simple schemes for creating a snowman with your own hands + step-by-step instructions for children
Winter. Applications - Summary of a lesson on application in the preparatory group “Winter Birch”
Publication “Summary of a lesson on appliqué in the preparatory group “Winter...” Topic: “Winter Birch” Goal: Mastering non-traditional technology for making wood from cotton wool and paper. Objectives: 1. Continue to teach children to create an image of a birch tree using the appliqué method, conveying shape, color, size. Teach the correct technique for working with cotton wool…
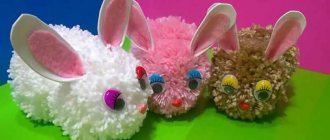
Master class on three-dimensional applique “The gray bunny sees off summer, and the white bunny welcomes winter” for children 5–7 years old
Purpose of the master class: hand-made bunnies can be used by children in games; in thematic classes; as a guide for comparing summer and winter hare; for an exhibition or to decorate the interior of a children's room. The purpose of the master class: to make white…
Summary of GCD for appliqué in the preparatory group “Snowman” GCD for the preparatory group Application “Snowman” Goal: continue to teach children to perform applique using an unconventional technique. Objectives: Educational: teach children to use diagrams to cut out and draw the necessary parts. Continue to learn how to use it in applications...
Notes on artistic and aesthetic development in the preparatory group, application on the theme “The bullfinches have arrived” Notes on artistic and aesthetic development in the preparatory group, teacher Fedorova E.S. Application on the theme “The bullfinches have arrived.” Goal: to develop in children the ability to convey the image of a bullfinch in appliqué using the technique of broken appliqué. Objectives: Educational:…
Snowman
To form a snowman, you will need to cut out the base from a white sheet. Cotton balls are glued to the prepared material. A cap, eyes and a nose are attached to the snowman. Handles and pom-poms can be added if desired.
Snowman made of cotton pads
One of the easiest crafts is a snowman made from cotton pads. In order to make it you don’t need too much time and significant materials, it’s enough to prepare:
- sheet of cardboard;
- cotton pads;
- scissors;
- PVA glue;
- colored paper.
Glue 3 pieces of cotton pads to make a snowman figure. Cut small thin strips from another cotton pad and glue them to the snowman as arms.
From colored paper, cut out a bucket for the snowman's head, a broom, buttons, eyes, nose and mouth. Glue everything carefully. You can also not make small details out of paper, but draw them with a felt-tip pen.
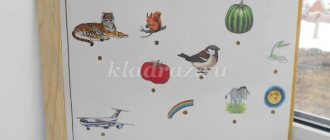
Bullfinch
Draw the details of the birds on a separate sheet, cut them out and assemble them into the overall picture. For the background, blue paper is selected or a regular sheet is painted blue. Snow is formed using glue and cotton wool.
A bird branch is cut out of brown paper and glued to the main background. There is a bullfinch on a branch. Rowan is created from red balls of paper.
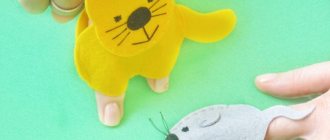
Deer
Disposable plates are very good as an applique on the winter theme. You can easily make a Christmas reindeer out of them. The plate is painted brown. Horns are created using handprints.
Cardboard rectangles are suitable for paws. All parts are cut out and attached to each other. Eyes made of beads or paper are glued onto the muzzle.
Winter applique for the preparatory group of kindergarten
Application on the theme: Winter for kindergarten. Preparatory group
Volumetric winter applique “Meeting in the winter forest” Master class with step-by-step photos.
One day in the winter, in the forest, the Hare met a fox, a very cunning little sister. - Bunny, bunny friend! Sit with me for an hour. — — I can’t do it for a minute - I’m running to visit the hedgehog. He met me yesterday and invited me to eat cloudberries. Author: Mokrozub Roma, student of GBDOU kindergarten No. 73 of the Krasnoselsky district of St. Petersburg Leader: Maley Galina Alekseevna, teacher of GBDOU kindergarten No. 73 of the Krasnoselsky district of St. Petersburg Description: the master class is intended for children of the preparatory group for school, educators, caring parents . Purpose: a painting using the three-dimensional appliqué technique can serve as interior decoration or work for a winter exhibition. Goal: making a painting for a winter exhibition of children's creativity. Objectives: - learn to create an image of a Christmas tree and animals from colored paper folded like an accordion; - develop fine motor skills of the hands, a sense of color, rhythm and shape; — consolidate the skills and abilities of working with scissors, — develop the child’s imagination, spatial perception, and creative abilities; — compositional skills are improved; - cultivate perseverance, patience, accuracy in work, the ability to complete the work started; Materials: - Colored paper green, white, black, red, orange;
- a sheet of blue cardboard in A3 format; - scissors, PVA glue, white gouache, toothbrush; — plastic eyes, — frame. Progress:
To make a Christmas tree, cut out the required number of triangles (depending on how tall you need the Christmas tree). We needed 55 pieces. We fold all the triangles like an accordion. We bend the resulting accordion in half and glue the middle. The resulting leaves are the “needles” of our Christmas tree.
We form a Christmas tree from the resulting leaves, starting to glue from the top and gradually, row by row, expanding the Christmas tree to the bottom.
To make a bunny, you need white stripes and triangles. We fold all the blanks like an accordion. /The paper only seems pink from the unfortunate falling light/. We roll up the accordions and glue them together, as shown in the photo. Glue the halves of the bunny's head and tail together to form a circle. The process for making ears and paws is the same as for spruce leaves.
We glue the resulting parts together, forming the image of a bunny. Glue the plastic eyes. The chanterelle is made in a similar way. We cut out blanks for birds. We fold the wing and tail in the already familiar way - with an accordion. Gluing the parts together, we form a bird. We need three of these bullfinches.
Glue our Christmas tree onto blue cardboard. Our Christmas tree was covered with snow using white gouache, using a toothbrush, using the “spray” method.
We glue all the “heroes” of our composition.
We frame the picture.
We recommend watching:
Application on the theme Winter for kindergarten Do-it-yourself New Year's applique for children from 5 years old Do-it-yourself winter applique made of cotton pads "Snowman" for children 4-5 years old Do-it-yourself paper application on the theme "Winter" for children 4-6 years old in kindergarten garden. Master class with p
Similar articles:
Application. Bullfinches on a branch
Winter ball
The glass ball is a popular souvenir. Using a minimal set of decorative paper, cotton wool and glue, you can create a paper version. Inside the winter ball, using colored paper, it is easy to arrange fairy-tale scenes: houses, Christmas trees, a palace or a snowy landscape.
Note!
- New Year's decorations for windows 2021: 150 photos of beautiful templates for do-it-yourself window decorations for the New Year
Winter landscape
A simple and beautiful winter applique made from paper will appeal to middle school children. To make this you will need cotton pads and swabs. For the background it is better to choose blue cardboard. Holographic paper can convey the feeling of frost with iridescent snowflakes.
The contours of the tree are applied to a cotton pad and cut out. Nearby you can place a similar tree glued to a cotton swab. By cutting the disks in half, beautiful snowdrifts are formed, they are glued at the base of the picture.
It is easy to obtain a young moon from the edge of the disk. All parts are fixed using PVA glue. You can create stars and snowflakes from small rolled balls.
Summary of GCD in the senior group of kindergarten. Application on the theme: Winter
Notebook on non-traditional appliqué techniques “Winter” for children of the senior preschool group
Author: Elena Viktorovna Salova, teacher, MBDOU - kindergarten No. 7, Yekaterinburg Description: this summary on non-traditional appliqué techniques is intended for pupils of senior preschool groups. It will be of interest to educators, additional education teachers and parents. The goal is to create conditions for the development of creative abilities of preschool children. Objectives: Educational objectives:
- consolidate ideas about winter and its signs;
— introduce the works of Russian artists; — introduce an unconventional appliqué technique – cotton wool applique. Developmental objectives:
– develop children’s creative abilities;
– develop cognitive interest, careful and aesthetic attitude towards nature; – develop attention and logical thinking. Educational objectives:
– to cultivate restraint and perseverance;
– to cultivate sensitivity to the perception of the beauty of the winter landscape. Planned result:
- be able to apply acquired knowledge;
- be able to listen carefully and answer questions asked; — be able to perform work according to a given algorithm. Form of joint activity: gaming, communicative. Form of organization: collective, individual. Educational area: “Artistic and aesthetic development”, “Cognitive development”, “Speech development”. Educational and methodological set: Tools: visual – reproductions of paintings, samples of completed work; literary - poem by A.S. Pushkin; materials
- cardboard, pencil, PVA glue, brush, cotton wool, colored paper.
Progress of the lesson
Organizational stage
The teacher attracts the attention of the children. Educator. Guys, guess the riddle. Snow on the fields, Ice on the rivers, Blizzards are blowing, When does this happen? /winter/ The teacher reads a poem by A.S.
Pushkin Here the clouds are catching up with the north, They breathed, howled - and here comes the sorceress winter herself! She came, crumbled into clumps, hung on the branches of oak trees, lay down in wavy carpets Among the fields, around the hills. Frost flashed. And we are glad for the pranks of mother - winter.
Updating children's knowledge
Educator. Guys, do you like winter? What's good in winter? What's bad in winter? Children's answers. Educator. Okay, now let's remember all the signs of winter and natural phenomena that occur at this time of year. Children's answers. Educator. Let's look at pictures of winter nature. Do you remember what paintings depicting nature are called? /landscape/ They look at reproductions of winter landscapes (A. Savrasov “Winter Landscape”, K. Yuon “Winter”, A. Meshchersky “Winter Landscape”). A. Meshchersky “Winter Landscape”
A. Savrasov “Winter Landscape” K. Yuon “Winter”
Creation of a problem situation
Educator. Today I will tell you a story that happened to a little girl from our kindergarten. Mom read her an interesting book “Winter Forest”. The girl wanted to see what this amazing forest looked like, but, unfortunately, there were no illustrations in the book. She turned to me for help. Let's help this girl? Children, let's create winter landscapes that will become illustrations for the book, and show the girl what the forest looks like in winter. Guys, have you been to the winter forest yourself? What does he look like? Children's answers.
Motor activity
Educator. And now we will play the game “Snowfall”. You walk in a circle with the words: “One, two, three - the snowball is flying towards us!”, Take one or two snowballs at a time and throw them up. They play with the teacher.
Visual activities
Educator. Guys, let's sit down at the tables and make an applique illustration of a winter forest. Look, there is cotton wool on our tables, does it look like snow? The teacher explains the progress of the work. Educator. Guys, for work we need a sheet of cardboard, glue, cotton pads, scissors. Educator. From cotton pads, cut out three small rectangles and two thinner rectangles.
Educator. Next, we glue these parts: the large ones are the tree trunk, the thin ones are the branches. We glue round cotton pads onto the branches - these are branches covered with snow.
Educator. We glue the remaining cotton pads above and below those already glued. Educator. In winter there are a lot of snowdrifts in the forest, so we also make snowdrifts under a tree. Cut the cotton pad in half and glue it. And from the remaining pieces we make snowflakes.
Reflection Educator. Guys, did you like the time we spent with you today? What did we do today? What new did you learn today? What did you like most?
We recommend watching:
Summary of a mathematics lesson in the senior group on the topic: Winter Summary of GCD on application in the senior group on the topic: Winter Summary of a lesson on application in the senior group of kindergarten. Application “Polar Bear” from cotton Notes of a lesson on application in the senior group of kindergarten
Similar articles:
Walk “Wind Watching” in the senior group
Observation in the senior group of kindergarten. It's frosty outside
Night in winter
A wide variety of materials are used for winter nights. Therefore, this application is suitable for schoolchildren. For better results, just watch the video and repeat the finished master class. The result will be a nice decoration for your apartment.
At the initial stage, you should decide what will be depicted in the picture. On a winter night there is always a birch tree with a house and a fence, and everything is covered with snow. The desired idea should be sketched on cardboard.
The next step is to prepare a mass of papier-mâché. To do this, napkins are manually crushed and filled with hot water and finally beaten with a blender. Excess moisture is removed by normal squeezing.
PVA glue is added to the finished material until a plastic consistency is formed. The mass is thoroughly mixed and oil is added.
Using plasticine, snowdrifts, logs and branches are formed. The entire drawing is processed with the finished mass. The top of the product is coated with PVA glue. The work must dry well.
The final stage will be painting with gouache. Blue or black would be perfect for it. For snow, you should choose white, and light blue should be used as a shadow. Draw black stripes on white birch. For the house and fence you should choose the desired shade of brown.
Snowfall
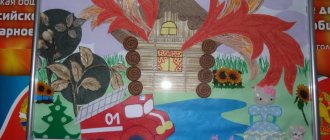
For winter style applique you will need: blue cardboard, sheets of brown, orange and red, white sheet, scissors and glue.
You should cut out the parts for the craft. A rectangle for a house made of red paper. Small orange squares for the window, and brown trunks for the trees. Snow is created from a white sheet torn into small pieces.
Markings are made on the background for the location of the finished patterns. The parts are glued to the finished strokes, and excess glue is removed with a clean cloth. Prepared paper snow is also fixed with glue.
You can use pencil glue for a cleaner job; it dries quickly and won’t leave streaks. The application is ready, all that remains is to place it in the frame.
Application made from napkins for children 5-7 years old on the theme: Winter
DIY winter crafts for kindergarten. Senior - preparatory group
Napkin applique “Winter Forest”. Master class with step-by-step photos
Author: Dasha Mayorova (6 years old), student of the MKDOU "Buturlinovsky kindergarten No. 7, Buturlinovka, Voronezh region Leader: Nadezhda Nikolaevna Kravchenko, teacher of the MKDOU "Buturlinovsky kindergarten No. 7", Buturlinovka, Voronezh region Addressed focus: This master class is intended for children of middle and senior preschool age, teachers, parents, and also those who are interested in creative ideas. Purpose: the work can be given as a gift to loved ones, or to decorate the interior of a room. Goal: making crafts with your own hands. Objectives: Teach basic techniques for working with napkins (cutting, gluing, rolling) Develop fine motor skills of the hands, the ability to navigate a plane, correctly distributing the composition on a sheet of cardboard. Foster accuracy and economy in the use of materials. We bring to your attention one of the ideas on how you can use napkins in your child’s creative work. What you will need: Blue cardboard White napkins Pencil Scissors Glue stick
Manufacturing process:
To create a winter tree, take a white napkin, unfold it once. You will get a napkin folded in half. Starting from the fold of the napkin, draw half of the silhouette of the tree.
Using scissors you need to cut the tree along the contour and unfold it
This way you can cut out trees of different sizes You can draw a Christmas tree
Cut it out and unfold it
Then place the cut out trees on the cardboard and, trying them on, cut out random snowdrifts from the unfolded napkin. Glue all the blanks with a glue stick. Apply glue only to the cardboard, placing the silhouette of a tree or snowdrift on top.
Cut small strips from a napkin - these will be snow flakes Glue snow flakes onto trees and snowdrifts Roll up small lumps from a napkin (snow)
And glue in random order on a sheet of cardboard
This winter forest turned out to be so simple and unusual in execution.
Thank you for your attention. We wish you creative success!
We recommend watching:
Application made of plasticine for children of the preparatory group on the theme: Winter Snowflakes made of chenille wire with your own hands. Master class with step-by-step photos DIY winter panel made from eggshells and paper for children 5-7 years old DIY winter paper crafts for children 5-7 years old
Similar articles:
DIY winter crafts for kindergarten
Forest trees
For work you need sheets of blue, green, yellow and brown paper. The parts are initially cut out from newspaper, then from colored material. For the background, blue paper is used, ideally velvet.
Dashes mark the points for the location of the cuttings. Each tree is carefully fixed one by one to the base using glue. Excess glue is removed with a napkin. For snow you will need white paper
You can decorate trees with multi-colored confetti. To ensure accurate work, you should wait until each tree dries individually. With this approach, the glue will not smear across the background.