Summary of OD in the senior drawing group “Fluffy Animals”
Irina Serikova
Summary of OD in the senior drawing group “Furry Animals”
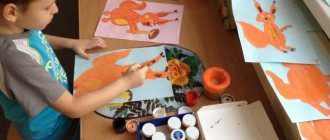
1. Teach children to create an expressive image of a kitten using painting techniques with a dry brush or a “broom”
.
2. Continue learning to draw animals in motion .
3. To consolidate children’s knowledge about the work of illustrator E. I. Charushin.
4. Improve your skills in working with gouache.
5. Foster a caring attitude towards animals.
6. Develop articulatory motor skills.
Materials for the lesson:
•Demonstration: books with illustrations by E. I. Charushin
•Handout: tinted A4 paper, gouache, bristle brushes, thin brush, broom branches, napkins, oilcloths.
• Preliminary work Reading the stories of E.I. Charushin, looking at the illustrations for them.
1. Magazine “Child in kindergarten”
3-2002
Step-by-step schemes for kids
There are many simple patterns that make beautiful drawings; for children, animals are of more interest than household items or landscapes, so you should start with them.
A simple example of drawing a bird. Children love to feed the ducks on the ponds, any child would love to draw their own duck.
- The creative process begins with two ovals: the head and the torso, connected to each other by a short neck.
- Paws are drawn from the body down.
- On the duck's body, just below the middle, draw an arc representing a folded wing.
- Sharpen the edge of the oval from the tail side using an eraser. The tail is depicted by several almost parallel lines of short length
- A beak and an eye are drawn to the duck's head.
- The final touch is adding details in the form of drawing feathers throughout the body and wing of the bird.
- Now you can color it.
How to draw a duck
Preview:
Topic: “These funny animals.”
- To acquaint children with the features of the animalistic genre, to define the concept of “artist – animalist”.
- Expand children's understanding of the work of the writer and artist E. I. Charushin.
- Teach children to depict animal fur using strokes, showing the features of stroke movements when creating an image.
1.Develop technical skills in working with graphic materials.
2.Improve the ability to depict animals using a diagram.
3.Develop creative thinking, imagination, speech activity, communication skills.
1. Cultivate a love for animals.
Equipment: Sandpaper, crayons.
Methodological material: presentation, methodological tables, sample work.
I. Organizational moment.
In one city there lived a little boy, Zhenya. He loved animals very much.
Many different animals lived in the house. It was a real home zoo. In the yard lived piglets, turkey poults, rabbits, chickens, kittens and all kinds of birds - goldfinches, siskins, waxwings. Cats lived in the house, cages with birds hung on the windows, and there were aquariums and jars with fish.
Zhenya not only loved animals, he cared for them, observed them, and also drew them.
The boy Zhenya grew up and became a wonderful artist and animal painter.
II. Conversation during the lesson.
— Guys, do you know who animal artists are?
-Let's take a trip through the pages of children's books and see.
-What do animal artists draw?
Well, let's go on a trip.
1 slide. -Guys, here is a portrait of the animal painter E. Charushin.
2 slide. – These are drawings from children's books drawn by E. Charushin.
- Guys, what do animal artists draw?
Animal artists paint animals.
An artist who draws animals is called an animalist.
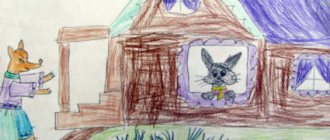
3 slide. – Illustration for the story “The Little Wolf”.
-Do you like this little wolf?
-And why? (He is small, nice, looks like a puppy)
-What can you say about the wolf cub? (ears stick out, tail tucked)
The artist shows that the wolf cub is terribly uncomfortable in the forest.
4 slide. - “Bear cubs.”
-Look how funny the bear cubs are. The artist painted them so that we see soft ears, shaggy fur, serious faces and soft paws. One diligently sucks milk from a bottle.
- What can you say about the other? (He also wants milk and this will go either way).
— And here we see cubs on the roof of the house.
-What can you say about these cubs? (They carefully examine the brick that lies on the roof. The artist depicts one bear cub on its hind legs. The muzzle is elongated, surprised.
-What can you say about the other?
5 slide. – Here we see Tyupa hunting for a bird.
And this is Tomka. How funny and cute they are.
6 slide. – The artist depicts animal cubs that are fluffy, soft and completely helpless.
— Guys, did you pay attention to the fur of animals?
- What is it like for them?
— To draw fluffy fur, the artist uses his own techniques.
— Do you want to learn how to draw fluffy, funny animals?
-What materials can be used to draw fluffy fur?
-You can depict it in gouache or watercolor, as E. Charushin did, but you can also depict it with pencils and crayons.
Early in the morning from far away
Magpies flew to us (crossed hands, imitation of flight)
They began to chatter loudly (fist on fist three)
Wave a long tail (palms close to each other and tilt left to right)
They pecked the grains (Hands peck and peck)
Everything in the world was told. (Clench and unclench your fists)
V. Explanation of the material.
Today we will get acquainted with a new unconventional technique. And we will draw not on a sheet of paper, but on an unusual material.
-Maybe you know what kind of material this is. Look, touch it.
This is sandpaper.
-You and I are good at drawing pets.
And today this will be very useful to you. And I’ll tell you how, knowing how to draw pets, you can learn to draw other animals.
- Here's your first clue.
1. Find the differences between a kitten and a tiger cub. (Ears, color, tail).
2. Find the differences between a kitten and a lion cub. (Ears, color, tail, mane).
Conclusion: Knowing how to draw a cat, you can draw a lion, tiger, panther and other animals.
- Where do we start work? From the diagram.
-The animal can be depicted in motion, or lying down. Look at the diagrams.
- Now think about what animal you will draw.
-Let's get to work.
-Guys, you drew the outline. Now you need to draw the fur. Look how I will do it. I choose a color and paint it with small strokes. Adding different shades.
Source
Where to start learning
It is advisable to teach children to draw animals by mastering a simple pencil. It will create an outline of the image, which you can later happily color. In addition, children quickly get upset if something doesn’t work out for them. In the case of a simple pencil, it’s not difficult to fix everything: erase the missing element with an eraser and continue creating.
Which animal to choose for drawing
The first lesson is the most important, because you can teach a child to draw animals in a few minutes, provided that the object to be depicted is chosen correctly. You shouldn’t immediately suggest drawing a horse or a giraffe. The best option is a duckling, kitten or puppy. The images of these pets consist of a small number of elements, which minimizes the risk of failure in the lesson.
Interesting! Parents who decide to try to learn drawing techniques using step-by-step templates themselves rejoice like children, amazed at the result.
What you need for drawing
Any activity, be it drawing or morning exercises, should be started when the child himself wants it. It makes no sense to force someone to draw, because creativity is closely related to the state of the soul. For the first lessons you will need a minimum of tools:
- paper;
- a simple hard-soft pencil (marked TM or HB);
- eraser.
Note! It is preferable to take A4 paper or a classic sketchbook, but a notebook sheet will not work, the lines and cells in it will interfere with the baby, and the sheet will seem initially unclean to him.
How to teach a child to count - effective and proven methods
It is recommended to give preference to a hard-soft pencil, because it is easiest to work with. Drawing with a hard stylus is inconvenient because it requires stronger pressure and the mark left behind is not bright. It will not be possible to erase it efficiently - a groove from the rod will remain on the paper. On the contrary, a soft lead does not require pressure at all, its mark is bright and clear, but when you try to erase the line, the eraser will smear the soft mark, leaving dark stains.
How to draw a sitting cat
Representatives of the cat family are graceful in any position - lying down, jumping, sitting. The anatomy of this animal is unique - its skeleton has more bones than a human's.
How to draw a kisul with a pencil and convey in the process the elegance of movements and the naturalness of the pose? It is necessary to correctly determine the position of each part of the body relative to the others, to maintain their proportionality, observing proportions.
Step 1
Draw the cat's head in the shape of a circle, the body in the form of an elongated figure, curved in the middle, where the back is.
Step 2
Lightly outline the limbs and tail with curved lines. The animal's front legs are usually straight when sitting. The hind legs are bent in two places: in the area of the kneecap and where the shin bone meets the parts of the foot. In this lesson we will depict a cat washing itself, whose front paw is raised.
Step 3
Connect the head and neck. Add volume to the paws and tail in the right places. Mark the arch below the cat's withers. Draw the eyes, ears and mouth.
Step 4
Remove all unnecessary lines and adjust the figure if necessary.
Step 5
Add details to the image: draw pupils, claws, ears.
Step 6
Think about what pencil color you will choose for your cute character. It is interesting that only cats are tri-colored or tortoiseshell; cats with such a skin are extremely rare. The spots can be drawn arbitrarily; the stripes on animals are usually larger on the back and sides, and narrow on the face and paws.
Step 7
Color the image. When using blue, do not press on the pencil, use light shading, then these areas will appear snow-white.
Another option for drawing a cat
Drawing classes within the theme “Domestic and wild animals”
The topic “Animals” is quite complex and voluminous, so it is advisable to divide the process of studying it into several lessons, which will be evenly distributed throughout the academic year.
Thematic blocks
- “Forest Dwellers” - one of the most popular is the thematic series of drawings “How Animals Winter.” Each animal tells how it prepares for winter: changes the color of its coat, makes preparations (mushrooms, nuts, cones), prepares its home (hollow, den, hole), etc.
- “Pets” will help to form a kind attitude towards pets, reinforce ideas about the peculiarities of their appearance, and teach how to correctly convey in a drawing the body shape, size and pose of the animal’s figure.
- “Animals of Southern Countries” will enrich your horizons with new knowledge about exotic animals, awaken interest in animals and the desire to depict them using various materials and techniques.
- “Animal World of the North” will expand children’s understanding of the animals of the north, the characteristics of their habitat and way of life.
Photo gallery: children's work on different thematic blocks (animals of hot countries, northern animals, our forests)
“Hedgehog in the autumn rain” - combined technique (felt pens and paints)
“Hedgehog Harvesting” - combined technique (wax crayons and paints)
“Donkey” – colored pencils
"Giraffe" - felt-tip pens
“Burenka” - colored pencils
“Carrot for a bunny” - combined technique (colored pencils and watercolors)
“Polar bear” – gouache
“Prickly hedgehog” – wax crayons
“Mustache-striped” – gouache
“Bunny in winter” – felt-tip pen
“Kitten with a ball” - colored pencils
“Shaggy Dog” – gouache
“King of Beasts” – watercolor
“Sister Fox” – watercolor
“Goat” - colored pencils
“Horses” – gouache
“Yard Cat” - combined technique (gouache and wax crayons)
“Hedgehog with hedgehogs” - combined technique (watercolor, wax crayons, felt-tip pens)
"Elephant" - wax crayons
“Giraffes” – watercolor, crayons and markers
“Hippopotamus” – watercolor and colored pencils
Complex large compositions, which are based on a detailed plot and include many different elements, are usually created collectively. The preparatory stage, during which the background is painted over, individual details or figures are drawn, is carried out in small subgroups of 3-4 people, and then the children together compose a plot picture on whatman paper, gluing the silhouettes they have prepared, simultaneously developing spatial thinking abilities, as well as coordinated skills actions. When creating a collective drawing, children are guided by a given condition or design, and the process of collective work itself develops skills of mutual understanding and camaraderie.
Creating a collective composition in a subgroup fosters mutual assistance and camaraderie among children
It is important to pay close attention to the problem of teaching children to understand and follow the correct sequence of work to create a plot composition or collage. The teacher should explain that first you need to prepare a background drawing, painting the entire space of whatman paper, then draw background objects (trees, sun, clouds, houses, flowers, mushrooms, etc.) and only then draw or place previously prepared and cut out silhouettes animal based.
Photo gallery: collective work of preschoolers
“Wintering of forest inhabitants” “Inhabitants of hot countries”
"Beasts in the Autumn Forest"
"Summer Forest"
"Fauna of the North"
Motivating techniques for working with children
During the lesson, it is necessary to include playful moments that stimulate curiosity, cause a positive emotional reaction and activity.
Motivating techniques can be the appearance of a toy character, reliance on a well-known fairy-tale plot, demonstration of pictures, a musical break, a surprise moment, introduction to new knowledge, or the personal artistry of the teacher. It is important to develop the ability to concentrate attention and see an object, to perform its sensory (touch and vision) analysis. The lesson will be interesting if the teacher thinks through the game line of the scenario, taking one of the popular fairy tale plots as a basis.
Table: examples of questions, games, dynamic gymnastics for a lesson on the topic “Wild and Domestic Animals”
| Author and theme of GCD | Contents of the summary fragment |
| Vaganova O. G. “Forest Dwellers” | Game moment
Children, together with the teacher, walk along an imaginary path with the words:
Educator: Guys, here we are in the forest. There are many trees and bushes in this forest, but no animals are visible at all. Guys, look, what is this? There is an envelope under the tree (children's answers). And there is a riddle in the envelope, listen:
The teacher takes it out of the envelope and shows an illustration with a fox. Educator: Really beautiful! Guys, what kind of fox is it? (children's answers). Of course, she has a long fluffy tail, a muzzle that looks like a teardrop, and a sharp nose. We continue our journey (the children and the teacher continue their walk) and approach a birch tree. The teacher finds an envelope under a birch tree, opens it and reads the riddle:
The teacher takes out an illustration with a hare from the envelope. Educator: Guys, what kind of hare? (children’s answers). Indeed, the fur is fluffy, the tail is short, and the ears are long. We continue our journey (the children and their teacher continue their walk). Guys, look, there is an envelope hidden for us here (the teacher opens it and reads the riddle):
Educator: Guys, what kind of bear? (children's answers). Of course, the bear has strong paws, large, but small round ears. The body is large and powerful. We have disenchanted all the animals and now we will show how they move. Physical education minute.
|
| Levochkina T. P. “Drawing polar bears” | Conversation between teacher and children:
|
| Chesnokova O. A. “Travel to distant lands” | Didactic game “Add a word” The teacher names the definition, the children guess what kind of animal it is.
|
Scheme and outline of the lesson
In the preparatory group, standard long-term planning provides for one drawing lesson per week. The total duration of continuous activity should not exceed 25–30 minutes; methodological manuals recommend performing physical exercises (finger, breathing, motor exercises) for 5 minutes for relaxation and prevention of mental and physical fatigue in children.
Lesson outline:
- Organizational part (5 minutes). The information and familiarization stage involves awakening children's interest in the depicted object, studying its shape, color and components.
- Practical part - the teacher explains the sequence of drawing parts of an object, based on a step-by-step scheme for creating an image (5 minutes). Six-year-old children are given more freedom in the drawing process; the pattern is used, as a rule, only in decorative drawing. Demonstration of a picture or sample prepared by the teacher should not be used for copying, but only for the formation of a correct understanding of the task or its clarification. The work is done from life or on the basis of life experience and observation; the basic techniques have already been mastered, and therefore do not require additional demonstration, with the exception of the initial use of new material, for example, sanguine.
- Independent work of children (20–25 minutes).
- The final part - children's images are compared with the object, the degree of similarity between the original and the artistic copy is assessed (3 minutes).
Photo gallery: drawing diagrams of animals (horse, cat, dog, sheep, fox and others)
Rabbit
Goat
Hedgehog
Pig
Squirrel
Horse
running horse
Dog
Monkey
Kitten plays with a ball
Elephant
Cow Giraffe
Fox
Lamb
Cat Camel Leopard
Table: synopsis of GCD on the topic “Domestic animal cow” (author Maltseva I. A.)
| GCD stage | Contents of the stage |
| Goal and tasks | To consolidate and expand children's ideas about pets and the features of their appearance. Learn to draw a cow, continue to develop the ability to think through the compositional construction of an image, continue to learn how to mix paints, develop imagination and memory. Encourage children's initiative and independence when making thematic additions to the work |
| Organizational part | Teacher. People have faithful friends and helpers - pets. Close your eyes. Listen. What did you hear? The audio recording “Voices of Pets” is played or the teacher imitates the voices of animals. 1st child. I heard a dog barking. 2nd child. I heard the cat meow. 3rd child. Like a cow mooing. 4th child. And I heard the horse neigh. 5th child. How a pig grunts, etc. Teacher. Right. Why are these animals called pets? Children. They live next to a person who takes care of them. Teacher: Tell me what a baby cow is called? Children: A baby cow is called a calf. Teacher: What benefits do you think cows bring to people? That's right, they give us milk and meat. People have learned to prepare many healthy, tasty and nutritious foods from milk. |
| Practical part | Teacher: today we will depict a cow walking in a meadow. Let's start drawing with the torso. It looks like an oval. Then we draw a round head. The head has an oval muzzle. On the face there is a nose and mouth. There are also ears and horns on the head. For our cow to see grass, she needs eyes. Now our cow needs to draw legs - at the ends of which there are hooves. Now we need a tail so that our cow can drive away flies. In order for a cow to produce milk, she needs an udder. What a beautiful cow we have! A cow grazes on a wide, green meadow. The warm sun is shining on her from above. Somewhere in the distance, in a village, a kind mistress is waiting for her. |
| Independent work of children | Children draw animals to calm music. The teacher, if necessary, conducts individual work. |
| Final part | Teacher: Now our cows will all gather into a herd. Children hang their work on the board. The teacher asks the child to give a name to his cow and tell what her character is. |
Schemes and templates for children 4-5 years old
Children at five years old already have basic drawing skills, especially if they attend a preschool where they are taught by teachers. But in the hot summer, many kindergartens are closed, and not all parents know how to draw themselves. In order to help your child with creativity, you can use children's instructions from the Internet.
How to draw a bee by creating your own coloring book.
Step-by-step instruction:
- Draw a round head.
- The body is drawn towards the head, like a flower petal or a propeller blade.
- Slightly curved lines divide the body into segments, depicting striped coloring.
- Children's imagination perceives animals as endowed with emotions, just like people. Therefore, the bee needs to finish drawing her eyes and smile.
- Now it's time to add antennae and wings.
- The final touch is a sting in the form of a narrow inverted cone.
More complex drawing techniques
Interesting! Insects are the best representatives of the fauna on which you can train your artistic skills. It’s easy to draw them using the simplest geometric shapes: a circle and an oval, which make beautiful caterpillars, bumblebees and bees.
Program and training in a chess club for kids
Class notes
| Author's full name | Title of the abstract |
| Shtyrkhunova T.N. | "Dolphin" (graphic drawing) Educational objectives: learn to draw a dolphin in motion, designate circles on the water and splashes using an eraser. Developmental tasks: expand your understanding of graphics, consolidate knowledge about marine mammals. Educational tasks: cultivate interest and respect for animals. Demo material: mnemonic diagrams - a story about a dolphin, a brush in a girl’s outfit, a pencil in a boy’s outfit. Handout: sheets of white paper according to the number of children, soft graphite pencils, erasers. Progress of the lesson: The lesson begins with a riddle about a pencil and a brush:
These tools came to the children to resolve their dispute. The brush claims that it is the most necessary - it is friendly with paints, and has a beautiful squirrel tail. The pencil helps the artist to draw pictures in gray tones. It is also very necessary, it can have different shades of gray. The pencil invites preschoolers to draw a dolphin. But first, children must talk about it, based on mnemonic diagrams with the following content:
Dolphins give birth to their children and feed them with milk. Dolphins communicate with each other by whistling. Finger gymnastics “Sea Animals” is carried out. Children are invited to depict a dolphin bending over in a jump. The teacher shows drawing techniques, applying shades with a pencil, and how to highlight circles and splashes on water using an eraser. Independent work of preschoolers. Analysis of finished works. The guys come up with names for the dolphins (for example, Beauty, Jumper, Veselchak, etc.). |
| Pshenkina Yu.A. | "Polar Bear and Northern Lights" (drawing with wax crayons) At the beginning of the lesson, the bear cub Umka appears, who has lost his friend and hopes for the help of the guys. They promise to draw him friends. Riddle about the Northern Lights.
The teacher explains to the children what kind of natural phenomenon this is and how beautiful it is. Multi-colored stripes shimmer in the dark sky, giving a reflection to the white snow - it seems to be trembling. Guys, let's help Umka and draw him friends - polar bears. But first we will play with you. A physical education session is being held
The teacher explains the principle of drawing a polar bear: the body is made up of geometric shapes (ovals of different sizes). Independent activity of preschoolers. |
| Shakhova L.V. | "Giraffe" (drawing with watercolors and wax crayons) The teacher invites the children to go to hot Africa, where there is never winter. Children are offered riddles about African animals. What follows is the teacher's story about the giraffe. This is a very kind and beautiful animal. He is the tallest animal in the world. The long neck helps the giraffe reach the tallest trees - acacias. And thanks to his excellent vision, he always notices predators in time. Beautiful spotted coloring provides excellent camouflage in the shade of trees. The teacher asks the children to carefully examine the giraffe, and then describe its appearance in detail (calls on several children). This animal has a small head with horns and large ears. The front legs of a giraffe are thinner and longer than the hind legs. Reading the poem “Giraffe” by B. Zakhoder. Finger gymnastics on the theme of African animals:
Practical activities for children. The teacher first clarifies why it is better to place the sheet of paper vertically. The outline is drawn with a simple pencil, then the spots are marked with wax crayons, and then the animal’s skin is painted with watercolors. Watercolor does not stick to wax - the spots remain bright. When the animal is drawn, the teacher invites the children to complement the composition with a suitable background (any materials can be used). At the end of the lesson, children talk about their giraffes. |
| Minaeva T.V. | "Fairytale Horse" Conversation on the topic: what a fairytale horse might look like, how it differs from ordinary horses. Reading an excerpt from A. Ershov’s fairy tale “The Little Humpbacked Horse.”
Looking at a picture of a running horse. Her body shape is discussed, how her legs, neck, and head are positioned. The teacher explains the basic principles of drawing a horse: how best to position the base, in which direction the mane and tail will develop, how the animal will hold its head and neck (emphasizes that the horse is a freedom-loving animal and has a proud posture). The teacher emphasizes that children can choose absolutely any color of paint and actively use gold and silver gouache. It’s good to depict how the grass sways under the horse’s feet. This will make the drawing more dynamic. You can add stars and a month to the sky if you wish. At the end of the lesson, the merits of each composition are discussed. |