Application made of colored paper for Sparrow elementary school. Templates. Master class with step-by-step photos.
Application made of colored paper for primary schoolchildren
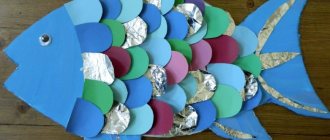
Application made of colored paper “Little Sparrow”. Master class with step-by-step photos.
Author: Nechaeva Elena Nikolaevna, primary school teacher, KSU “Secondary school No. 21, Saryozek village” Osakarovsky district, Karaganda region Kazakhstan Description: The guys really like to do appliqué. The master class is designed to work with primary school children and for those who like to work with colored paper. The material can be used in labor lessons or in circle work. Goal: developing the ability to perform interesting works from colored paper. Objectives: to teach how to correctly select the color scheme of paper for applique; observe safety precautions when using scissors at work; develop imagination, fantasy, creativity; cultivate perseverance and accuracy while performing work. Materials and tools necessary for making an applique: cardboard, colored paper, scissors, glue, pencil, black felt-tip pen or marker, templates, sample work.
Everyone knows the sparrow. And, it would seem, what could be interesting about such a familiar bird? This bird is found in many fairy tales and is loved by Russian folklore. Guess where the name of the sparrow came from: “Strike the thief!” Oh, that’s how it turns out, “beat the thief.” So the sparrow is our thief! What is he stealing? Probably grains, crumbs from pigeons, dogs, cats and even people. The character of this bird is nimble, agile, cunning, pugnacious, and brave. cocky. But scientists believe that our sparrow is not our thief at all. They say that the word "sparrow" comes from the ancient "thief". From this “thief” the words we know as “fence” or “gate” come from. Why then “throw and beat”? Because a sparrow is a bird that sits on fences and gates and has lived next to a person for a long time. That's why the sparrow! Gray, small, funny, jumps next to me, I'll pour crumbs for him, I'll drive the cat away.
You tweet more cheerfully, My good sparrow. “I was returning from hunting and walking along the garden alley. The dog ran ahead of me. Suddenly she slowed down her steps and began to sneak around. I looked into the distance of the alley and saw a young sparrow with yellowness around its beak and down on its head. He fell from the nest (the wind strongly shook the birch trees of the alley) and sat motionless, helplessly spreading his barely sprouted wings.” This is what I.S. Turgenev writes in his story “Sparrow”. So our sparrow fell from the nest, he is still very small, he cannot fly at all. Let's make an applique from colored paper and make a little sparrow. But first, let's remember safety precautions when working with scissors: Use scissors with rounded ends. Store the scissors in a specific place, with the sharp ends facing away from you. Pass the scissors rings first with blades closed. You can't cut on the go. When working with scissors, it is necessary to monitor the movement and position of the blades during operation. Do not use blunt scissors or loose hinges. Do not hold scissors with the blade facing up. You have templates on your tables, using them we will cut out all the details of our sparrow. Choose colored paper for your applique. For this work we will need templates.
Making the “Little Sparrow” applique: 1. Take cardboard and cover it half with green and half with blue paper - this is grass and the sky.
2. Trace the sparrow’s pants according to the template, cut them out and glue them onto the grass, approximately in the middle.
3. Trace the sparrow’s abdomen according to the template, cut it out and glue it onto the panties.
4. Trace and cut out the left wing of the sparrow and glue it.
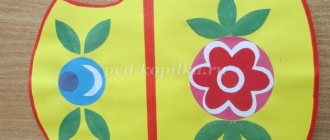
5. Next, trace and cut out a scarf from bright colored paper and glue it.
6. We trace the right large wing of the sparrow according to the template, cut it out and glue it on the right side.
7. Cut out the small right wing of the sparrow and glue it onto the large wing.
8. Cut out the tail according to the template, cut it out and glue it.
9. Next, we will outline and cut out the head, and glue the head.
10. Glue the cut out top of the hat above the head.
11.Next, trace and cut out the ears of the hat. Glue it to the top of the hat.
12.Glue a bell to the hat.
13. Next, cut out the white eyes and glue them onto the sparrow’s head.
14. Glue black eyes onto the white eyes and small white circles on them.
15. Cut and glue the beak.
16. Glue on the pink cheek.
17. Cut out the paws according to the template and glue them onto the sparrow.
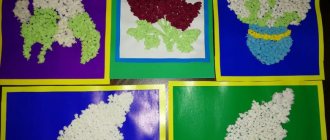
Our sparrow is ready, you can make a flower meadow by gluing flowers to the grass.
We recommend watching:
Practical advice and knowledge on teaching preschool children how to design from paper Do-it-yourself colored paper applique for 1st grade children. Cat Applique made of colored paper for children 7-8 years old with templates. Mouse Spring applique for children for the holiday of March 8th. Templates. Master class with photos
Similar articles:
Application for children 5-6-7 years old. Lilac in a vase
Applique Cockerel made of colored paper
Volumetric applique made of colored paper “Sunflower” for children in grades 2-3 step by step with photo
Paper contour mosaic
Abstract of the GCD for the application on the topic: “Sparrows in puddles”
"Sparrows in Puddles"
Summary of GCD for application in the middle group
Educational field: Artistic and aesthetic development
Notes prepared by: teacher
Tsytsarkina N. A.
Summary of GCD for application in the middle group
Educational area:
artistic and aesthetic development
Form:
direct educational field
Subject:
"Sparrows in Puddles"
Tasks.
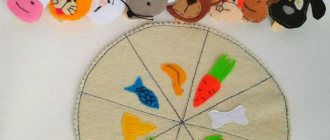
Teach children to cut out circles (a puddle, the body of a sparrow) by sequentially rounding the four corners of a square. Enrich the applicative technique, supplement it with graphic elements to convey small details and dynamics. Show composition options (sparrows in a puddle, above a puddle, near a puddle, etc.). Develop creative imagination.
Equipment.
Sheets of blue paper of the same size as the basis of the composition; brown paper squares for the body of the sparrows and for the head (size from 5x5cm to 7x7cm); scissors, glue sticks, colored pencils or markers; oilcloths, paper napkins, easel.
GCD move.
The teacher reminds the children how in winter they watched the birds at the feeder and fed them. He says that all the birds are very happy about the arrival of spring; They bask in the sun and enjoy swimming in puddles and washing their feathers. He offers to make paintings about spring “Sparrows in puddles” and shows an approximate sequence of work:
We take a square of blue or light blue paper and turn it into a puddle (we round the corners with scissors): we hold the square tightly by one corner, and round the other corner - we move the scissors in an arc from the middle of one side to the middle of the other side - the corner has fallen (the teacher shows ), then we round off another corner (shows) - and this corner fell (the teacher comments on all the actions). Look: the square has turned into a circle - it's a puddle! If necessary, the teacher can mark visual landmarks on paper blanks (draws points on the midpoints of the sides of the square and one or all arcs).
We take a small brown square and round the corners to make the body of a sparrow, cut off the corners with smooth movements of scissors or pluck the corners so that the square turns into a circle;
If the children are confident enough in using scissors, the teacher offers them to cut out a head from the smallest square in the same way (or gives them ready-made shapes);
Glue the sparrow (body and head) onto the puddle.
To show that our little sparrow is splashing water, jumping, and rejoicing, we need to arrange his wings in different ways: raise them, spread them to the sides, etc. (Shows options for the placement of wings and offers to draw as you wish.)
Then we finish drawing the eyes and beak, wings, tail, legs with felt-tip pens or colored pencils.
For those children who quickly completed the artistic task, the teacher offers to make a “friend” or several “friends” for the sparrow so that he will not be bored alone.
Children can do collective work, uniting 4-5 people in one group. In this case, the teacher draws the children’s attention to the fact that sparrows can be placed in a puddle in different ways: swimming in a puddle, diving into a puddle, flying over a puddle, or jumping along the shore of a puddle.
After class. Organization of an exhibition of children's creative works “Sparrows in Puddles”.
Poultry
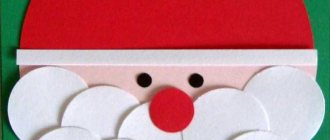
As a rule, children's acquaintance with the world of birds begins with poultry, because this is most expedient. Therefore, already in kindergarten, children know perfectly well what poultry is and what they look like.
It is advisable to start getting acquainted with this type of creativity with familiar images, so it will be much easier for the child to consolidate the acquired knowledge in memory.
Poultry includes ducks, chickens, geese, turkeys; all of them are quite easy to make from paper, cardboard or other improvised means that you decide to use in the craft.
The easiest way to assemble a craft is from paper or cardboard, because it is a hard material from which absolutely any shape can be cut.
For the craft you will need:
- Base (colored cardboard)
- Watercolor or gouache
- Plasticine
- Glue stick
- Cotton pads, napkins
Assembly
Let's start assembling the small chicken.
The assembly instructions are very simple; the body will be a solid cotton pad, which needs to be glued to the base using a glue stick.
Next, to complement the image, giving it an increasingly realistic look, you need to place another cotton pad a little higher; it will serve as the head of the craft. Please note that these 2 cotton pads should be touching each other.
At this stage it is necessary to paint the workpiece using yellow paint. It is worth remembering that cotton pads absorb moisture well, so you should try to squeeze out the brush, leaving only paint with less water on it.
Once they are carefully painted yellow, you need to give them some time for the paint to dry.
When it is dry, you can begin further assembly. To make chicken wings, you need to take a new cotton pad and use scissors to cut it into 2 equal parts. Only one half is needed for this craft.
It should be placed on the body so that the rounded part of the disk is at the bottom. The part of the cotton pad itself should be located exactly in the middle of the body.
The wing also needs to be carefully glued, wait until the glue dries, and then paint it yellow, like the rest of the parts. All that remains is to make the beak, eyes and legs.
For the beak and paws, red or burgundy plasticine is used. A part of the desired shape is carefully molded from it, after which it is glued to the base with a slight movement.
To make an eye, it is recommended to use a black felt-tip pen; you just need to gently press once on the desired place, and an even circle will be ready.
This completes the assembly of a simple craft; the time spent on manufacturing and combining all the parts does not exceed 30 minutes, which is very convenient.