Autumn craft ideas for kindergarten
Let's start with the simplest compositions. It is difficult for kids to make intricate crafts, so appliques made from dry leaves, chestnuts and acorns would be excellent options. Such applications will delight the little ones.
A wreath made of leaves is also a fairly simple children’s garden craft, but no less beautiful for that.
Such a wreath will be an excellent craft if you do not have time to stock up on natural materials. Just cut out the leaves from colored paper; it will be especially chic if you decorate the leaves with paints or gouache.
Very simple crafts for kids - trees with colorful foliage. There are so many options for making them!
All children love hedgehogs and many people associate this animal with autumn. Cute and prickly hedgehogs with an apple or mushroom on their back will delight children. They are made simply: as a rule, the body is made of plasticine, and needles - seeds (or other natural materials) are pressed into it.
Note! DIY Christmas crafts made from felt
Children in the older group of kindergarten are no longer so interested in making simple compositions, so we found several more complex options, but making them will not be difficult. For example, a doll with a dress from dry leaves is not difficult to make. You need to take the top half of the doll and place it in the neck of half a plastic bottle. Due to the shape of the bottle, different styles of dresses will be obtained. The leaves are glued in layers and moment crystal glue is used. Of course, girls will like this craft more than boys.
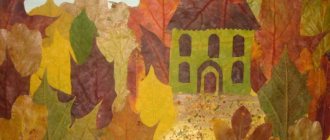
The following crafts are universal, both boys and girls will be delighted with them. Of course, these are already beloved houses made from natural materials. In such a house you can settle fairy fairies or animals, or you can leave them on their own.
Corrugated paper aster
Buying laminate wholesale in MoscowDIY New Year's crafts - 9 best options
- Crafts for Easter from scrap materials
You will need: corrugated paper of purple, yellow, green and light green, scissors, wire, glue gun, pencil, ruler, watercolor paints, brush.
Master Class
- Prepare a strip of purple corrugated paper 4 cm wide.
- Tint one edge of the strip with purple paint and set aside to dry.
- Fold the strip several times.
- Make cuts along the unpainted edge. The first blank is ready.
- Make the second blank in the same way, only take a purple strip 6 cm wide.
- Prepare a strip of yellow paper 3 cm wide.
- Fold the yellow strip several times and make cuts.
- Wrap the wire with a light green piece of corrugated paper and secure with glue. This will be the stem.
- Wrap a yellow blank around the end of the stem - these will be the stamens.
- Twist the ends inside the purple piece, which is 4 cm wide, using a pencil.
- Step back from the base of the stamens and glue the petals.
- Take a 6cm wide purple blank and wrap it around the bud as shown in the photo.
- Twist the ends of the petals and straighten the middle.
- Cut out 6 sepals from green paper, then glue them on.
- Cut 6 long leaves of different sizes from light green paper and glue them to the stem.
The corrugated paper aster is ready! You will find even more flowers HERE.
I recommend watching this video!
Note! How to make crafts using quilling technique