What and how to make an applique from leaves
What we need:
- 1. Natural material: leaves of various sizes, shapes and colors (they can be dried in advance), twigs, flowers, herbs, seeds.
- 2. Colored paper, felt, glue, scissors, paints, pencils, cardboard.
- 3. Varnish can also be useful to fix the finished work and give it shine.
How to work with leaves:
To start working on crafts from leaves, they must first be dried. This can be done between the leaves of books, or using an iron. Store the leaves between the pages of books or newspapers.
Types of applications made from natural materials
- Overlay applique. A simple look that does not require additional work with leaves - they are glued to a sheet of paper or cardboard, creating the intended plot. These can be animals, trees, mushrooms. You can add some details.
- Mosaic or modular application. This technique involves gluing leaves that are identical or similar in shape. This way you can make a bird's tail or fish scales.
- Symmetrical applique. In this case, it is necessary to select similar leaves to create mirror images. This way you can make an image in water, a butterfly, a dragonfly.
- Ribbon applique. A type of symmetrical applique, but in this case you can make several similar images.
- Silhouette applique. The leaves are trimmed to create the desired pattern or shape.
Children become interested in applications and crafts even at the stage of collecting material. Kids like to collect leaves on the paths while walking, look for cones and chestnuts. Therefore, it will not be difficult to persuade your child to use all this to create a beautiful applique.
Simple autumn applications for kids
It is always more difficult to work with the youngest children and you need to find an approach to them. They cannot be forced to sit on one job for a long time. Therefore, the craft should be as simple as possible. How to make an interesting autumn-themed craft in just a few minutes to inspire your child to continue.
It seems that nothing simpler than this application can be found.
Take one beautiful yellow leaf. Turn the wide part down. Glue it onto cardboard. You can finish drawing the arms and legs, and insert the drawn umbrella into your hand.
A leaf like this with eyes will look funny. They can be made from plasticine or cardboard, or maybe you can find small buttons and glue them on. Don't forget to make it cheerful by drawing a smile.
Autumn from palms: applique
We will need:
- Colored paper
- Scissors
- Glue
- Sheet of cardboard
1. We need brown paper to create a tree trunk.
2. Trace children's palms on colored paper, making several multi-colored blanks.
3. Glue the tree trunk and leaves onto the cardboard
Options for appliqué on the theme of autumn made from palms:
Application for the younger group: autumn tree
Another applique option for the little ones is a tree.
It’s easy to make: collect thin branches of approximately the same size and glue them in a bunch on cardboard. We lay the leaves above like a crown. You will get an autumn tree from leaves.
You can make a torn applique from colored paper.
Using cereals you can make a beautiful autumn tree.
Paint the millet with different colors. Draw the trunk and branches. Using PVA, glue the cereal to create a tree crown.
Application for the younger group on the theme of autumn
Applications made from natural materials in kindergarten are not very complicated. For them you can use not only leaves, but seeds, acorns, twigs. Colored paper and cardboard are also used.
Autumn flower applique
Beautiful colorful leaves that fall to the ground from trees can be transformed into an autumn flower. You can create such a flower using glue and a sheet of cardboard.
If one flower is not enough, then you can make a vase with flowers from autumn leaves.
Beautiful umbrellas will be made from pieces of colored paper. This type of applique is called cut-off.
Crafts for March 8
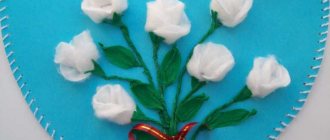
Tulips are very delicate and graceful flowers. And such crafts for March 8, made in the preparatory group, will be an ideal gift for mothers.
These flowers can be put in a bouquet or given one at a time - in any case they will look very beautiful. Materials to prepare:
- Disposable plastic spoons,
- One flower will require four pieces,
- Scotch tape and colored corrugated paper,
- Shades should be green and red.
For one flower you need up to one meter of each type of paper. Wrap red paper around the spoons, and wrap the handle of the spoon in green paper and use tape to secure it. Attach leaves cut from green paper.
Beautiful flowers are ready, you can arrange them as a bouquet in a basket.
Autumn applications: preparatory group
Applications made from natural materials in kindergarten occupy a large part of the children's development program. Autumn gifts of nature open up many possibilities for activities with children. Therefore, autumn fairs are a place where you can show off your talents.
You can invite the children to come up with a real composition of leaves.
If you combine drawing and applique, you can make such a cute hedgehog from seeds.
Using flower petals and grass sprigs, you can make beautiful applications
Master class on three-dimensional applique for children and parents of the preparatory group
Short-term parent-child project “First-Grade Day”.
Joint activity of parents and children of the school preparatory group in the production of three-dimensional appliqué.
Goal: to promote the harmonization of parent-child relationships, the formation of parental consciousness when preparing children for school. Relevance:
Visual activities, including drawing, modeling, and appliqué, are of great importance for the comprehensive development of preschool children and preparing children for school.
Visual arts classes, which are regularly held in kindergarten, are the basis for a child’s acquisition of artistic experience. The main task of the teacher remains to create conditions under which parents can enrich their experience with new artistic impressions and create favorable conditions in the family for the child to develop independence and creativity when working on an application. Implementation dates:
from October 20 to October 24.
Project participants:
parents and children of the school preparatory group, art teacher.
Place of implementation:
MADOU - kindergarten No. 2, hall named after Bazhov.
Equipment:
projector, multimedia presentation, manuals for parents, art materials and tools. The result of joint activities, parents’ awareness of the importance of developing artistic skills in children.
Master class on the application “Forest clearing”.
Joint activity of parents and children of the school preparatory group in the production of three-dimensional appliqué.
The master class is designed for children of senior preschool age and parents.
Description of work.
Volume applique.
Purpose.
The work can be used for presentation at an exhibition, as a gift, or as a decoration for a child’s room.
Goal: Formation of the preschooler’s mental and creative abilities, work skills, and artistic taste. Objectives:
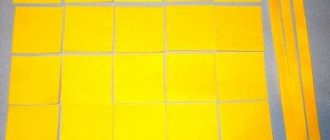
• Continue to teach children to cut out flowers from paper squares folded twice diagonally and make multi-colored (polychrome) flower corollas from them, placing the cut out shapes on top of each other;
• Improve the technique of cutting out symmetrical objects from paper folded in half; • Improve the technique of cutting out paper folded like an accordion (ribbon applique); • Develop compositional skills (place cut out elements in tiers starting from the background); • Improve the technique of cutting circles by sequentially rounding the four corners of a square; • Introduce the types of applications; • develop the individual abilities of pupils; • instill aesthetic taste; • Develop fine motor skills of the hands; compositional skills; • Creating a favorable atmosphere for interaction between the child and the parent. Equipment:
Finished base parts made of fA4 cardboard, folded on the floors;
blanks for applique; templates; glue stick, simple pencil, felt-tip pens, scissors, cups for handouts, projector, screen. Participants:
a group of 10-11 children with parents.
Progress of educational activities: Part 1: Introduction Hello dear parents. I'm glad to see you at my master class. For visual activities. Visual activities, including drawing, modeling, and appliqué, are of great importance for the comprehensive development of preschoolers and preparing children for school. Today I want to draw your attention to the application; it is very important for the formation of the mental and creative abilities of a preschooler, for the development of his moral ideas, work skills, and artistic taste. In applique classes, preschoolers master a range of labor skills related to processing material (folding, cutting, gluing) and using tools (scissors, glue, brush). The process of creating an applique consists of a number of sequentially performed actions that require from the child not only a high level of development of visual and technical skills, but also concentration, perseverance, endurance, accuracy and independence. Children improve and coordinate their hand movements, develop qualities such as accuracy, speed, smoothness, and develop a work culture. Let's invite our guys. Children pass and sit down next to their parents. Today we will make a three-dimensional appliqué called “In a forest clearing” and get acquainted with its types. The quiet melody of the forest sounds. Forest glade A bright forest glade, calling me from afar, beckoning me into the green, silky comfort of the tall grass. The daisies nod their heads, And the blue bell, Straightened its shoulders behind the violet, In the uncut forest grass. Bees fly over the flowers, butterflies flutter in the distance. And the birds on the branches bring out their sonorous Rulades. The slender birch trees are beautiful, With a carved yellow earring, A golden ray walks along the thin white-trunked skin. And in the sky, the clouds rose, They arranged a luxurious feast, The sun laughed at them, Enormously illuminating the world. Nikolai Stolyarov Part 2: Practical Look what a beautiful forest clearing. Let's make forest clearings together today. We have all the tools and blanks to make it. Guys, where do you think we should start our work? Children's answers Correct, we need to create a background for our clearing. We take cardboard and glue a green and blue background (earth and sky) onto it. Apply glue to the rectangles on the board along the edge. We try to combine all the edge lines so that our clearing is beautiful and neat. To make our applique voluminous, we glue a strip of cardboard onto the blue background near the fold line. This is necessary so that our forest is in the foreground. Press the strip with the finger of your left hand and spread glue from the finger to the side. Glue and press with a napkin. Guys, please tell me how to cut out trees and a forest from long strips of colored paper so that the trees alternate and repeat? Children's answers That's right, well done, cut the trees using the strip method using templates. To do this, we take two long green strips of colored paper (light and dark green) and fold them into an accordion shape with the colored side facing inward. We apply the template, aligning the edges, and outline the crown of the trees. We cut out only the upper part of the crown without touching the fold lines. Why can't you cut the fold line? Children's answers Yes, that's right, if we cut the fold line, we won't get a ribbon applique, and neither will the trees. As work progresses, parents help their children if they find it difficult. Glue the dark green trees above the white cardboard strip. You need to glue a row of trees made of light green paper onto a white stripe, while only the lower part of the trees needs to be smeared with glue. Gently spread glue on the board, on the white side. Okay, well done! Physical exercise “Trees grew in the field”
Trees grew in the field.
It's good to grow in freedom! Stretching - arms to the sides. Everyone is trying, reaching for the sky, reaching for the sun. Pulling your arms up. A cheerful wind blew, the branches began to sway, and the children waved their hands. Even the thick trunks bent to the ground. Bend forward. Right and left, back and forth - This is how the wind bends the trees. Tilts left and right, forward and backward. He turns them, he turns them. When will there be a rest? Rotation of the body The wind died down. The moon has risen. There was silence. Children sit down at the tables. Have a rest! Can you think of what else is missing in our clearing? Children's answers Of course, honey! Let's settle it in our sky, let it be a sunny, warm clearing. Look, you have a yellow square on your tables, take it. How to make a circle from a square without using a template and a pencil? Children's answers Correctly, cut a circle out of a square by gradually cutting off the corners. You guys are great, you know everything! Glue our sun onto the blue background of the sky. Spread it on the board on the white side in a circle. What is our sun missing? Children's answers Of course, warm rays. I suggest you make the rays using cut-out appliqué. Take a yellow rectangle and cut long strips out of it. They will look three-dimensional on our sky, since their edges will not be smooth. Glue the rays near the sun. Spread glue on the board from the white side from the finger to the side. Well, what is the sky without white and fluffy clouds? Take a white square, draw a silhouette of a cloud, cut it out. This type of applique is called silhouette cutting. Glue it on a blue background, sky. You can use a felt-tip pen to make our cloud fluffy. It’s so nice in our clearing, the trees are growing, the bright warm sun is shining. Guys, what do you think is still missing in the clearing? Children's answers Correctly beautiful, bright colors. Look at the images of several flowers whose corolla has a circular structure - garden chamomile, aster, carnation. What are the similarities and differences between these colors? Children's answers Children come to the conclusion that all the flowers in question look like the sun or a star when you look at them from above. How can you cut such flowers? Children's answers Yes, that's right, you can cut it like this... a very good way... Flowers, we will cut out a rosette flower by folding a paper square twice diagonally. Take a square of the color you like and bend it diagonally 2 times. Draw the petal you like. Cut it along the drawn line without cutting the fold line. You can make a lush polychrome (multi-color) flower - 2-3 or more cut out shapes are glued on top of each other so that the largest and brightest is at the bottom, and the smallest is at the top. In this case, you only need to glue the flowers together in the centers, lifting the petals to get a voluminous, lush shape. From the yellow square we make the centers for the flowers, fold them in half 2 times, we get 1 small square, and cut them out. Glue the flowers onto the clearing. Music is playing, guys, let's turn into little beautiful butterflies! Physical exercise “Butterfly”
Our butterfly shook itself, smiled, and stretched. Once - she washed herself with dew. Two - she spun gracefully. Three - she bent down and sat down. And she ate the nectar to her heart's content. Children perform movements in accordance with the text. And you want colorful butterflies to fly to our clearing. To do this, take a square of any color, fold it in half, draw 2 butterfly wings, and cut them out along the drawn line without touching the fold line. You can design butterfly wings using a felt-tip pen. Glue butterflies to the clearing. Now our forest clearing is ready, thank you for your work, you have a very colorful, beautiful postcard, you are great! Music is playing. The teacher offers parents reminders for the future first-grader. Parents, children and teachers exchange impressions of joint activities.
Presentation on the topic: Master class on the application “Forest Clearing”
We recommend watching:
Parent meeting on traffic rules in the preparatory group Creative workshop in kindergarten “Making laboratory materials with your own hands” Lesson with parents in kindergarten. Abstract Literary quiz on fairy tales for kindergarten
Similar articles:
Plan of interaction with families of children of the middle group of general developmental orientation
Methodological recommendations for drawing up an individual development program
Educational and creative project on the theme “Golden Autumn”. Junior group
Project for children of the senior group “Our cheerful garden”
Leaf applications: senior group
Leaves are the most accessible material for embodying your talent in creating bright and colorful paintings and applications on the theme of autumn. By choosing leaves of the correct shape, you will get a variety of animals and insects.
Applique: fox made of colored paper
It is very convenient to make applications with children using ready-made templates. To do this, just print the blank and cut it out.
Another version of the fox template made from colored paper made of geometric shapes.
The fox cubs may turn out completely different, but adding them with a drawing will result in interesting works:
Unusual three-dimensional applique made of colored paper
Applique Autumn tree: middle group
The change in nature in autumn is noticeable to everyone and even children see the difference when the trees turn yellow.
We will need:
- Sheet of cardboard
- Colored paper
- Glue
- Scissors
Create a tree trunk and branches from brown construction paper.
Glue the tree onto a background sheet of cardboard, having previously made a tree crown
Glue leaves of different colors onto the branches of the tree.
Autumn mushroom: applique
You can always find mushrooms under a tree in the fall, so learning how to make mushroom appliques is also useful.
Mushroom cutting templates for appliques
If classic appliqués are already boring and you want some variety, then you can combine drawing and gluing natural materials. Such works are quite suitable as applications made from natural materials for elementary school.
Children can already give a gift to their mother by drawing her portrait and adding leaves and other natural materials to the picture.
Autumn applications made from natural materials
With the help of activities with natural materials, you can also strengthen children’s understanding of changing weather conditions, explain to them what the seasons are and what happens with their changes.
The late autumn applique will help reveal to the child a new stage of nature that precedes winter weather. After all, in late autumn we observe a cooling, the leaves become less and less and the last leaves are blown away by the wind from the branches of the trees.
Application: autumn has come
An application on this topic will reveal to the child the concept of how summer changes to autumn, what happens in nature during this period. After all, there are still many leaves on the trees, some green, but also red, orange and burgundy.
Take unnecessary puzzle pieces, paint them with different colors, whatever color you want the leaves on the tree to be. The tree trunk can be drawn, or it can be glued from paper.
Volumetric applique on the theme of Autumn
Autumn is accompanied by rains and an attribute that can be found in any apartment is an umbrella. It’s quite simple to depict an umbrella and create a voluminous applique on an autumn theme.
Take a white sheet of paper. Starting from the corner, draw any pattern. You need to cut the corner in a semicircle. We fold the cut out part of the sheet like an accordion.
Glue this part onto a piece of paper
You can draw raindrops on a piece of paper.
You can also use a ready-made template to make an umbrella.
We cut out the template, having previously printed it, and make patterns on it.
Just like in the previous version, we fold the umbrella blank like an accordion
You can make such funny umbrellas
Draw or print out an image of a girl and glue an umbrella to her hand.
Recommendations for Improving Collaboration
- When learning how to applique vegetables, it is important to follow each step consistently.
- It’s worth preparing all the required materials and templates in time so that you don’t have to be distracted by collecting what you need later.
- At the time of preparatory work, it is of considerable importance to familiarize children with works of art, as well as demonstrate drawings and photos of vegetable appliqués.
- With children, conducting classes in the form of a game is more suitable, since this way the children’s attention is drawn to what is happening and thereby develops emotional responsiveness.
- Adults should create a small plan so as not to lose track of the sequence of actions. Older children can follow the steps themselves.
- It is worth giving young creators more independent work so that they can express their imagination and learn how to realize it.
- During independent work, an adult is obliged to help the children, especially those who are not doing well.
- Upon completion of all the work, it is advisable to hold a collective exhibition, when everyone can look at someone else’s work and thus learn to enjoy the results of their own and other people’s work.
- In addition to individual work, the proposed ideas can also be implemented in group work, when everyone cuts out their own vegetable and glues it onto a large common base in the form of a plate, pan or cup.
- This approach is suitable for many applications. Especially on the topic of fruits.
Leaves applique: autumn
It is not necessary to use only whole leaves for appliqués. There is a separate direction in creativity - broken applique. You can use not only leaves, but also colored paper. Its principle is that the silhouette of the figure is created from torn material.
To make the application, we will need:
- Sheet of cardboard
- Leaves
- Glue
- Dye
Dried leaves must be crumbled.
Draw a tree trunk and branches on cardboard.
Once the paint is dry, apply glue to the trunk and branches where you want the leaves to be.
Sprinkle pieces of leaves onto the glue.
Press down the leaves a little to secure.
Shake off excess leaves from the appliqué.
The same tree can be made using colored paper.
It is not so easy to cope with such an application. The main thing here is to choose the right leaves
Unusual applique
If the master has already mastered several basic techniques, then it’s time to think about making an unusual craft. For example, you can make an original snowman with your own hands.
"Snowman"
For this job we will need:
- Colored cardboard: blue, white, red, black;
- Scissors;
- Glue.
Step-by-step instruction:
- Step one. Cut out three circles from white cardboard: large, medium and small.
- Step two. Lubricate the large circle with glue and glue it in the center of the blue cardboard, then glue the middle and small circle onto it so that they come into contact with the large one at the highest point.
- Step three. We cut out a red hat and a carrot for the snowman, and twigs from black cardboard, eyes, a mouth and hands. We glue them to our snowman.
- The finished application should result in a snowman looking up with his snowy head raised; to complete the picture, you can add snowflakes around him. Then it turns out that he is admiring the falling snow.
Paper applications are a good reason to have fun and interesting time with your child.
Each such work develops not only fine motor skills, but also imagination. And the most important thing is that there is nothing complicated here, the main thing is to start, but you won’t be able to stop!
Applique Autumn bouquet
This craft is quite suitable as a gift for a teacher or mother from a schoolchild. After all, such a bouquet of leaves will last much longer than a fresh bouquet of real flowers.
Pre-dry leaves from different trees. Prepare glue, scissors and a sheet of cardboard.
Form a vase from the leaves by gluing them onto cardboard. And then help your child create a beautiful bouquet of leaves. To make it bright and neat, use light leaves for the craft, without holes or stains.
A vase for an autumn bouquet of leaves can be made from colored paper, or you can create a bouquet not only from leaves and do without a vase.
Materials for applications
The most popular material for applique is paper. As a basis, you can take simple colored, wrapping, corrugated, foil, self-adhesive, kraft paper, and also use a variety of clippings from magazines and notebook covers.
Often the basis for such crafts is used:
- cereals and dried plant seeds (rice, sunflower seeds, peas, beans);
- dried leaves of trees and shrubs, flower petals;
- small shells, small pebbles;
- sand;
- plasticine;
- felt;
- buttons;
- cotton wool, cotton pads.
Naturally, to create an applique you will need scissors; you can use simple stationery or curly ones that will make the edges of the paper in a certain pattern. You can use shaped hole punches to create small, neat shapes (butterfly, tree leaf, heart, star). PVA glue, glue stick, and silicone glue are good for gluing.
Autumn paintings, panels: applications
Using the appliqué technique, you can create beautiful and original paintings from a variety of natural materials.
Collect various leaves, twigs and flowers, dry them as a herbarium and start creating real panels and paintings.
The following are perfect for such a picture: moss, straw, spikelets, seeds, small flowers
Painting “Autumn Girl”
Positive aspects of applications
When creating applications, the child develops fine motor skills, masters and improves coordination of movements. Working in this technique, the baby actively fantasizes, develops observation and logical thinking, it is easier for him to learn new colors and combine them with each other. With the help of this type of activity, the child learns to divide one whole into several parts, and vice versa - to create one whole from several parts.
Volumetric applications of vegetables and fruits in the preparatory group
Every child will be interested in making a variety of fruits and vegetables out of paper, which they eat from an early age. They can be made as appliqués on paper or in volume.
How to make an apple out of paper
We will need a sheet of red double-sided paper. Fold it in half and cut it. We also fold the halves in half and draw the silhouette of half an apple with a pencil.
Glue the apple halves onto a piece of paper and create a core, stalk and leaf.
Paper crafts
Paper is a very convenient material, working with which allows you to practice many important skills and gives a lot of scope for the child’s imagination.
In order for children to become more diligent, as well as more careful and attentive, pay attention to paper crafts for work in the preparatory group.
Fruit applique: senior group
Making strawberries out of paper
Cut out tails from green paper.
Fold two pieces of red paper in half and cut out a heart.
Glue one part to the base of the sheet, and glue the second along the fold line.
Glue a green tail cut from a template on top and draw dots with a black felt-tip pen.
Volumetric cherries made of paper: applique
From red paper you need to cut 4 circles (diameter 5-6 cm).
Fold the circles in half and cut out the green strip.
Take a green sheet 12*6 cm and cut out the leaves by folding the paper in half
Glue a strip folded in half onto a sheet of cardboard. Glue leaves on top and a cherry on each branch.
Bunch of grapes made of colored paper
paper horse
In the photo of the crafts in the preparatory group you can see an interesting product - a horse made from a paper template.
To work, you will need brown double-sided cardboard, a black felt-tip pen, double-sided black paper, and the presence of scissors, pencil glue and a simple pencil are also important for the work.
In addition, find a horse template on the Internet that you will use for your work.