If you like to make things with your own hands, then you may bring back whole bags from your vacation to the coast with shellfish shells and small pebbles that you collected on the beach.
Souvenirs made from them will remind you of your vacation, and the process of working on them will give you creative satisfaction.
In this article you can get ideas if, for example, your child needs a sea craft for kindergarten, or if you just want to enjoy the creative process.
Even if you don’t have natural materials, it doesn’t matter. Crafts with a marine theme can be made from more affordable materials.
Materials for working on a marine theme
All the crafts proposed in this article are very easy to make; they do not require any very rare or expensive materials. Most of them can be bought at a stationery store, and shells and pebbles can be collected on the beach or, if this is not possible, purchased at a souvenir store.
Everything you need for each specific souvenir will be listed separately.
Photo report of the application lesson: “Underwater world - Cheerful jellyfish” (second junior group).
To become a friend of nature, to learn all its secrets, to solve all its riddles, to learn to observe, together we will develop attentiveness, and our curiosity will help us to learn everything.
The underwater world is very colorful and vibrant, there are so many interesting things there: unusual plants and algae, colorful fish and menacing sharks, playful dolphins and giant whales, but it is not directly accessible for children to explore. After all, you can’t just look there. At today’s lesson, which takes place as part of the thematic week “Black Sea Day,” I invite the children to “dive” into the seabed and get acquainted with a jellyfish through arts and crafts (appliqué).
Lesson topic: “Underwater world - Cheerful jellyfish” (applique)
Goals and objectives:
- Introduce children to the holiday “World Black Sea Day”;
- Deepen knowledge about the Black Sea and its inhabitants;
- Expand and deepen children’s understanding of jellyfish;
- Cultivate an interest in nature, a desire to learn something new about it;
- Foster a desire to protect nature.
Lesson format: group lesson.
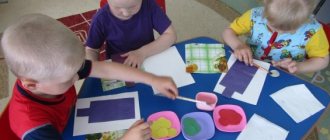
Class participants: children of the second junior group.
Material by number of children:
- A sheet of white paper;
- Templates made of colored paper (semicircle, “eyes”, “mouth”...);
- Glue;
- Tassels;
- Rugs;
- Napkins;
Preliminary work:
- Reading fiction;
- Reading poems about the inhabitants of the Black Sea;
- View illustrations of jellyfish;
- Some information: Jellyfish are incredibly beautiful, they are transparent because they are made of water. They have an amazing property: they foresee a storm at sea long before it begins and go to the depths of the sea away from the shore. The study of this property allowed people to create a device that could warn of the approaching storm.
Progress:
Ch udo-umbrella on the wave
Swings merrily. with myriads of lights . The umbrella is watery. Likes to live where it is clean. (Medusa) Author: Struchkov.
Today we will travel through the “Underwater World of the Black Sea”. Let's please him with our works and make a funny jellyfish using the applique technique.
You will need:
- Good mood;
- The desire to take a picture.
All is ready? Then let's get started with the task:
— Guys, look, what will you make pictures from?
I clarify what each child must do, what techniques they will use during work (gluing....):
You will create your picture from colored paper, glue the details of the jellyfish (semicircle, eyes...) onto a white sheet of paper.
Independent work of children:
During my work, I give children individual advice and provide assistance.
Glue a semicircle of colored paper to a white sheet.
We glue strips cut from colored paper along the edge of the semicircle on the reverse side.
Glue on the jellyfish's eyes and smile.
These are the wonderful and unusual jellyfish we created; each work deserves special attention and appreciation.
Our kindergarten has changed
Turned into the bottom of the sea.
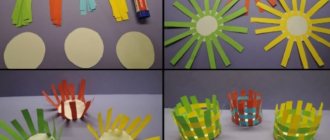
Accordion paper fish for children 5-7 years old
We will need a long and voluminous strip folded like an accordion.
Small stripe; and we also bend it like an accordion - the tail.
A small semicircle, on the edges of which we draw arched stripes - fins.
2 circles with a dot in the middle - eyes.
Fold the larger strip in half.
Fold a small strip in half. We fix it with glue from the edge of the large strip in the middle.
Also in the middle between the two halves of the large strip we glue a semicircle so that it protrudes evenly on both sides of the strip.
Glue the 2 halves of a large strip together with an accordion.
Glue on the eyes.
As you can see, you can make cute fish using the same technique in different ways!
Author of the work
Another option is to make the accordion a bright multi-colored one; to do this, you can stick colored strips onto the main sheet and then fold it into an accordion. Or first fold the accordions and then glue one on top of the other.
I also recommend Riddles, fairy tales, games about the sea for children
Volumetric applique “Fish in an aquarium”
Bright and nimble waterfowl attract all children, so they will definitely love the voluminous applique “Fish in the Aquarium”. But the fish themselves in this work are quite complex. Therefore, if children are small, it is better to make simple multi-colored fish in a flat form. You also don’t need to make a very small aquarium, since making small fish using this technique is quite problematic, especially for children.
Light and beautiful origami paper fish - a simple pattern for children
Everything is very simple! It is very easy to repeat a similar design according to the instructions. You just need to stock up on squares of colored paper, a plastic eye and a felt-tip pen in advance.
Fold the square along two horizontal lines and in half.
Expand the square. And fold it again so that the fold in the middle of the sheet is inside two triangles with one vertex.
We bend the side corners of one triangle to the middle with an overlap. It turns out to be a fish tail.
We turn the structure over. Glue the eye and draw a smile.
As you can see, everything is very simple. You don't even need to cut anything.
Source
This option is more complicated, but more interesting:
A few more simple patterns for children:
Craft Hungry paper fish
It's time for humor and fun when we work on children's crafts with our little ones! Moreover, such a drawing, which we will now try to make together, is also an excellent toy!
A sheet of A4 paper needs to be folded in three places so that it looks like the letter “M” from the side. That is, we bend it in half.
Then cut in half again.
And we reveal it.
We connect one “top” of the letter “M” to the other.
Turn the sheet of paper over so that the fold is horizontal.
Let's draw a fish.
It is necessary that the connecting points of the upper part of the fish and its lower part converge at the place where the paper folds.
We finish drawing all the minor details: eyes, scales, fins, etc.
We move the fold apart and in the place between the upper part of the fish and the lower one we finish drawing everything so that the parts are connected.
We paint the whole picture, even the part that is hidden. By the way, you can draw a cute worm or fish in the fold.
We fold the drawing so that a simple fish is visible, swimming carefree in the water.
Now, if you want to surprise someone, open the sheet and show it. How hungry is your fish?
P.S. If you remember, I don’t welcome a huge number of monsters in the apartment, but it still turns out that children are attracted to them. Here is the result - my son picked up the idea and produced a kolobok...
Aquarium with fish
You will need: a cardboard box, a simple pencil, a ruler, paints, a brush, scissors or a stationery knife, colored paper, markers, threads, glue, pebbles, shells.
Master Class
- Paint the inside of the boxes blue and the outside white, then leave to dry.
- Draw the outline of the glass using a pencil and ruler.
- Cut out the "glass".
- Draw or print bright fish, then cut them out.
- Cut out the bottom and seaweed from paper, then glue them on.
- Glue shells and pebbles to the bottom of the aquarium.
- Glue the threads to the fish, and use a needle to thread them through the top of the box and secure the knot, then hide the knots by gluing a strip of white paper.