Any application that depicts animals, plants, birds is an excellent way to introduce a child to the world around him. Birds are a huge and very significant part of nature, and each of the tens of thousands of species has its own characteristics of plumage, lifestyle, and habits.
Collecting, for example, an applique of poultry in the younger group of a kindergarten is very exciting; it helps introduce children to various representatives of the feathered family.
However, such creativity will be interesting at all ages, so both parents and children will enthusiastically invent new ways of appliqué and come up with unusual, attractive plots.
Bird applications for different age groups of children
The most effective way to show how to work with appliqué is by using the example of poultry - children encounter them most often, if not in real life, then in pictures in books, in alphabet books, on blocks, etc. so it will be easy for even kids to imagine a duck or a cockerel.
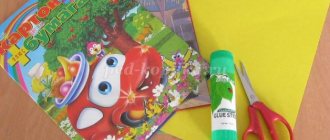
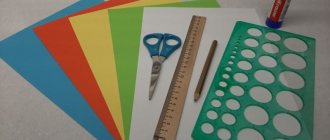
To work in the younger group, you should prepare cotton pads, sheets of colored cardboard, plasticine, paints and brushes, as well as glue and scissors with “blunt” tips.
The head or body of a bird is made from a whole disk; disks cut in half will serve for the wings or tail. These parts are glued to the cardboard in the appropriate order and painted. Paws, beak, comb and beard, and eyes are made from plasticine.
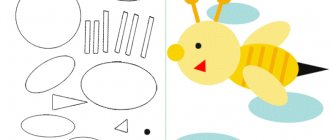
A little more complex work can be done in the middle group. To do this, you need to print out images of birds in advance, prepare cotton wool, PVA glue, felt-tip pens and paints.
First, the contours of the body, head, wings and tail are outlined with a felt-tip pen. Then small balls are rolled out of cotton wool and glued inside the outline with glue. When the entire image is filled, the cotton wool can be painted. Parts can also be made from plasticine.
An even more difficult application should be offered to children in the preparatory group. To do this, you will need rooster and hen templates, thick white sheets, paints and brushes, colored paper and napkins of different colors, scissors, a hole punch and glue.
The operating procedure is as follows:
- first you need to paint a white sheet with paints, depicting the sky, the sun, grass on it, and leave it to dry;
- a house, a roof, a fence is depicted on colored paper, after which the details are cut out and pasted onto the dried drawing;
- the cockerel and hen are carefully cut out along the contour on the template;
- napkins are torn into small pieces, from which lumps are rolled up - they can be used to glue the breasts of birds, the head;
- Confetti is prepared from colored paper using a hole punch - circles are glued like feathers on the wings and tail;
- the beard and comb of the cockerel are painted over with red paint;
- The birds are glued to the base.
The joint work of groups of different ages will look great - a large poultry yard made of appliqués made on a large sheet using different methods and materials.
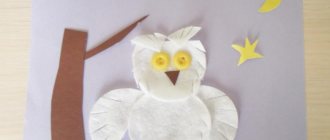
Working on the image of an owl is also perfect for collective creativity. Adults should only draw the body of the bird along with the head on a large sheet of paper.
Each child should be given the task of making a feather for a bird. There is no need to dictate exactly how this should be done - let the children use their imagination. The finished feathers are collected into a tail and glued to the base.
Now you can start decorating the body and head - someone should roll balls of cotton wool or use a hole punch to make confetti from multi-colored paper, someone should stick on the decor, someone would paint the details, someone would sculpt a beak and paws from plasticine.
Lesson summary for the application “In the world of fairy tales. Kolobok"
Irina Soina
Lesson summary for the application “In the world of fairy tales. Kolobok"
Educational: Learn to transform shapes. Cut a circle from a square by cutting off the corners. Cut the square into triangles diagonally. Teach children to navigate on a sheet of paper.
Practice the ability to apply glue to the entire shape of the applique .
Reinforce the rules for using scissors.
Developmental: Develop fine motor skills of the hands and creative thinking. Develop coordination, color perception and accuracy.
Develop the child's visual and auditory attention.
Educational: Cultivate accuracy when gluing. Cultivate interest in Russian folk tales .
Materials: Sample of a fairy-tale hero in paper applique .
Oilcloths, scissors, glue, brushes; coasters, napkins, glue jars.
1/2 album sheet. Yellow square 6*6cm, green square 4*4cm, brown rectangle 2*4cm.
Su-Jok for every child. Fairy-tale characters ( gingerbread man , fox)
.
Safety rules when working with scissors. Audio recording (sounds of nature)
.
Previous work: Reading the fairy tale Kolobok , conversation on the content, conducting classes on drawing and sculpting a Kolobok , table theater " Kolobok "
.
Vocabulary: circle, round, bun .
Methodological techniques: Guessing riddles, looking at illustrations for a fairy tale , physical education
, finger gymnastics and Su-Jok therapy, independent activities of children, summing up.
Paper bird applications
There are many options that depend on the child’s age, abilities and desire to follow a certain procedure. A little help from adults will, of course, be needed, but in general children can do a lot on their own.
You should also not limit their imagination if somewhere they want to deviate from the planned plan - after all, this is creativity, and it does not always fit into the framework.
Arrival of birds
A very appropriate theme for spring, and the craft is as simple as possible:
- green (blue) cardboard for the base is prepared;
- white paper is cut into strips - these will be birch trunks; horizontal lines should be applied to them with a black marker along the entire height in different places;
- a birdhouse is cut out of brown paper, the window in it can be made of black paper, or painted with black paint;
- birch leaves are cut from green paper;
- the birds are cut out according to a template and painted (or decorated with cotton balls, confetti, beads, etc.);
- Now all the details are glued onto a cardboard base: first the birch tree trunks, then the birdhouse, followed by the leaves and, finally, the birds.
The missing parts can be painted on or made from plasticine.
Dining room for the birds
Once you start with appliqué, it may be difficult to stop, and you may end up making a real bird feeder. But first, it’s worth getting your child interested in a three-dimensional appliqué of birds on a paper feeder.
A sheet of white cardboard is prepared. Using the “wet” watercolor method, you can apply the blue sky and thawed patches in the snow to it. By the way, if you take initially blue cardboard, you can simply spray the snowball by dipping a hard brush or an old toothbrush into diluted white gouache. And paint on the snowdrifts.
While the paints are drying, cut out tree trunks from brown paper and add a few branches. It would be best to glue the feeder from corrugated cardboard.
You can cut out birds for applique from colored paper according to the template, outlining the contours of the wings, beaks and eyes. The figures are glued to the base - everything is ready!
Swallows on wires
For this work you will need gray woolen thread (twine will also work), white, yellow and black paper, blue cardboard, glue, white felt-tip pen (you can take a proofreader), scissors.
The blue cardboard is unfolded with the wide side down. From edge to edge horizontally, through the middle of the sheet, two threads are pulled and secured with glue on the back side of the base.
Strips 8-10 cm long and 3 cm thick are cut from white paper. Strips of the same thickness should be cut from black paper, but they should be 15-16 cm long, and the lower edge should be thicker. It is cut into a dovetail shape.
You also need to cut out wings from black paper (a curved strip with tapered tips, resembling the open wings of a swallow in shape), and from yellow paper - small squares that fold diagonally - these are the beaks of birds.
Now you should assemble the parts sequentially: the black strip is glued in the middle to the “wire”, tail down, its upper part is folded forward, and the edge is glued to the tape - you get a bird’s head. The wings are glued a little lower.
The white ribbon is folded into a ring, the edges are glued together, after which it is attached under the head of the bird - this is the breast of a swallow.
The beak is glued to the head, and eyes are drawn above it with a white felt-tip pen (corrector).
Paper palms
You can create an impressive craft even without a bird stencil for applique - you will only need multi-colored paper, white cardboard (A3), glue, scissors, pencil, felt-tip pens and decor.
In the middle of the white sheet, closer to the bottom edge, the body of the bird along with the head is drawn. You can only outline the wings and outline everything with a black felt-tip pen (or any bright, saturated color).
You need to trace the child’s palm on colored paper and repeat on several sheets of different shades. Cut out and glue the back of the bird like a fan - this will be the tail.
Now you can give free rein to your imagination: for example, outline the glued-on palms with a liner, glue the body of the bird with cotton balls and color them, draw the eyes and beak or cut them out of paper and stick them on.
You can use sequins, gold leaf, beads, confetti, threads and much more for decoration.
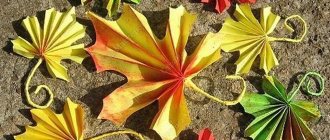
Bird leaf appliques
It is very convenient to use natural materials for applique - in the fall, leaves of different colors, ironed or stored in a book, are perfect for this. You will also need to prepare blue cardboard, white and yellow paper, glue, scissors and plasticine.
You can use any cardboard - simple, metallized, velvety, with a print.
A dense green leaf is glued in the center of the leaf; it should be oval in shape and without damage. To press and smooth the leaves, you can use a dry and clean cloth.
The beak is cut from a red or burgundy leaf; a bird's crest can be cut from a leaf of a brighter shade.
Now you need to cut a large maple leaf in half and glue the halves on both sides of the body, like wings. On top of them you need to stick the same halves of leaves, only smaller in size.
The tail can be made from several leaves of suitable color, shape and size, also arranged in a fan shape and in 2-3 layers.
Clouds are cut out of plain white paper, and a sun is cut out of yellow paper, after which these parts are glued onto the base.
Photo crafts fairy tale hero
Read here - Crafts made from fluffy wire - 115 photos and video instructions for children on how to make crafts with your own hands
Did you like the article?
0
Volumetric applications of birds
The simplest methods for making volumetric appliqué were discussed above. With an understanding of how you can make interesting pictures using glue, paper and cotton wool, comes the desire to experiment with other materials. However, paper can offer many options.
For example, tear-off appliqué perfectly develops motor skills, perseverance and imagination. You can draw a bird (or several birds) yourself, or you can trace it using a stencil, or cut out a template.
The plumage is created using small pieces of colored paper.
You can add trees to your work (the trunks are made not from simple strips, but from strips twisted into a tube and glued together, from plastic tubes, from thick threads and ropes, etc.), a colorful landscape as a background, to create a nest using the weaving technique, etc. d.
Plasticine is great for creating three-dimensional works. True, it will be difficult for very young children to cope with this material without adults, but the older group will cope with plasticine appliqué of birds on branches with pleasure. Here is an example of such work.
Take a sheet of black or dark blue cardboard - a round or oval shape will be original and attractive. Flagella are made from brown plasticine, several of which are attached together to a base - these are tree trunks. Branches are added from the same flagella.
Two large circles (the body of the birds) and two smaller circles (the heads) are cut out of velvety gray or light brown paper.
Yellow eyes, black pupils and a yellow beak are molded from plasticine. Feathers can be made using any technique - from cotton balls, scraps of paper, thread, etc. Wings can be cut out of paper, or they can be molded from plasticine and the feathers treated with a special stack.
A cotton pad is glued to the top of the composition - this is the moon. Reflections of moonlight can be shown by outlining all objects with a light outline (blue, soft white) - paint or a felt-tip pen can be used only in some places, it will be more reliable.
To create three-dimensional works, you can use plasticine flagella, buttons, beads and seed beads, nut shells, corks and caps, shells, cereals, and much more.
How to make a teddy bear from fabric
Teddy Bear is a famous character. Many children are familiar with his adventures. Therefore, they are very willing to make it in different interpretations.
In the photo below you can see an example of a Tady bear craft made from fabric with threads.
For the craft you will need:
- Fabric and filling for it;
- Stationery scissors;
- Pattern.
Stages of work:
- First, you need to make a pattern as shown in the picture. It can be transferred to the fabric with chalk or pencil. But chalk is better suited for such purposes.
- Based on the pattern, future parts are cut out. Then they are sewn together with the reverse sides.
- Older children can do this on their own. Young children are usually helped by adults.
- When all the parts of the Teddy bear are ready, they are sewn together.
- After which the bear is turned inside out, straightened, and filled with filler to obtain a three-dimensional shape.
- The hole through which the filler is drawn is sutured last.
At the request of the children, it can be dressed, decorated with accessories or decorative elements. Sew a beautiful hat, make an expressive face (beautiful eyes, nose, ears, mouth). Usually, the product is limited only by children's imagination.
Advice: Before taking on a complex appliqué made from fabric and threads, it is better for adults to practice on small crafts, especially when adults do not have such experience.
Crafts made from paper, thread and fabric are an interesting and useful leisure activity for children, parents and educators. In addition to fine motor skills, children develop perseverance, attentiveness, a desire to complete their endeavors, and accuracy.
Accompanying the creation of the application with interesting stories and fairy tales, it will be easier to hold children’s attention, and children will form the right associations with the characters of fairy tales.
You shouldn’t do all the work for your children; it’s better to guide and help them.
Bird applications using quilling technique
One of the most interesting techniques for creating three-dimensional paper appliqué. These are rolled paper strips that can be shaped into circles and droplets.
By varying the width of the ribbons, the thickness of the twist, the sizes of individual elements and, of course, colors, you can create paintings that are completely different from each other each time - even if you take a finished work you like as an example.
The name itself translates from English as bird feather, which is great for bird appliques. You can involve not only children, but also adults in the process by creating a Firebird - colorful, alluring, magical.
To work, you need double-sided colored paper - you need to cut thin long strips from it using a ruler and a stationery knife. However, many specialized stores sell ready-made kits.
For a fairytale bird you need red, orange, burgundy, and golden shades. For the background you need to stock up on cardboard and beautiful paper. You also cannot do without a pencil and eraser, scissors and white paper. To twist, you can use a regular toothpick (skewer).
The cardboard base is covered with beautiful paper. Although you can paint the cardboard yourself, or simply paint it. You should draw a sketch of the future work on a separate sheet so as not to get confused in the placement of parts.
Yellow and orange stripes are twisted; they will be used to decorate the head, beak and some places on the body. After this, you should try on the parts on the sketch and glue them together. The voids can be left as is for now, or you can twist a few more elements and fill the gaps.
Yellow and golden paper will become the basis for the feathers. It is easier to cope with this task if you have templates of different sizes. The edges of the feathers must be cut into fringes. The parts for the wings need to be folded in half; for the tail elements this is not necessary.
The top of the wings will be decorated with curved strips; for strength, three parts should be glued together.
Now the assembly of the Firebird applique begins on the basis. The body is glued, the base for the wings is attached to it - it should immediately be bent to shape. Now it’s the turn of the feathers, including the tail ones.
A fringe is cut out of golden paper and glued under the bird's neck. The crest on the head is made in the same way. Now the twisted elements are glued onto the feathers. When working, you should adhere to the greatest possible realism of the image.
Choosing the most suitable application technique for yourself is easy. This type of creativity is extremely attractive; once you have mastered the basics, you will be able to create entire canvases with a variety of subjects and characters.
In addition to the fact that children learn about the world with the help of applications, it also contributes to closer communication with parents, the development of motor skills, and the relief of emotional stress.
Application “Fairytale Bird”
Methodological development of a lesson on the application “Flight of the Fairytale Bird”. The topic is designed for 3 hours, of average difficulty for children 8-9 years old (second grade).
Materials and equipment: sample of the “Fairytale Bird”, coloring pages with the image of a bird, blanks of clouds and trees, white background (album), glue, scissors, napkin, pencils – plain and colored, felt-tip pens, glue stick.
Lesson one
Our picture will look like this:
I prepared it at home with such diligence that the students squeal with delight at the sight of such beauty. Another question is that they will soon have to realize how much work they will need to invest. I tell you that our ancestors often depicted the sun in the form of a Firebird. Now we will decorate it with patterns. The most difficult moment is the solar circle on the chest, because the bird is depicted in profile, and, therefore, we see only half of this circle. Moreover, it must be positioned very precisely - without moving it either to the neck or to the abdomen.
This is what the original coloring looks like:
On the board I draw the same bird and show step by step how to decorate it with patterns:
The goal is to reproduce the pattern from the sample. Since people usually tend to reduce, students need to be warned to watch the proportions.
So, the picture now looks very chic, let's move on to coloring. It is important to remember that you should alternate contrasting colors. And logic dictates that black, gray and brown details on the firebird would be inappropriate.
This work will be enough for students for one lesson - 45 minutes. The smartest ones, if they have drawn and painted it beautifully, carefully, let them start cutting out along the contour. We are about to create an application.
Lesson two
Let's cut out the painted bird. This is not so easy, warn the students not to rush and be more careful with the legs and beak. Shall we glue the resulting bird? No, first let’s figure out how to act more rationally. If you think about it, you should prepare the background first! Well, let's open the album on a blank sheet of paper and start placing clouds in the sky. What if you think about it some more? Our bird is large, it will take up almost a third of the entire area; drawing clouds under this bird seems like extra work. Therefore, we place the cut out bird in the middle of the sheet (or a little higher, but not close to the edge) and trace it along the contour (we train our skills in working with a stencil).
The work area has been significantly reduced. Now we’ll place the forest along the bottom edge of the sheet. All students receive blanks for completing drawing symmetrical figures:
We complete the missing half with a simple pencil, then fold the sheet and cut it out along the colored outline. On the resulting tree silhouette, we look at how accurate our pencil constructions were. We line the trees with a frieze and glue them.
Lesson three
So, we already have a thick forest ready. Yes, it’s time to take up the sky. I delayed this sky until the last minute because I know that children, of course, think that the sky is blue, and the clouds are, like, white. But when it comes to practice, the guys start painting without hesitation, no! - haphazardly draw with a blue pencil, just to somehow fill the upper part of the picture with something blue. And they generally don’t notice the contradiction between the neat picture and the carelessly shaded sky. We have clouds planned. Okay, here’s the template (you still need to cut it out yourself along a complex contour):
Using these patterns, we will try to fill the sky with clouds as densely as possible. Well, honestly, I really don’t want to leave large voids for thoughtless painting over the blue.
Now let’s trace these cloud contours with a felt-tip pen (circling is a great way to develop fine motor skills):
There is just a little bit of sky left between the clouds, but you need to paint it correctly, distinguishing between what is in the picture - the sky or the cloud:
And now, finally, we can glue the bird (we develop our eye - we try to accurately fall on the previously outlined outline).
Yes, I had to work hard. But, what a beautiful picture it turned out to be!
Marina Novikova told you how to make the “Fairytale Bird” applique.
Tags: paper applique for children, bird applique, methodological development