The “mushrooms” applique is one of the simplest themes available for children’s creativity from 3 years old. A strong mushroom with “baby”, autumn leaves, green grass, insects or a hedgehog will not leave anyone indifferent.
In general classes or at home, children are given the task of making an appliqué from paper or fabric. Fly agarics and porcini mushrooms are made according to patterns, but it is better to give the child the opportunity to work arbitrarily until the perfect sample is obtained.
The simplest fungus application
Preschoolers can make a mushroom from different materials. To complete a creative task, you will need a dense base - a sheet of cardboard or plywood on which mushrooms will “grow”.
A simple application of colored paper “mushrooms” is the most affordable option. There are other methods - using natural and available materials:
- “mushroom” applique from cereals (semolina, buckwheat);
- smooth made of fabric (on glue) and voluminous (sewn with overcasting over a layer of padding polyester);
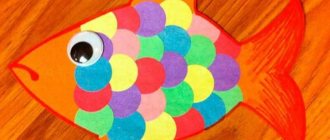
- from cotton pads;
- break appliqué;
- combined works (using dry leaves and herbarium, fabric and paper).
To make the paper work beautiful, it is done according to the white mushroom template for applique. This is a popular theme for exhibitions of work, which are often held in kindergarten and junior school groups.
Making “Mushrooms in a Glade” from colored paper using templates
It is very easy to make such an application; it is perfect for the 2nd junior group of kindergarten.
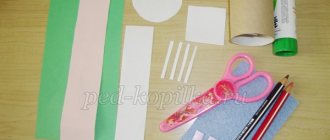
You will need:
- Colored cardboard – sheet A-4
- Mushroom patterns
- Colored paper
- Scissors
- Glue
Step-by-step instruction:
- Prepare mushroom templates. You can draw them yourself or print ready-made ones:
- According to the templates, cut out elements from different colored papers in the color of mushrooms
- Prepare the grass - take a strip of green colored paper and cut along one edge in many places
- Glue all the elements, and apply the grass last to the drawing
That's it, your work is ready! This work can give you room for creativity, since you can use the template for one mushroom or several, and the grass can be made in several layers, it all depends on your desire.
Mushroom applications for the middle group
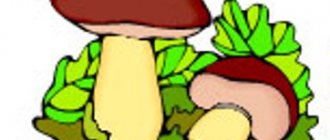
The simplest image is made of white and brown paper - a leg and a cap.
We round the rectangular workpiece at the leg, gently cutting off the corners. It can be slightly narrowed at the top. If the top part goes under the cap, you don’t have to round it. The bottom can remain without a cut if the leg is covered with a leaf or grass.
The hat is a semicircle or half an oval with curves. If there are several mushrooms in the composition, it is better to make them of different sizes, but of the same shape. The legs, accordingly, will be of different heights.
Important! Symmetrical parts are made from paper folded in half, cutting along the fold line.
If the mushroom is made using a more complex technique, the cap should be deflected, the stem entering the white part of the top. The finished porcini mushroom should look like the paper applique in the photo.
Bulk applique of cereals
Craft “Boletus Mushroom” – applique made from cereals. She develops perseverance and accuracy in her work. Cereals are poured onto parts soaked in PVA glue. The task develops fine motor skills, creative abilities and imagination of children.
This technique is proposed to be used in the middle and senior groups of kindergarten. Bulk appliqué is also recommended for extracurricular work and home practice (during vacations and weekends).
To work you will need:
- base (a sheet of colored cardboard in A-4 format or a small piece of sanded plywood);
- paper for the template on which glue will be applied;
- dark-colored cereals (buckwheat);
- semolina or other light cereal;
- split green peas;
- PVA glue with a brush;
- scissors and pencil.
Completing of the work:
- Cut the mushroom according to a template or any shape, with recognizable contours of the boletus mushroom.
- Glue the stem and cap in the center of the base.
- When the template is fixed, saturate the surface well with glue.
- Sprinkle the coated mushroom cap with buckwheat or other dark-colored grains. If gaps have formed, lightly brush with glue, pour in the cereal and press lightly with your palm. Shake off any excess when the glue has set.
- While the cap dries, soak the stem with glue. Sprinkle semolina or finely ground light-colored corn grits onto it. Brush off excess.
- Apply glue in random order under the mushroom, depicting grass. Pour split peas onto the soaked base (they can be ground in a coffee grinder or cereal crusher). After drying, the work is ready.
Note! If in your picture the cap is open, the pulp of both the top of the porcini mushroom and the stem should be covered with a different type of cereal.
Fungus applique from autumn leaves
Teachers have developed many interesting autumn-themed techniques, including an image with a porcini mushroom and fly agarics.
Helpful advice! Upon completion, complement the traditional “mushroom-boletus” work made of colored paper with natural materials. Small autumn leaves of different colors, acorn caps, and dry berries will add a “natural” look to the picture.
To add variety to the plot, complement the composition with beaded raindrops, or a butterfly flying over mushrooms. The basis of the autumn composition should be small autumn leaves.
Applique mushrooms in a clearing
By removing the yellow leaves and replacing them with green grass and flowers, the work becomes summer-like. Add a mushroom with a snail or a bug to liven up the picture a little. Green grass is made from different materials:
- cutting yarn, including special “grass”;
- chopped green beads;
- a strip of silk (any thin fabric) finely chopped;
- green colored paper.
Note! If a strip of fabric is cut diagonally, it will not delaminate and crumble. By gluing the cut tape up with a “fringe” in 2-3 rows, you will get volume - the grass will sag. It can even be slightly smoothed down for a 3D effect.
You need to place a mushroom in the grass so that it seems to “grow” out of the grass. The color of the cap and the shape of the mushroom can be varied.
It is better to make elegant fly agarics from red fabric with polka dots, and decorate the leg with a lace skirt. It is proposed to “immortalize” the aesthetic application of fly agaric mushrooms by transferring them to children’s clothes or handbags.
If this is a decoration for felt boots or felt boots, the details of the design are symmetrically duplicated according to a common stencil.
Paper applique
The paper mushroom applique features a variety of techniques and examples of work. Children can be offered classes of varying complexity, aimed at both the youngest and older ages.
To work you will need:
- mushroom template for applique (this can be a separate mushroom or a composition of several elements);
- colored paper;
- napkins;
- scissors;
- glue;
- colour pencils.
Applying templates
The easiest way to create a paper mushroom applique is to use ready-made templates. For the lesson, you will need to prepare in advance sheets on which the details of the mushroom are printed.
Such classes are suitable for younger and middle groups, where the task is to teach children to create a composition of 2-4 parts. The number of blanks should be 2-3 more than the number of children.
The work is carried out in several stages.
- Children are shown a sheet with printed patterns. They discuss every detail, what it looks like, what part of the mushroom it is.
- In the middle group, where children own scissors, they cut out the blanks on their own.
- All parts are laid out on a sheet of colored cardboard. If the picture is correct, then the template is glued to the base.
The use of different compositions allows you to make the work more complex and interesting. You can invite the children to make an applique of a basket of mushrooms or mushrooms on a forest edge.
Tear-off technique
For the development of fine motor skills and the formation of a finger grip, the tear-off technique is of interest. It is based on tearing off pieces of paper that are used to fill out a template.
To apply a mushroom cutout, you will need to prepare a template with an outline, colored paper and glue. The mushrooms should be in the form of a black and white outline, the hedgehog – colored.
Sequence of work:
- Children carefully study the picture. It could be a mushroom in a clearing, a hedgehog with mushrooms, or any other picture. The mushroom is not painted.
- The teacher explains that the children’s task is to fill in the outline of the mushroom. The stem is with pieces of white paper, the cap is brown.
- Children prepare pieces of white and brown paper, opening from a large sheet.
- The prepared pieces are glued with glue (it is better to use a pencil) onto the template.
The complexity of the work and its size are chosen depending on the age of the children.
Lump technique
The lump technique is more suitable for older children. To implement it you will need paper napkins (white and brown or red), glue and a mushroom template.
Sequence of work.
- The teacher explains to the children the features of the technology. To work, you need to prepare a sufficient number of lumps. To do this, open a piece of the napkin and roll it into a ball.
- Children carefully study the pattern. They explain what color the hat is made and what color the leg is made.
- Glue is applied to the leg (PVA is better). The lumps are evenly distributed over the smeared surface and lightly pressed down.
- The steps are repeated with the mushroom cap.
Children in the middle group can be asked to fill only the hat using the lump technique, and color the leg with colored pencils.
Mushroom applique for the older group
Autumn mushrooms in a basket - a complicated task for older preschoolers. They are able to make their own version - boletus, boletus, saffron milk caps, chanterelles, using their imagination.
The basis of teamwork is a big basket. It can be woven from strips of cardboard or fabric, adding a braid to the side and handle.
Suitable materials for the joint application “Mushroom Basket” will be needed:
- sheet of colored cardboard A3 (blue or dark blue);
- colored paper (orange, yellow, brown, red, white);
- strips of paper or fabric for grass and baskets;
- glue, scissors.
The aesthetics of the basket will depend on the imagination of the leader in the senior group and the materials. It is advisable to have an adult perform the difficult part of the composition. Ready-made mushrooms made by children are placed in the basket.
Helpful advice! Show the children how to make different mushrooms using a template - chanterelles, russula and “simply edible mushrooms” with caps of different colors from different materials.
It is advisable to complete 2-3 fly agarics and a group of toadstools, but explain to the children that they are not placed in the basket with edible mushrooms. It is proposed to simultaneously show a mushroom picker’s atlas with photos of edible varieties - this is part of the educational process.
In the application, poisonous mushrooms should lie next to the basket.
If you weave a basket from strips of thin colored foam rubber, mushrooms can even be made from plasticine. You can use dry leaves under the basket as decoration.
Make a hedgehog from seeds and “bead rain”. Complex work will take its rightful place at an exhibition or decorate a classroom until the New Year.
Mosaic application of fungus
Children become familiar with the mosaic technique by performing various types of appliqué. Mosaic is a way of filling a complete composition with small fragments of a suitable color.
Many materials are suitable for mushroom themes in the middle group:
- scraps of colored paper;
- buttons of a suitable shade;
- colored beads, beads and sparkles;
- cereals, colored sea salt;
- drunk and bean coffee;
- leftover green powder for Easter cakes;
- seeds and bulk materials of natural origin.
There may be several mushrooms in the picture. Using adhesive impregnation of the base according to the template, show children how to work with bulk materials. Large fragments to fill the stencil must be carefully laid out end to end.
In the same way as filling the mushroom template with cereals, a mosaic applique is made from beads, beads, or rolled plasticine balls. You need material in white, red and green.
The red beaded fly agaric with white buttons instead of spots on the cap looks nice.
Fungus applique from scraps
One of the most common techniques remains scrap paper appliqué. To do this, you will need to prepare finely chopped or torn colored paper.
Traditionally, boletus is prepared:
- brown scraps - cap;
- light yellow – leg;
- green - leaf.
The image can be made on a blue or white background - a sheet of cardboard in A-4 format. If it is a colored background, you need a template for the mushroom cut-out appliqué. On a white sheet of office paper, it is enough to draw in advance the outlines of a boletus with a green leaf.
The first stage of the lesson is to give the children a base with ready-made outlines and show them what the finished work should look like.
The second stage is to prepare pieces of colored paper.
The third stage is to saturate parts of the work with glue and fill the image with pieces of brown, yellow and green.
The fourth stage is to hand over the finished work and clean up the workplace.
Volumetric application of fungus
You can add volume to an image in different ways:
- Make a fly agaric cap from crumpled paper in the shape of an accordion, decorating it with white spots.
- Place the outline of the mushroom inside with pieces of colored cotton wool.
- Roll thin strips of paper into small rolls and glue the tails.
- Make small balls from circles of red paper and place them in the shape of a fly agaric cap.
- Cut the satin ribbons into pieces, roll them up, hem the ends and fill in the mushroom template.
All details of the three-dimensional image are seated on PVA glue.
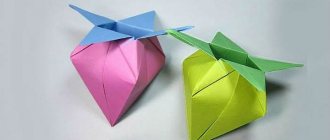
Mushroom applique using origami technique
A mushroom using the modular origami technique is not an easy job for school-age children who master this type of needlework. Traditional Japanese art is taught as part of extracurricular education.
The whole group can perform identical modules according to the template, and then take turns laying out their part of the composition.
Simple origami is much easier to do - fold a sheet of paper step by step until you get a blank of the desired shape, as in the photo examples. Various crafts are made from them.
Summary of OUD on the design of “Walk in the Autumn Forest” using TIKO technology
Mektepaldy to yimdastyrylgan about ku kyzmetіnіn notes
Summary of organized educational activities in the preschool group
Using Tiko-technology
Circle work “Tiko-dreamers”
Bilim take salas/Educational area:
"Cognition"
Pәn/Item:
"Construction"
Takyryby/Topic:
"Walk in the autumn forest"
Maksattaras/Goals:
1. Tarbielik - educational:
Foster playful communication with each other using TIKO figures.
2. Damytushylyk – developing:
Systematize the idea of autumn, expand children’s ideas about wild mushrooms, the features of their appearance, and develop fine motor skills. Strengthen the ability to decode information by coloring the details on the figure diagram. To develop the ability to perform auditory dictation TIKO modeling.
3.Okytu-training:
Improve the ability to connect TIKO parts and design three-dimensional TIKO figures.
Pedagogical technology / Pedagogical technologies:
Tiko-technology, health-saving.
Resurstarmen kamtamasyz etu/Resource support:
Designer TIKO "Fantaser".
From the album of practical tasks “Tiko-dreamers”: auditory dictation (leaves) – page 6,
logical problems (No. 1,2,3), samples of three-dimensional figures (mushroom diagram No. 1,2,3) - page 7, colored pencils for each child.
Koptildilyk/Multilingualism:
Kazak Tili:
sanyraukulaktar - mushrooms, uly - poisonous, shybynzhut - fly agaric.
English:
mushrooms - mushrooms, poisonous - poisonous, fly agaric - fly-agaric.
Uyimdastyrylgan oku kyzmetinin barysy / Progress of organized educational activities
1.yimdastyrushylyk kezeni/organizational moment:
- Hello guys! Meet our guest, the bunny TIKO. TIKO the bunny lives in a geometric forest, in which all the plants and animals are constructed from geometric shapes.
Bunny TIKO: - Hello!
“For several days now, something strange has been happening in our forest: the leaves on the trees are turning yellow, turning red, even orange leaves have appeared. What happened in the geometric forest? What's happened? (It's autumn, so the leaves are changing color!)
2. Negіzi bolіmі/main part:
— Guys, tell the TIKO bunny what other signs of autumn you know.
Children (with the help of a teacher):
— weather changes (cold temperatures, lower temperatures, precipitation - rain, cloudiness);
- changes in the plant world (many mushrooms, grass turns yellow and withers, leaves on trees become multi-colored and fall off);
- changes in people’s clothing (people wear waterproof raincoats, jackets, warm clothes).
Bunny TIKO:
“And here’s another strange thing: the squirrel, the bear, the badger don’t play with me anymore; They spend all day doing some kind of nonsense - the squirrel carries nuts into the hollow from morning to evening, the bear only thinks about where to eat something. What happened to my friends?
Children (with the help of a teacher):
With the arrival of autumn, changes occurred in the animal world.
Migratory birds fly south, animals carefully prepare for winter - they fatten up a layer of fat, they grow a thick undercoat that retains body heat well, they can withstand frosts in the open air and lead an active life, they prepare food, many prepare housing.
Those animals that do not hibernate - squirrels, chipmunks and other rodents - make provisions for the winter. Squirrels build several houses in the treetops. Many animals do not build houses, but make temporary ones - in the snow. Fox, hare, wild boar, and wolf make entire holes in the snow in winter. The giant elk lies down in deep snow for the day, and it turns out to be a large hole - a bed that protects the animal from the cold wind.
Bears, hedgehogs, badgers, i.e. those who prefer to sleep in winter “put on fat” in the fall.
- Guys, what gifts has autumn prepared for us, besides bright leaves? (Mushrooms)
- What mushrooms do you know?
- Are all mushrooms healthy?
Fizminutka:
"For mushrooms". Goal: perform movements according to the text
All the animals are at the edge of the forest ( children dance in a circle)
They are looking for milk mushrooms and trumpet mushrooms.
The squirrels were jumping
The saffron milk caps were plucked . ( jumping squat, picking imaginary mushrooms
s)
The fox ran
I collected chanterelles.
The bunnies were jumping
They were looking for honey mushrooms. ( jump while standing, picking imaginary mushrooms)
The bear passed by
Amanita crushed (they waddle, then stomp with their right foot)
The teacher invites the children to go and sit at their desks.
— Guys, you and I can design autumn leaves ourselves. What color construction parts do we need for this? (Yellow, red, green).
Auditory dictation “Leaves”
1. Connect two small equilateral triangles - what tree leaf does this figure resemble (birch leaf).
2. Connect two acute triangles - what tree leaf does this figure resemble? (willow leaf)
3. Connect four diamonds in series one after another - on what tree do such leaves grow? (on a maple tree)
- Lay out an autumn carpet from your leaves (children collect them into a common carpet).
Work on individual sheets
- Construct a figure (mushroom) and color the diagram.
- Below, color the TIKO parts that make up the figure. Complete the missing TICO details.
- Draw an acute triangle by connecting three points. Where does the acute angle of the triangle point? Draw a triangle to the mushroom. Color the mushroom.
The teacher offers
construct three-dimensional mushrooms according to the model.
Teacher show me
t individual work.
Children independently complete the task to the music of nature sounds.
3. Korytyndy/final part:
Lets you down
Bottom line, encourages children.
Conducts
a reflective circle “What did we do with you?”
Organizes
exhibition of children's works.
Mushroom applique for school children
Grown-up children are not interested in making primitive fungus; they are more willing to take on the development of non-standard techniques. They can “revive” the Boletus Mushroom or Fly Agaric by adding facial features to fabric appliqué with a felt-tip pen or using embroidery.
Helpful advice! The fly agaric hat and skirt can be made using different techniques. Invite more talented girls to make an appliqué of fly agaric from satin on burlap (canvas) as part of labor classes. Decorate the hat with pearl beads, crochet the skirts, and embroider the grass with thin ribbons or yarn.
Drawing a background for the applique is one way to complicate the task. It could be a forest or mountains with a river in the distance, and in the foreground of the image there are mushrooms with a hedgehog and a snail. Some students manage to create a realistic image.
Schoolchildren can decorate the grass in some complex way, adding spikelets and felt leaves. Offer to enliven the mushroom appliqué with insects made of beads or three-dimensional characters made of fabric. Creative tasks develop children's artistic taste and reveal hidden talents.