4.6/5 — (40 votes)
Hello!
Today I again propose making crafts in an autumn theme. Look out the window and see how many colorful leaves are already lying there. Memories and lines from children's poems immediately come to mind, for example these:
“Suddenly it became twice as bright, the courtyard, as if in the sun’s rays. This dress is golden On the birch trees on the shoulders...”
This time of year is good because there is something to craft from. Because you can take any natural materials and create, for example, a man made from pine cones, or maybe you like to make crafts from vegetables and fruits? Then you can easily make a souvenir for an exhibition, for example from a pumpkin.
You can even take ordinary leaves and create a masterpiece on paper. In general, the list can be endless. So let me introduce you to a lot of cool and beautiful ideas on this topic.
I hope you will be inspired, and once you decide, you will immediately start making crafts with your children. After all, children of any age really love such work, be it primary schoolchildren or preschoolers.
Well, I can’t wait to share with you my findings that I dug up on the Internet. By the way, don’t forget to share your thoughts and opinions, write reviews and suggestions below.
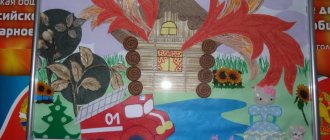
Crafts “Gifts of Golden Autumn” for an exhibition or competition
In my previous note, we have already considered many options for what you can make with your own hands from various types of materials, it can be natural, fruits, vegetables, and even waste. This time I will show you a few more options, which are also no less beautiful and attractive.
And perhaps I’ll start with a non-traditional, but a paper-plasticine miracle. Take cardboard and make blanks of maple and oak leaves. You will also need glue for ceiling tiles and a CD for the job.
Take plasticine of different colors in your hand and roll it into a ball.
Advice! You can use modeling dough instead of plasticine.
Roll out with your hands, as if painting the surface of the leaves.
Glue the finished blanks onto the disk using glue.
Mask the middle with oak leaves and roll up the red rowan berries. This is such a cool masterpiece with an autumn theme.
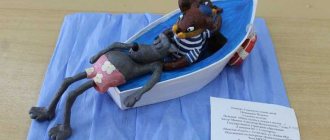
Do you want to create something extraordinarily cool from real rowan berries? I propose to make a picture of rowan in the form of a squirrel. You need to draw the image of a squirrel on cardboard (from under a box, thick) and then cut it out.
Use decorative tape to connect the edges of two cardboards. Or glue with regular PVA. And then fill the image of the animal with berries. It looks original and beautiful! She's a charmer, isn't she?
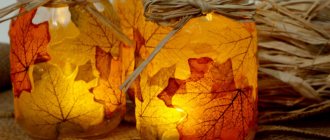
The next craft is a flower vase, you can make it yourself. Take any glass container and wrap it with woolen thread or twine. When doing this, first paint the jar with glue. You can see the stages of work below in this figure:
Now prepare the bouquet and place it in a vase. And a gift or souvenir for the exhibition will be ready. Good luck!
Now make a funny little guy in the shape of a sun. Cut out a circle from colored paper, glue eyes, mouth, and nose onto it. Or you can draw all these details with a marker.
Then cover the diameter of the circle with dry leaves.
Also, in order to comfortably hold the sun with your hands, glue a stick. Or then stick it in a glass, which you can also build yourself.
With preschool children in the park, collect dry leaves and then invite them to decorate them with felt-tip pens, or better yet, with acrylic paints.
It turns out to be quite wonderful and cool, you won’t be able to take your eyes off it!
You can go the other way and make a cool bouquet. I remember that I haven’t shown you anything like this before. But, I repeat.
You can give this to your mother, grandmother, or your favorite teacher.
Autumn craft ideas for kindergarten
Let's start with the simplest compositions. It is difficult for kids to make intricate crafts, so appliques made from dry leaves, chestnuts and acorns would be excellent options. Such applications will delight the little ones.
A wreath made of leaves is also a fairly simple children’s garden craft, but no less beautiful for that.
Such a wreath will be an excellent craft if you do not have time to stock up on natural materials. Just cut out the leaves from colored paper; it will be especially chic if you decorate the leaves with paints or gouache.
Very simple crafts for kids - trees with colorful foliage. There are so many options for making them!
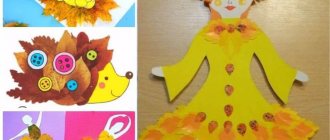
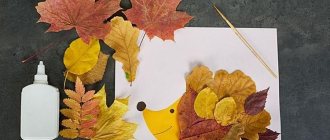
All children love hedgehogs and many people associate this animal with autumn. Cute and prickly hedgehogs with an apple or mushroom on their back will delight children. They are made simply: as a rule, the body is made of plasticine, and needles - seeds (or other natural materials) are pressed into it.
Note! DIY paper tulip craft
Children in the older group of kindergarten are no longer so interested in making simple compositions, so we found several more complex options, but making them will not be difficult. For example, a doll with a dress from dry leaves is not difficult to make. You need to take the top half of the doll and place it in the neck of half a plastic bottle. Due to the shape of the bottle, different styles of dresses will be obtained. The leaves are glued in layers and moment crystal glue is used. Of course, girls will like this craft more than boys.
The following crafts are universal, both boys and girls will be delighted with them. Of course, these are already beloved houses made from natural materials. In such a house you can settle fairy fairies or animals, or you can leave them on their own.
DIY crafts for kindergarten on the theme “Autumn” (all new items)
With preschool-age children, you can simply use your imagination. Take and lay out magical multi-colored trees from plasticine balls. And indeed there will be a golden autumn.
In addition, you can also use paints and cotton swabs for hygiene; you can use them to create paintings and scenes on any topic.
Agree, there is nothing difficult about this, just sit there and put it on a piece of paper.
Another fun work from scrap materials, made at home, such as millet, is what the author offers.
You can also make pictures from rice and semolina, or pasta, in the same way.
Everyone knows that kids love to play with signets, so why not take advantage of it. Dip dry leaves collected from the ground and dip them into liquid paint, you will get an excellent print.
You see how brightly and elegantly you can decorate any drawing.
Or you can go another way, put leaves (either real or paper) and use them as stencils, that is, paint directly on them, you will get prints.
Works made from palms are popular. Well, let's use this idea.
You need to take a disposable white paper cup and paint it green. Make a barrel out of a toilet sleeve and glue it to the plate.
Draw the children's hands on cardboard and cut them out.
Glue one of them brown on the trunk.
And then, in this order, everything else.
Alternatively, you can make the work in the form of acorns and even squirrels, cool!
Kids also love to use natural materials in their creations; for example, you can get by with pumpkin seeds. Print out a picture of wheat or rye on an A4 sheet of paper and decorate it with these branches. Doesn't it look creative? And most importantly, it’s simple and charming!
Read the finished description with materials and description below:
Do you want to use only colored paper? So you will need to cut strips of different colors and a couple of circles. Decide on the sizes yourself.
Fold each circle in half.
Then draw the trunk and make the crown of the tree, cut it as shown in the photo with scissors.
Glue the trunk on white paper, and the crown, that is, two circles with each other, only asymmetrically.
What is missing is, of course, colorful leaves! Cut them out in red, yellow and green.
So, what else, but here's what. You can take disposable paper plates, these are sold at a fixed price or in any hardware store. Paint them in the desired color, for example brown, and then let them dry. Cut out the body of a hedgehog or other animal from white cardboard, draw parts of the body, and let it hold a pine cone or acorn with its paws.
Probably the most primitive, but also so bright, souvenir made from cotton pads. Dilute the paint in a glass beaker and take pipettes. Carefully paint the discs with them. Let them dry.
And then glue it to any background, wow, beauty! And my mood even lifted, it was so bright and cool!
In my classmates I came across another such landscape, only it was made in a different technique.
Target:
introduce children to the painting by I.T. Khrutsky “Still Life” - still life of mixed type. Pay attention to color combination as a way of providing an emotional impact, to composition as a means of constructing a picture, continue to teach how to independently cut out various shapes from a sheet of paper folded in half or several times, cultivate respect for collective work, and learn to work in concert.
Material:
colored paper, scissors, pencils, glue, brushes, adhesives, napkins, a large sheet of tinted paper, dummies of fruits, vegetables, mushrooms, flannelgraph, a set of flat vegetables, fruits for a flannelgraph, a picture by I.T. Khrutsky "Still Life".
Preliminary work:
drawing, modeling, applique of fruits, vegetables, mushrooms, baskets, vases. Laying out various still life compositions on flannelgraph. Games “Make a still life of vegetables”, “Make a still life of fruits”, “Select the colors that the artist used in his painting.” Consideration of still lifes by P. Cezanne “Still Life with Bulbs”, A. Kuprin “Still Life with Zucchini and Basket”, A. Lentulov “Vegetables”, P. Konchalovsky “Tray and Vegetables”, R. Guttuso “Basket with Potatoes”.
Progress of the lesson
The teacher examines I. Khrutsky’s painting “Still Life” and asks the children:
— What kind of mood do you think the artist was in when he decided to paint this picture? What was he happy about?
That's right, he was happy with the abundance of vegetables, fruits, and mushrooms. How many there are, how different they are. Let's look at the picture in more detail. What vegetables are in the foreground? On the right is a large pumpkin. It is greenish-yellow, its smooth sides glistening in the light. On the left lies a pile of limp overripe cucumbers. Between them flaunt a red tomato and an elastic boletus mushroom with the remains of soil on a thick stalk.
Where do you think all these fruits came from? Look what's nearby. Stack of coins. Well, of course, the hostess brought all this from the market. Vegetables are dense, strong, ripe. The artist seems to compare them with a glass and an elegant glass bottle - so fragile and thin.
What else do we see? Three baskets contain mushrooms, apples, carrots, and herbs. All baskets are woven differently. Look at the basket of mushrooms. What mushrooms did you recognize? Tell us about them.
Look at the basket of apples. What are they? There seems to be a subtle aroma coming from them. What's next to the basket? Beautiful bulbs. In the background stands a large, tall brown basket filled with assorted greens, and on top are orange-red carrots and long-tailed parsley. What a wealth of fruit! The artist painted the gifts of the forest, garden, and vegetable garden. How amazingly he arranged and laid them out. The green colors of the fruits turn into yellowish-brown, pinkish-yellow, dark brown, orange-red. How beautiful this abundance looks against a dark background! What a treat for the eyes! How generously our land gives people!
Guys, let's also try to create our own still life. Let's do a lot of collective work. Each of you will select the elements of the still life separately, and then we will combine them all together. But first, let's imagine on a flannelgraph.
After this, the children begin to work with paper. Everyone does collective work together, coordinating their actions with the actions of other children. After work, they come up with a name for the still life.
Original works made from cones and acorns
Of course, forest or waste material is always in great demand. Especially in the autumn period. Because the gifts of nature can be found on paths and in parks and forests. If you have a desire to create something ingenious from ordinary pine cones, then here’s an idea for you, go for it.
Pour acrylic paint into a cup and dip each piece. After drying it, place it on any tray covered with oilcloth.
Then, from durable cardboard, you can even use a box, cut out a ring and decorate it with cones, they are glued with a glue gun. Just be careful not to get burned.
Carry out this procedure only together with adults.
Try to glue the cones tightly to each other so that there is not much space between them.
Here's a wreath for you, isn't it cute? I really liked it. By the way, you can also use it as a New Year’s craft.
You can also make a bouquet from them, who would have thought, but it looks so beautiful, especially if the vase is made by your own hands.
I recently showed you a lot of ideas about what else can be done on this topic in this article. These can be bunnies, hedgehogs, owls, foxes, etc. and any other animals. Here are a few more ideas for inspiration.
I would like to show you one more video. In it you will see a bunch of new products this year. Enjoy watching.
As for acorns, there are also creation options from them. People or animals are usually made, but also cutlery and cups. Additionally, matches or twigs are used.
Well, if you want to distinguish yourself, then make an original thing, this is a brooch. Good luck.
Straw applique
This material is very durable and beautiful. It's interesting to work with him. Every craft and composition turns out beautiful.
Before starting to work with this type, soak the straws in hot water. After this, it will become stronger, more elastic, and will bend well. The cereal tubes are carefully cut lengthwise into flat strips. Smooth out each piece on all sides with a blunt object. When the straw dries, dry it by ironing it with scissors from the front side. Next, we apply a drawing of the future masterpiece to the base. We try to glue the tapes to each other without gaps, creating our own splendor. The completed work is ironed with a hot iron and put away under the load.
Crafts “Autumn Fantasies” for school (grades 1-4)
And now I propose to make a craft according to this master class in the style of modular origami. Wow, I’ve been asked for a long time to show how you can quickly and easily make maple leaves like this out of paper. So take note, because it is with these blanks that you can decorate the interior of a group, class, and even at a gala event, a matinee.
And then please, take it and fantasize. Here's how they decorated it on the Country of Masters website.
The next option, which is loved by younger schoolchildren, is of course the main character - a hedgehog.
In order to create it, you will need everything that you see in the picture below. This is colored paper, a glue stick, a felt-tip pen.
Take brown colored paper and fold it in half. Cut along the fold line with scissors, you will get two rectangles.
Then glue them together to form a stand.
After the glue has dried, draw and make round edges on the workpiece. Cut along the line. Using pink paper, also draw outlines in the form of a semi-oval.
It is also necessary to cut out round-shaped ears and paws from it. Arrange the parts in the correct proportions as shown below and glue to the base. Scatter real dry leaves or cut them out of colored paper.
Now all that remains for the hedgehog to do is make the spines; make cuts along the edge of the brown paper.
Draw the eyes and face. Your fabulous little animal is ready.
Using an accordion, make the work in the shape of trees. Look how original it looks.
Also, one of the favorite characters among children at any time of the year is the sun. I suggest making it this time from a CD. And again the paper will have to be folded like an accordion, in general, look at the instructions in the pictures and create.
What an unrealistically charming sun it turned out to be; my spirits lift when I see it.
And if you don’t have colored paper, then use napkins, although take them in a single color. Cut into small squares and roll each piece into balls.
Draw any still life, in this case the author depicted trees and a river. And sit and painstakingly glue each ball until the whole image is formed.
The next idea is work from cotton swabs, which, as you can see, were initially painted, their heads, in the desired color.
And for those who want to comprehend quilling, or are deeply interested in it, I would like to invite you to consider such a masterpiece.
Here's another fascinating idea, look how cool the author came up with it. Do you want to make it happen? Then let's get down to business. It will turn out to be just a living corner.
And if this is too difficult for you, then take a regular package and follow the photo description.
Beautiful souvenirs made from natural materials and vegetables
I think that every time you visit such exhibitions you always rejoice. Because such events are always fun. Thanks to positive and creative works. Which are made from all sorts of things.
You can take absolutely any vegetables and fruits and use them to build any characters or compositions.
The simplest and easiest idea is a basket with such characters. As you can see, the author used a lot of vegetables that are found in any home.
And even build the heroes Smeshariki and Minions, catch the description:
Here are a few more thoughts that will lead you to your next creation. You can see the rest here in my previous post. By the way, you can also create with pumpkins! There would be a desire.
I came across a video on YouTube in which the author suggested making cacti from cucumbers.
Well, I want you to build Gena the crocodile. Especially when there are instructions with a description. We don't need much: carrots, cucumbers, tomatoes and toothpicks.
Use a knife to cut a piece of the carrot into a cylinder shape, and then make something similar to a mushroom.
Cut off the tip of the cucumber, and cut the vegetable itself in half, but not all the way.
Connect the resulting parts with a toothpick. The result was the head of a crocodile.
Then make eyes from cucumber pulp and black olives.
Stick them also into the head using wooden sticks. Cut the tongue out of the tomato.
For the body, use a slightly rounded cucumber, and design the legs like this.
You can also make an accordion from the greens pulp, but this is optional.
Place the weirdo on a plate and run to school or kindergarten to amaze everyone.
And then there are these faces, oh, when I saw them, I was really scared). And you?
How to make an applique from leaves: quickly and beautifully
For such works, you can take absolutely any character and easily decorate it with dry leaves that you collected in the park. For example, you can lay out funny owls using cardboard and paper.
Or you can make a huge owl entirely out of leaves.
Or plant the birds on a branch decorated with bunches of rowan berries.
You can take any face, preferably some animal, cut it out, and then decorate it.
And with what, of course, leaves. Collect them and place them on a sheet of newspaper so that they do not shrink when drying.
Maple leaves are best suited as decoration, for example a lion.
Or perhaps you will be interested in working in the form of a little lion cub.
Today my kids and I made these creations. And we actually sat down to do it, and then my mother remembered that she forgot to buy glue. I’m thinking what to do, mine are about to go broke))). It's good that there was plasticine. And this is what happened.
You can easily build a vase using a balloon.
Or make an applique of seeds and plasticine.
Or you can imagine the work in the form of a three-dimensional toy.