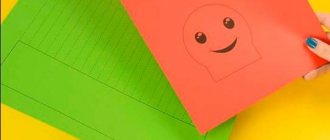
Children of any age can make applique animals. As a rule, children are very interested in such crafts. You just need to choose the right level of difficulty for each age group of children.
To make all applications you will need the following tools and materials:
- stationery glue or glue stick,
- simple pencil,
- ruler,
- scissors,
- cardboard,
- colored paper of various colors,
- multi-colored felt-tip pens or markers
- ready-made paper templates.
Animal applications for children under 3 years old
For very young children, flat animal applications made from geometric shapes - circles, ovals, triangles, rectangles and squares - are suitable. At the same time, this will allow you to get acquainted with these figures in a playful way and learn how to work with them.
Before working with your child, all elements should already be cut out of paper. It is advisable to show the child a drawing of the finished application and, naming the figures on it, invite him to choose similar figures from several different ones. Draw the child's attention to the importance of color.
Next, tell us in what order you need to assemble the applique and show how to apply the glue correctly. You need to start working with animals that are well known to the child, for example, a dog, a cat or a bird.
In the future, it will be possible to offer the creation of images of other domestic and then wild animals. It is important to focus the baby’s attention on the distinctive features of each animal that make it recognizable.
For younger children, the application should consist of large parts and a small number of elements, so that children do not lose interest in the process.
Lords of scissors and paper...
When inviting children to cut out figures from paper, fabric, dry leaves, etc., it is important to interest them in an interesting plot.
In kindergarten, we always prepare a whole backstory, for example, we read a fairy tale or listen to a recording, look at pictures, sing songs, read poems on a topic that is in tune with the theme of the application.
Children today cannot imagine life without a TV, so take advantage of it. Let's say you watched a cartoon about Luntik, and here's a theme for creativity - animal appliqué. For children, depicting the animal world is their favorite activity.
If your child already knows basic geometric shapes, it will be easier for you to teach him how to cut out blanks. So, having decided to make a figurine, show it in the picture and discuss with your child what elements it consists of. Look for schematic images that are easier to divide into ovals, triangles, circles, etc.
If you teach children at home, I recommend using animal templates for appliqué to start with. This is convenient at the stage when you are just learning to cut along the contour and paste.
In general, in the younger group we only give children the opportunity to paste ready-made elements onto the background. It can be as simple as sticking a face on a matryoshka blank, gluing a bird or birdhouse on a tree, etc.
The middle group is already picking up scissors. Children learn to cut paper into strips, and then we begin to cut out simple elements. Application of geometric shapes is the next step in teaching preschoolers.
It is difficult for children to cut out smooth lines, so first we make compositions from squares, triangles and rectangles. In order to get round parts, you can use available items as templates - caps from bottles, doll dishes, etc.
Paper animal applications step by step
Children in the middle group can be asked to make an applique of the following domestic and wild animals from scratch:
cat
You can offer to make a cat for the youngest children who are just learning to work with scissors.
First, you need to invite the child to choose the color of the future cat and draw on paper of that color a head - a circle, a body - an oval, ears - triangles, paws - elongated rectangles and a tail - an arc.
Then you need to cut them out and assemble them into a finished animal on a sheet of thick paper or cardboard. In conclusion, draw the muzzle.
Piglet
The piglet is made in the same way as a cat. But for recognition, in addition to the pink color, the body needs to be made thicker and more voluminous, and the legs thinner and smaller. They should end in hooves.
You need to glue a white or red circle - a snout - onto the muzzle, and make the tail curl. Older children can make this voluminous craft from rolled paper.
Dog
For small children, it is better to print out a dog template. The animal on it can be of any breed, in full face or profile, or just a close-up portrait. You just need to follow the rule - the smaller the child, the larger the parts.
The template must be cut into separate parts, traced around them like patterns on paper of the desired color and cut out. Then glue the cut out parts onto a sheet of thick paper or cardboard and draw a face, eyes and mustache.
Cow
The youngest children need to be given ready-made parts for gluing. Older children can draw them according to a template and cut them out themselves, as well as make a composition of several cows grazing in a meadow.
We need to draw children's attention to the fact that one of the most recognizable features of a cow is its large contrasting spots.
Lion cub
For the lion cub you will need yellow and orange paper, plastic eyes and a template. You need to trace according to the template on yellow paper and cut everything out according to the template. Then cut a wide strip from the orange one and cut it crosswise into narrow “noodles”, not cutting through the strip all the way.
Next, take a circle of yellow paper that will serve as the head, and stick a cut strip of “noodles” onto it around the perimeter on the back side. Glue the lion cub's tail to a piece of cardboard first, then the body, front paws and finally the head. Glue on the eyes, draw a muzzle and mustache.
Penguin
The little penguin is suitable for children of the middle group. To create it you will need black, white and orange paper. From black you need to cut out a large oval for the body and elongated triangles for the wings.
From white - a small oval for the chest and a circle for the head. The orange one has a triangular beak and flippers. All parts must be well glued to the base.
Dragon
To make a dragon you will need green and some yellow paper. On the red one you need to draw 4 large circles using a template and cut them out. Then fold each circle in half and cut. And fold each half in half, the colored side inward.
Glue together quartered circles in pairs to form a book. Glue it with the “cover” pages to a sheet of paper. The result is the body of a dragon. Using the template, draw and cut out a head with a neck and a tail from red paper. Glue them on opposite sides of the body.
Using the neck template, draw and cut out a semicircular strip from yellow paper. To turn it into the comb of our dragon, cut out the cloves in its upper part. Cut out several yellow circles.
Glue the comb to the neck, and the circles all over the dragon's body, including the neck and tail. Draw the eyes and teeth of the dragon.
Paper applications
For the most exciting form of such leisure time and instilling initial creativity skills in preschool age, materials are usually prepared in advance.
The set of handy tools is already quite familiar: colored paper, glue, templates and scissors. Depending on the age category, simpler or more complex figures are chosen.
The principle of operation is as follows. The colored picture is cut into pieces, after which the child assembles it like a puzzle and pastes it onto a sheet of paper.
You can complicate the task by coloring the black and white image yourself, followed by cutting and sticking. This will make the process even more interesting.
As an alternative, you can create a separate representative of the fauna or a whole composition from prepared parts - torso, head, paws and tail. Showing patience and accuracy, the child tries very hard to create a unique image.
Pets
All kids know what the pets that live in grandma's house or yard look like. Older children know that, in addition to cats, dogs and rabbits, domestic animals also include cows, goats, sheep and horses.
By jointly remembering all the inhabitants of apartments and garden plots, you can make a beautiful applique.
Cat
Cut out the constituent elements: round head, oval body, paws, tail and ears from ¼ circle. The picture is assembled and painted. An adult can print geometric shapes on a printer in advance, and then build a kitten from the photo.
Dog
The figure is also not difficult, like the previous one. In addition to auxiliary materials, you will need blanks. The eyes, body and front paw are formed from ovals, the head from a whole circle, and the back paw and ears from halves.
Piglet
The body, legs, head, tail, ears are cut out of colored paper, and for the face: nose, eyes and snout. Children are asked to connect all the components and stick them on paper to create the appearance of a pig. It will look more fun if you make the tail voluminous.
Cow
Since at the age of 3-4 years it is quite difficult to cut out small details of the applique, you can use templates, which are subsequently glued onto a green sheet of paper.
The composition with a herd grazing in a meadow looks especially impressive. To prevent the process from seeming too labor-intensive, several cows are painted.
To improve perception, colors are selected for the background: light green, deep green or grass.
Applications with wild animals
They live in the thicket of the forest, so to see them you need to visit the Zoo. When going on an exciting journey, you need to have on hand: scissors, sheets of paper, glue, millet, felt-tip pens and animal figurines.
Bear
In our area, he is the real owner of the forest, so many children want to see him. Sequence of work:
- Pictures of a bear are distributed.
- Using a brush, carefully apply glue to the area where the body is located, precisely following the contour and without violating the boundaries of the design.
- Oatmeal is poured over the glue.
- Wait until completely dry.
The result is an applique extremely similar to Toptygin’s!
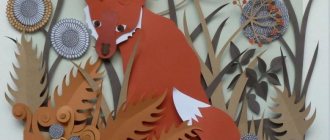
Chanterelle
It is best to assemble a fox with a bright fur coat from geometric shapes. The head and ears are triangle-shaped, and the tail, body and paws are oval. The eyes and nose on Patrikeevna's face are drawn with a felt-tip pen.
Bunny made from napkins
In the forests there are not only formidable predators, but also absolutely non-dangerous animals that feed on grass. Step-by-step instructions for the bunny:
- Take white napkins and tear them into small pieces.
- They are formed into balls.
- Bunnies are drawn using templates.
- The lumps are glued to the ears and body.
- The middle of the ears, tail and muzzle are decorated with cotton wool.
- At the final stage, a mustache is made from dark stripes.
This bunny can be placed on a postcard and presented as a gift!
Inhabitants of hot countries
All children are very inquisitive and always ask who is found on the distant southern continents. Using the appliqué technique, you can make exotic animals that you won’t find in your own forest.
Elephant
Typically, appliqué is done using blanks. First of all, the figure is cut out and then glued onto a piece of paper. To complete the composition, select a background that is suitable in color.
a lion
These animals live in the African savanna. Many children have seen live lions at the Zoo, so they can clearly imagine what this king of beasts looks like.
To make the lion cub really cute, you need to thoroughly prepare. You must have: black and red markers or felt-tip pens, PVA glue, a brush, scissors, sheets of yellow and orange paper.
Progress:
- The head and mane are cut out.
- The parts are glued together.
- An orange triangle imitating a nose is placed in the middle.
- They complete the look with eyes drawn at the top with a marker, and a mouth and cheeks at the bottom.
The almost finished craft is dried and set aside for a while. This applique can be used to decorate a greeting card or gift box!
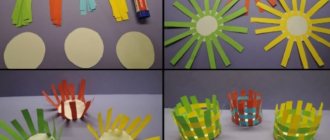
Animal appliques made from accordion paper
It’s just as easy to make animal appliqués from accordion paper. First, children need to be explained how to fold an accordion out of paper. This application will be interesting in the middle group and is suitable for the theme of domestic or wild animals. There are several ways to make such crafts:
- An accordion fan. If you glue an accordion on one side, you get a fan. The easiest way to make a hedgehog is based on it. The paper fan will represent a body with needles. To its base you need to glue a semi-oval made of paper with a drawn muzzle and two legs to it from below.
- Accordion circle. By gluing two fans together, we get a circle. It can act as a body for a pig, a mane for a lion or a face for appliqué of any other animals. The missing body parts need to be glued to it.
- Straight accordion. It will serve as a body to which you can glue the head, legs and tail - you will get an applique of any wild or domestic animals. You just need to choose the desired color of paper and add a face to the finished application.
Volumetric animal applications
There are several ways to make a three-dimensional paper applique:
- Strip applique. To use this method, you need to glue the animal’s body together from narrow strips, like a flashlight. And glue a paper head, legs and tail to it. You can make a whole exhibition of works on such an application in the senior group - for example, on the topic “Animals of the North”. You can invite children to make one of the following animals: deer, wolf, polar bear or owl.
- Cone applique. Cone-based applications are perfect for developing children's imagination. For example, for children in the preparatory group, you can suggest a theme for the application “Animals of hot countries.” Children can make a tiger, lion, giraffe, elephant or crocodile. The cone can act as a head, torso, or any other part of the body. For younger children, the cutting of the cone should already be ready, and a sample should be provided for copying.
- Cylinder applique. The scheme is the same as in the previous versions, but this craft is easier to make. Plus, absolutely any animal can be made this way.
Scheme for preparing lesson notes
The lesson plan must include time for physical education and finger exercises.
To successfully conduct a lesson, the teacher needs to take into account a number of methodological recommendations that relate not only to the actual implementation of the application, but also to drawing up a plan for working on it. And you need to start by formulating the goals and objectives of the lesson. So, the goals of working on the application in the senior group can be identified
- the formation of general ideas about wild and domestic animals, their cubs;
- continued work on developing the ability to transfer an object image to a plane;
- consolidation of ideas about the color, size, shape of an object;
- cultivating patience, as well as the ability to bring the work started to its logical conclusion.
Objectives of the lesson on the application dedicated to wild and domestic animals:
- continue teaching children to work with scissors, cutting out individual elements of the workpiece;
- strengthen the skill of careful gluing;
- to cultivate an emotionally positive attitude towards the results of one’s own creative process, as well as towards the works of other children;
- develop a respectful attitude towards the environment;
- develop motor skills, including fine, perception, attention, memory, speech and thinking.
In order for the lesson to go well, the teacher must strictly follow the timing of each stage of work on the application.
- Introductory part (6 minutes). This is the time to motivate children.
- Main part of the lesson (18 minutes). This time includes not only work on crafts, but also a break for finger exercises and physical education.
- Summarizing. In the last 6 minutes, the teacher sums up the results (praises and thanks the little ones for their work), and the children conduct a short self-analysis of their own work results.
Example of lesson notes
Compensatory kindergarten No. 260 (Moscow) “Pets: cat and dog” (fragment)
| <… Didactic game “Who eats what?” Pictures on the board: bone, fish, milk, hay, grass, food waste (bucket). On the board, children put pictures of the corresponding animal, accompanying their actions with speech: “The dog is chewing a bone. The cat laps milk and loves fish. Cow, horse, goat, sheep eat grass (hay). Pig waste." Game "Guess the cub." The teacher names an adult pet, and the children name their cub: Cat - kitten Dog - puppy Pig - pig Cow - calf Horse - foal Sheep - lamb Goat - kid Physical education Educator: “And now you and I will turn into cats. Turn around and turn into a cat!” Children: (perform movements in accordance with the text). The cat sat down under a bush, ate a piece of cheese, the cat stood up, stretched, and its fur unfurled. Each child has a blank on the table (two sheets of paper: one with a drawn house, and the other with a drawn cat and dog), pencils, scissors, glue. Teacher: “Guys! Look at our piece of paper, what’s written on it?” Children: “On one sheet of paper there is a house, and on the other there is a cat and a dog.” Teacher: “Remember where our cat lives?” Children: “In a man’s house.” Teacher: “Where does the dog live?” Children: “In the kennel.” Educator: “Do we have a kennel on our sheet?” Children: "No." Teacher: “So, what needs to be done for the dog, what needs to be drawn?” Children: "Kennel." Children take pencils and draw a dog kennel on sheets of paper with a house. Educator: “Well done guys! You and I remembered where our pets live, but now we need to return them to their houses. What will we do for this? Children: “Let’s cut out a cat and a dog, and then glue it on.” Educator: “We work carefully with scissors and glue.” Children carve a cat and a dog. They each stick to their own house (the cat is next to the person’s house, and the dog is next to the kennel). The teacher helps the children as needed, and does the rest independently. Educator: “Well done guys! Look, but the artist forgot to color our pets, let’s help him.” Children take pencils and color pets. Analysis of finished works. Children show each other their work. They evaluate them. Summary of the lesson. The teacher, together with the children, remembers the name of the lesson, topic, content. Then the finished works are exhibited on the stand> |
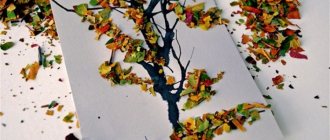
Animal leaf appliques
In this type of application, the selection of material is important. It is best to store leaves in the fall - then there is an opportunity to collect material of various shades, especially warm tones. The leaves need to be straightened and placed between the pages of a large format book.
They must remain there until completely dry, otherwise the leaves will curl. It is better to collect leaves together with children, simultaneously explaining to them where each tree is and telling them about them.
Working with leaves is practically no different from working with paper, except that dry leaves are quite fragile and they do not stick well. Application of leaves develops the child's imagination.
He learns about the properties of natural materials and learns to work with them, compares the shape and color of various objects.
Fabric animal appliques
Fabric appliqués are usually used as decoration for clothing or other textiles. They can be made by older children who are familiar with the technique of sewing by machine or by hand.
The principle of operation is the same as for paper, except that such an applique is sewn on rather than glued, and when working with loose fabrics it is necessary to overcast the edge.
The design is transferred to dark fabrics not with a pencil, but with a piece of soap. You can use contrasting threads to “draw” the face or highlight the outline of the animal. The child will be happy to wear something decorated with his own hands.
Applications of animals from cotton wool
Cotton wool is a good material for applique, perfectly conveying animal hair. To work with it, children need to draw the outline of an animal.
It needs to be filled with cotton wool close to the texture of the fur of a particular animal: for a sheep - with lumps, for a dog - with narrow hanging strips, etc. If desired, this “wool” can be painted.
It is quite possible to simply cut out some of the elements from paper and stick them on.
Animal applications using quilling technique
Quilling is an application of increased complexity. The work consists of gluing narrow strips of paper, usually folded in the form of spirals, onto cardboard.
First, the outline of the animal is glued, and then it is filled from the inside with curls of the desired shade. This technique is good because it successfully imitates the texture of animal fur or bird feathers.
All children, without exception, love creativity. Therefore, appliqué is one of the most interesting hobbies. Children work with her with great pleasure both in kindergarten and at home. Not only is it a wonderful leisure activity for a child, but it also develops his imagination.
Let's take a look into the treasury of the Internet...
I love finding useful materials in my favorite stores and sharing them with you, friends.
So, on our topic, “OZON.RU” offers many “useful things” for teachers and parents who want to teach children the art of appliqué.
There is a large selection of thematic literature and creativity kits: teaching aids, convenient kits with detailed instructions.
You can buy ready-made stickers and create your own application - both the youngest and older children will like it. They sell colorful books with entertaining stories, in the illustrations of which you can paste some element. By reading a book to your child, you simultaneously train his fine motor skills. Convenient and useful, isn't it?
To help educators and advanced parents, I offer training manuals from UchMag:
“Funny applique” by Y. Kozlova - here are 17 themes for applique classes in kindergarten and at home. The material is informative and interesting, the author wonderfully substantiates the need to engage in creativity with children.
The didactic set of the “Master Samodelkin” series consists of 8 cards and 8 templates, supplemented by methodological recommendations for conducting classes with preschoolers. This can be a great help for parents - it clearly and simply describes how and what to cut out to get the intended applique.