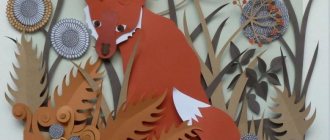
Children's creativity not only contributes to the development of artistic taste and fine motor skills, but also broadens the child's horizons. Creating landscapes using the appliqué technique will help kids learn the concepts of perspective and horizon. The theme of the autumn forest will help kids learn the signs of this time of year.
Tell your children about autumn and let them make crafts according to their taste, without being limited by rules. Even if the first works do not really meet the requirements, they are still beautiful, because the child filled them with his imagination and sincere love for this world.
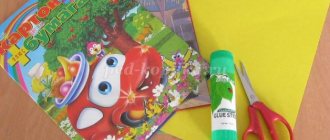
Applique autumn forest made of colored paper
Crafts on this topic can be made even with children in the younger group of kindergarten. At this age, children already know the features of the seasons and can create the correct color palette for the appliqué.
To practice fine motor skills, it is best to use torn paper technology. Choose soft colored paper, as tearing thick paper can cause your child to cut himself.
First make the background. Cover the bottom half of the sheet with green paper with a torn edge. The green should not be too bright as it is an autumn grass. You can add accents by drawing individual blades of grass. Stick blue clouds on the sky.
Cut out tree trunks from brown paper and arrange these objects on the background sheet. There is no need to require the same arrangement; let the children show their imagination and make original compositions. Glue the trunks.
Take colored paper in autumn shades (red, orange, yellow, light brown) and tear it into pieces about 1x1cm. Then randomly glue them onto the top of the trunks, as well as onto the ground, like fallen leaves.
Children from the preparatory group can make a more complex application “Hedgehog in the autumn forest” in this way. From gray paper, cut out the shape of a hedgehog (an oval with a nose), and use a black felt-tip pen to draw needles, eyes and a nose for the hedgehog. Cut out apples from red paper and stick them on the back of the hedgehog.
Options for paper applications
Autumn-themed crafts have always been popular and have not lost their relevance to this day. It is during this period of the year that the miraculous transformation of green trees into yellow, orange or red occurs.
All this gives applique lovers the opportunity to find the most beautiful leaves and use them in their crafts. In addition to them, during work you will need a minimum amount of simple and accessible materials for everyone. Their low cost means that even children from families with little financial resources can practice appliques.
Vegetation objects
Most children begin their education in creativity while in kindergarten. There, professional educators keep them busy with various activities that help the proper development of fine motor skills and mental activity. One of these activities is autumn-themed appliqué.
In the preparatory group, children study various plants, flowers and trees, which become their first objects for creating crafts.
Most often, educators use tree appliqué as a lesson. In order to get started, you need to prepare the following materials and tools:
- several sheets of colored paper;
- multi-colored cardboard;
- glue;
- brush;
- a simple pencil;
- scissors.
Instead of colored paper, you can use pre-collected natural materials, such as tree leaves. They will help revive the future picture and make it more attractive.
The process of making a children's applique is simple and consists of the following steps:
- First of all, take a sheet of thick cardboard and cut out a base of the required size from it. Its color can be chosen arbitrarily or based on the requirements of the future craft.
- A picture of a tree trunk is drawn on a piece of brown paper.
- Then, using sharp scissors, the workpiece is cut out and set aside.
- At the next stage, yellow, red and orange paper is taken. The required number of leaves is drawn on it. You can also use pre-prepared templates to apply contours. This will not only help speed up the process, but will also greatly simplify it. It is best to use oak, birch or maple leaves.
- Multi-colored leaves are cut out and folded separately from the tree trunk. You can immediately arrange the blanks by color so that you don’t waste time searching for them during the creative process.
- As soon as all the details of the application are prepared, the process of gluing them to the cardboard base begins. First of all, take the barrel and lubricate its back side with glue.
- After this, the largest part of the craft is attached to the center of the base.
- Next comes the turn of the cut leaves. They are glued to the cardboard one by one and form the crown of the tree. Its appearance depends only on the author’s imagination and personal preferences. To ensure that the attached elements do not lose their shape after the glue dries, it is necessary to apply it not to the entire surface, but only to the edges.
- The finished tree is set aside for a few minutes to dry completely.
- If there is enough space left on the base, then you can attach several more smaller trees in the same way.
- The craft is decorated with various additional elements. It could be grass, flowers, clouds, the sun or any other attribute of a children's applique.
Forest applique of autumn leaves
Working with natural material is quite complicated; it requires preparation and careful handling of fragile leaves. Typically, an application of leaves on the theme “Autumn Forest” is done in 2nd grade.
The material for this craft must be prepared in advance by drying the leaves. To prevent the composition from looking sad, find leaves that retain a bright color after drying. For example, red wild grape leaves or yellow linden leaves.
The collected raw materials need to be laid out with newspapers and weighed down with something heavy, leaving in this form for three to four days. If the material is needed urgently, it can be quickly dried with an iron. To do this, the sheet is placed between two sheets of paper and ironed for ten minutes.
Cut out or draw a tree trunk from paper. Glue the leaves using PVA glue.
Older children can cut the leaves into small pieces and make a craft using the collage technique.
Volumetric applique of autumn forest
This method requires some skills and is accessible to children of primary school age.
Take white birch paper and draw black marks. For a voluminous central trunk, cut a strip of 9x17 centimeters and screw it into a tube onto a marker, gluing the edge so that the tube retains its shape.
Attach strips of 10x4 centimeters in the same way, using a pencil, to get thinner tubes. Roll the paper along the long edge, so you will get a thick tube 17 centimeters long and several thin ones 10 centimeters long.
Glue them in the form of a central trunk with branches on the sides. Using a template or a hole punch, cut out leaves from paper in autumn shades and attach them evenly along the branches.
For originality, you can add autumn fruits, such as apples.
DIY autumn crafts
Crafts on the theme Autumn
Autumn crafts with children
Crafts made from natural materials
Autumn crafts from natural materials for schoolchildren. Master classes with photos
Autumn gives us many beautiful ideas for creativity. What beautiful autumn leaves are in the fall, you can look at them endlessly. Nature has spread a beautiful golden autumn carpet of leaves in front of us.
In autumn, you can collect not only leaves, but also acorns, cones, chestnuts, acorns and other natural materials for children's creativity.
DIY autumn flowers made from threads
Work from waste material “Autumn stars”
The work is intended for children 6-7 years old.
Can be used as a group decoration or as a gift
Goal: to promote the development of creative imagination.
Objectives: develop coordination of movements, fine motor skills of fingers, cultivate a caring attitude towards nature.
Master Class. Panel “Wonder of Autumn”
For work you will need: cardboard, fabric, scissors, pencil, Moment-Crystal glue, tree leaves, wood shavings, pencil shavings, a cutout of a woman's face from a magazine, braid.
Draw a contour figure of a girl on thin cardboard and cut it out, cut out the base for the panel from box cardboard of the desired size.
From an opaque plain fabric, cut out the background for the panel, 1.5 cm. larger than the panel size.
DIY autumn crafts at school
Master class: “Leaf fall”.
Application: Work for exhibition, interior decoration.
Dear friends, in childhood we all launched paper airplanes, made wallets, boats and steamboats out of paper, made caps and hats from newspapers. And only many years later they learned that paper folding is called a beautiful word - origami.
And I offer you a master class of work made using the modular origami technique - “Falling Leaves”.
Material: For work you will need colored paper in “autumn” shades, a ruler, a simple pencil, glue (glue stick), gouache, and a brush.
Modular origami is a style of origami in which a whole figure (work) is assembled from separate parts - modules. There are many varieties of origami modules, both flat and three-dimensional.
Master Class. Composition “Autumn Sun” (natural material).
The master class is designed for students in grades 2-3.
This craft can be used for an exhibition at the Autumn Ball holiday.
Step-by-step manufacturing process
Prepare dried flowers or dried flowers (small leaves are fine).
Materials we will need: scissors, yarn, Titan glue, any lid from large paint cans (I used a lid from Façade Paint).
DIY crafts made from natural materials.
Master class “Butterfly made from natural material”
The master class is designed for school-age children, teachers, and parents.
Purpose: Decoration in a corner of nature, interior decoration, gift.
Goal: To develop fantasy, creativity, imagination.
— Introduce a new way of using natural materials;
— Develop fine motor skills, attention, intellectual and creative activity;
— Foster a sense of love for nature.
Corn leaf doll. Master class with step-by-step photos
Crafts from talasha. DIY doll
Master Class. Corn leaf doll
This master class will be useful for additional education teachers, technology and primary school teachers, and passionate and creative parents. The doll can be made together with children over 8 years old.
The product can be used to decorate the interior or as a souvenir
Application on the theme “Applique of autumn leaves”
Master Class. Application of autumn leaves “Fairy”.
Autumn was blooming at the edges of the colors,
I quietly ran a brush across the foliage.
The hazel tree turned yellow and the maples glowed,
The aspen trees are purple, only the oak is green.
Autumn paper crafts in the preparatory group of kindergarten
Master class “Autumn trees”
Making autumn trees in different ways.
Technique: Paper plastic.
The master class is designed for preschool children aged 6-7 years.
Purpose of the master class: interior design of kindergarten groups for the autumn holiday.
Goal: development of artistic and creative abilities of children.
Crafts for the autumn school exhibition
Purpose: the master class is designed for craftswomen who have experience in threading and weaving beadwork and are passionate about this technique, since the work requires a lot of patience and some theoretical knowledge and practical skills in this field of art.
Note! Craft polar bear
“The sky was already breathing in autumn...”
Crafts made from natural materials for primary schoolchildren
Master class: Volumetric applique made from natural material using paper mosaic “Vase with flowers”.
The master class is designed for students of primary school age.
Goal: to create conditions for unleashing the creative potential of children through artistic creativity.
— deepen students’ knowledge and skills about paper mosaic, volumetric applique and techniques for using natural material in work;
DIY rose bouquet from maple leaves
Roses from maple leaves. Master Class
Autumn bouquet “Roses for you” Master class
Master class: DIY autumn crafts from natural materials.
Bouquet! It can be so different: candy, floral, fruity. And this bouquet is special, deciduous. It is beautiful and unusual, made of crimson autumn leaves.
Such an autumn bouquet can be a pleasant gift for your loved ones, a decorative decoration for a table and not only for autumn, show your imagination and it will delight you all year round.
Application on the theme “Autumn”. Master Class
DIY Autumn tree applique
The master class is designed for children of middle and senior preschool age, teachers and parents.
Purpose: interior decoration.
To work you will need:
DIY autumn crafts for elementary school
Application made from natural material “Trees in autumn”
Materials needed: glue, scissors, colored or white cardboard, dry leaves, a small tree branch, paints
Roses from maple leaves. Master Class
DIY crafts made from natural materials
Goal: learn to create flowers from different materials: colored napkins, maple leaves, threads and wooden sticks; work carefully.
Materials: tree leaves, threads, colored napkins, scissors, wooden sticks, tape, stapler.
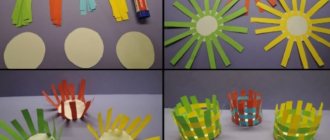
Autumn forest made from rolled strips of paper
Prepare an autumn background for the application and determine the location of the trees on the sheet.
Three-dimensional trees can be made in three ways.
The first method: cut strips of 1x5 centimeters from colored paper in autumn shades. We glue each strip into a ring, the colored side out. Glue the resulting rings sideways onto the trunk in a chaotic manner. Try to glue so that the joint line is hidden at the bottom.
Second method: Cut a strip of paper 1.5x20 centimeters and wind it in a spiral around a pencil. Make 10 spirals in this way and glue them to the paper, placing them like rays from one point in the center of the trunk.
Glue smaller leaves on top of each spiral. Leaves can be cut out using a template or punched out with a hole punch.
Third method: willow or birch. Cut out many strips of 0.5 x 20 centimeters and screw them very tightly onto a toothpick so that you almost get a tube. Draw a willow or birch trunk with drooping branches. Glue the resulting spirals to the ends of the branches.
Autumn craft ideas for kindergarten
Let's start with the simplest compositions. It is difficult for kids to make intricate crafts, so appliques made from dry leaves, chestnuts and acorns would be excellent options. Such applications will delight the little ones.
A wreath made of leaves is also a fairly simple children’s garden craft, but no less beautiful for that.
Such a wreath will be an excellent craft if you do not have time to stock up on natural materials. Just cut out the leaves from colored paper; it will be especially chic if you decorate the leaves with paints or gouache.
Very simple crafts for kids - trees with colorful foliage. There are so many options for making them!
All children love hedgehogs and many people associate this animal with autumn. Cute and prickly hedgehogs with an apple or mushroom on their back will delight children. They are made simply: as a rule, the body is made of plasticine, and needles - seeds (or other natural materials) are pressed into it.
Note! Easter basket applique. crafts for Easter
Children in the older group of kindergarten are no longer so interested in making simple compositions, so we found several more complex options, but making them will not be difficult. For example, a doll with a dress from dry leaves is not difficult to make. You need to take the top half of the doll and place it in the neck of half a plastic bottle. Due to the shape of the bottle, different styles of dresses will be obtained. The leaves are glued in layers and moment crystal glue is used. Of course, girls will like this craft more than boys.
The following crafts are universal, both boys and girls will be delighted with them. Of course, these are already beloved houses made from natural materials. In such a house you can settle fairy fairies or animals, or you can leave them on their own.
Autumn forest applique made from cotton pads
This technology is perfect for children aged three years and older. Since the disks are quite large, this method is more suitable for single trees. Prepare red, orange and yellow paints. For this craft, it is better to use gouache, as watercolor will give lighter colors.
Paint 10-15 discs and dry. You can paint with a brush or dilute the paints and drip from a pipette. If you use several colors on one disk, the colors will mix with each other and give new shades, which will allow you to more fully convey the color scheme of autumn.
Glue the barrel onto a sheet of paper and painted cotton pads on top.
Applique autumn forest from other materials
You can use many materials to create a beautiful and unusual applique. It all depends on the desire and capabilities of the master.
Application from plasticine
Since plasticine is quite heavy, applique requires a solid base, such as cardboard or fiberboard. You can use a disposable plate. You need the softest plasticine so that it spreads easily.
For the background, roll out two green sausages and one light brown one, then assemble them into one sausage without kneading. Tear off pieces and spread where the soil should be.
There is no need to mix the colors into one; let the effect of chaotic spots remain, as if part of the grass has already dried out. Smear blue across the sky, occasionally adding white.
Sculpt or paint with gouache. Roll many 5mm balls in the color of autumn foliage. Each ball must be attached to the base and squeezed to form a flat cake.
Use these flatbreads to fill the space of the tree crown. You can make mushrooms from white and brown plasticine and place them between the trees.
Cereal application
For the “Autumn Forest” applique you need buckwheat, millet, wheat and other cereals. The paper should be thick enough, since you will have to use a lot of PVA glue, and the thin paper will get wet.
It is better to paint the background and contours of the trunks. Apply glue to the tree crowns and sprinkle with cereal. You can use a separate type of grain for each tree or mix all grains together. The work should lie until the glue dries completely.
A craft with seeds is made in a similar way. Pumpkin seeds are painted with gouache in the colors of the autumn palette, and then glued to the base.
To develop children's imagination, invite your child to choose his own materials for crafts. For example, paper can be replaced with fabric or felt. Let your child get acquainted with different textures and materials.
It is in early childhood that the child’s imagination develops most actively. Don't miss this moment and grow a creative person.
"Amanita"
Kersten T.
Fly Agaric boasted in the grove: “Oh, the dress I’m wearing is beautiful!” Any red hat with fringes will be the envy of anyone!
What would a forest be without this beauty? After all, he is the first one that catches our eye when entering the grove. Therefore, he also needs to pay attention. It's easy to do. The hat folds like an accordion. You already know how to do this very well, but I won’t repeat it. If you don’t know how, please look at the article above.
We will need:
- cardboard
- colored paper
- glue
- scissors
Progress:
We fold the future mushroom cap like an accordion.
Fold it in half. Glue the middle together.
We bend the bottom of the accordion, as shown in the photo. We turn the corners so that everything is neat. We fix them with glue. We turn the workpiece over and connect it to the base. Cut out a leg from white paper.
We make two accordions from the strips. Glue them to the leg under the hat. These are our skirts.
Next we decorate the head with white spots. Decorate with leaves and grass. He turned out to be such a cute guy. We won't put it in the basket, but it's nice to look at.