Paper applications
For the most exciting form of such leisure time and instilling initial creativity skills in preschool age, materials are usually prepared in advance.
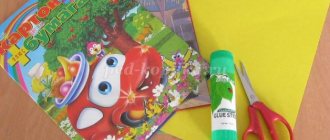
The set of handy tools is already quite familiar: colored paper, glue, templates and scissors. Depending on the age category, simpler or more complex figures are chosen.
The principle of operation is as follows. The colored picture is cut into pieces, after which the child assembles it like a puzzle and pastes it onto a sheet of paper.
You can complicate the task by coloring the black and white image yourself, followed by cutting and sticking. This will make the process even more interesting.
As an alternative, you can create a separate representative of the fauna or a whole composition from prepared parts - torso, head, paws and tail. Showing patience and accuracy, the child tries very hard to create a unique image.
Pets
All kids know what the pets that live in grandma's house or yard look like. Older children know that, in addition to cats, dogs and rabbits, domestic animals also include cows, goats, sheep and horses.
By jointly remembering all the inhabitants of apartments and garden plots, you can make a beautiful applique.
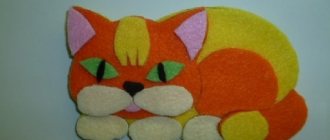
Cat
Cut out the constituent elements: round head, oval body, paws, tail and ears from ¼ circle. The picture is assembled and painted. An adult can print geometric shapes on a printer in advance, and then build a kitten from the photo.
Dog
The figure is also not difficult, like the previous one. In addition to auxiliary materials, you will need blanks. The eyes, body and front paw are formed from ovals, the head from a whole circle, and the back paw and ears from halves.
Piglet
The body, legs, head, tail, ears are cut out of colored paper, and for the face: nose, eyes and snout. Children are asked to connect all the components and stick them on paper to create the appearance of a pig. It will look more fun if you make the tail voluminous.
Cow
Since at the age of 3-4 years it is quite difficult to cut out small details of the applique, you can use templates, which are subsequently glued onto a green sheet of paper.
The composition with a herd grazing in a meadow looks especially impressive. To prevent the process from seeming too labor-intensive, several cows are painted.
To improve perception, colors are selected for the background: light green, deep green or grass.
Applications with wild animals
They live in the thicket of the forest, so to see them you need to visit the Zoo. When going on an exciting journey, you need to have on hand: scissors, sheets of paper, glue, millet, felt-tip pens and animal figurines.
Bear
In our area, he is the real owner of the forest, so many children want to see him. Sequence of work:
- Pictures of a bear are distributed.
- Using a brush, carefully apply glue to the area where the body is located, precisely following the contour and without violating the boundaries of the design.
- Oatmeal is poured over the glue.
- Wait until completely dry.
The result is an applique extremely similar to Toptygin’s!
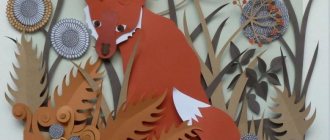
Chanterelle
It is best to assemble a fox with a bright fur coat from geometric shapes. The head and ears are triangle-shaped, and the tail, body and paws are oval. The eyes and nose on Patrikeevna's face are drawn with a felt-tip pen.
Bunny made from napkins
In the forests there are not only formidable predators, but also absolutely non-dangerous animals that feed on grass. Step-by-step instructions for the bunny:
- Take white napkins and tear them into small pieces.
- They are formed into balls.
- Bunnies are drawn using templates.
- The lumps are glued to the ears and body.
- The middle of the ears, tail and muzzle are decorated with cotton wool.
- At the final stage, a mustache is made from dark stripes.
This bunny can be placed on a postcard and presented as a gift!
Inhabitants of hot countries
All children are very inquisitive and always ask who is found on the distant southern continents. Using the appliqué technique, you can make exotic animals that you won’t find in your own forest.
Elephant
Typically, appliqué is done using blanks. First of all, the figure is cut out and then glued onto a piece of paper. To complete the composition, select a background that is suitable in color.
a lion
These animals live in the African savanna. Many children have seen live lions at the Zoo, so they can clearly imagine what this king of beasts looks like.
To make the lion cub really cute, you need to thoroughly prepare. You must have: black and red markers or felt-tip pens, PVA glue, a brush, scissors, sheets of yellow and orange paper.
Progress:
- The head and mane are cut out.
- The parts are glued together.
- An orange triangle imitating a nose is placed in the middle.
- They complete the look with eyes drawn at the top with a marker, and a mouth and cheeks at the bottom.
The almost finished craft is dried and set aside for a while. This applique can be used to decorate a greeting card or gift box!
Crafts from semolina
Crafts in the senior group of kindergarten should not only entertain, but also develop the child. Semolina paintings are great for showing physical processes.
- Draw or print a template on paper, it can be any character;
- Invite your child to coat the design with PVA glue inside the outline;
- Sprinkle semolina over the glue with your child, shake off the excess;
- When the semolina dries a little, decorate the cereal with watercolors.
The paint will spread smoothly and the semolina will swell. This technique allows you to beautifully mix colors.
Fauna of the Far North
There are many master classes on the Internet about animals living in permafrost conditions. Children know these waterfowl from books and cartoons.
Panda
The clothes of this exotic animal look very unusual. The procedure for making a panda is as follows. A larger cut out black oval will serve as the body, and a smaller one for the abdomen.
Other components are black paws and a red mouth. All components are attached to the base with glue. The cheerful panda is ready!
Applications are not only made of paper, but also partially made of cotton wool. Most often they decorate the body and head of animals. The material is glued in a solid piece or in the form of rolled balls.
If you paint the cotton wool, you will get a delightful craft.
Multi-colored woolen threads, cereals or plasticine are also used for decoration. This activity is very useful for children, as it teaches perseverance and develops creativity!
Junior group. Early childhood, nursery. Children 1-4 years old
Master class on making crafts from packaging mesh for fruit “Pineapple” for children from 4 years old
The master class will be interesting and useful for children from four years old, educators, additional education teachers, and caring parents of preschool children. Purpose: attribute for role-playing games “Family”
,
“Supermarket”
and other independent games for children. Target:…
Crafts from plasticine for kids 2–3 years old At this age, children are already good at rolling koloboks and sausages, pinching off, smearing and flattening plasticine. However, crafts with many small details that can be found in popular children’s modeling manuals are not yet possible for them: as a rule, they are not...
Photos of applications in the form of different animals
Mouse from a sleeve
Required tools and materials:
- sleeve;
- cardboard;
- colored paper;
- paints;
- glue;
- scissors.
Progress:
- Paint the bushing gray and let dry. This will be the body of the little mouse.
- Cut out ears and paws from gray cardboard.
- Make cuts in the sleeve to fix the cardboard elements in them.
- Cut an oval out of pink paper and glue it to the base. This will be the tummy.
- All that remains is to draw the eyes with eyelashes, a nose and two teeth.
Educational crafts for kids can be good helpers in studying many topics. For example, when studying shapes, you can make a chest of drawers from matchboxes and label each one with a certain meaning: circle, triangle, square. Then cut out these shapes from colored cardboard. This way the child will learn not only to cut out the simplest shapes, but also to sort them correctly.