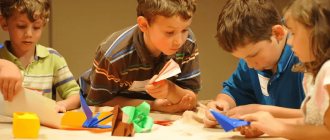
A lesson in design using origami technique on the theme “Ships” for the older group.
A lesson in design using origami technique on the theme “Ships” for the older group.
Author:
Mazhova Svetlana Aleksandrovna - kindergarten teacher..
Target:
making a paper boat using the origami technique.
Program content
:
Continue to introduce children to the art of origami.
Learn how to construct a boat out of paper.
Strengthen children's knowledge about water transport.
Develop constructive thinking and memory.
Develop fine motor skills of the hands, coordination of hand movements and speech.
Cultivate accuracy and perseverance when performing work.
Preliminary work:
a conversation about what kinds of ships and ships there are (passenger, cargo, special purpose, military), working with the illustration “Ships” - (modeling from geometric shapes), reading and looking at illustrations of reference literature on the topic.
Equipment:
rectangular sheets of colored paper 15/20 cm for each child.
Progress of the lesson:
Educator: Guys, I have prepared a riddle for you, listen carefully:
Passengers, cargo is being transported,
In the bays he will wait out the storm,
It will buzz with a loud bass,
He will run away into the sea! (ship)
Educator: Just recently we got acquainted with different types of ships and vessels. And today, I want to invite you to make a paper boat.
Educator: First I will show you how to make a boat, and then each of you will try to make it yourself.
-For work we need a rectangular sheet of paper. First, fold the sheet in half. Now we mark the middle of the sheet by bending and straightening the sheet. Fold the upper corners of the rectangle towards the middle, lift the bottom strip up, and turn the figure over. We bend the corners to the intended line, lift the bottom strip up, open the figure, stretching it in different directions. We lift the corner up, turn the figure over, lift the other corner up, open it by pulling the side corners. The ship is ready.
Now take your jobs, but before you get to work, let's play with your fingers.
Gymnastics for the development of fine motor skills of the hands:
One-two-three-four-five (count your fingers)
We will count the transport.
Bus, boat and moped,
Motorcycle, bicycle (show vehicle movements with your hands).
Ship, train, helicopter (alternately clench your fingers into fists, starting with the little finger)
-Our fingers have played, and now get to work (while working, monitor the children’s posture, help if necessary).
Summary of the lesson.
(Reflection)
-Children, did everyone get the boats? (Analysis of children's works).
- Ilya, look at all the boats and tell me which one you like the most.
— Ulyana, which boat did you like? Why?
- You guys are great! Look what a flotilla we have.
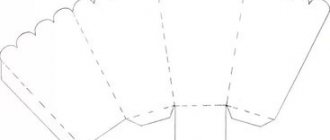
Boat with sail for children
The scheme differs significantly from the classic version, but there is nothing complicated about it.
Detailed instructions:
- A square sheet of paper is suitable for origami.
- It needs to be folded diagonally. Be sure to bend all 4 corners to form a cross on the sheet.
- All 4 corners meet at the central point.
- The structure needs to be expanded.
- Next, the square with folds is turned over to the other side and folded in half.
- Each half that appeared during the instructions is folded again.
- Next, the sheet is unfolded again with the front side.
- Folds in half again.
- Diagonal guides should appear along which you need to fold the sides.
- Once the workpiece is ready, you need to fold the figure in half.
- The free angle is unbent, creating a full-fledged sail.
It is unlikely that this design will withstand water, but it can become a wonderful part of the decor. Additionally, you can color the composition using gouache.
The main thing is not to place the product on a radiator or near a heat source, as after drying it will lose its appearance.
Step-by-step paper boat master class for beginners
Well, I would like to touch on the topic and show the youngest children another option that can be used for kindergarten.
1. Take a square sheet of paper, you can take regular white or colored.
2. Fold it in half to form a triangle.
3. Bend the bottom end to the top, as shown in this picture.
4. Now, where you have a fold line, drag the bottom corner up, as if turning it inside out.
5. Here, the fold line is marked, in case you didn’t understand.
6. And this is what happens.
7. You can trim the tip or hide it. This is such a wonderful and cool creation.
How to make an origami steamer
The origami steamer is another model that folds easily and requires a few simple steps. Brief instructions for origami paper boat for children:
- You need to start with a square sheet of paper, colored on one side.
- You need to fold the paper in half, and get vertical and horizontal folds in the center.
- The paper is turned over and folded at the bottom so that the end of the sheet coincides with the central fold.
- The structure is then turned over. The right side is lifted and placed against the center fold. After this you need to press and smooth it well.
- You need to repeat the above step for the left side.
- Raise the square at the bottom left and make a squash fold, for the right side as well.
- Bring the top of the model to the bottom. Fold and make a crease.
- When opened, you can see that a horizontal fold forms in the center.
- Now you need to make another fold so that the top matches the beginning of the bottom.
- Make a small triangle in the form of folds along the edges.
- Unfold these triangular folds and gather the folds together.
The final step is to unfold the structure, after which a steamship is obtained. You can send it sailing if you lubricate the edges with wax in advance. To create a model, it is better to use colored paper, the sides of which will be of different shades.
How to make an origami exhibition boat from modules
A ship with raised sails reminds of a possible journey. This instruction is much more complicated than the previous ones, but if you are going to participate in an exhibition or competition, then it is definitely worth trying. Modular origami was invented in 1734, according to Ranma Zushiki.
The technique allowed one to gain patience and attention to detail, so for some time it was even taught at school. Now we have to figure out how to make an origami paper boat using an unusual technology.
How to make a module
The structure will consist of 1027 modules, which can be held together with ordinary glue. The main difficulty is that you need to make even and neat parts; the appearance of the structure will depend on this.
Instructions:
- You need to take a rectangular sheet, then divide it into 38 equal parts.
- For convenience, you can print the cells on a printer in advance, then cut them out using scissors.
- Each part needs to be folded in half, then unfolded.
- Connect the corners of the rectangle in the middle.
- Turn over and lift the edges up.
- The corners are bent, resulting in the top of the ship described earlier.
Then the edges along the marked lines need to be expanded. You should get a figure with two pockets, they are involved in the connection. Thus, the master creates a modular construction set from which you can assemble any craft.
How to assemble a modular ship
There are two options: assembly takes place using the imagination of the master or ready-made diagrams are used. To simplify the first collection, it is better to use ready-made instructions:
- The ship is assembled in rows. A total of 16 lines will be used for the deck and 12 for the sail itself.
- The first row is composed of 47 modules.
- A base is made of 4 rows, where 1 module is added to each ring.
- Starting from rows 5 to 7, you need to add volume to the figure using 55 pcs.
- From the 8th line everything goes down by 1 piece. up to row 17.
To prevent the sail from falling off the ship, you can glue a skewer. Then you should start collecting. Everything is simple here, you need to count the remaining modules and assemble the structure according to an identical scheme. The master can experiment with any color and create patterns when assembling. The process will be reminiscent of playing with Lego.
DIY foam ship for children
Do not rush to throw away foam plastic after purchasing household appliances, especially if you have children. It can be useful for making a quick boat.
Materials:
- Styrofoam pieces
- Toothpicks
- Knife
- A thread
- Film for decoration
- Colored paper
Using a knife, cut out the shape of a boat - two rectangles of different sizes. A large rectangle needs to have a sharp nose.
Using glue or a toothpick, connect both parts
All that remains is to decorate the boat. In this matter, you can give your child room for creativity.
Cut out flags from paper and glue the flag onto the mast.
You can add a second toothpick to the ship and tie them together with rope or thread. We'll insert another toothpick at the back of the deck. The places where the thread is attached can be lubricated with glue.
The outermost toothpicks need to be shortened.
We will hang small flags folded in half on the thread.
Another option for a ship's mast made of foam.
Let's make a cross from two toothpicks and wrap it with thread. Let's break off the ends.
The sail can be made from a tree leaf or fabric.
More complex foam ship designs will require more time.
Origami constructor made of cardboard
This method is suitable for those who are just developing hand motor skills. The constructor is created on the basis of a diagram that you can come up with yourself and draw in paint or on paper. How to collect:
- There are several types that use glue and special compartments to accommodate “fasteners”.
- In both cases, each piece is cut out with scissors.
There are no rules in this master class; you can give free rein to your imagination. If a child will do the work, you need to ensure comfort and safety (plastic scissors and a ruler are chosen).
Ship: paper applique in kindergarten
Activities with colored paper are not only fun, colorful results, but also creative development. For kids who are not yet 3 years old, you can make blanks, cut out the parts in advance, and then glue them onto a sheet of cardboard or paper. Older children can be given scissors with rounded edges.
It is convenient to use glue for appliques - a pencil or PVA with a brush.
Ship made of colored paper: simple application
To make a beautiful and bright applique, we will need a set of colored paper, scissors, glue, pencil, and ruler.
Let's transfer the part templates onto colored paper:
- 3 clouds on blue paper,
- yellow triangle, blue flag,
- yellow semi-oval,
- red rectangle,
- blue hexagon,
- 3 waves of blue color,
- Black bird
The colors of the ship can be safely replaced with those that the child wants more.
Boat template: paper applique
Glue two waves on the bottom of the sheet, leaving room for the third wave.
Glue the deck in the form of a blue hexagon and perpendicularly a long red rectangle - the mast.
Glue a yellow triangle to the right of the red mast, and a semi-oval to the left. We will place a flag on the mast. Directly on the blue deck, between the two waves, we will glue the third wave.
Ship: applique for the younger group
For little ones, prepare pre-printed parts - you can even cut them out in advance. This is important so that children can understand which colors to combine and learn to understand shapes.
Print out ready-made templates and help children understand which part to glue where.
You can choose from several options, focusing on varying degrees of difficulty.
The boat is sailing: three-dimensional applique
If you make some details voluminous, the applique will turn out to be more original. The parts that create volume are glued last.
How to make a three-dimensional applique: a boat in the senior group
This work uses the skills of drawing, gluing, and cutting, as well as the child’s creative talents.
Materials:
- White sheet A4
- Watercolor
- Brush
- Scissors
- Colored paper
- Markers
- PVA glue
We start by designing the background of the craft. We draw waves and clouds with a blue or light blue pencil.
Paint the background with blue watercolors
To make a beautiful boat, you can print the template
Cut out parts according to a template from colored paper
Glue blue stripes that will be waves. Apply 3-4 drops of glue at an equal distance from each other and attach wave strips to them, creating volume.
On the main parts of the ship, draw stripes and glue three blue circles - portholes.
Glue on the mast and flag
Now let's glue the white sailboat
Ships on the roads: application in the preparatory group
You can easily place several ships on this application and this work can be done collectively. This process will help children learn to identify the parts of a ship. Each boat may have a different shape and deck color. You can depict pirate or warships.
You can pre-color the background
If the work is done by a group of children, you can give each child the task of creating their own model of a ship.
Applique Warship
An application of this type would be appropriate on postcards for February 23, or May 9. When children make cards for dads or grandfathers, they will need the ability to make warship appliqués.
You can use a template to prepare a ship.
Ship template for applique
Applique Ship for the little ones
Little ones should learn to use scissors and glue and be able to draw basic elements of nature before they go to school.
Therefore, such an applique as a boat at sea, which is combined with drawing skills, will be an excellent training.
Materials:
- Colored paper
- Cardboard
- Scissors
- Glue
- Crayons
- Markers
For the base of the applique we use a white sheet of cardboard.
Tear off a few strips of blue paper to glue along the bottom edge of the base, making waves.
Let's cut out the sun, clouds and ship elements from colored paper.
Draw the birds and add other details to the applique.