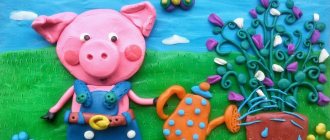
Positive aspects of creating applications
This type of crafts has a very beneficial effect on the development of the child. The main advantages of creating applications:
- Development of fine motor skills of the hands;
- Development of creative and logical thinking;
- Trains perseverance and accuracy;
- While working, the baby remembers what objects look like and what they are called.
Also, in this way, a child can create not just a simple standard craft, but also present the work as a gift or interior decor.
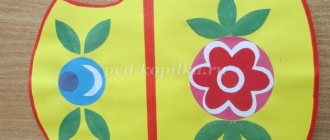
Applications fruits and vegetables
Applications in the form of fruits and vegetables are quite popular; they are created by both younger and older children. Using them you can glue real compositions, and from different materials.
The depiction of fruits and vegetables using the appliqué technique facilitates their quick learning and memorization, which is very important for a small child.
Materials for their manufacture
To make applications depicting fruits and berries, you can use not only the usual material - colored paper, but also others:
- corrugated paper;
- felt;
- some types of fabrics;
- dried tree leaves and berries;
- seeds;
- cereals and pasta;
- beads;
- eggshells;
- threads
An application on this topic with several types of materials turns out to be quite interesting and original.
Technicians
As a rule, fruits and vegetables are depicted in the form of standard applications, but they also look very interesting in 3D volume. If desired, you can make the applique using the origami technique or by twisting narrow strips of paper.
They also often do work using the mosaic technique, that is, they tear paper or break eggshells into small pieces, and then fill them with the required image.
Application using cutting technique
This technique is especially popular among beginners. Because it is very simple, but guarantees a good result. After all, crafts made using this technique look beautiful.
"Airplane"
We will need:
- Colored paper: gray, blue, yellow;
- Blue cardboard;
- Simple pencil;
- Brush;
- PVA glue;
- Black felt-tip pen.
Application stages:
- On blue cardboard with a simple pencil we draw silhouettes of the sun, clouds and airplane. To highlight a brighter outline, they can be outlined with a black felt-tip pen.
- Next, to make a paper appliqué, you need to tear the colored paper into pieces of different sizes. Using a brush, apply glue to the silhouette of the airplane and glue it with pieces of gray paper. When everything is glued, you can make the airplane several windows and a front windshield from blue paper, gluing it on top of the gray paper.
- Using exactly the same steps, we cover the sun and clouds.
"Ship"
To complete this work we will need:
- Colored paper: white, green, red, brown;
- Blue cardboard;
- Black felt-tip pen;
- PVA glue;
- Brush;
- A simple pencil.
Application procedure:
- We take cardboard and draw on it with a pencil a sketch of our future ship with a double sail and a flag, you can also draw waves and seagulls. Next, we outline the outline with a black felt-tip pen to make the picture brighter.
- To decorate, tear colored paper into small pieces; if desired, you can use scissors. When we have several bales, we begin to seal the ship. White and green are used for the sail, red for the flag and brown for the ship. Thus, an applique of torn paper is obtained.
For the little ones
You can start making your first applications from about 2 years old, you just have to choose the easiest and simplest options. As a rule, appliques of vegetables and fruits in a preparatory group or nursery are done in the form of a single work, rather than a composition.
This way it is easier for children to glue them and also to remember them. To make it as easy as possible for your child, you can use already prepared templates of fruits and vegetables for appliqué.
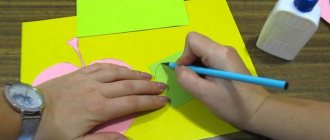
Cherry
Cherry is an excellent applique option for the youngest children on this topic. To make it you will need:
- white sheet of cardboard;
- pencil;
- scissors;
- glue;
- colored markers;
- red colored paper.
Work plan:
- Draw 2 small circles on colored paper and cut them out.
- Glue the circles onto the cardboard so that they are on the same level and not far from each other.
- Using a brown felt-tip pen, draw 2 stripes, connecting the circles to create a design in the form of a pair of cherries.
- Draw a leaf with a green felt-tip pen.
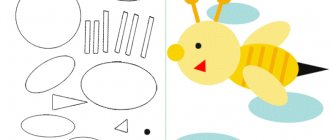
A pineapple
Almost every child likes this exotic fruit, and of course it makes them want to portray it. For a more beautiful and interesting look, you can make it voluminous from simple colored paper. All you need for this craft:
- yellow, green paper;
- sheet of cardboard;
- glue;
- scissors;
- pencil.
Step-by-step work plan:
- Draw a pineapple on a piece of cardboard.
- Cut the yellow paper into strips, approximately 5 cm long and 1.5-2 cm wide.
- Take one strip and fasten its ends to make a ring, glue the ends together.
- Press down a small part of the ring a little and glue it to the upper contour of the pineapple.
- Glue another ring next to it and fill the entire top row.
- Take a ring of paper and also glue it, but just below the top row of the pineapple, while the glued part should be under the free edge of the upper rings.
- Follow the previous step until the entire pineapple is filled.
- Cut out small long leaves from green paper and glue them to the top of the pineapple.
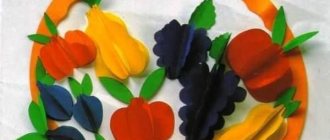
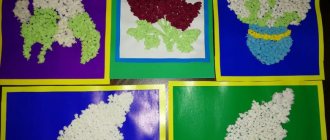
Fruit basket
Quite an interesting way to create a fruit applique from felt. This material is sold in a wide range of colors and is easy to work with. Also for this craft you will need: a sheet of cardboard, brown paper, scissors, a glue gun and sticks for it, a pencil, a newspaper.
Action plan.
- Draw a basket on a sheet of cardboard.
- Cut the sheets of paper into strips about 2 cm wide and roll them into thin tubes, seal the edges well.
- Lay out the outline of the basket from newspaper tubes, cutting them to the desired size.
- Tear the brown paper into small pieces and roll them into tight balls.
- Glue the balls over the entire area of the basket, so that there is no gap between them.
- Cut out the desired fruits from felt, attach them to the basket in a happy order and glue them.
In principle, for such a volumetric application of fruits and vegetables, you can use seeds and cereals, as well as eggshells.
Applications depicting fruits and berries allow you to create colorful works from a variety of materials and using different techniques. Even the smallest creative hands can begin their acquaintance with appliques with vegetables, berries, fruits, and older children can create entire compositions.
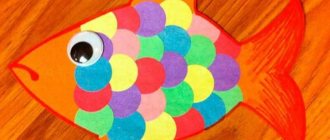
Types of creativity
Before work, you should choose the type of creativity. There are different types of applications, which are divided into three main groups:
- Object products are a simple type of applique for kids. Figures are created from paper, fabric or natural materials and placed on the base. The image can be anything: a leaf, an animal, a bird, a house, a spikelet, etc.
- In plot images, the image is made from different elements interconnected. The finished painting can demonstrate an event or manipulation.
- Decorative ones are used to decorate albums, frames, and so on. Most often they consist of various patterns or ornaments.
In addition, applications are divided according to the following criteria:
- color scheme (colored products, black and white, plain);
- volume (flat, convex);
- material (paper, fabric, natural components, pebbles, etc.).
To understand how unique this type of creativity is, it is enough to get acquainted with the most popular, as well as the most unusual types of creativity for kids.