How to do:
- Take a sheet of blue paper and bend it on both sides as shown in the photo. Bend the top corners to form a house shape. Trim the corners. Cut out two rectangles from white paper and write the name of the fairy tale on them. Cut out windows from yellow paper and glue them onto the house. Draw a roof with a felt-tip pen or pencil.
- Expand the house. Let's start decorating the inside for a fairy tale. Take half a sheet of orange paper and glue it to the middle of the blue sheet. Turn over and cut off any excess orange paper. We got a big house-teremok.
- Cut out four windows and a door for the mansion from yellow paper. Glue the windows onto pieces of red paper, cut along the contour with curly scissors or simple scissors. Now the windows and doors will be bright and beautiful. Glue the door to the tower, but leave the right side of the door unglued so that you can hide the figurine of a fairy-tale hero behind it. Glue the windows with pockets, without smearing the upper part of the window with glue.
- Glue grass from green paper on both sides of the tower. The grass can also be glued into a pocket, then the fairy tale characters can be placed in the forest. Cut out two Christmas trees from colored paper and glue them onto the grass. Cut out and glue clouds from white paper, and a sun from yellow paper. The background for the fairy tale is ready. Now let's start making heroes.
- Heroes for a fairy tale can be drawn and cut out, just like we did. You can print the necessary pictures from the Internet on a printer or cut out suitable pictures from old children's magazines. The mouse was the first to come running into the mansion, look how we drew it.
- The second frog jumped up to the tower. That's how funny it turned out to be.
- Then the runaway bunny came running.
- Following the bunny, a little fox-sister wanted to settle in the little house.
- And here is the top - a gray barrel.
- And of course, when there was already little space in the little house, a bear came and climbed onto the roof.
Now that we have all the heroes of the fairy tale, we can start the performance or game. Invite your friends or parents and open a fairytale house! The fairy tale begins!
“Building” a forest tower with children
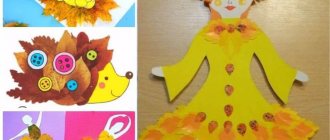
My child’s kindergarten is hosting an exhibition of autumn crafts, so we decided to make this. The craft is made in the form of a small yellowed clearing on which there is a tower, and around the tower there is a bear with a barrel of honey, a bunny and a little baby in a hedgehog costume.
Let's take a closer look at the gray bunny, young birch tree and mushrooms.
And this is a clubfoot bear, holding his harvest in his clawed paws, and, of course, a little “hedgehog.”
Let's take a closer look at the tower to get a better look.
Well, let's get to work.
For this craft you will need the following set of materials and tools:
- salty dough;
- cardboard;
- chipboard;
- toothpicks;
- matches;
- pebbles;
- natural materials (acorns, cones, twigs, etc.);
- wire;
- beads;
- paints;
- polymer clay;
- textile;
- decorative sand;
- scissors;
- glue;
- needles;
- tassels.
Let's start with the clearing. Take a rectangular piece of cardboard or chipboard and apply a small layer of salt dough on it. We mark the location of the tower, sprinkle the path with gray decorative sand, and draw fine grass with needles.
We make the foundation of our tower and the threshold from salt dough, on which the steps will be attached in the future.
From thick cardboard we cut out a rectangle with rounded corners of the same area as the foundation (ours is about 12 x 20 cm).
Now we take toothpicks and insert them along the edges, cutting off the sharp ends at the top. This is our future fence.
We glue it all to the foundation. On the side, the foundation can be decorated with decorative soil, and road curbs can be laid out from peas (or from the same soil), as shown below.
Next, we move on to the construction of our tower. We sketch out the details on paper, transfer them to cardboard and cut them out. Dotted lines indicate fold lines. The sketches turned out to be on two sheets - A and B.
This is sheet A.
And this is sheet B.
The shaded areas are areas where parts are attached using glue.
We cut out our first piece under No. 1. This is our 1st floor.
Using PVA glue or a gun, attach it to the base.
Then we cut out part No. 2 with the door and attach it to the front end.
We attach the 3rd to the 2nd part.
Next we make the base of the roof. We cut out part No. 4 - this is the base of the roof of the 1st floor, then the roof itself (No. 5 and No. 6) and parts No. 7 and No. 8. We fasten all this as shown below.
We make the roof for the second floor (No. 9, No. 10 and No. 11).
Next, we connect parts No. 12 and No. 13, cut out the windows.
We fasten them as shown in the figure. Attach the roof (part no. 14).
Now we cut out and fasten parts No. 15 and No. 16.
We attach the result in place (see photo below).
We cut out the chimney (No. 17), assemble it and attach it as shown below.
Now we will begin covering the roofs with tiles.
We make “tiles” from pine cone scales.
Coat the surfaces where the scales will be attached with salt dough.
The roof was covered, all unnecessary cracks were covered with salt dough.
We installed windows with “glass” made from tracing paper, with a frame made of salt dough and toothpicks, and attached a round shade.
The fence had to be temporarily removed so that it would not interfere with the “window installation work.” Now that the finishing is complete, the tower was painted with gouache and a wire door handle was attached.
We thought about what was missing here and made balconies on the 2nd tier from dough, cardboard and toothpicks.
Then we returned to the fence and finished it.
They laid out steps from cardboard and attached railings.
All unevenness on the railings were also corrected using salt dough.
We also made a flower pot. The pot was a medicine measuring cup painted in acrylic, instead of soil there was black salted dough, and the flower was dry juniper twigs.
We painted the earth brown-golden, planting green bushes, which were also gilded.
A young birch tree was woven from beads.
My 5-year-old son also took part in making the craft, and with the greatest pleasure turned the pine cones into Christmas trees, painting them with green gouache paint.
We plant Christmas trees in the clearing.
We make mushrooms from natural materials and salted dough. We use salted dough for the legs, and chestnuts and acorn caps for the caps.
Now we move on to making forest animals. Let's make a bear.
Using a needle we draw his fur.
We sculpt his claws, paint them and give him a barrel of honey, consisting of an acorn and salt dough.
We sculpt a hare and a crow.
Take a piece of salt dough and shape it into the bird's body as shown below.
We use toothpicks to make its legs, and then draw feathers, eyes and wings with a needle. We paint it with black paint and get a finished crow, which we attach to the top of one of the “Christmas trees.”
Now we fashion a hare.
Using toothpicks and needles we also draw the fur and color it.
And this baby is molded from flesh-colored polymer clay, about a little less than 5 cm tall. The arms and legs are movable, on pins, the pacifier is removable. He is wearing a hand-sewn carnival hedgehog costume. Unfortunately there is not enough space to show how it was made.
We put everyone in their places, as in the photo, and the craft is ready. Enjoy watching everyone.
I apologize for the terrible quality of the photo, the camera is already old and a little washed out.