Where to start?
So, regardless of which group you are conducting the lesson with, it is initially necessary to introduce children to the varieties of trees and shrubs.
After all, only a few of them will be able to name you more than 2 types of trees, not to mention shrubs. How can you do something you don’t know? Therefore, the teacher’s task is not only to tell, but also to show what this or that tree looks like. Perhaps you have teaching material on this topic: hand-drawn or printed from the Internet. But I recommend that you purchase demonstration pictures “Trees and Shrubs”, which can later be used in other classes. They cost just a penny, and the thick cardboard and large size of the cards will make you very happy.
The thematic picture dictionary “Flowers, Trees” will also serve well in classes where you need to get acquainted with the diversity of the plant world, depict it in the form of an applique or draw it. These two manuals will provide invaluable assistance to the teacher both in the initial stages of preparation for creative work, and in the case of a more in-depth study of the topic.
And of course, you will need templates to work. For the little ones, you will need to cut them out yourself, leaving only small elements for cutting - you need to practice using scissors from an early age. Students will only have to glue the necessary elements. For older children, “patterns” will be useful for tracing them on colored paper and then cutting them out yourself.
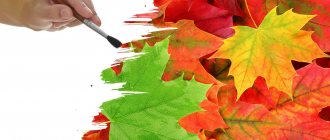
Making the application “Autumn Kaleidoscope”
So, we will be interested in a multi-colored applique that would best symbolize a beautiful autumn tree. Pupils from the middle group can be offered a voluminous applique - with your help they will cope with this task perfectly. Such work will contribute to the development of fine motor skills, strengthening skills in working with scissors, and cultivating beauty and neatness.
To make the application we will need:
- sheets of blue cardboard;
- tree templates (ready-made colored or white for tracing);
- colored paper;
- pencil, glue, scissors, ruler.
Stages of work
- At the first stage of work, we will prepare the silhouette of the tree. We give the kids cut-out blanks from brown paper; for the older ones, we give them stencils from cardboard or plastic, if available, to trace and cut out. Don't forget to offer children the safety scissors I mentioned above. When the tree is ready, put it aside for a while and work on the background.
- As you remember, we have blue cardboard as the background. You can cut out a semicircle from green construction paper and glue it in the middle of the bottom of the sheet. This will be the greenery on which we will place the tree. We also glue it on top. But there’s never enough greenery, right? Bright rich colors can decorate any application, so next you need to cut a thin green strip of paper and fold it across the entire width like an accordion. It will be weed. We glue it along the entire lower width of the sheet on top of the trunk.
- Next, perhaps, comes the most painstaking stage of work. We will make leaves. You can alternate the stages as you wish. You can first prepare all the elements of the image, and then all that remains is to glue them, or do everything in stages. I recommend that teachers make blanks for the leaves, since this will take a lot of time for children. For leaves you need multi-colored squares 3cmx3cm according to the color of the leaves: red, green, yellow, orange, light green, etc.
- Now we form the leaves directly, fold the squares like an accordion starting from any corner. When the accordion is ready, bend it in half and glue the middles together - these will be the original leaves. You need quite a lot of them to make the tree beautiful, so allocate more time for this work. One tree will require at least 30 leaves. Glue them onto the branches.
- The final stage of the applique will be clouds, which are formed from torn, crumpled blue paper and glued to the top of the background.
If you do the work at home with children, you can buy this interesting set of “Peppa Pig” applique, which can be planted under a tree.
MAGAZINE Preschooler.RF
Tsapko Anna Vladimirovna. Teacher at GBOU d/s No. 2723, Moscow. Goal: developing skills in making appliqué from crumpled paper, cardboard parts, and decorative stickers. Objectives: Educational: master new non-traditional appliqué techniques; summarize children’s knowledge on the topic “Trees”; Educational: to cultivate respect and respect for nature; Developmental: correction of general and fine motor skills. Equipment: · artificial spruce trees; · reproductions of paintings by I.I. Shishkin “Oaks”, “Morning in a pine forest”, “Oak grove”, “Pines illuminated by the sun”; · napkins in different shades of green, yellow, orange; · a set of decorative stickers; · poster “Tree”; · “crowns” oak, birch, maple. Preliminary work: · examination of reproductions of paintings by I.I. Shishkin “Oaks”, “Morning in a pine forest”, “Oak grove”, “Pines illuminated by the sun”; · Conversations on the topic “Forest”, “Trees”; · learning the song “We walked in the forest” Lesson progress: Children are divided into 3 groups and sit at 3 tables. The teacher, standing near a stylized forest (artificial spruce trees), addresses the children: I entered the forest on a green day. The green oak swayed in it. Green leaves, Green grass, Green frogs Sing: “Kva-kva, kva-kva, kva-kva!” Green moss lay on a stump. The green beetle was buzzing above him. The sun opens its eyes, the silent forest comes to life, we open the forest door, we talk to the forest. What is a forest? Children's answers. Right! A forest is a place where many plants grow and is home to many animals and birds. What plants live in the forest? Children's answers. What is a tree? How does it grow? Who can name all the parts of a tree correctly? Children's answers. (Summarization of answers by the teacher). Let's get up and imagine that we are in the forest and take a walk and stretch our legs. Children go out to the “clearing” and sing the song “We were walking in the forest” to the soundtrack. We were walking in the forest, we were looking for mushrooms. We walked around the birch trees and found a boletus. Ai Lyuli Ai Lyuli The boletus was found. We walked into the forest, we looked for mushrooms. We walked around all the aspen trees and found boletus. Ay lyuli ah lyuli The boletus was found. We were walking in the forest, we were looking for mushrooms. Everyone came up to the Christmas tree and found a large white mushroom. Ai Lyuli Ai Lyuli A large white mushroom was found. Educator: We took a walk, breathed the forest air, and now we’ll sit on the chairs and relax. Guys, what time of year is it now? What kind of trees are there? What kind of Christmas trees? (children's answers) Correct! The Christmas trees are always green, and the trees change the color of their foliage depending on the time of year. We'll play with you now. Children go to the “Glade” Game-Physical Education Minute The wind blows in my face (waving their arms) The tree swayed (sway) The wind gets quieter and quieter (they squat) The tree gets higher and higher (they stand up and stretch up) The game is played 3 times, each time the teacher takes out a “crown” and puts it on the child with the words: The cold wind in autumn blows, howls, rustles, and plucking leaves from the maple tree, it gilds the entire Earth. (“crown with yellow leaves”) The wind shakes the tree and turns it into a birch tree. ("crown" with green leaves) The wind shakes the tree and turns our oak tree into a winter shroud, a cap of snow onto our oak tree. (“crown” with white foliage) The teacher places a crown on each table and asks each group of children to determine the season of the year by the color of the foliage. Shows the children a blank for the future application, which depicts a tree trunk, and offers to correct the missing details and choose the color of the foliage. The teacher gives the children yellow, white and green napkins, and the children make “balls” from them. Now guys, decorate the tree with leaves. A pre-prepared image of a tree without leaves is placed on each table and the children take turns gluing crumpled paper onto the crown. Well done! So we have an autumn, winter and spring tree growing in our magical forest... Guys, in fairy tales we don’t always see ordinary trees. Listen to the poem by K.I. Chukovsky’s “Miracle Tree” (added and changed by the teacher): Just like at our gate, the Miracle Tree grows. Miracle, miracle, miracle, wonderful miracle! Not leaves on it, Not flowers on it, But stockings and shoes, Like apples! Hares sit on it and wiggle their ears, and laughing frogs chatter and scream. And cars, and cakes, Fishes, squirrels, flowers... What a tree, a wonderful tree! In front of the teacher there is an easel with a picture of a tree, while reading a poem, he pastes cardboard pictures of the characters in question. This is the “Miracle Tree” I grew up in. Let’s make “Miracle Trees” too. Everyone will have their own tree with its own wonderful fruits. To make your work beautiful, you need to warm up. Physical education minute. He went into the forest himself. (steps in place) I climbed the birch tree myself. (hands moving) He grabbed the branch himself. (grasping movements) I scratched my knees myself. (pat knees) I fell from the birch tree myself. (squat down) Tears began to fall.He wiped away his own tears. (rub eyes)
Nobody saw anything. (spread your arms and cover your face with them)
Well done! Now let's get to work!
The teacher distributes blanks for the appliqué; children take out stickers one by one from the “magic bag” and, under guidance, complete the task.
Well done guys, all the applications are beautiful and interesting! Now tell us one by one what wonderful fruits have grown on your trees.
Children describe their work.
The teacher sums up the lesson and thanks the children for their work. All works are displayed at the exhibition.
| Next > |
Family tree making technology
If you want to try something new in your work, then I suggest you do some applique work in the form of a family tree. In this case, it is advisable to make the crown of the tree whole; voluminous leaves are not suitable here. In this photo they look very sloppy.
What will happen on the crown depends on your imagination. You can stick apples on which children will write members of their family (suitable for a preparatory group) or flowers. You can also ask parents in advance to bring photographs of family members in the form of small circles. Such a craft can even take pride of place in the living room and become a family heirloom. There are a lot of options, choose depending on the age of your students.
Application options
Many people believe that such a craft can be made exclusively from colored paper, but there are other methods. You can stick it on cotton wool, cotton pads or any other elements. In this case, the result will be completely different. Therefore, we recommend experimenting, introducing your child to creativity and developing his original approach to creating things.
Flat paper applique
The standard way to create an autumn forest. To do this you need:
- Take a piece of paper of any color that seems most suitable - white, blue, green.
- Glue a strip of paper along the bottom to imitate the ground. More often they choose brown or green. Just choose this color that is contrasting with the background.
- Make several trees of different colors. It can be yellow, orange, dark green, brown, mustard. Here the child must draw the outline of the future tree on the back of the sheet, and then carefully cut it out.
- Don’t forget to cut additional trunks for each tree.
- Carefully, lubricating the back side of each blank, stick them onto the prepared sheet so that the trunks stand on the ground.
- Then suggest using a black or dark brown felt-tip pen to draw branches directly on top of the colored paper.
The technique is easy and accessible, even for small children. It is used in kindergartens.
Volumetric techniques
By working not only on a given theme, but also on texture, you can achieve a certain effect when creating an appliqué. There are several techniques for creating volumetric applications. Let's try to analyze the main and most effective of them.
Working with cotton wool
This method involves molding pieces of cotton wool into the required volumes. Fixing them to the main sheet. And then carefully painting the entire surface to create a specific color scheme for the entire composition.
This is done as follows in class:
- A piece of cotton comes off.
- It is necessary to prepare a small container of water to make it easier to mold the cotton wool.
- By dipping your fingers in water, give the cotton a certain look and shape.
- Lubricating or dipping one part of the cotton wool into glue, then fix it on the paper in the right place, while creating a tree crown.
- Take a brush with a fairly voluminous and thick bristle, dilute the paint of the appropriate color quite thinly, and with precise movements paint the cotton wool in the desired color. It is not necessary to achieve a continuous tone creation. It will be enough to apply it pointwise.
- Cut out trunks from paper and glue them under the cotton wool.
Application with cotton pads
It is necessary to invite the child to take cotton pads and color them in the desired color. Take into account and prompt the child that the final application will look most impressive if the cotton pads are painted with several shades of the same color at once.
Cut out a trunk from colored paper and glue it to the main sheet. Now start gluing cotton pads around the trunk and on top of it, forming the crown of the tree. Keep in mind that if they are placed one on top of the other, with a slight overlap, you can achieve greater volume of the composition and its effectiveness.
Make several of these trees, preferably painting cotton pads in different colors.
Composition of rolled strips of paper
In this case, a colored sheet of paper needs to be cut into thin strips of short length and glued into rings. Cut out the trunk and glue it to the base.
Drop a drop of glue onto the rings, preferably in the place where there is a seam on the paper. And fix it around the trunk in this way so that a crown is formed.
Please note that the rings can be glued both vertically and horizontally. This will result in completely different wood looks. Therefore, you can combine several methods on one application to get more texture.
Using methods for creating an autumn forest appliqué, you can arrange a real master class for your child, both at home and in classes in the garden or at school. Although, there are other ways that the teacher must also take into account when drawing up notes for the relevant classes.
Lesson summary on application in the second junior group Topic: “Applique “Tree and its inhabitants”
Integration of educational areas:
Tasks:
1) Continue to develop the ability to answer questions in complete sentences. Learn to construct detailed statements, expand and activate your vocabulary: bark, wood, woodpecker, insects. (“Speech development.”)
2) Foster love and interest in nature, develop a desire to take care of the environment. (Socio-communicative development.")
3) Continue to teach how to create a collective application. (Artistic and aesthetic development.")
Methods and techniques:
- application - practical;
- demonstration of images of trees, woodpeckers, natural tree branches - visual;
- conversation, children's answers to questions are verbal.
Materials and equipment: model of a tree made of light paper, colored paper, object pictures, natural tree branches, environmental signs, glue, brushes, rags.
Children's activities and forms and methods of its organization.
Communicative activities - conversations, speech situations, guessing riddles, situational conversations.
Visual activities - appliqué, drawing.
Game activity - didactic game.
Logic of educational activities
Q: Hello children.
Today, while you were sleeping, a guest flew to me. Guess who it was?
It knocks all the time
hollows out trees.
But it doesn't hurt them
but only heals.
D: - Woodpecker.
Q: Have you seen this bird? Tell me where did you see the woodpecker?
D: (Children's answers.) In the park, in the forest on a tree.
Q: - Is it possible to listen and understand that a woodpecker is sitting on a tree?
D: - Yes. It can be distinguished from other birds by the sound it makes. It makes a knocking noise. Knock-Knock.
Q: - It’s not for nothing that this bird is called the forest doctor - the fact is that woodpeckers feed on insects and their larvae that live under the bark of a tree, on branches or in wood and cause harm to it. The woodpecker knows how to determine where pests are hiding - to do this, he lightly taps the bark. As soon as he senses the presence of pests, he immediately begins his “sweeping” and does not calm down until he gets all the insects.
Q: - Please look at the pictures, what is shown on them?
D: - Trees.
Q: - What do all trees have?
D: - Roots, crown, branches, trunk.
Q: - Let's look carefully at the trunk and branches (demonstrates a branch), on the outside they are covered with bark, like a person with skin, and under the bark there is wood. It is precisely in the wood under the bark that the insects that the woodpecker loves so much hide.
I suggest you make a real tree today. Let it grow in our group and maybe a woodpecker will fly to it too.
Q: - Look at the bark, what is it like?
D: - Dark, uneven, rough.
Q: - What kind of wood?
D: - Light, smooth, located under the bark.
Q: - Look in front of each of you there are pieces of brown paper. This will be our bark. It has little windows in which insects will hide. To make the bark uneven and rough, crumple the paper a little and then straighten it again. We apply glue to it, bypassing the window, the doors of which will have to open, and glue our bark to the tree.
Now let's remember our insects, which we drew in the last lesson. Let's plant them under the bark on the wood.
Look what a beautiful tree we have made.
Q: - Who can remind me where insects live on a tree?
D: - In the wood, under the bark.
Q: Who is called the forest doctor?
D: - Woodpecker.
Q: - Now tell me guys, is it possible to break branches, knock on a tree, tear off the bark, thoughtlessly cut down forests?
D: - No, because... trees are home to many insects, which provide food for many birds, including woodpeckers.
The teacher shows one of the environmental signs (do not break tree branches).
Q: - Now let's play, I show the environmental signs that we have already considered, and you tell me what this sign warns about or what it prohibits.
D: - Children's answers.
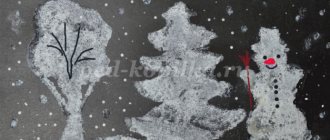
Cotton wool applications
One of the most popular and simplest ways to imitate snow for crafts is cotton wool. The work done in this way turns out to be voluminous and truly winter-like.
Snow covered trees
What you will need:
- blue or light blue cardboard;
- pencil;
- glue;
- cotton wool
Let's get started:
- Take cardboard and draw a tree trunk on it.
- We coat the branches with glue and put cotton wool on them.
- In the background we draw snowdrifts and a few more trees, make clouds and bushes.
- We glue the cotton wool to the snowy hills and along the contours of the plants. The picture is ready.
We use cotton balls
For the next craft we will prepare: cardboard, colored paper and several cotton balls.
- We cut out snowdrifts from a strip of white paper and glue them at the bottom.
- We make several trunks for future trees from brown paper and place them on cardboard. We put a snow cap made of cotton wool on each of the branches.
- We cut out patterned snowflakes or make small circles using a hole punch and paste them over the trees.
Forest of cotton pads
As an alternative to regular cotton wool, you can use cotton pads. Additionally you will need: colored cardboard, glue and scissors.
Let's start designing the application:
- To imitate snow-covered hills, take a cotton pad, cut it in half and glue it onto cardboard.
- Then we cut out several strips - these will be tree trunks. Glue them onto the snowdrifts.
- We make the crown of the tree from a whole disk.
- To add liveliness to our picture, we draw snowflakes. They can be cut out of paper, drawn with cotton swabs, or small circles of cotton pads made with a hole punch can be glued on.
Another craft option:
- We draw Christmas trees on several cotton pads: we got four, then we cut them out.
- From another disk we make a month and snowflakes.
- We take cardboard and glue a cotton swab in the middle at the bottom - this is the trunk of one of the trees.
- Cut several cotton pads in half. In our case - three. We glue them at the bottom with different sides - we get snowdrifts and snowy hills.
- Place a cotton pad on top of a cotton swab - this is the crown of the tree.
- We place the cut out Christmas trees on the snowdrifts. Glue the month and snowflakes.
House in the forest made of cotton swabs
Don't forget about cotton swabs. With their help, you get cute snow-covered trees and houses.
Let's take: cardboard, colored paper, scissors.
- Whole sticks are suitable for tree trunks, but to create branches you will need to cut them.
- To make it at home, place cotton swabs next to each other horizontally or vertically. Cut out a triangular roof from white paper and glue it on top. We make windows and doors from colored paper. You can do the opposite: cut out houses from paper, and lay out the roof from sticks.
- We also cut out clouds, snowflakes and snowdrifts from white paper.
Abstract of GCD for application in the second junior group on the topic: “Autumn tree.”
Abstract of GCD for application in the second junior group on the topic: “Autumn trees.”
Target:
expand children's understanding of the season (autumn).
Tasks:
Educational:
— learn to glue leaves on tree branches prepared in advance. Educational:
- develop imagination and thinking.
Educational:
- cultivate an aesthetic vision of nature. Materials and equipment:
magnetic board, application sample;
paper with a tree glued on, yellow leaves cut out of colored paper, glue, napkins, brushes for applying glue; pictures depicting autumn nature. Preliminary work:
reading poems about autumn, observing autumn trees in nature, talking about the season.
GCD type:
Consolidation of what has been learned.
GCD form:
Frontal.
Duration:
15 minutes.
Age:
3-4 years
Methods and techniques for working with children:
Visual methods (use of pictures, observations in nature), verbal (conversations, riddles), practical
GCD structure:
| GCD stage | Content | Time |
| Organizing time | Guessing the riddle Conversation | 2 minutes |
| Main part | Reading a poem Physical education minute Practical part Finger gymnastics | 11 minutes |
| Final part | Exhibition of works Final conversation | 2 minutes |
GCD move:
1. Organizational moment
Educator:
- Guys, guess the riddle:
Came without paints B without a brush And repainted all the leaves
(Autumn).
- That's right, guys, now is the time of year - autumn. What signs of autumn do you know? (Children's answers) 2. Main part
- How beautiful the autumn outfit of the trees is! Look at the picture, the trees are dressed up in colorful leaves! (Showing pictures of the autumn forest, talking about them) Physical education minute.
We, the autumn leaves, sat on the branches. The wind blew and they flew. We flew, we flew. And they sat down quietly on the ground. The wind came again. And he picked up all the leaves. He turned them over and around. And he lowered it to the ground.
(Children imitate the actions of the “leaves” in accordance with the text of the poem: they squat, fly around the room, sit quietly again, rise, spin and sit again.)
Educator:
— Walking through such an autumn forest is a pleasure.
But our trees have not yet dressed up in autumn leaves. Let's decorate our trees and dress them up with beautiful yellow leaves! Application "Autumn trees". A sample application is attached to the magnetic board. Educator:
- Children, tell me what is on your tables? (Children's answers) - Well done, right! There are no leaves on the tree branches, but the trees just want to dress up! Let's help our trees and decorate them with beautiful leaves! Educator:
- Children, what color are our leaves? (Children's answers) Q: - Correct! Please look how the leaves cover my tree. - I take a brush, dip it in glue, apply glue to the leaves one by one and glue them to the branches (The teacher accompanies his words with a demonstration.)
“That’s how the leaves covered the trees in my forest.” Are the trees in your forest beautiful? (Children's answers)
Children perform an applique on the topic. The teacher controls the work methods, provides assistance to children experiencing difficulties, and encourages those who add additional details.
Educator:
- Children, your fingers are tired, let's play with them!
Finger gymnastics is carried out
The north wind blew: “S-s-s-s” (blowing)
I blew all the leaves off the branches... (move your fingers and blow on them)
They flew, spun and sank to the ground (wave their arms in the air)
The rain began to patter on them
Drip-drip-drip, drip-drip-drip! (tap the fingers of your right hand on the palm of your left hand)
The hail pounded on them, (with a pinch of your right hand, tap on your left palm)
It pierced all the leaves. (knock the fist of your right hand on your left palm)
The snow then powdered (smooth movements of the hands back and forth)
He covered them with a blanket. (place your right palm on your left)
3.Final part
Children's drawings are displayed on the stand.
Educator:
- Oh, what a colorful forest we have grown in our group! There are beautiful leaves on every branch! And we had so much fun walking in our forest.
Result:
- Children, what did we do today?
- What time of year were we talking about?
- What did we decorate with leaves today?
Autumn forest made from rolled strips of paper
Prepare an autumn background for the application and determine the location of the trees on the sheet.
Three-dimensional trees can be made in three ways.
The first method: cut strips of 1x5 centimeters from colored paper in autumn shades. We glue each strip into a ring, the colored side out. Glue the resulting rings sideways onto the trunk in a chaotic manner. Try to glue so that the joint line is hidden at the bottom.
Second method: Cut a strip of paper 1.5x20 centimeters and wind it in a spiral around a pencil. Make 10 spirals in this way and glue them to the paper, placing them like rays from one point in the center of the trunk.
Glue smaller leaves on top of each spiral. Leaves can be cut out using a template or punched out with a hole punch.
Third method: willow or birch. Cut out many strips of 0.5 x 20 centimeters and screw them very tightly onto a toothpick so that you almost get a tube. Draw a willow or birch trunk with drooping branches. Glue the resulting spirals to the ends of the branches.
Autumn forest applique made from cotton pads
This technology is perfect for children aged three years and older. Since the disks are quite large, this method is more suitable for single trees. Prepare red, orange and yellow paints. For this craft, it is better to use gouache, as watercolor will give lighter colors.
Paint 10-15 discs and dry. You can paint with a brush or dilute the paints and drip from a pipette. If you use several colors on one disk, the colors will mix with each other and give new shades, which will allow you to more fully convey the color scheme of autumn.
Glue the barrel onto a sheet of paper and painted cotton pads on top.
Application “Autumn tree” made from pumpkin seeds
In order to create this work, you will need:
- sheet of cardboard
- paints
- glue
- pumpkin seeds
- tree stencil
The first step is to create the autumn leaves. This application involves the use of pumpkin seeds, which are previously painted in different colors. It is advisable to use yellow, orange and red colors.
Coloring can be done with both paints and felt-tip pens. On a sheet of paper you need to draw a barrel with paint or use a stencil. Then the work will be more accurate. Now all that remains is to glue the leaves to the tree.
The work is ready.
Application “trees in the snow in the second junior group
Construct of joint educational activities
according to PM.02 Organization of various types of activities and communication of preschool children
student 33 “A” group Stratonova Alexandra Sergeevna
Specialty 44.02.01 Preschool education
Date of:
13.12.19
preschool educational institution
: № 5
Educator:
Zelenina Irina Alexandrovna
Methodist:
Chemezova Natalya Yurievna
Head of practice
: Eyvazova Yulia Nikolaevna
Group:
second youngest (3-4 years).
Type of OD:
applique
Subject:
Trees in the snow
Educational area:
artistic and aesthetic development, social and communicative development, cognitive development.
Forms
: group, individual, collective
Target:
development in children of the ability to stick cotton wool, distributing it on a sheet of paper.
Planned result:
Children have fixed ideas about snow (white, soft), and are able to distinguish between seasons (autumn, winter). They have the idea that snow warms trees. Tactile sensations develop. Children have acquired the ability to follow the algorithm for performing the application, they know how to follow the rules of use and safety precautions when working with a brush and glue, follow the rules of behavior (apply carefully, remove excess glue from the walls of the jar, do not wave the brush, do not make noise, do not shout). Children demonstrate the skills of careful use of glue. Children pronounce the sequence of application. Children know how to pinch off small pieces of cotton wool and place the cotton wool on a sheet of paper (on tree branches). Children have established rules of behavior during class. Children demonstrate the ability to complete a job they have started, perseverance, and patience while working. Children have developed a culture of behavior during work (address each other politely, call each other by name). Children have the ability to stick cotton wool onto a surface smeared with glue. Children fine motor skills of the fingers are developed. Children show friendly relationships.
| TASKS educational program | Tasks taking into account the individual characteristics of group students |
| Educational : develop the ability to finish a job; cultivate perseverance and patience during work; cultivate mutual assistance, the desire to help each other. Developmental: to form a culture of behavior during work (address each other politely, call each other by name). Develop skills in safety rules (rules for using scissors). Develop creative imagination, thinking, attention. Strengthen children's ideas about snow (white, soft), teach children to distinguish between seasons (autumn, winter). Develop tactile sensations. Educational: teach children the rules of use and safety precautions when working with a brush and glue, follow the rules of behavior figurative: teach children to create an applique “Trees in the Snow” Technical: teach children to pinch off cotton wool, stick the cotton wool onto the surface of a leaf and distribute it on paper (on tree branches). Compositional : teach children to create an application in accordance with the teacher’s model Color: learn how to create an applique using white cotton wool. |
Application “Autumn tree” made of autumn leaves
To work you will need:
- autumn leaves,
- cardboard with a silhouette of a tree,
- glue.
It is advisable to use bright colors of cardboard, so the tree will be more noticeable.
For work, you need to choose beautiful and undamaged dry leaves. They are cut into strips. To continue the task of appliquing autumn leaves, you need to prepare glue and a brush. The branches of the tree are coated with a brush. Dry leaves are placed on these branches. All that remains is to let the work dry.
Crafts with natural materials
Natural materials can also be used to create applications. Most often, they are collected leaves of various trees, which are perfect for such purposes. For crafts, it is important to choose only the most beautiful ones. This will help improve the quality and beauty of the future product.
Golden autumn
Children need to be taught creative work from a very early age. In kindergarten, for these purposes, various crafts are used from natural material that has been collected and properly dried.
An application on the theme of autumn in the younger group involves the use of multi-colored autumn leaves, which the children themselves chose and brought. It doesn’t matter what size or shape they are. To try to make a beautiful craft, you need to prepare:
- glue and a brush for applying it;
- cardboard or thick paper for the base;
- scissors;
- natural natural materials (leaves, twigs, flowers);
- small decorative elements.
For this craft, it is advisable to collect leaves from different trees. This will not only help make a more beautiful picture, but will also allow educators to teach children to distinguish them from each other.
The golden autumn applique is made following the following sequence of actions:
- First, the children collect the leaves and other natural materials they like.
- Then only the highest quality and most attractive specimens are selected from the total mass. All rotten, dried or damaged leaves are removed and disposed of.
- Selected specimens are laid out on the work surface and dried from excess moisture. It is important not to overdo it, so as not to end up with pieces that are brittle and unsuitable for application.
- After this, a cardboard base is taken and a rectangle of the required size is cut out of it.
- Then the brush is moistened in a jar of glue and the leaves are coated one by one.
- Immediately the image details are attached to the base. This should be done chaotically and in random order.
- The finished composition is transferred to a warm place for the glue to dry completely.
- At the very end, the applique is supplemented with various decorative elements.