Open lesson "Let's feed the chickens"
Author: Bikchentaeva Aigul Faritovna
Summary of a lesson with children of the first junior group in kindergarten using non-traditional drawing techniques “Let's feed the chickens” (drawing with cotton swabs).
Goal: Development of artistic and creative abilities of children of primary preschool age through the use of non-traditional drawing techniques.
Objectives : - educational: to consolidate children’s knowledge about their children’s poultry; to train children in non-traditional artistic techniques: drawing with cotton swabs.
-educational: to educate children to be neat when drawing.
— developmental: develop interest in drawing, develop color perception and hand-eye coordination in children; develop fine motor skills in children;
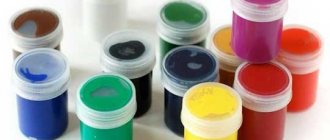
Materials: picture of chickens, album sheets with pictures of chickens, cotton swabs, black gouache, seeds.
Methods and techniques:
artistic expression, surprise moment, demonstration, explanation, music, imitation, finger gymnastics, exercise, sketch, dance.
Progress of educational activities
Organizational moment.
— Listen to the poem
The shell in the nest crunches
A curious eye shines:
From an egg, like from a diaper, a chick emerges. He stretched, shook himself, quietly squeaked, looked around: “Well, I guess I’ll go and find my parents!”
- What animal did I tell you the poem about?
– These kids came to visit us today (showing a picture with chickens).
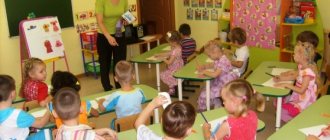
Main part
-Do you know what chickens say? Who is the chicken's mother? And dad? Well done! What kind of birds are they? (To the home). What other poultry do you know? (children's answers) - Goose (gosling), - Duck (duckling), - Turkey (turkey chick). Let's play the game "Hen and Chicks." I'll be a chicken. And you are my chickens. Educator:
The chicken went out for a walk and nibbled some fresh grass. And behind her are the guys - Yellow chickens. (Children walk in a circle behind the teacher.) Co-co-co, co-co-co!
Don't go far. Row with your paws, look for grains! (Children imitate the movements of chickens: they row with their paws and peck at grains)
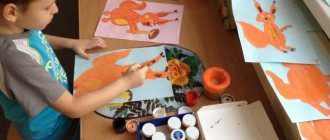
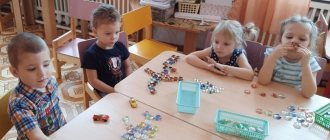
Educator: Oh, the kids are here, there are no grains on the carpet at all, and the chickens have nothing to eat. Let us paint the grains with paint. To do this, we will sit at the table. And before we draw the seeds for the chickens, let’s prepare our fingers.
Finger game:
The hen has a chick, the goose has a gosling, the turkey has a baby turkey, and the duck has a duckling, every mother has babies, all of them are beautiful and good.
Educator : Now I will show you the seeds. What color are they? (black). We dip a cotton swab in black paint and “scatter the grains” across the clearing for the chickens, like this (I show drawing with a cotton swab in the picture of chickens). Kids rhythmically make “spots” with cotton swabs on a sheet of album with a picture of chickens.
-Well done guys, you tried very hard.
Summary of the lesson.
Educator : Children, what did you draw? For whom?
— What is the name of the chicks’ mother?
-What does she call her children?
— How do the chickens respond?
Integration of areas
: Physical development, Cognitive development, Social and communicative development, Speech development, Artistic and aesthetic
comments powered by HyperComments
Step-by-step instructions for drawing a chicken with a pencil
A chicken (a drawing for young children should not contain too many details) drawn with simple pencils can be more realistic than a picture made with paints. Using thin pencil lines you can show the direction of feather growth, apply shadows and work out small details of the drawing.
Outlines
First you need to make a sketch in pencil marked T2.
Chicken - drawing for children step by step
Algorithm of actions:
- Draw a small circle in the center of the sheet. This is the future head of the chick.
- At the bottom, draw an oval twice as large as the head. Position it at an angle. The top of the figure should be in contact with the outline of the circle below.
- Using thin lines, connect the circle and oval into 1 shape. The point where they meet is the chicken's neck, so the lines should be slightly curved inward.
- Draw a small tail for the chicken, slightly extending beyond the lines of the oval.
- Mark 1 small wing on the side. Its edges can be depicted with a wavy line, imitating the shape of feathers.
- Since the chicken in the picture will be turned half a turn, the other wing should not be drawn completely, it is enough to depict only a small part protruding from behind the breast.
- Draw the bird's legs from below. They should have the shape of an inverted and elongated cone.
- At the bottom, on the thinnest part of the legs, draw hooked toes.
- Draw a triangular beak.
- Add 1 small and round eye. Draw on 2 short eyelashes.
- There is no need to draw on the other side of the eyes. It is enough to indicate the protruding eyelashes, which will show that the chicken has 2 eyes, it’s just not visible.
Use an eraser to erase all additional lines. Remove the connections of the figures inside the neck, erase the lines inside the tail.
Detailing
Details should be drawn with a pencil marked TM.
Chicken - drawing for children step by step
Algorithm of actions:
- Draw the outline of the chick's head and body with a zigzag line, imitating protruding fluff and small feathers.
- Draw a small tuft on the top of the chicken's head.
- Draw the feathers on the wings and tail.
- You need to make several horizontal stripes on the bird’s legs.
- Draw nostrils on the beak.
Using an eraser, remove the contour lines of the head on the crest, and also erase the old contour of the body.
Shadows and highlights
The shadows need to be worked out with a pencil marked M2.
Algorithm of actions:
- Shade the lower part of the body.
- Mark the shadow under the wing.
- Paint the tips of the wings.
- Shade the area under the tail.
- Apply a few strokes to the front of the neck.
- Mark the shadow under the crest.
- Carefully blend all applied strokes with your fingers.
- Use an eraser to remove any graphite that has accidentally smeared behind the contours of the drawing.
- Paint in the chicken's eye and shade its beak.
When applying strokes, there is no need to put pressure on the pencil. Using an eraser with a sharp angle, erase some of the graphite inside the eye to create a highlight. Also remove a thin layer of graphite from the top of the beak.
Summary of a drawing lesson in the senior group of the kindergarten "Chicken"
Mikhaleva Alesya Vladimirovna
Summary of a drawing lesson in the senior group of the kindergarten "Chicken"
Goal: continue to learn to draw carefully , paint carefully, trying not to leave gaps.
Refine your knowledge about poultry and continue to expand your understanding of them ( “where does it live?”
what to eat, how to care for it); consolidate the ability to name primary colors and shapes.
Develop memory, thinking, imagination, speech,
To cultivate a caring attitude towards birds, empathy, a caring and attentive attitude towards them, and a love of creativity.
subject picture “Bird yard”
,
“hen and
chicks ” Wax crayons, colored pencils
Conversation and viewing of paintings on the topic: “Poultry”
.
Reading fiction by K. Ushinsky “Cockerel with his family”
,
In Suteev " Chicken and Duckling "
,
Drawing “Chicken Little” (middle group)
Anna Pronina
Drawing “Chicken Little” (middle group)
Pronina Anna
After reading a story or a fairy tale, I like to use the children to identify the main character and draw him, sculpt him from plasticine, cut out various details from paper and design, or first I print out the main character and the children and I smear the drawing with glue and cover it with colored sand and much more.
And this time I decided to remember the story “ Chicken and Duckling ”
, wrote its wonderful author Vladimir Grigorievich Suteev.
And the children were happy to draw .
Goals: continue to introduce children to the techniques of depicting oval and round objects; learn to compare these forms, highlight their differences. Learn to depict parts of a chicken's body in a drawing. Strengthen the ability to paint with a brush and paints , hold the brush correctly, rinse it well and dry it. Strengthen painting skills. Cultivate the desire to achieve good results.
Objectives: To awaken in children emotional responsiveness to the world around them, to improve observation, aesthetic perception, artistic taste, and creative abilities. Teach children to complement the image with additional elements. Cultivate accuracy when working with paints. Be happy with the result.
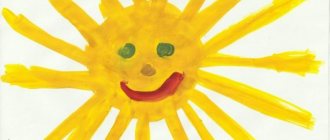
Here's what we got:
Children's master class on applique "Chicken Little" I bring to your attention a children's master class on applique. The idea arose from a conversation with one of the students in my group. The girl said... The master class of collective work “Chicken Little” is interesting and simple, it may be useful for working with children before the Easter holiday! 1. We will need: PVA glue, yellow and green gouache paints. Master Class. Unconventional painting using the spray technique “Fireworks on Victory Day” (middle group) Victory Day! It's a holiday of holidays! Celebration with tears in our eyes for 71 years now. The whole country is always preparing to celebrate this holiday. Master class: Easter card “Chicken Chicken” from a series of crafts for Easter Little chicken Born from an egg, Crawled out of a shell, Very surprised! How light it is outside, How much space there is, Inside the shell.
Examples of images for sketching, tips for beginners
Those who are just learning to draw need to know a few secrets that will make the drawing more accurate.
Tips for beginners:
- To avoid smearing the graphite of a simple pencil, you need to place a sheet of clean paper under your hand.
You can use round objects to draw circles
- When creating a sketch of circles and ovals, you can trace round objects or tablespoons by placing them on the paper.
- When coloring the body of the chicken, it is important not to go beyond the lines of the eyes, especially if they are supposed to be white. To prevent this from happening, paint should be applied around each eye and wait until it dries. After this you can start coloring.
- If the paints take a long time to dry, you can blow on the drawing with a hairdryer.
- When painting the long fingers of chickens with paints, the brush should be pressed at the base and raised closer to the end of the finger, then the line will smoothly change thickness.
- To show the direction of feather growth, you need a hard-bristled brush and very thick paint. Then you will get clear strokes.
- You need to outline a picture painted with paints only after it has completely dried.
The main rule of drawing is not to be upset if the drawing does not turn out beautiful the first time. You can always take a new sheet of paper and try to draw the picture again.
Drawing chickens will help children develop their thinking and prepare their hands for writing. Parents should conduct classes with their child, explaining during the drawing process who chickens are, where they come from and how they grow. You can choose a picture for sketching from the options presented in the article.
Preview:
GCD for drawing in the middle group
Theme: "Chicken in the Meadow"
Goal: learn to convey the features of the depicted object using a poke with a hard, semi-dry brush.
Tasks: continue to teach children to draw an object consisting of two circles with a simple pencil, bring the object to the desired image using a brush;
develop imagination and artistic taste;
Materials: halves of album sheets, simple pencils, gouache, hard and soft brushes, jars of water, napkins.
Reading the poem “Chickens” by V. Berestov, accompanying it with appropriate actions:
We are chickens! We are chickens!
We peck, peck, peck
Everything we meet along the way.
Invite the children to draw chickens.
Show how to draw a large circle (torso) with a simple pencil, and a smaller circle (head) on the top left.
To make the chicken fluffy, you need to put quite a bit of yellow gouache on a dry, hard brush and, holding the brush vertically (the brush taps with the “heel”), make “poke” on top, placing them inside and along the edges of the circles. When the paint dries, you need to finish painting the chicken's eyes, beak, and paws with the tip of a soft brush.
Finger gymnastics “Chicks”
One, two, three, four five (Join the fingers of both hands to form a ball.)
We will count chickens (They clench and unclench their fists rhythmically.)
Once - a chicken on the porch, (Bend one finger on both hands,
starting with large ones, for each count.)
Two - still sitting in the egg,
Three - the chicken is the bravest,
And four is the whitest,
The fifth is a little chicken, (bending the little finger, pressing their fists together
Wanted to eat, sleepy, tapping with the index finger of the right hand
Individual assistance: posture, how to hold the brush, how to remove excess water and paint from the brush.
A chicken was walking along the path,
He jumped on his right leg.
And he was also circling boldly,
He waved his paws skillfully.
He hurried to his home.
3. Final part: