Middle group. Junior preschool age. Children 4 - 5 years old
Summary of a modeling lesson in the middle group “Make whatever vegetables you want”
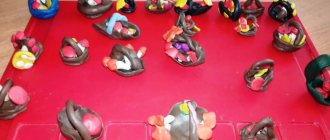
Summary of a modeling lesson in the middle group “Make whatever vegetables you want” Program content: to consolidate the ability of children to roll a ball of plasticine between their palms and pull out the plasticine with two fingers to give the work a characteristic image; strengthen the ability to listen to the teacher and...
Summary of an open lesson on modeling and appliqué in the middle group “Snowman” Goal: - to consolidate in children the idea of the Snowman, obtained as a result of their own observations, and in classes on modeling and appliqué .
— consolidate the ability to use gouache paints correctly, dip crumpled paper into a container of paint, and work carefully. - encourage children...
A popular recipe for salted play dough
It will be very interesting and useful for children to try to “play” with real dough, only salted. Many will imitate their mother and try to make their favorite dumplings (with cherries, cottage cheese - who likes which ones), others will start creating children's dishes, and still others will start with the most difficult thing - shapes! The most interesting thing is that salt dough can be either plain white or colorful multi-colored. In the second case, gouache paints will come to help the teacher. By adding them a little to the already divided pieces of dough, you can open up a whole palette of colors for creativity for your baby and awaken his imagination. The soft dough, having been crushed, rolled and rocked, will finally acquire its final shape, breaking out of small, tired hands.
So, what is salted play dough made from? The ingredients are very simple and, best of all, they are available to everyone; you just need to know the exact proportions - and everything will work out!
For one glass of flour, take the same amount of ordinary kitchen salt, mix everything well, add ½ glass of ordinary cold tap water and one tablespoon of sunflower oil. Mix everything thoroughly on a board until it has a homogeneous consistency; if desired, divide it into pieces and add paints of the required colors to them. Then you need to place the finished dough in the refrigerator for 3 hours (after putting it in a plastic bag). The dough will “reach” there, and it will be a pleasure to sculpt from it!
When working with salt dough, in addition to already familiar tools, you must additionally prepare an oilcloth, a glass of water and brushes. Using a brush dipped in water, the separately sculpted parts of the figure will be connected to each other. You need to sculpt from salt dough with dry hands, and the methods and techniques of sculpting are completely no different from those used when working with plasticine. The dough dries out quickly, so it’s better to take the pieces out of the plastic bag in parts.
The finished figure must be thoroughly dried. To do this, you can use the oven at home (low heat for 30-60 minutes, depending on the volume of the figure) or the usual sun! The figurine will dry in the sun for a long time, up to 5 days, you will need to be patient!
Modeling. All modeling materials - Modeling “Birthday Treats” in the middle group
Publication “Modeling “Birthday Treats” in the middle...”
Birthday treat Goal: to continue to cultivate children's interest in modeling; Children 3 years old should practice rolling plasticine with circular movements between their palms to improve their circle skills. Encourage 4-year-old children to make cakes according to their imagination, continue to educate them with the ability...
Summary of a sculpting lesson in the middle group “Plum and Lemon” Summary of a sculpting lesson in the middle group “Sculpting a Plum and Lemon” Purpose: to teach children to sculpt round-shaped objects of different sizes and colors Tasks: - to activate the mastered sculpting methods (rolling a ball, pulling, pinching, ability to work with a stack, leveling)…
Summary of GCD on modeling using the plasticine technique "Matryoshka" in the middle group
Goal: to make children want to create the image of a cheerful nesting doll. Objectives: To learn to reflect the characteristic features of the design of a matryoshka doll using the technique of plasticineography. Continue to learn how to pinch off small pieces of plasticine from a piece and attach it to the base, smear the plasticine onto...
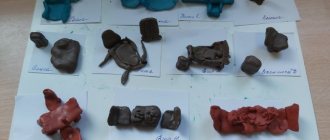
OD on modeling “Thrifty Squirrels” with children 5 years old for International Squirrel Day at MAAM”
Teacher of the highest qualification category Kurnina Lyubov Vladimirovna MBDOU kindergarten No. 54 “Teremok” Kovrov, Vladimir region. Dear colleagues, I invite you to the photo report “Thrifty Squirrels” with 5-year-old children. Goal: - to awaken positive emotional...
Tools needed for the lesson
Modeling, like every type of art, requires special training and specific tools. In kindergarten, each child should have his own individual devices for this activity.
So, what will you need:
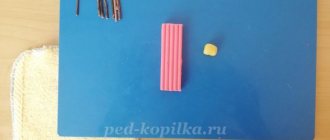
- modeling board;
- material from which the figures will be sculpted (plasticine, dough, clay);
- water;
- clean rags;
- stacks.
And also a prerequisite is the small palms and fingers of a smart child, whether he is in the younger group or the older one - it doesn’t matter!
During the lesson, the teacher will first tell the kids in the group an entertaining, and maybe an instructive story about a hero who will later be asked to sculpt.
After the fairy tale, the teacher, in a playful way, will show each child in the group the already molded main character of the fairy tale. Kids will immediately want to independently sculpt the same character out of plasticine, but their own, individual one! And here the teacher faces a difficult task: to gradually tell, show, explain and teach each child:
- Using various techniques, independently make individual blanks of various shapes from plasticine.
- Using known methods, connect the newly sculpted parts together into one three-dimensional figure.
- Teach kids to place ready-made figures on a special stand (board), using already known methods.
- If the group lesson is supposed to be plot-based, then it is necessary to teach the child to come up with or choose a plot for his composition, plan where each character will be, what he will look like, what will happen between the characters in the plot, and then begin making individual parts. Such an activity will take more than one lesson, so for unfinished compositions it is necessary to find a place where the work will wait for its next “incarnation”.
- During the decorative lesson, the teacher will teach the kids, using fairly simple techniques (rolling a flagellum, a ball), to decorate a ready-made “freshly sculpted” object in a folk-applied style.
So, step by step, lesson by lesson, kids will learn to create, receive real aesthetic pleasure, and discover the world of the most beautiful fine arts.
How to make a frog from plasticine
Plasticine is an amazing material that allows you to develop not only creativity and imagination, but also fine motor skills. You can make a frog from plasticine using a master class, where everything is described step by step and is understandable even for children. Follow the instructions exactly or apply your own ideas - everyone decides for themselves.
A simple do-it-yourself plasticine frog
Any child can make a frog from plasticine with their own hands in the simplest way. Just 8 main parts, 5 additional ones and the little toad will be ready. The child can complete large parts independently, and one of the adults will help him with small ones.
Sculpting process:
- Roll 2 balls from the green material - one larger than the other. Connect them together - this will be the torso and head.
- Make two identical small balls and attach them to the top of the head. Thin white plasticine circles are glued on top of them. Pupils of blue or another color are sculpted on them.
- The mouth and nose are cut using stacks or toothpicks. Attach a tongue made of red plasticine.
- Roll out two green bars. Flatten on one side, giving the shape of fins. The legs are bent and fixed on the frog's body.
- For the front legs, the blanks are made thinner and shorter. The lower part is made flattened. Cut out 3 toes on each foot, making membranes using a toothpick. Attach the legs to the body.
Frog princess made of plasticine
To get your child interested in modeling, you can make a frog princess from plasticine. To do this, first make the frog itself and add just a couple of additional details - a crown and an arrow:
- Roll the green mass into a roll and cut it into 3 pieces - 1 small and 2 larger.
- Prepare a blank for the head. One of the large pieces is rolled and flattened, giving it an oval shape.
- Roll the second large piece into a ball. Stick a toothpick or match into it and connect it to the head blank.
- From the last piece, four sausage-shaped legs are created. Bend them in half and connect them to the base.
- 2 small flat cakes are connected to the paws. 2 slightly larger cakes are attached to the body in the abdominal area.
- Make 2 balls from the remaining piece and attach them to the top of the head.
- On the base for the eyes, fix 2 white circles and stick black pupils on them.
- A stack is used to cut through the frog's mouth. Roll small balls from pale green plasticine. Slightly flattening them, place them on the head and body. The same details indicate the nostrils of a frog.
- The abdomen is made from light green material and attached to the body.
- Using the stacks, cut fingers at the edges of the foot cakes. White mini-highlights are placed on the pupils.
- To make a crown for the princess, you will need yellow or light orange plasticine. Make a sausage and roll it into thin strips. Sharp teeth cut along the edge of the stack.
- Cut a part from the jagged strip so that it has 5 teeth. They fold it into a crown, which is placed on the frog's head. The sharp ends are slightly twisted in different directions.
- A small tongue is created from a piece of red plasticine and glued to the line of the mouth.
- The arrow is molded from plasticine in brown, yellow and white colors.
Frog made of light plasticine
Making a frog from light plasticine is easy step by step. For example, you can create the heroine of the cartoon “Frog Traveler”. Parts made of this material hold their shape well, and the mass does not stick to your hands.
Important! This material is afraid of moisture, both during the work process and in finished crafts.
- Take a small piece of green mass. They give it the shape of a head with chubby cheeks. Particular attention is paid to the mouth - making it slightly pointed. Designate slightly raised areas for the eyes.
- Roll out yellow plasticine and frame the lower part of the head. A thin strip marks the opening of the mouth.
- The eyes are made from the white mass. To make them look funny and cheerful, the pupils are sculpted in different shapes, blue with black splashes.
- To save material, you can use foil for the frog’s body, which is crumpled into a pear-shaped shape and covered with a thin layer of green mass. To highlight the frog's abdomen, the front part is covered with a yellow mass.
- The bases for the frog's legs are made in the form of rounded blocks of the required size.
- The fingers and toes of the frog are squeezed out with a stack. Give them the necessary bends. Add a yellow mass to the middle of the palms.
- Connect all the parts together. For a strong attachment, the head is “set” on a match or toothpick.
- Smooth out roughness and unevenness. Add dark green splashes to the arms and legs of the frog.
Craft with a frog made of plasticine
To captivate your child, you can make together with him not only one frog from plasticine, but an entire craft. A step-by-step analysis will help you understand how to sculpt reeds using toothpicks. How to make a pond and a water lily leaf on it:
- To create a reed, you will need toothpicks, brown and green plasticine. The bottom is wrapped in green plasticine, the top in brown. Leaves are sculpted separately. Everything is connected and fixed to the surface.
- To make a water lily leaf, roll out the green mass and flatten it into an oval with your fingers. Using a stack or a knife, draw veins and make a cut in the bottom of the sheet.
- Cut out a circle or any shape large enough from cardboard to accommodate the wah and additional accessories.
- The cardboard is coated with a thin green layer.
- On top of the green layer, pieces of blue and light blue material are laid out and smeared in a chaotic manner.
- Reeds are placed at the edges.
- A water lily leaf is placed a little away from the center, on which the main character is planted.