Plasticine hare: step-by-step master class on sculpting a plasticine hare with children in step-by-step photographs.
Plasticine is an amazing material for creativity. It not only gives children the opportunity to realize their creative potential and helps develop aesthetic taste, but also teaches them to live in harmony with nature. After all, children must express their feelings, emotions and imagination, their attitude towards the world around them.
Every child can easily master this technique and sculpt the desired figures and objects. To do this, you just need to correctly structure the modeling lesson and observe the necessary sequence in the work.
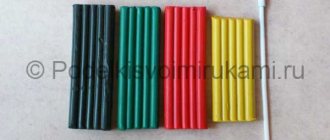
Which plasticine is best to choose for sculpting a hare? Good plasticine in bright colors, elastic, kneads easily in your hands and does not stick to them, does not leave stains on your hands or work surface.
The master class from this article was prepared by Vera Parfentyeva, a reader of “Native Path”. Vera is the leader of a children's art group, a technology teacher, and a participant in our Internet Workshop of educational games “Through play - to success!”
The main secret in sculpting a hare is the basic elements from which you can make the body of any animal or bird.
The craft - a plasticine hare - consists of three elements: plasticine balls, rollers and cakes.
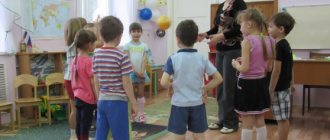
Modeling from life on the theme “Bunny (senior group)
Modeling on the theme “Bunny” (by nature, senior group)
Program content: Strengthen the ability to sculpt animals, convey the shape, structure and size of parts. Practice using a variety of modeling techniques. Learn to convey simple movements of a figure.
Material: Clay, bunny toy, “clearing” made of colored paper.
Progress of the lesson.
Educator. Guys, now I’ll tell you a riddle, and you will guess it and find out who we will sculpt today.
What kind of forest animal is this?
Stood up like a post under a pine tree
And stands among the grass -
Are your ears bigger than your head?
Children. Bunny!
B. Correct. Let's blind the bunnies and figure out which of them will do what. Also, a bunny came to visit us today (toy display), he wants to meet and make friends with your bunnies. For now, let's look at it. Tell me, what does the bunny have?
D. Body, head, paws, ears, tail.
B. Correct. Tell me, what does the torso look like?
D. On a balloon.
The called child shows what kind of body the bunny has.
Q. Guys, how are we going to sculpt the body?
D. First, roll the ball, and then stretch it a little on both sides. Guys, let's remember how to sculpt a ball. (Children in the air, with both hands, make rolling movements. If the children find it difficult to describe and reproduce sculpting techniques, the teacher reminds).
B. Correct. Now tell me, what does the head look like?
D. On the ball (ball).
B. Correct.
Another called child shows his head and circles it. The teacher draws the children’s attention to its location (on top of the body)
Q. Guys, look and tell me which is larger: the body or the head?
D. The body is larger.
B. Correct. What is it?
D. Ears.
Q. Yes, the bunny’s are big, but the tail, on the contrary, is small. What else does the bunny have?
D. Paws.
B. Correct. How can you sculpt ears, tail and paws?
(The teacher listens to the children’s answers, encourages correct ones, corrects mistakes. Reminds that ears are sticks that need to be flattened, and the tail is a ball with a slightly elongated end to make paws; pieces of clay need to be rolled out).
B. Look at the bunny again. Pay attention to where the tail is located, where the ears and paws are. You must make a similar bunny. But you need to imagine that your bunnies are real and live in the forest, what can they do there? Think about it and make a bunny that, for example, sits and gnaws on a carrot, or runs away from a fox. Or maybe someone will figure out what their bunny is doing? Now tell me, what are we going to sculpt first?
D. Torso.
B. That’s right, it’s the biggest one, we’ll attach the head, tail and paws to it. Just tell me again how you will sculpt the body so that it turns out round. (Children show again).
The bunny toy is placed on a stand at eye level, so that all children can see it.
During work, the teacher monitors the correct application of the necessary modeling techniques. Encourages interesting ideas in conveying movement.
Before analyzing the finished work, the teacher suggests placing the molded bunnies in a “clearing” under a tree.
Q. Guys, look at the bunnies and find ones that are similar to our little bunny. Which ones are similar and which ones are not so similar. Why do you think? Which ones did you like best and why? (Children review and analyze completed work). Well done guys, you all did your best, and now our bunny guest wants to meet your bunnies.
(A didactic game “What is your name?” Children come up with names for their molded bunnies and communicate in the form of dialogue).
Senior teacher:
Vasilyeva T.A
Modeling a hare from plasticine step by step. Master Class.
Creating miniatures of animals from plasticine with children is incredibly exciting. Kids perceive this soft, pliable mass of bright colors as a magic wand. From ordinary blocks you get separate parts that can be assembled into a beautiful craft. You need to practice such exercises at least once every two weeks, and maybe more often. The results will not take long to arrive. Within a few months, the child will independently create his own simple crafts from plasticine or wonderful masterpieces.
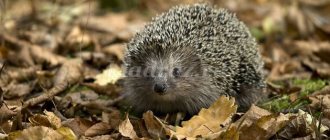
Every child knows what a hare is. This is a small animal that changes its gray coat to white in winter. He loves carrots, cabbage and grass. Often the hare appears as a character in cartoons or fairy tales. This lesson provides a detailed master class on sculpting a bunny from plasticine, after which you will know exactly how to sculpt a hare from plasticine step by step.
- Grab a set of plasticine for some fun work.
№1
- The bunny can be sculpted from white material. But it’s better to show your child that mixing white and black will result in gray. Mix the required number of pieces.
№2
- From the resulting gray mass, mold the hare’s body in the form of a drop and a smaller head.
№3
- Press your head tightly against your body. If you doubt the strength, connect the two parts with a match.
№4
- To create small details you will need some gray and white plasticine and a spatula. Make cakes of different sizes: ears, cheeks, breasts. To create a fluffy effect, use the tip of a spatula to slash the white elements.
№5
- Attach the ears to the head, add a nose and cheeks to the face, and an apron to the chest.
№6
- To make the front legs, roll small gray sausages, place a dot of white plasticine on the ends, then use a spatula to score the small toes.
№7
- Place the paws against the body and press firmly so that the plasticine sticks. Also glue the nose and eyes onto the face.
№8
- Leave a little more gray plasticine to create the hind legs and tail. Make two pieces of the same size, use white balls instead of fingers. Place white plasticine on the tip of the ponytail and rinse it with the tip of a spatula.
№9
- Add the prepared parts to the main craft.
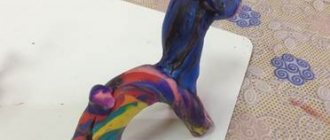
№10
- All that remains is to treat the cute bunny with cabbage. It can be assembled from several green cakes.
The final look of the craft.
The gray plasticine bunny is ready!
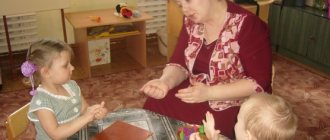
Summary of a modeling lesson on the topic: “Bunny - long ears”
Program content:
1. Teach children to sculpt a hare from plasticine, conveying the characteristic features: the body is ovoid, the head is a modified ball, the legs are cylinders, the tail is a ball, the ears are flattened cylinders. Use color as desired. 2. Teach children in a combined way. Use the following techniques: roll out the plasticine with circular movements of your hands until you get a ball; roll out the ball with straight hand movements until you get an ovoid; roll out the plasticine with straight movements of your palms until you get cylinders; draw eyes in a stack; Carefully smooth out the joints. 3. Explain the execution of your actions: back and forth, straight movements, cultivate accuracy in work. 4. To instill in children a desire to sculpt, to finish what they have started, and to cultivate accuracy in their work.
Previous work
: modeling cylinders from plasticine with direct hand movements; balls with circular movements of the hands; ovoids, rolling out the balls with straight movements of the hands.
Individual work
: teaches Masha.S., Vanya.F.
do the work independently, without the help of a teacher. Material for the teacher:
bunny - toy, hares - option. Samples from plasticine of different colors; plasticine, board; napkin; stack
Materials for children: plasticine in a set, board /individual/, napkins, stacks.
Progress of the lesson.
The children are sitting at the table. I am reading poetry. Once upon a time there was a bunny with long ears. The bunny's nose froze at the edge of the forest. My nose froze, my tail froze, and I came to warm up and visit the kids. I carry a bunny toy. - Guys, look, a bunny has come to us. -What color is the bunny? What body parts does the hare have? (torso, head, ears, tail, paws). What does the head look like? What about the torso? What shape are the ears and paws? That's right, guys. Do you know why the bunny came to us? He got bored in the forest, he wants to find new bunnie friends. Well, guys, let's help him? Then today we will sculpt bunnies from plasticine. Look how I will do it. I have balls of different sizes prepared in advance: a large ball for the body, a medium one for the head and a small one for the tail. I also made cylinders for the paws and ears. I take a large ball and roll it with straight forward and backward movements of my arms until I get an ovoid. This is the torso. Now I take the middle ball and pull out the muzzle. And now I press the head to the body and smooth it at the junction. Then I take two cylinders and press them to the body - these are the paws, and I also smooth it. And now I take the stack and draw the eyes. So I got a bunny. Guys, where do we start? (Roll out the balls). Show how we roll out the ball (with circular movements of the palms). What about the cylinders? (straight arm movements back and forth). Now, children, take some plasticine and start working. I draw the children's attention to the variable patterns, to the fact that they are of different colors. I remind you how to roll out an ovoid. I distribute cardboard carrots to the children (carrots with the children’s names). -Guys, bring your bunnies to our guest and place them around him. Let him look at your work. Bunny is very happy to make new friends and thanks you. Well done children, everyone did their best. And now the bunny wants to play with you.
Game "Grey Bunny Washes His Face."