08.10.2021
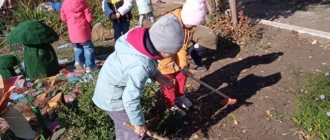
Working with natural materials in kindergarten and primary school develops in children not only fine motor skills, but also interest in the world around them. Autumn leaves can be collected on the way home. Waste material will be turned into unusual panels. The main thing is not to miss the collection time, warning parents what exactly will be needed for classes. The leaf fall period, when the leaves become especially colorful, is only 3-4 weeks, and to expand the palette, the collection should have all the basic tones from green to bright red.
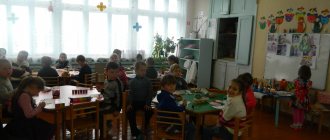
Applications for kindergarten
During kindergarten classes, children do the simplest work - create silhouettes of familiar animals and birds, make simple flowers. Kids can also collect the material themselves during a walk. The main task of the teacher is to develop initial skills in working with scissors, glue, and paper.
Hedgehog
Hedgehog leaf applique is one of the first crafts in kindergarten. The kids are asked to make needles out of natural materials. Children can trace the face and nose according to the stencil suggested by the teacher.
To work you will need:
- base - cardboard, cut wallpaper, album sheet, colored paper;
- PVA glue or glue stick;
- autumn leaves with sharp edges (birch, maple, rowan, currant).
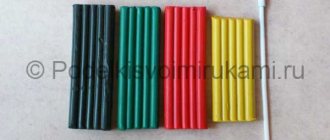
Glue can be replaced with plasticine, which children rub with their fingers according to a template pattern. In this case, the eyes and nose can also be made from plasticine balls.
Templates for applications:
If the group copes well with the basic task, you can offer a more complicated one - add a fungus laid out from leaves or berries from painted acorn caps to the needles.
Owl
An owl or an owl is a good example of symmetrical appliqué. The teacher can talk about the habits of the bird, explaining why it has such expressive eyes. You can use buttons as eyes on the applique itself.
To make it easier for children to repeat a complex silhouette, the work should be divided into stages, performed step by step:
- on a sheet of paper draw a branch on which the owl will sit;
- using a stencil or by hand, outlined the head and body at the same time - an oval;
- find the position of the eyes and wings, make the appropriate notes.
The children must handle the rest of the work themselves. They need to find leaves of the same size for the wings and line the body with small feathery leaves. The work is decorated with spectacular “ears” and paws, which should rest against a pre-drawn branch.
Owl templates for applications:
Turtle
There are several options for how to make a turtle. You can recreate the carapace ornament on the finished drawing. In this case, you will need to cut squares or hexagons from large leaves. The drawing itself, the basis for the lesson, can simply be printed.
The second option is to create a turtle from one birch or aspen leaf. Paws can be small leaves rolled into a cone or perfectly similar “helicopters” - ash seeds.
To make the picture complete, you can also consider an aquarium background. Cutting skills from colored paper will come in handy, although corals and small fish can also be made from leaves.
Turtle templates for appliques:
Hare
You can choose the bunny shape. From leaves it is easy to recreate both a running silhouette and a slant standing on its hind legs. In any case, the image will be recognizable, thanks to the long ears. At the same time, the teacher can tell you how the camouflage color of this animal changes in the fall.
Fish
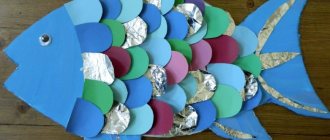
A fish made from one leaf with a drawn or added tail - a level of complexity that is accessible even to kids from the nursery group. Older children can be asked to pretend to be a goldfish - by this age they already know the fairy tale of the same name.
In this case, the fish must correspond to:
- laid out from glued overlapping small leaves of scales;
- with a large beautiful tail made of a maple leaf or aspen fan;
- with a crown made of a leaf glued into a tube.
From the same leaves you can create waves on which a fairy-tale heroine rises, or algae if the underwater world is depicted.
Sun
The image of the sun in the garden can be an independent work. At school, this same element will become a template for a large panel on an autumn theme or part of a festive classroom decoration. The simplest sun is small leaves around a dinner or printed template. To make the craft more effective, children need to be shown how to carefully glue leaves in a circle in layers from outer to inner. In this case, the image will appear three-dimensional.
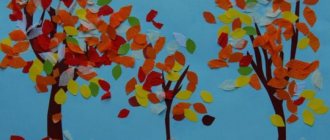
Autumn forest
The image of an autumn forest made of leaves develops associative thinking and imagination. At the same time, the work remains extremely simple - children just need to choose neat, spectacular leaves, stick them on the background and add trunks to them.
You can talk to older groups about perspective and contrasts, showing how yellow “birches” and “aspens” look impressive against a background of dark green “fir trees” (oak leaves or branches of coniferous trees). The concepts of “background” and “foreground” can be discussed.
DIY bookmarks for children (templates can be printed)
Bookmarks made by children are especially cute and precious. We can also focus on reading books. And you can stop at the right moment, fixing the place of reading, simply by laying a wonderful and beautiful strip between the pages. A great idea for crafts in the preparatory group of kindergarten or preschoolers for creativity at home. Check out these easy ideas for inspiration. If you are studying in a group and need to prepare material, then for convenience I have also placed templates that can be saved and printed.
Let's start with simple ideas that have simple forms and elements. Dimensions in width and height can also be arbitrary, depending on what books are made for. But usually the size of the bookmark in width and height does not exceed 20*5, which is suitable for A5 size books.
For kids, prepare thick white paper folded several times onto which you can stick different colored elements: stripes, squares, diamonds.
Or create a charming snake with your child
For the bookmark we need:
- Thick white paper
- Base cardboard in any color range
- Multi-colored paper strips of various widths
- Scissors
- Glue
- Stapler
- Tongue tape
Step 1. Measure a cardboard strip measuring no more than 20 by 5 centimeters. A little shorter in length, we randomly draw on white paper a winding figure of a snake and two round eyes.
Step 2. There is no need to cut it out right away. It will be more convenient to stick the applique directly onto the contour drawing. To do this, we glue pre-prepared strips of different colors, slightly wider than the snake itself, in random order.
Step 3. After drying, cut out the design along the contour and glue it onto a cardboard base.
Step 4. Our bookmark is almost ready. The finishing touches are to glue the eyes and draw a smile.
Step 5. If you wish, you can also make a hole with a stapler and tie a beautiful ribbon or ribbon. It's like a tongue. Now the bookmark is ready!
*****
You can make a great gift for mom by making a bookmark in the shape of a cup with a tea bag. Shape and color as you wish. Take this idea for women's holidays, for example, March 8, Mother's Day.
The caterpillars, which are made only from circles of paper of different colors, will look very easy, but interesting. It is necessary to glue them overlapping each other, adding antennae and eyes.
Apply a large amount of paint onto matte cardboard or watercolor paper and immediately blow on the paint with the children through a cocktail tube, driving it in one direction. You can also then make splashes with a hard brush. When the paper dries, cut the bookmarks to the required thickness and use a stapler to make a hole on top. We tie a tassel of floss, yarn or ribbon as desired.
Standard bookmark templates can be printed as a basis for future drawings or applications. Children will be able to show their imagination.
There are also interesting ideas with animals.
Coloring bookmarks are suitable for those who like to color. The colors are available in a variety of bright and bold colors. And such bookmarks are right up there in books of fairy tales and adventures.
Print on thick paper or transfer drawings of animals onto cardboard. Along the dotted lines, you will need to cut the legs and use them to hook the desired page. The faces will look very cute from the book.
The New Year theme was not ignored either. These Santa Clauses can be made as a gift.
How to prepare leaves
In order for the application to be neat and stored for a long time, the leaves must be prepared in advance. Drying in a loose position will not help; as moisture evaporates, the material will curl. Gluing such leaves is much more difficult, as is cutting out even shapes for a modular applique of leaves.
There are two options for drying natural material. You can put the leaves under a press, for example in a large book. But we must take into account that the pages are deformed, even if they are additionally padded with a napkin - the reason is evaporating natural moisture. Such drying is a long process, taking at least a month. Solid large veins should be cut lengthwise in advance so that they dry and do not begin to rot.
Express drying with an iron is much faster. It is enough to place the leaves on a newspaper and iron at medium temperature. In this case, the natural color may be distorted. To prevent this from happening, it is worth drying in several stages and not setting the iron to maximum.
To prevent the material from deteriorating before class, you can store it in a box with salt or rice sprinkled on the bottom. The absorbent will absorb residual moisture and prevent rotting.
How to make a paper bookmark for a book (step by step instructions)
This time I would like to show in step-by-step instructions how to make a bookmark from thin paraffin or wax paper. Due to the high temperature of the iron, it sticks tightly, fixing the herbarium inside. In this way you can “immortalize” leaves, flowers or grass collected in summer and autumn. Look at the picture below to see how original and interesting different bookmarks are.
For production we will need:
- Leaves and flowers dried between the pages of books
- Wax paper
- Thick album sheets for backing
- Scissors
- Iron
Place the herbarium on the wax paper as you like, determining the size of the future bookmark. Cover carefully with the second wax sheet. Be sure to place the material between thick album sheets and then iron it with a hot iron. Gently lower the iron onto the paper and slowly heat the sheet, pressing firmly.
Now cut out the strip with scissors. Our flowers remain well fixed inside the paper
Now we make a frame or frame for the density of the bookmark. As shown below, cut strips approximately 4 centimeters wide. Next, we bend it in half lengthwise and then fold each edge to the middle seam.
We try on the blank frames and also glue them together with the herbarium using an iron. We cut off the excess parts and the bookmark is ready. In the light you can see the unique contours that nature has created.
This is what autumn leaves and plant branches look like.
****
Variegated cardboard or an old geographical map also makes wonderful bookmarks.
For the craft we will need:
- Thick cardboard with pictures
- Scissors
- Hole puncher
- Yarn
There is nothing complicated or time-consuming about this option. The main thing is to find a suitable paper background, cut out a strip of the desired size and shape, as shown in the stencils above, and make a tassel from yarn. This is how quickly you can safely continue to embark on an exciting read.
You can make a braided bookmark from strips of paper in a contrasting color using this master class. By following the instructions you will get such an original bookmark.
There is also a very convenient magnetic bookmark that securely attaches to the book, protecting the desired page until you resume reading.
Applications for school
The difference between the program for schoolchildren and the application for children 4-5 years old is greater freedom of creativity. The teacher distances himself as much as possible, inviting students to independently choose the plot, characters and implementation of their own ideas. He can only suggest methods for implementing unusual techniques.
Templates are also abandoned when working with school-age children. They are already able to draw animal faces and silhouettes on their own. You can only suggest characteristic details - remind that the mouse needs a long tail, and the squirrel needs tassels on its ears.
In 1st-2nd grade
In kindergarten, applique of autumn leaves most often consists of complementing a ready-made figurine proposed by the teacher. The main goal of the lesson is to develop fine motor skills and develop skills in working with glue.
For school classes, the difficulty needs to be increased:
- abandon template solutions, allow children to find their own way to depict a face or background landscape and choose the right tones and shapes;
- give the opportunity to work with symmetry and reflection, showing examples of work in this technique;
- to focus on working with scissors, to complicate the silhouettes of the works proposed for repetition.
You can base your work on meeting exotic fauna or fantastic creatures. Perhaps children will be more interested in composing a scarlet flower or a firebird, a chameleon or a dragon, rather than the hedgehogs and bunnies that have been boring since kindergarten.
Tree
By the age of 7-8, children already understand the difference between oak and birch and can describe their appearance. This should be reflected in appliqués made of autumn leaves.
The teacher only suggests the corresponding thought with suitable associations:
- oak is strong, knotty;
- birch is thin, flexible;
- Weeping willow, hanging branches over the water.
Children draw the trunk, emphasizing its characteristic features. And the leaves peek out, choosing the appropriate colors and sizes.
Vase
Children usually make autumn leaves not into the vase itself, but into its filling - a bouquet. To simplify the task, a symmetrical vase is cut out of colored paper, folding the sheet along the axis.
Working step by step:
- Studying possible options and shapes of the vase. Cutting out.
- Gluing the vase onto the background.
- Adding a bouquet of leaves.
Additionally, you can add small larch cones or beads imitating berries to the bouquet
For children 10-12 years old, you can offer to decorate the vase itself using the mosaic technique. To do this, segments are cut from leaves of different colors, and then laid out end-to-end, secured with glue on the background.
An applique with a basket is created using the same principle. To complicate the work, you can invite children to place not just leaves, but flowers made from this material in a basket or vase. The variety of colors of the material allows you to create complex compositions.
In 3-4 grade
Simply gluing pieces of paper onto paper will no longer captivate ten-year-old children. The tasks need to be more challenging and creative.
The most popular options:
- modular appliques - complex silhouettes from parts;
- mosaic of geometric shapes;
- ornamental panels with a selection of colors;
- 3D applique craft made from leaves folded into a cone.
Combined techniques can be proposed in one work. Joint creativity will also arouse interest - a proposal to implement one idea together or three. This activity will also teach children to negotiate and work in a team. Gluing corners for a voluminous appliqué will promote perseverance and develop fine motor skills.
Dress for a doll
Children can make a dress for a girl even in kindergarten, so in elementary school the task needs to be complicated. It is necessary to convince children in advance that the dress must have an original cut, details, and accessories. Children can already come up with and depict the silhouette of the Queen of Autumn on their own.
Another complication of the topic is three-dimensional work. Old Barbie will probably be found in any family with girls.
Procedure for working on a three-dimensional model:
- Sketch, selection of material.
- Making a base from fabric or paper napkin.
- Gluing the leaves to the base.
Accessories can be chosen from natural or doll-like ones. For a formal outfit, sparkles, beads, and beads are useful. In addition to the dress, you can come up with a spectacular umbrella, fan, and hat. The doll itself will not suffer from such work.
Beauty Autumn
Children in grades 2-3 can also draw a face on their own. It is proposed to use the leaves to create a hairstyle and accessories. Despite its apparent simplicity, the work requires a creative approach, selection of colors and shapes. It is worth discussing in advance how students see this person - a fairy fairy in a light dress, a girl wrapped in a collar, or a queen in a ball gown.
Other photo ideas
The teacher planning the lesson needs to take into account that the leaves brought by the children may be of the same type - collected in the yard next to the school. To have a larger assortment of shades, you will have to take care of unusual colors and textures personally, starting the collection in the summer. To prevent crafts made from natural materials from losing their shape, finished works can be sprayed with hairspray.
Making a bookmark - a corner for books made of paper
It is very convenient to use a corner of paper on a book page. It is securely fixed, clearly visible and is not at all difficult to make, as it might initially seem. By following the pictures and repeating the same, you will get a wonderful book corner bookmark.
Until I looked at and repeated such a bookmark in the origami style myself, for my daughter and I it was out of the realm of science fiction
Practice doing it first on plain paper, and then with your child you can make multi-colored hearts for bookmarks. Everything is quite simple.