MAGAZINE Preschooler.RF
Summary of a lesson on application in the middle group “And the Sun has clear rays”Prepared by teacher Yakovleva E.S. 2021 Municipal budgetary preschool educational institution "Shemurshinsky kindergarten "Romashka"
Program content:
Educational objectives: learn to create an image - a symbol of the Chuvash pattern depicting the sun, arranging the elements of the pattern and gluing them to the base.
Developmental tasks: develop children’s ability to place shapes throughout the sheet, as well as the ability to compose a simple pattern of geometric shapes on a square; develop aesthetic taste.
Educational objectives: to cultivate interest and emotional responsiveness to the means of artistic expression of works of Chuvash applied art.
Vocabulary work:
Activate children's vocabulary with words: rays, sun, pattern.
Methods and techniques:
- A surprise moment - the Ilembi doll invited the children to visit.
- Examination of the pattern on the doll's dress.
- Questions:
-What does the pattern look like?
— Does the pattern look like a sun?
- What does the sun have?
4. Game “Sun Rays” (children lay out rays on the floor from satin ribbons to the model of the sun).
5. Making napkins for the doll’s girlfriends.
6. Demonstration of a sample method of action.
7. Laying out the pattern details on the prepared square.
8. Physical school.
9. Encouraging children.
10. Instruction, reminder.
11. Examination of symbol patterns on a multimedia installation
12. Outdoor game “Sun and Rain”
Preliminary work:
- Drawing the sun
- Learning the outdoor game “Sunshine and Rain”
- Learning physical education
Material and equipment
- Doll in national costume
- Fine model of the original pattern (symbol of the sun)
- Napkin with a pattern.
- Cards with drawings of patterns and their semantic meaning.
- Hoop covered with fabric.
- Colored ribbons.
- Attributes for an outdoor game (sun and cloud)
- Handout: red cardboard 15*15 cm, yellow and green pattern elements 2 pieces each, glue, napkins.
Progress of the lesson:
Educator: Guys, we have guests today, say hello! (Children say hello). Now come to me and see who is waiting for us? This is a doll. Her name is Ilembi. Let's come closer and see how elegant she is. Guys, the doll has a beautiful dress, and unusual patterns are embroidered on it.
Children look at the doll and the patterns on the dress.
Educator: What does this pattern look like? (children's answers). Well done! And it seems to me that this pattern resembles the sun. The sun has rays and this pattern also has rays. The rays look in different directions to keep everyone warm. Does this pattern look like the sun?
Children: Yes!
Educator: Guys, Ilembi is telling us something. Ah-ah-ah, I understand. She reminded me of an interesting game. Now you and I will play it, and the doll will sit next to you and watch.
Educator: I have a circle. Now we will make a sun out of it. Look how big the circle is (puts it on the floor). There is a circle, but what is missing?
Children: Luchikov.
Educator: That's right, the sun doesn't have enough rays. We will make rays from ribbons. Our doll has these ribbons. Look, here they are (takes out colored ribbons that are on a tray and shows them to the children). We will lay out the rays like this: first we will lay out a yellow ray, then a green one, then again a yellow one, and so on until we have laid out all the rays; Our rays are straight (shows how to lay out ribbons on the floor). Come to me, I will give you ribbons (hands out ribbons to children).
The game "Sunshine"
(children lay out rays from colored ribbons on the floor).
Educator: Look what a beautiful sun we have created! Well done! Now, guys, help me clean everything up (children help clean up the attributes). Our doll has a beautiful scarf! (Takes out a napkin that is located on the doll’s apron.) Look.
Children look at the napkin.
Educator: There is a sun on this napkin. And he has rays. The rays are colored, on a napkin they are located one after another. Our doll has girlfriends, but they don’t have such beautiful scarves. Can we help the doll make handkerchiefs?
Children: Yes!
Educator: Sit down at the tables, guys. Place a handkerchief in front of you, and now arrange the rays on it as on my handkerchief
Sets up an easel on which the sample is placed.
Educator: The rays look in all directions, up and down, right and left. Guys, are the rays different colors or the same? (Children's answers). That's right, rays of different colors. And on our handkerchiefs we will arrange the colors in order: yellow, green, yellow, green.
Children lay out the details of the pattern on their blanks.
Educator: Spread out? Well done! Now let's play. Stand near your chairs.
Physical school is being held.
Guys, let's call the sun!
Sunny, little bucket, (they wave their hands invitingly)
Look out the window! (one hand above the head, the other under the chin - depict a window)
Your kids are crying (pretending to cry)
They jump on the pebbles. (jump up)
Educator: We played, now sit down at the tables, let’s glue our rays. First, take the top yellow ray, turn it over, and spread it with thin glue. Spread glue over the entire ray; Carefully, evenly place the ray in its place, pressing it with a napkin. Then we take the green ray, then the yellow one, and now the green one again. Glued? Well done!
Educator: Take your tissues and leave the tables. Look how many beautiful scarves you have made. Give them to Ilembi doll so she can give them to her friends. How happy the doll is. We have the sun on our scarves and the sun on our dress.
Children place their work on the high chair where the doll is located.
Educator: Look at this big screen, everyone.
Displaying illustrations of patterns-images on a multimedia installation
Educator: What do you see on the screen? That's right, it's a tree, and this is how you can show a tree on a handkerchief. This is a pattern. This is a house, and this could be a house on a handkerchief. This is also a pattern. Say in unison: pattern.
Children (in chorus): Pattern.
Educator: Well done! Patterns may vary. Next time we will make other patterns on handkerchiefs. Guys, the sun has come through our window. Here it is (takes out attributes for the game).
The outdoor game “Sunshine and Rain” .
Educator: Did you like making handkerchiefs today? Did they turn out beautiful? Next time we will make other patterns on handkerchiefs? Say goodbye to the doll and the guests.
The children say goodbye and leave.
| Next > |
Master class on the application “Radiant Sun”
Elena Nesterova
Master class on the application “Radiant Sun”
Good afternoon colleagues!
I want to share with you my idea, “ Sunshine applique .
You always want to come up with something interesting, enticing for children, to arouse interest and the desire to make a craft on their own.
For work we need the base for work - white cardboard, half a sheet, glue pencil, sun (in my case it’s very fun, you can make different emotions, double rays (fold the yellow sheet in half and cut strips)
.
The rays can be made of different lengths, subsequently alternating them, for example, long, short, long, etc. I made them one length, because we did it in the second younger group.
So, the working material has been prepared, we can begin.
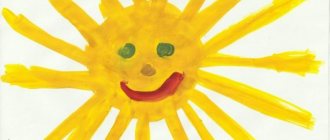
At the beginning of the lesson, I read the nursery rhyme “ Radiant Sun ” .
Created a problematic situation: “ Our sun has lost its rays , let’s help the sun to put on” its rays .
Glue the sun in the center of the sheet , coat the edge of the circle well with glue with a pencil and begin gluing the rays . Explain to children how to properly glue the rays . Find a corner near the double stripe “beak”, and you need to glue it to the edge of our sun . “The more rays , the warmer the sun will shine and warm us.”
At the end of the lesson, you can show the children that the sun turned out to be unusual , in the evening the sun hides , sets, rests and we can close the top rays , close the sun , and when morning comes, the rays will open again .
Lesson summary “Radiant Sun” Lesson progress: Educator: Guys, let’s look out the window and see what’s shining so brightly there! Educator: Listen to the riddle and try it.
Final event of the week “Radiant Sun” Final event of the week “Radiant Sun”. Time: spring, summer. Venue: kindergarten territory. Tasks: - expand.
Notes for a lesson on applique using millet grains “Radiant Sun”, paper lumps from napkins in II ml Notes for a lesson on appliqué using non-traditional materials (millet grains, paper.
Consultation for parents “Radiant Sun” Summer is a wonderful and most long-awaited time for children and adults, which everyone loves and looks forward to! It is in the summer that there are a lot of guys.
Master class “The sun is baking pancakes” using plasticineography and applique techniques. Master class: “The sun is baking pancakes” using plasticineography and applique techniques. Description: this master class is intended for preschool children. Regulations on the crafts competition “Radiant Sun” Regulations on the crafts competition “Radiant Sun”. 1. General Provisions. 1.1. The “Radiant Sun” crafts competition is held in the first junior school.
Scenario for March 8 “Radiant Sun” Children’s entry. They stand in a semicircle. Presenter: Hello, dear guests, We are glad to see you with us, May this festive hour not fly by sadly.
Templates for cut appliqué
It will be very convenient if you prepare beautiful templates in advance for working with scrappy techniques. You can get the template from anywhere:
- cut from a magazine;
- use old coloring books;
- draw with your own hands.
Children can also create these patterns on their own. After all, drawing the outline of a cat or butterfly does not require much skill, just like tearing off pieces of colored paper.
At the first stage, when the baby is just getting acquainted with this technique, you can offer him a ready-made template - for example, from an old coloring book. As they gain experience, children themselves will want to try to draw their own version of the outline drawing. These can be animals, landscapes, clouds, flowers and bouquets, kittens or puppies. The outline drawing should not be too detailed or complex. The main thing is that it serves as a good basis for further gluing with torn elements.
Decorating the work
Ready-made compositions can be supplemented with decorative materials. Tasks can be different - in level of complexity, topic, scale and amount of materials. The broken applique in the older group will differ in execution from the younger one, so the process can be complicated.
To decorate their work, children can use a variety of available and purchased materials:
- shells, pebbles, pebbles (small);
- dried leaves and flowers;
- beads and seed beads, glass beads, small rhinestones (with precautions and under adult supervision);
- threads, ribbons, bows and wool;
- buttons, buttons;
- parts of old toys.
Children can frame the result of their efforts and present it to a competition or exhibition. But the main thing is that the kids enjoy the creative process. If the painting decorates the interior, the children will be very pleased.
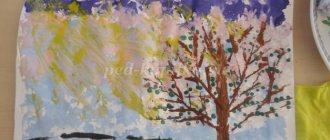
Example of a craft “Autumn Tree”
Let's look at a sample of a broken autumn tree applique. This is a simple and very beautiful option for children in the middle or senior kindergarten group.
For work you will need materials:
- glue stick;
- set of colored paper: yellow, orange, brown, green, blue;
- cardboard base (you can use white paper);
- additional decorations in autumn style: golden beads, small stones;
- a cloth for wiping off glue.
Work algorithm:
- Invite your child to apply the drawing to the base. Let it be a large tree with a lush crown. You can draw the sun and clouds in the sky, and bushes and paths on the ground.
- Next, select the main shade for the wood - yellow, orange, brown. The paper is torn into pieces and evenly pasted inside the contours of the tree. Dark colors are used for the trunk, light colors for the crown.
- They cover the sky with blue pieces, leaving space for clouds.
- The sun is decorated in yellow. Thin rays can be drawn with a pencil or felt-tip pen.
- The finishing touches are glued on – pebbles on the ground, beads on the tree as fruit.
The picture is ready, it can be framed. You can also wipe off any excess glue on the image before the glue dries completely.
Master class on three-dimensional appliqué for children of the middle age group “Sun”
Varvara Nikolaenko
Master class on three-dimensional applique for children of the middle age group “Sun”
Creation of the Sun using the technique of volumetric applique.
1. Introduce preschoolers to the Sun, the nearest star in the solar system;
2. To develop in preschoolers an interest in studying the planets of the solar system;
3. Strengthen skills in mastering the technique of volumetric appliqué.
1 sheet of yellow colored paper; 1 sheet of orange construction paper; a circle of white paper with a diameter of 10-12 cm; scissors; glue stick.