Galina Klokova
Notes on drawing lessons using non-traditional image techniques.
Art activities using non-traditional
image technician in a preparatory school group.
Prepared by G. A. Klokova, teacher of the 1st category of kindergarten No. 25 “Ryabinushka” in Michurinsk, Tambov region.
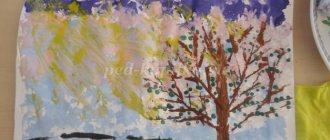
Theme: “Autumn bouquet.”
Goal: development of creative abilities through the use of non-traditional drawing techniques : “leaf print”.
Objectives: - continue to introduce the genres of fine art (still life)
;
— learn to mix paints directly on the leaves;
— improve drawing skills using leaf printing and plasticine printing techniques;
— develop compositional skills.
Equipment: sheets of paper, watercolor paints, brushes, leaves and plant seeds, plasticine.
Lesson summary “Introduction to the non-traditional drawing technique “Ebru”
Lesson notes for children with disabilities in the senior group.
Solovyova Olga Ivanovna.
Topic: Introduction to the unconventional drawing technique “Ebru”
Target
: formation of children’s ideas about a new unconventional way of drawing “Ebru”
Tasks:
Introduce children to an unconventional drawing technique - “Ebru”
Develop creativity and imagination through productive activities.
Develop fine motor skills and thinking.
Cultivate perseverance and interest in new things.
Materials and equipment:
a tray with water (a thickener has been added to the water), ebru paints, a fan brush, an awl, a glass of water, napkins, paper.
Progress of the lesson
-Look, guys, what’s on my table? Children's answers (paints, brushes, water....)
-Today we will be wizards, we will draw magical pictures on the water. This drawing is called Ebru. It appeared a long time ago in eastern countries: Turkey, Pakistan. I added a special thickening powder to the water so that the paints did not sink, but remained on the surface of the water. Our paints are also special, they are very liquid, and contain the bile of cattle, so that the paint spreads over the surface of the water.
— First, we create the background, for this we put paint on the brush (be sure to mix the paint, since the special pigment settles to the bottom). We have a fan brush (I show) to spray paint on the surface of the water. We hold the brush above the surface of the water at a distance of 5-7 centimeters and lightly tap it on the palm of our hand or spray the paint on the water with our fingers on the brush. You can use one or more colors. The colors can be whatever you like. Wash the brush well in water after each paint and blot it on a napkin. The first drops spread across the water and become light. Look, the colors do not mix, but push each other, moving through the water like clouds across the sky. Ebru is called - air clouds.
Our background is ready, we will paint, but not with a brush, but with an awl, like this (I show). The most important rule: wipe the awl dry with a napkin after each color. Dip the awl into the water just a little bit. The background can be left as we sprayed it. To create a more complex background, you can use an awl or comb. Using an awl, we move along the surface of the water from right to left or from top to bottom; you can draw a spiral (in Ebru this technique is called a nightingale’s nest) or draw a comb in any direction. Admire how the colors move (how the design changes) creating a unique pattern.
- Now I will show you how to draw a flower. We pick up the paint with an awl (don’t forget to mix the paint) and lower the awl into the water 3-5 millimeters, wait a little for the paint to run off, wipe the awl with a napkin and pick up the next color and lower the awl into the middle of our first circle, this way you can make several colors. Our colorful circle is ready. We will use an awl to deform (change) the circle: lower the awl from the outer edge of the multi-colored circle and draw it into the middle, then from the opposite side. Look, you get petals, you can make as many petals as you want.
-Let’s make a stem with leaves for our flower, for this we take green paint and make a circle on the surface of the water. We take yellow paint, lower the awl into the middle of the green circle (can be repeated 2-3 times), wipe the awl dry and draw from the outer edge of the circle from right to left through the entire multi-colored circle and from left to right, and then lower the awl at the upper edge of the circle and draw down - it turns out to be a stem with leaves.
-Our magical drawing is ready, you can transfer it to paper. To do this, take the leaf by the opposite edges and carefully lower it into the water. We draw an awl along the surface of the paper and along the edge, counting to ten. Then use an awl to lift the edge of the sheet and with both hands use the corners to pull the sheet along the edge of the tray so that excess liquid remains in the tray. And now our magic drawing is ready (I show the children the drawing)
-And now you will draw. But first, let's do some physical exercise.
Fizminutka "Flowers"
The flower was sleeping and suddenly woke up, (Torso to the right, to the left.) Didn’t want to sleep anymore, (Torso forward, backward.) He moved, stretched, (Hands up, stretch.) Soared up and flew. (Hands up, right, left.) The sun just wakes up in the morning, the butterfly circles and curls. (Spin around.) detkin-club.ru
I will help you while drawing, do the work carefully. You will definitely get beautiful drawings that you can give to someone you love or keep for yourself.
Final part:
-What did you like about the lesson?
-Guys, what is the name of the drawing we met? (Ebru)
-What did we draw on today? (on the water)
-Why don’t the colors fade? (a thickener has been added to the water….)
-So we became a little wizards, learned to draw a miracle.
Our drawings will dry and you will take them away. Thanks guys for your work.