Summary of a lesson on appliqué in the middle group “Christmas trees - prickly needles”
Evgeniya Khamzina
Summary of a lesson on appliqué in the middle group “Christmas trees - prickly needles”
Lesson topic : “Christmas trees, prickly needles ”
.
1. Continue to develop in children the ability to cut triangles from
squares, make an applique of two items , placing them side by side
center of the sheet, starting from the bottom.
2. Strengthen in children the ability to use scissors and hold them correctly
brush, spread glue, press on the sheet with a napkin, enjoy the result
your work, recognize and name the color green.
3. To develop in children the ability to hear and understand the teacher, to cultivate curiosity and interest in the application .
Reading winter tales, poems, asking riddles, looking at snowflakes
on a walk. Drawing snowflakes with paints and pencils. On a walk
looking at the branches of a Christmas tree.
Bunny – soft toy; "Snowman" envelope
;
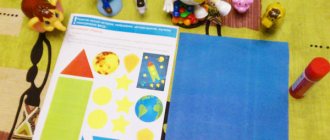
sample application ; three triangles decreasing in size
3 green squares (5*5, 4*4, 3*3 cm,
sheets of blue landscape paper with a white strip pasted on
paper at the bottom of the sheet (snow)
.
Narrow white stripes for falling snow
(0.5*10 cm, glue, scissors, napkins, brushes.
a guest came to our . Who is it you need to guess.
Riddle about the hare:
Educator: Who is this?
Educator: That's right, today a hare came running from the forest to our lesson .
He brought us a letter. Now we will open the envelope and find out who sent it
(I open the envelope, take it out and read
Hello my good children!
Grandfather Frost is writing to you.
There are not enough Christmas trees in our forest for the holiday , could you please
help - make a lot of Christmas trees so that they
there was enough for everyone for the New Year holiday.
Sincerely, Grandfather Frost.
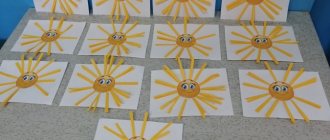
Educator: Guys, let's help Santa Claus and make a lot of Christmas trees .
Let's make these beautiful Christmas trees
Educator: Look, what geometric shapes is the Christmas tree made of?
Children: Christmas trees are made of triangles.
Educator: Are the triangles the same size?
Children: Triangles are different in size: large, smaller and small.
Educator: -Where are the big branches located and where are the small ones?
Children: Large branches are at the bottom, and small ones are at the top.
Educator: Guys. What kind of Christmas tree do we have?
Children: beautiful, fluffy, green, prickly, big.
Looking at an illustration on TV.
Educator: What geometric shape does the Christmas tree look like?
Children: the Christmas tree looks like a triangle.
Educator: -That's right, the triangles gradually decrease in size
size, and the Christmas tree becomes like a pyramid. Every next
finds it on the corner of the bottom.
Educator: How would we lay out triangles?
Children: First you need to put the largest triangle below, a little
above (above him)
a little smaller, the smallest one at the top.
I show the children a square and ask: “What is the name of this geometric figure?”
Children: This is a square.
Educator: -What color is it?
Children: green square.
Educator: We will cut out Christmas tree branches from these squares. Every
the square must be cut into 2 triangles. To do this you need to take a square like this:
so that one of its corners is at the bottom and the opposite is at the top. Necessary
look at the top corner and point the scissors there. Like this! (explanations are accompanied by a demonstration)
.
Do you remember everything well? Now let’s rest: (Children stand behind their chairs)
.
Here under the Christmas tree
Here under the green Christmas tree (Stand up.)
The crows are jumping merrily: (We jump.)
Kar-kar-kar! (Loudly.)
(Clapping hands above their heads.)
All day long they shouted, (Turns the body left and right.)
The boys were not allowed to sleep: (Tilting the torso left and right.)
Kar-kar-kar! (Loudly.)
(Clapping hands overhead.)
Only towards night they fall silent (Waving their arms like wings.)
And everyone falls asleep together: (They squat down, hands under their cheeks - fall asleep.)
Educator: Now we will cut out the branches of the fir trees.
During work, individual work is carried out.
I watch my posture, TB with scissors. Glue.
At the end, finger gymnastics is performed.
Finger gymnastics “Herringbone”
In the morning, the children were surprised (spread their arms to the sides, raising their shoulders)
What miracles happened
This New Year's night.
We expected anything (they clench and unclench their fingers)
And we saw the parade:
Snowmen stand in a row (they draw three circles in the air with their hands)
The eyes are shining merrily, (close and open the eyes with the palms)
And in front of them is a Christmas tree (clap their hands)
Fluffy, with needles .
Educator: -Now we will stick our Christmas trees on a sheet of paper, starting
from below the strip of snow, placing the Christmas trees in the center of the sheet.
Turn on calm music. (Children work to music)
.
During the lesson , I suggest that the children cope with the task faster than others to depict falling snow. (I explain individually how to do this)
.
Educator: - You need to tear off small pieces from the white paper and apply glue with a brush in the place where the snowflake will be, and then glue it
put it in this place, remove excess glue with a napkin.
Snowflakes should not be glued close to each other; they can also be glued to Christmas trees. After all, when snow falls in nature. It covers everything around.
(At the end, each child places his work on the stand)
.
Lesson summary : Tell me, what did we do today?
Child: We cut the square into triangles, pointing the scissors at the top corner.
We glued Christmas trees from triangles of different sizes, starting with the largest. We made an applique of 2 items .
Educator: Look, it’s a big spruce forest. All the Christmas trees grew straight , there are enough of them for everyone. When Grandfather Frost comes, we will all be ours
Application "Traffic light". Summary of educational activities for children of the senior group Program content: To consolidate children’s knowledge about the rules of the road and behavior on the street in the game - quiz “Rules of the Road.
Long-term planning of the “Workshop of Miracles” club for middle group children. October “Screen with vegetables” Expand children’s knowledge about vegetables; consolidate the techniques of applying glue with a brush to the back side of the figure; continue.
Original DIY crafts on the theme “Winter” for kindergarten
It is safe to say that all handmade crafts are original. However, there really are some that are simply impossible to look at without being pleasantly surprised.
Pig - piggy bank from a plastic bottle
We will need:
- plastic bottle 1.5 l;
- acrylic paint white and pink;
- scissors;
- scotch;
- glue gun;
- brush;
- acrylic lacquer;
- bushings for legs.
Step by step steps:
- We cut off the top and bottom parts of the plastic bottle and connect them together with tape.
- On one side of the bottle we glue 4 legs from any available material, small foam balls, large beads or lids from the container of the Kinder Surprise toy.
- Using a sharp knife or soldering iron, make a hole for coins, and also cut out slots for the ears.
- We cut out the ears according to a pre-prepared stencil from a plastic bottle, insert them in place and secure them with glue.
- We wrap a thin strip from a plastic bottle on a thin stick, get a tail, which we also insert into a pre-made hole and secure with glue.
- We cover the piggy bank first with white acrylic paint, and then pink, let it dry and cover it with acrylic varnish.
- We draw eyes and nostrils with a black marker, decorate them additionally, the craft on the theme of winter for kindergarten is ready, we definitely take a photo as a keepsake.
Snowman
We will need:
- foam balls of various diameters;
- glue gun;
- felt of any color;
- orange or yellow felt (small piece) or orange sisal and foam cone;
- scissors;
- a piece of thin foam;
- the eyes are semi-beads.
Step by step steps:
- We make flat cuts on the foam balls for fastening, coat them with glue and connect them. On the large lower ball we also make a flat cut from the bottom to stabilize the figure.
- We cut out small round parts from foam plastic - handles.
- We cut out a long strip of felt, cut fringe at the ends, and tie the resulting ball onto a snowman for a kindergarten competition.
- We also cut out a rectangle from the same piece of felt, the length of which is equal to the circumference of the top foam ball, cut the fringe from one edge, glue the cap and glue it in place.
- We also cut out gloves from felt for the handles, glue them to the “handles”, which in turn are also glued in place.
- We make a nose - a carrot - from orange felt and glue it on, we also glue on the eyes - beads. If you have prepared sisal and a small foam cone for the nose, then first glue it with yellow sisal, then glue it in place.
- Draw the mouth with a black marker, cover the cheeks with blush using shavings from a red pencil lead. A DIY craft on the theme of winter for kindergarten, as shown in the step-by-step photos, is ready.
- You can put any additional items into the snowman’s hands: Christmas tree decorations, a box with a gift, a broom; all this should be done additionally, which is not at all difficult.
Winter applique – junior group
Applications for this age group are the easiest to make; excessive complexity should not scare the child away from the creative process. However, it is still necessary to make with your child the craft that interests him; we offer several interesting options.
Winter city
We will need:
- colored cardboard;
- colored multi-colored paper;
- scissors;
- glue;
- cotton pads.
Step by step steps:
- We cut strips from colored paper so that we get 4 long strips, the length of which coincides with the length of the cardboard - the base, and the width is calculated so that when gluing them onto the cardboard, there are gaps of 2 - 3 cm between them.
- We coat the long strips with glue and glue them, between them we glue shorter multi-colored strips of different lengths and widths, gluing them onto the long strips.
- We cut cotton pads in half and glue them onto the roofs of the “houses”, then glue pre-cut squares and rectangles from multi-colored paper - the windows of the houses.
- At the bottom of the craft for the kindergarten competition we also glue halves of cotton pads - city snowdrifts.
Application "Pig"
Required:
- colored paper in pink and brown colors;
- light pink colored cardboard;
- part templates;
- colored pencils and markers;
- glue;
- scissors.
Step by step steps:
- We cut out the printed templates from paper: the body of a pig, a dress, ruffles, a snout and a flower for decoration.
- Place the template of the pig's body on cardboard, trace it and cut it out.
- We cut out a dress and a snout from pink paper, and cut out ruffles and a flower from brown paper.
- On the ruffle detail we draw pink peas with a felt-tip pen, and we draw exactly the same pea on the flower.
- We glue the dress to the pig's body, glue ruffles on the bottom and a patch on the muzzle.
- Using a pink felt-tip pen we draw the hooves, holes on the nose and ears.
- We draw a smile and eyes with a black felt-tip pen, and apply blush to the cheeks with a light pink pencil.
- Glue a flower decoration onto the pig’s head, the applique is ready.
This applique can be presented to kindergarten in its original form, or it can be glued onto colored cardboard of any shape and decorated with New Year’s decorative elements.
Winter applique – senior group
For older kindergarten age, it is quite possible to offer for production those versions of appliqués that are supposed to be done by primary school students. This will be much more interesting for children, especially since the creative process takes place under the control of their parents.
Father Frost
We will need:
- colored paper: red, pink, black, white;
- scissors;
- stapler;
- glue.
Step by step steps:
- We fold the red paper like an accordion, determine the width of the stripes yourself, make two such parts, and glue the extreme sides together.
- We assemble the accordion into a strip, tie it in the middle and unfold it, glue the sides of the accordion on both sides, and get a circle for a winter-themed craft.
- We do the same thing again, only now we glue one red accordion and the other pink, and cut off the ends of the resulting two-color strip to get a circle of smaller diameter.
- We connect the two circles with a stapler, the pink side in the middle.
- From white paper we cut out the edge for the hat, pompom, mustache and beard, and glue them in places.
- From large oval parts and small black balls we glue together the eyes of Santa Claus and glue them in place.
- From red paper we cut out and glue the nose - a small circle and the mouth - a semicircle, which we glue on the border between the mustache and beard.
- From black paper we cut out a circle - a button for a suit, which we glue in the center of the red circle.