For 2.5 years now, my daughter and I have been adherents of the Montessori method - a wonderful early development system that has conquered the whole world, a system based on the idea of free education and deep respect for the interests of the child. I will not repeat myself and talk about the basic principles of the methodology; they were previously written about here. In this article I would like to dwell on how to implement the Montessori method at home. After all, going to a developing Montessori club is one thing, but maintaining the spirit of free education at home is completely different, perhaps this is an even more important component.
You may have already read my article on the website about implementing the Montessori method at home. Now before you is a revised version of the article, written taking into account our accumulated experience in applying the methodology.
So, if you want your child to develop harmoniously, learn to play independently, and at the same time enjoy playing not only with flying fairies and cars, but also with educational educational toys, so that he learns to clean up after himself, then you simply need, firstly, create a developmental environment , and secondly, give the child complete freedom of action in this environment.
And here's what you need for this:
Age-appropriate educational materials
The experience of Maria Montessori showed that children are most interested in those activities and objects that are connected with the real life of adults. Therefore, the children's environment should replicate the adult one: let the children's room have dishes, all kinds of jars, boxes, provide the child with everything necessary so that he can pour water, string beads, cut paper, wipe off dust, etc. The Montessori system places great importance on the development of fine motor skills, so don’t forget about playing with beads, buttons, tweezers, clothespins, etc.
I write in detail about what games will be interesting to a child at each stage of development in the sections “Development of fine and gross motor skills” and “Ready lesson programs.”
Stages of development
Maria Montessori believed that as children grow older, they go through certain levels of development. To make learning as useful and enjoyable as possible, the lesson program must take into account the characteristics of each stage.
First level
- from birth to 6 years. The baby becomes an explorer who is already striving for independence. The adult acts as an observer and ally. He helps create a comfortable environment and learning environment, and then only supervises the learning process.
Second level
- from 6 to 12 years. The children experience physical changes: their baby teeth fall out, and their legs and torso grow evenly. A “herd instinct” and the desire to show oneself appear. Along with the body, imagination and intellect actively develop. At this stage, students need to be explained that it is normal to have their own opinion, even if it differs from the judgments of others. At the same time, children are told how to behave in society.
Third level
- from 12 to 18 years. It is associated with puberty and adolescence. This stage of development is the most unstable. Children's sense of justice and self-esteem intensifies. They are actively looking for their place in the world, are sensitive to their appearance and want to be liked. At this age, close attention is paid to the creative potential of a teenager.
Fourth level
- from 18 to 24 years old. Dr. Montessori believed that if a child is developed according to her method, then by the time he reaches adulthood he has already turned into a full-fledged personality with the makings of a leader. In general, she characterized this period as the need to receive money for her work. The young specialist strives for financial independence.
Proper storage for toys
Very often, in children's rooms, all toys are stored in containers or deep toy baskets. In essence, this is a toy dump where it is almost impossible to find anything specific. Yes, a small child will never do this, he simply forgets about those toys that are lying at the bottom of the basket.
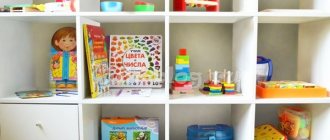
In a properly organized play space, all materials are arranged on racks and shelves. At the same time, all the shelves are located at the child’s level so that he can independently take any benefit that interests him. Each material has its own specific place here, which means the child always knows where to get what he needs and where to put it away later.
In Montessori development centers, the play space usually looks something like this:
However, it is very difficult to do something similar in an ordinary city apartment, because all these shelves require a lot of space, and you also need to put a closet somewhere and a bed... Therefore, at home you can make a more simplified version with fewer shelves . In addition, you do not need to post all the manuals at once, as in a development center; you can post a limited number of toys and rotate them regularly. This approach will not only save space in the room, but also help maintain the child’s interest in toys; they will not become boring. More on this below.
Thus, to organize a Montessori environment at home, one 2-3-tier rack is quite enough. It can be made to order or use ready-made solutions. We bought our rack at an Ikea store, this is what it looked like at 2 years old:
When such a shelving unit appeared in our nursery, it immediately became clear that this was a huge boon! I’m not talking about my daughter’s delight at all. Previously, frame inserts, knockers and other equipment were lying on the windowsill, where everyone always forgot about them, now everything was in plain sight, both for my daughter and for me. When Taisiya started playing, it was immediately clear what to tackle
There are several important points that you need to know in order to organize a competent Montessori environment in which your child will always be interested.
1. There shouldn’t be a lot of toys on the rack!
Firstly, a limited set of toys makes it easier for the child to choose and helps him concentrate on something specific. Secondly, if the shelves are chock full of developmental materials, then getting to any specific one becomes not so easy. Well, if a child experiences difficulties associated with pulling out and putting away the material, then with a high degree of probability he will prefer not to play with it at all.
2. It is necessary to constantly change the toys displayed on the rack.
When I first organized a shelving unit for my daughter, I was guided by the display of the development club - absolutely all the developmental materials available were laid out there. I wanted Taisiya to have a full selection of materials at home, so I pushed into the rack all the educational toys we had that were currently suitable for my daughter’s age. Some time passed before I realized that my daughter simply stopped noticing the toys that were constantly in the rack! They became so familiar to her that they seemed completely uninteresting.
Then I did what should have been done from the very beginning: I put all the toys in a closed cabinet, and put only a limited set of materials on the shelves so that each one was clearly visible. Every week I began to conduct a small audit: I removed from sight those toys in which there was no interest, and replaced them with others. And here the second life of our Montessori shelving began! Materials that no one had looked at before began to sparkle with new colors.
Regular rotation of toys is really very important, it helps to maintain the child's constant interest in developmental aids. It also allows you to get by with a small set of toys, since, disappearing from the child’s field of vision, they are soon perceived as a new thing.
Naturally, in order to meet the baby’s changing interests and promote his further development, completely new materials need to be displayed from time to time.
3. Toys should be at a height accessible to the child
(no higher than eye level), so that he can take from the shelf and put back any benefit that interests him without the help of an adult.
4. Each item on the rack should have its own place.
If possible, place toys so that they are visually separated from each other (at a short distance from each other).
5. The rack must be open.
Avoid anything that blocks the child’s view of the contents of the shelves: a large number of drawers, doors, etc.
Maria Montessori recommends distributing all materials into zones. In your shelving, you can also group games by meaning. For example, in one compartment you can always lay out insert frames, in another - cubes and construction sets, in the third - lacing, fasteners,
in the fourth - puzzles,
in the fifth - musical instruments, etc.
Despite the fact that Maria Montessori paid little attention to role-playing play, I am convinced that role-playing toys are also necessary on the shelf. For us, these sections have always been one of the most used.
The simplest games
There are many Montessori exercises and games. Let's look at the easiest options that you can play at home without any problems.
Comparison
Such fun will help to consolidate knowledge about colors in an easy and unobtrusive form. Here are the most useful exercises:
- Correlation. The child is given a circle divided into segments of different colors and a set of colored clothespins, the tones of which match the color of the circle fragments. The task is simple - “put” the clothespins into place (so that their color matches the color of the circle). An additional benefit is the development of fine motor skills.
- Socks. The child is given several socks, his goal is to sort them out in pairs.
The exercises are simple, sure to please the little one, and at the same time useful.
With water
These games are aimed at developing fine motor skills, as they involve working with small objects. Here are some of the most successful examples:
- Several objects should be placed in a basin of water, for example, mosaic elements, pebbles, shells, toys (the smallest ones available). The baby’s task is to take objects out of the container one at a time under the supervision of their parents. To prevent the baby from getting bored, it is better to come up with some interesting story, for example, that he helps an old fisherman get the necessary items from the bottom of the sea.
- The second option is to prepare soup for the queen. Water is poured into a plate at a comfortable temperature for the child, and grains of rice are dropped to the bottom. Using his fingers, the baby must take them out and put them in another container (from where the fairy-tale cook will take the grains and prepare a delicacy from them).
- It’s easy to ask your child to water flowers from a small watering can. This will accustom him to performing household duties and will help him learn new facts about representatives of the flora.
- Whipping foam with a whisk is a healthy pleasure. The child strengthens his hand and has fun.
These are the simplest exercises that require only a little water. The baby will have fun, have fun, and in addition, his individual skills will develop.
Furniture and play equipment according to the child’s height
To prevent your baby from feeling like a midget in the land of giants, it is advisable to purchase furniture for him according to his height. A children's table and chair are primarily needed to ensure that the baby sits in the correct position during creative activities, and also to ensure that the child has the opportunity to independently prepare his/her own work space (bring paints, brushes). A children's easel and magnetic board will also be very useful.
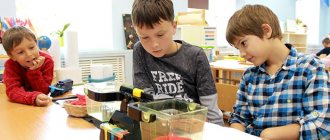
Switching attention
The educational institution works throughout the school year, performing different functions for different children in each period. At the initial stage, they help the baby “enter” the environment, adapt, and later serve as a means of relaxation and switching attention, helping to take a break from complex intellectual activity by engaging in simple muscle work.
For example, for about 2 hours, a 4.5 year old child solves problems using the mathematical material “Marks”. After some time, he becomes overloaded, which manifests itself in fatigue and loss of interest in work. Many children at this moment intuitively stop activities in the mathematics area and move to the educational level, for example, taking up washing the table. If the child cannot do this on his own, then the teacher offers him similar material.
Personalized cleaning products for your baby
An integral part of the Montessori system is providing the child with the opportunity to clean up after himself. Give your child a cloth, a sponge, a small mop, a brush and a dustpan for his own use so that he can clean up spilled grain or spilled water during play. Let cleaning products always be in a place specially designated for them. There must be a trash basket in the baby's room.
Socialization
Montessori materials from UPL help children socialize. On the one hand, watering flowers and cleaning the classroom, kids do this for others. On the other hand, they do it for themselves, for example, when combing their hair or getting dressed. But in the second case, they solve the problem of looking neat - in a way that is acceptable in society, that is, they learn to adequately present themselves to others.
Many materials in the UPL area are interconnected, which leads to the establishment of connections between children. For example, there is the exercise “Sewing on a Button”, followed by “Ripping off a Button” (this is the so-called mini-cycle). Recently in one of our classes we observed such a picture. The boy liked to rip off buttons, but really didn’t like sewing them on. Then he agreed with a girl from his classmate that she would sew it on and he would rip it off.
Creative corner
Very often, paints, plasticine, and glue are stored in drawers and other places inaccessible to children. A child draws only when his mother suggests, and not when he wants it. However, it is very important to provide the child with the opportunity for spontaneous creativity.
Try to organize a creative corner for your child so that the same rules about accessibility, limited availability and regular updating of materials are observed.
This could be a creative table in a place convenient for the child or a shelf on your shelf reserved for creative materials. Do not post a lot of different materials there at once; it would be better if they are updated regularly.
Naturally, if the child is still too young, tastes almost everything and does not yet know the rules for working with certain materials, you should not put glue, sharp scissors or liquid paints in the public domain. But you can already put a stack of paper and a few wax crayons.
Adaptation
Montessori practical life exercises help the preschooler adapt to his environment and prepare him for real life in society. This makes the baby independent and gives him a sense of self-worth.
Presentations in the UPL zone are selected and composed in such a way that they help children quickly adapt not only to the Montessori environment, but also to society. None of the remaining zones of the Montessori environment 3–6 can cope with this task. The preschooler begins his acquaintance with the Montessori class with things and activities that are familiar to him, which he can then easily do at home himself, for example, sweeping dust from the table, sweeping the floor, wiping up spills.
Frames with clasps
Wooden frames with various fasteners: large buttons, small buttons, snaps, bows, string that goes through a hole, string that wraps around hooks and eyes, strap fasteners, Velcro fasteners. Material. As an example, we give the work with a bow clasp. A square wooden frame covered with fabric consisting of two halves, with 5 ribbons sewn on the inside of them. The ribbons of one half differ in color from the ribbons of the other. Goal: untying and tying bows, development of motor skills, coordination of movements. Age: about three years. How to work with the material. The teacher begins to untie one bow after another from bottom to top. He grabs the ends of the ties and pulls them in different directions. Tying a bow is a very difficult task. Through analysis of the course of events and repetition, the child understands the course of action more clearly. He unties all the knots from bottom to top, folds the halves of the fabric in different directions and straightens the ties from different sides. With both hands, he grabs the halves of the fabric in the corners and brings them together in the middle. He takes the two bottom ties and places them on top of each other in a cross pattern. Actions with ties are not performed with the whole hand, but only with the hand. The same thing happens with all other ties. Then the teacher inserts the end of the top tie under the bottom one and pulls it. This is how a knot is formed. He forms a loop from one string and holds it close to the knot with his thumb and forefinger. Using the thumb and forefinger of his other hand, he guides the loose tie from front to back around the loop and pushes it through the hole above the knot. Then the teacher performs the action with two loops at the same time, so that they form a bow with equal ends. The child can repeat the exercise in full or only part. Error control: Fabric halves do not fit together. The bow unties itself. Application: tie a bow on your own clothes or on another child’s clothes. Help in gaining independence.
Pouring water
Material: tray, watering can made of transparent material with a water level mark, vessel with a large hole, rag. Goal: development of coordination of movements. Help you navigate the world around you. Age: about three years. How to work with the material. The watering can is filled to the mark with colored water. (If the watering can is overfilled, then pouring water becomes difficult). The watering can and the vessel stand next to each other. Order in the workplace is important. The teacher takes the watering can by the handle, lifts it high, tilts it over the vessel and slowly pours water until the vessel is full. With a weak tug, he returns the watering can to its previous position, takes a rag with his other hand, wipes away the remaining drops and places the watering can on the table again. He takes the filled vessel, lifts it to the height of the watering can and pours the water back into the watering can. Then he wipes the remaining drops with a rag and puts the vessel back on the table. A particularly interesting point! The teacher demonstrates the exercise, slowly and clearly performing the movements, and always with obvious interest in his lesson. The introduction should not be interrupted until the child understands the entire course of action. He invites the child to repeat the exercise and watches him as he does so. Finally, the exercise can be varied by taking a larger number of vessels or a vessel with different properties, for example, with a small hole.
Metal cleaning
Materials: mat on a tray, liquid metal cleaner in a bottle, a drawer with cotton balls or pieces of sandpaper, a cup each for dirty cotton wool and a small amount of cleaner, a polishing cloth, a not too small brass object without decoration. Goal: development of coordination of movements. Cleaning metal objects. Age: about three years. How to work with the material. The teacher prepares the workplace with the child. Starting together can give the child extra incentive to do the exercise. All objects that the child needs must be within his field of vision. First of all, the teacher pushes a small bottle of cleaning product. At the same time, he holds onto the lid. A large bottle would be an additional difficulty for the child. He places the bottle on the mat, unscrews the cap and places it bottom down. She pours a small amount of cleaning product into a cup, caps the bottle, and places it back on the tray. Interesting point! Opening, closing, pouring, screwing. In addition, this prevents the bottle from tipping over. Using a cotton ball, the teacher takes a dark cleanser from the cup, shows the child a small amount of the cleanser on the cotton ball, and spreads it in slow and careful circular motions over the surface of the item. Dirty cotton wool is placed in a prepared cup. It is especially difficult to use not too much and not too little cleaning product. While the cleaning product is waiting to work, the teacher pours the remaining product back into the bottle and closes it again. He then takes a cotton swab and wipes the cleaning agent off the surface of the brass object and shows the child the dirt on the cotton. This process is repeated until the cotton wool is clean. Interesting point! The teacher takes a polishing cloth and rubs the surface of the object until it shines, shows the object to the child, conducts the exercises without interruption, with slow precise movements and with obvious interest in the matter. In this way, the child is given the opportunity to learn the course of actions in connection, clearly understand individual actions and pay attention to the matter as a whole. The teacher invites the child to repeat the exercise with another thing and watches him. After some time, you can move away, but continuously maintain contact with the working child. When the activity is finished, the teacher shows how to clean up and put away the required material. Only after cleaning is the exercise considered completed. Further exercises: complicate the exercise with the help of small, deformed or decorated objects. New objects or tools for work can help the child maintain interest in the activity longer. Error control: dirty polishing cloth, shiny thing. Application: cleaning door handles, cutlery.
Pouring water (2)
Materials: tray, watering can, jars of various sizes, measuring cup with marked edge, rag. Purpose: to pay attention to the different volumes of blood vessels. Age: about four years old. How to work with the material. The watering can is filled with colored water up to the marking (marking is 1 unit of measurement). The water level will be better visible. The teacher takes a watering can and slowly pours water into the measuring cup. At the same time, he pays attention to the marked edge. When the water level reaches the marked edge, the teacher leaves the watering can and pours water from the measuring cup into the first container, then back into the watering can. He does this one by one with all the vessels. By repeating the course of action, the child learns how equal amounts of water are distributed differently in different vessels. Further exercises: The watering can contains, for example, 4 units of water volume. Error control: spilled water. Control using a measuring cup. Application: • pour a drink; • drain the foam.