Leading psychologists and teachers have long approved the most useful and interesting drawing techniques for children. They are sure that such creative activities not only influence the acquisition of artistic skills and the development of imagination, but also stabilize the child’s nervous system and have a positive effect on his psychological development.
Among the most popular drawing techniques with a preschooler or elementary school student, experts highlight:
- Frottage;
- Air paints;
- Marbled paper;
- Soap painting;
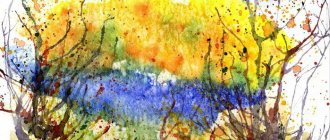
- Blotography (drawing with splashes);
- Drawing on a wet surface;
Frottage is an artistic technique using the rubbing motion of a pencil.
Drawing with air paints
Drawing marble paper
Soap painting
Blotography - splash painting technique
Drawing with salt and glue
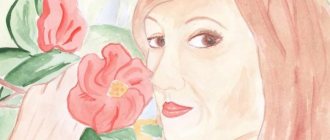
Drawing with wax crayons
Balloon drawing
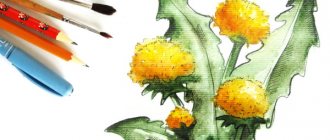
- A bunch of pencils;
- Crayons and starch;
- Multi-colored glue;
- Drawing with salt;
- Wax painting;
- Foam rubber or sponge;
- Drawing with cotton swabs;
- Drawing with handprints, fingers, palms, feet;
- Drawing with balls.
The benefits of creativity for child development
Drawing lessons are a mandatory element of comprehensive development for children 6-7-8 years old.
In particular, they provide:
- Stimulation of fine motor skills, which makes it easier for preschoolers to prepare their hands for writing.
- Development of the right hemisphere, and with it imagination, creativity, creative thinking.
- Conscious perception of real objects, deep knowledge of their properties.
- Education of aesthetic feelings.
- Mastering relaxation techniques, since creativity in any form is considered a powerful meditative tool.
- It works like art therapy: creativity allows, through a concrete or abstract plot, not only to express a personal opinion, but to throw out emotions, reduce fears and anxiety.
- A useful pastime that can later turn into a stable hobby.
- Improving communication and cooperation skills when working in a group.
How to get your child interested in drawing
Encouraging a child to engage in creativity and maintain his interest is the main task of a parent or teacher. Often children refuse to even try to draw, or, as soon as they pick up a brush, they quickly switch their attention to something else, and eventually give up.
To interest your child, you need to:
- propose a topic that is relevant to him, for example, pets, superheroes or favorite cartoon characters.
- experiment with materials: watercolors, finger paints, pastels, painting with light. Some children may not like holding a brush, but they are happy to use their own palms for art, while others, on the contrary, will prefer a pencil, since the structure of the paints is unpleasant for them.
- you need to watch the child, perhaps he himself will tell you what interests him in painting. Once the initiative has been taken, it must be supported.
- the most important thing is to lead by example. A child will be more actively involved in any process if an adult regularly studies and offers to study together.
Organization of the workspace, course of the lesson
Training should be done at a table or easel. There should be no unnecessary, distracting items in the workplace, only materials necessary for the current lesson. The surrounding space can be protected from possible exposure to paints by laying down a film.
You should sit in the illuminated part of the room and turn on the light if necessary. It is also necessary to limit the room from the possible influence of extraneous phenomena or sound.
Drawing lessons for children 6-7-8 years old can be conducted using an easel
Drawing lessons for children 6-7-8 years old begin with the preparation of tools that the child is introduced to. It is useful to inform the child about the topic of the lesson and briefly explain what will happen.
The creative process depends on the level of children's skills. So, if children are little familiar with this art and have not drawn before, first of all, an adult breaks down the artistic image into elementary figures.
You can start drawing both from the background and from the main object, gradually painting over the remaining areas. The lesson ends with cleaning the workspace. The finished painting can be hung on the wall or framed.
A reminder about the basic materials, suitable tools and their specifics is indicated in the table.
| Material | Mandatory accessories | Possibilities of the material, features of technology |
| Colour pencils | Plain paper, eraser (knead) | One of the most accessible materials will allow you to both practice basic skills and depict realistic objects. |
| Pastel (pastel pencils) | Pastel paper, napkins, nag | Similar to colored pencils, but allows for better shading of the work. |
| Gouache | Plain paper, a set of brushes of different sizes and structures, palette | Budget paints, suitable for beginner artists. |
| Acrylic | Thick paper, brushes: synthetic and bristles, palette knife, palette, tablet | Creates bright, detailed images, adheres well to paper and allows for multiple layers. |
| Watercolor and watercolor markers | Watercolor paper, soft brushes, napkins, palette, liner, tablet | The ability to paint airy pictures and abstractions, use unusual wet technique. |
| Oil | Canvas, set of synthetic brushes, palette knife, palette | Complex and expensive material, used by professional craftsmen. |
Principles of drawing with children aged 6-8 years
Drawing lessons for children 6-7-8 years old should be interesting and bring visible benefits.
Therefore, to get results, you must adhere to a number of rules:
- For creativity, you need to allocate a corner where the child can retire and take the necessary materials for the lesson.
- Drawing should be done in stages - from simple to complex, or from general to specific.
- If it is difficult for a child to come up with a plot on his own, you can ask a specific topic.
- It is advisable to continue the lesson until all the work is ready. You can take short breaks. If a child becomes tired, he should not be forced to continue drawing.
- Classes should be diversified with new tools and non-standard techniques.
- You need to sit down to draw in a good mood. The preschooler should be alert and focused.
You cannot scold a child for drawing incorrectly - the little artist has the right to his own vision of the future image
- The thing to remember is that it can't go wrong. The child has his own vision of an object or landscape; in this regard, creativity allows for greater freedom of expression. At the end of the lesson, you must reward for your efforts.
Developing a child's drawing talent
Having noticed a child’s craving for drawing, parents should think about developing his abilities: enroll him in an art school, in an appropriate club, or even contact a private teacher who offers individual training.
But experts recommend enrolling a preschooler in specialized institutions only if he himself enjoys attending classes. And if a child does not want to go to art school, or parents prefer to temporarily postpone education, it is quite possible to develop the talent of a preschooler independently.
Drawing with pencils with children 6-7-8 years old
Drawing techniques
Pencil drawing styles:
- An outline drawing is an image of the appearance of an object or character.
- Adding volume - drawing details, working with light and shadows.
- Hatching : involves making short straight sections. The length, density, and direction of the stroke depend on the author’s idea.
- Shading, or rubbing , of the main lines in whole or in part. The boundaries become less noticeable, the entire image softens. The technique is used to convey the realism of the picture.
Ideas and themes for drawing
List (approximate) of ideas and topics:
- Pet (kitten or dog): 2 large ovals - body and head, 4 smaller ones - paws. Long ears and a tail are added. The muzzle contains a mouth, eyes and nose, and a mustache. A dog may also have a bone, a cat may have a bowl of milk. The animal is painted over by shading or shading.
- Kindergarten (school): ask them to draw their friends, choosing a special color of pencils and shading for each.
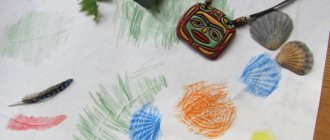
- Bright abstraction : secure several pencils together with an elastic band and draw patterns in this way.
- Drawing on tinted paper : paint the paper with watercolors in the chosen color, draw on top with colored crayons or pencils.
Children willingly draw birds and animals (tit in pastels on tinted paper).
Thus, you can depict a field with dandelions on a dark green or blue sheet. To make a flower, you need to draw a circle and a lot of short strokes from it; complement it with a long stem and elongated leaves.
Master class 1
Colored pencil image of “Northern Lights” - materials:
- Colored or pastel pencils.
- Plain white (or pastel) paper.
- Paper napkins.
Northern Lights with colored pencils
Work steps:
- Place the sheet vertically.
- The lower part, about 4-5 cm, is the ground. It is painted over in any form in black or dark green.
- The northern lights appear as sinuous lines that go from one edge of the sheet to the other. The segments are about 1 cm wide, they are hatched with straight lines. For shine, 4 or more shades are used; colors can mix and overlap one another.
- With similar elements the entire space is painted over to the dark bottom.
- Finally, you need to paint the trees and bushes in black (dark green). For Christmas trees, first draw a vertical axis - the trunk; straight or slightly rounded lines extend from it to the right and left. The bushes look like dashes extending from one area in different directions.
Master class 2
Creative work “Cat with a ball”, drawing with pastel pencils.
To create this drawing you will need pastel pencils.
Preparation of tools:
- Pastel pencils.
- Pastel paper.
- Napkins.
- Nag.
The working process:
- The paper is arranged in a vertical format. The work is done in pastels, as it allows for better shading, but it is acceptable to use soft colored pencils.
- The cat's body is an oval, occupying about 2/3 of the sheet. You can immediately draw it with yellow pastels without a simple pencil sketch. Paws extend from the body - 2 more elongated ovals.
- The head is a circle, located on the body, approximately in the center of the sheet. On the head there are triangular ears, they depict 2 smaller triangles as the inner part of the ears.
- At the bottom of the sheet there is a pink ball of round thread.
Cat with a ball of pastel pencils
- First of all, the background is painted over. Light blue, blue and a little black around the edges of the paper are used. Shading can be done with napkins or fingers.
- The cat's body, paws, muzzle and upper part of the ears are painted completely yellow. In the central part of the head, as well as on the legs and body, you can add a little dark yellow to create volume. The contours are outlined in white.
- Muzzle: the nose is drawn pink with a white spot in the middle; for the eyes and mouth, curved lines should be drawn in black. The cat also has light eyebrows and long straight whiskers. The inner areas of the ears are painted with pink and white pastels. The boundaries of colors are blurred.
- The ball is painted pink in combination with purple, individual threads are drawn in pink and white. Also, the threads lie in semicircles around the cat and encircle its body and paws.
Graphic arts
Anastasia Kuzmina
Graphic arts
Drawing is one of children's favorite activities, which provides great scope for the manifestation of their creative activity. The themes of the drawings can be varied. The children draw everything that interests them: individual objects and scenes from the surrounding life, literary characters and decorative patterns, etc. Outstanding representatives of pedagogical thought have always advocated that the teaching of drawing should be done correctly. That is why the child needs to be given knowledge of how and with what to draw.
The simplest form of art, but also the most capacious, is graphics . Graphics is a type of fine art that uses lines, strokes, spots and dots as the main visual means.
graphic materials are mainly used such as colored pencils, watercolors and gouache paints, which have different visual capabilities.
A linear shape is created with a pencil. At the same time, one part after another gradually emerges, various details are added. The linear image is then colored. This sequence of drawing creation facilitates the analytical activity of the child’s thinking. Having drawn one part, he remembers or sees in nature which part he should work on next. In addition, linear outlines help in coloring the drawing by clearly showing the boundaries of the parts.
In painting with paints (gouache and watercolor)
the creation of the form comes from a colorful spot. In this regard, paints are of great importance for the development of a sense of color and form. With paints it is easy to convey the color richness of the surrounding life: clear skies, sunset and sunrise, blue sea, etc. When executed with pencils, these themes are labor-intensive and require well-developed technical skills.
The kindergarten program determines the types of graphic materials for each age group. For senior and preparatory groups, it is recommended to additionally use charcoal pencil, colored crayons, pastel, and sanguine. These materials expand children's visual capabilities.
When working with charcoal and sanguine, the image turns out to be one-color, which allows you to focus all your attention on the shape and conveyance of the texture of the object; colored crayons make it easier to paint large surfaces and large shapes; pastel makes it possible to convey a variety of shades of color.
According to Olga Borisovna Dronova, the expressiveness of images in the drawings of preschoolers is influenced by a number of factors:
knowledge about objects and phenomena of the surrounding reality. Thus, color is used to convey similarity with a real object, to express the attitude of the painter to the object of the image and in decorative terms.
general artistic training for children. By mastering the techniques of composition, children begin to reflect their ideas in plot works more fully and richly.
individual characteristics
acquaintance with genuine art, which: develops artistic taste; activates creativity; encourages you to improve your own drawings. Various genres are available for graphics (portrait, landscape, still life, historical genre, etc.)
and virtually unlimited possibilities for depicting and imaginatively interpreting the world.
But we already know all this, and now I’ll talk about graphics that can be used to diversify visual activities.
1. Tone drawing - a drawing in which objects are depicted by simulating their light characteristics - the objects’ own coloring, light and shadows, both natural and falling.
2. Highlighting a charcoal drawing - charcoal is considered one of the most variable and expressive drawing media. A wide range of tones, from pale silver gray to velvety black, is just one of the advantages. The drawing is created in the reverse order, from dark to light. The entire paper is covered with charcoal strokes, and then to obtain white, grayish and gray spots from some areas, the charcoal is removed with a knurling eraser. Some tones that have become too light can be straightened by adding charcoal.
3. Spot Drawing – The use of spot and its unpredictable possibilities as an artistic technique has a long history. In 1786, the English artist Alexander Cozens dedicated an entire book, A New Method for Promoting Pictuality in Painting Original Landscape Compositions, detailing how a spot of ink could be used by artists to enhance and enliven their work. A group of spots scattered across paper can, according to Cozens, produce “a collection of random shapes from which a design can be composed.”
. An entire piece can be completed using this technique, but it is usually used to create a specific effect on a specific area of the drawing.
4. Dot method - in this technique, the image is made primarily with dots rather than lines. Groups of small black dots placed close to each other can be read as gray spots from a distance. By changing the size and density of the dots, you can achieve different tonal effects. This technique is often used in engraving to produce halftones and very fine lines, as well as in illustrating natural science black and white publications. The dots are made with a pen or pencil. The points can have different shapes and sizes if they are made of different materials.
5. Lines and washes - it is interesting and useful to use a combination of different techniques in a drawing. Lines can be drawn with a pencil or pen, and washes are usually done with diluted ink or watercolor. By using both, the artist gains the benefits of flexibility and expressiveness of line and the ability to quickly and effectively convey tones, light and shadow, or color through washes.
6. Brush painting – painting on grainy white paper with a good firm brush dipped in ink is one of the most emotional techniques. Fluid lines, varied strokes and the ability to quickly and easily achieve delicate halftones are a good confirmation. Smooth and bold lines are the key to a good drawing, or the key to success is barely visible lines.
7. Contour drawing - this technique is based on the ability to convey a three-dimensional shape and volume using lines drawn with graphite or colored pencils. The planes and curvature of volumetric forms are conveyed exclusively by lines: the external contours of the form and the contours within it are drawn, allowing you to simulate the image.
8. Frottage – used in painting to create texture effects. Frottage can be done on any hard surface that you can lay paper on. Most dry materials are suitable for transferring a drawing, in particular soft pencils and core conte. Can be combined with pastels or colored pencils to create a broken color effect.
9. Sgraffito - scratching a paint layer to expose the underlying surface. This is a kind of negative drawing, as it is created by removing paint rather than adding it.
10. Polishing - using friction and pressure to obtain a smooth and shiny surface. In combination with colored pencils, polishing allows you to achieve a glossy surface, smooth out color boundaries and even out the texture of the paper. It can create the impression of greater fusion of colors and enhance the brightness and reflectivity of the surface. A common method of polishing is dense shading with a white pencil over a previously applied paint layer, and wax crayons or pencils are also used in polishing.
11. Punching – The basic principle of punching is to create an indentation in the paper. After this, lightly shade the surface with the indentations with a pencil, which will slide over the pressed pattern, which as a result appears on a colored background.
12. White line drawing - the use of punching to create a specific decorative effect. First, create a drawing on tracing paper, then place it on drawing paper and draw lines with a hard pencil, needle or ballpoint pen, pressing them into the base paper. The image is then finalized by shading using soft pencils or pastels.
13. Reservation technique - based on the incompatibility of oil and water. Colored lines or stains are made with oil pastels, and then a thin wash of ink, watercolor or acrylic paints is placed on top. The greasy base of the pastel will repel diluted paint, which will fall on the areas of paper around the pastel strokes, leaving their color and texture clearly visible.
When developing children's creative abilities in visual arts, the main thing is that artistic creativity knows no limitations in material, tools, or technology. Children should be taught to draw using a wide variety of graphic materials . For a child, artistic material has a bewitching, attractive power. It suggests an idea, influences its character, and contributes to the creation of an artistic image.
In addition, by learning the properties and qualities of various materials, children enrich their sensory experience. In addition, when using various materials, you can create a situation of free choice, so necessary for creative activity.
Therefore, one of the main tasks of the teacher is to constantly update his own experience of working with new art materials and introduce children to them. Working in a variety of graphic techniques broadens one's horizons, develops creative imagination in artistic creation, develops imagination, helps to display the world around us in all its diversity, and teaches self-organization and attentiveness. Despite the undeniable effectiveness of using graphics for the comprehensive development of a child’s personality, little attention is currently paid to this type of activity. In programs for preschool children in visual arts, a limited number of options for these techniques are offered, or they are completely absent.
Drawing with paints with children 6-7-8 years old
Drawing techniques
Methods of working with gouache and acrylic:
- “Dry brush”: put a small amount of paint on the tool and make light movements over the picture. This way the colors are muted, creating the effect of old paintings.
Dry brush painting
- “Dipping” and “poking.” Grass and plants, animal fur, glare of light - everything can be done by applying perpendicular pressure with a brush onto the paper.
- “Liquid acrylic” is a mixture of acrylic paint with glue and silicone. Thanks to its structure, it allows it to flow across the canvas in different directions, creating surreal patterns.
- The right-hemisphere type of drawing is painting in an intuitive manner without preliminary drawing of details.
- Using stencils. They can be figures cut out of cardboard, which are transferred to paper and then painted.
- Prints – creating a design using stamps, rollers, hands, natural elements, such as dry leaves.
- Drawing with thread: dipping a thread into paint and moving it randomly along the paper.
Examples of watercolor techniques that are suitable for teaching drawing lessons to children 6-7-8 years old:
- Wet: multi-colored spots are placed on a sheet moistened with water, creating an airy, delicate picture. It can serve as a background, and other layers can be applied on top to refine the elements.
Grisaille style
- Watercolor spots – filling the image with abstract color spots.
- Grisaille is a style made in black and white or simply one color.
- Blowing: A straw blows air onto a large spot of watercolor paint, causing it to stretch into intricate shapes. This way you can create the sun and grass, a flower, a balloon, and sea creatures.
Ideas and themes for drawing
List of ideas:
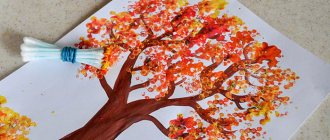
- Autumn in the style of Afremov: by applying the fleecy surface of the brush, create multi-colored leaves throughout the image. After drying, paint the path and trees along it with a dark color. For this work, gouache or acrylic and a medium brush with a semicircular or square cut are suitable.
- Fantastic blue forest: complete the craft in only one color, varying its saturation. If this is a winter landscape, using the tapping method you can create splashes of white on top, which will look like falling snow.
Space in watercolor
- Space: paint a large landscape sheet with a purple tint and put yellow dots (stars) around the entire perimeter. Then cut out cardboard circles of the required size (planets) and decorate them with wet-on-wet watercolors. The child can experiment with the colors of celestial bodies or rely on their appearance presented in books.
- Bouquet of palms: draw a free-form vase. Then paint the child’s palm with gouache and attach it to the paper, do this several times. Add twigs and greenery.
- Fruit still life: depict a semicircular plate; use a large foam brush to stamp the shape of apples onto the paper, and use a small brush to make a bunch of grapes in the same way.
Master class 1
Drawing lessons for children 6-7-8 years old in the direction of right-hemisphere techniques, exercise “Seascape”.
Required tools:
- Set of gouache, whitewash.
- A sheet of white paper.
- Synthetic brushes: medium No. 7 and small No. 3.
- Container with water.
Gouache is an easy-to-paint paint that is suitable for children
. Work progress:
- The sheet is laid horizontally and divided into 3 approximately equal parts: the upper third will be the sky, the rest will be water.
- In the sky area, a few drops of white and blue paint should be placed on the sheet, then stretched across the entire upper space. The sky needs to dry before the next step.
- Clouds: white gouache is picked up on a round brush or fingertip, and the paint is smeared in a circular motion on a certain area. The number of clouds is optional; they can be of different sizes and shapes.
- The sea is performed similarly to the sky. Only when creating it, in addition to white and blue paint, blue and a little green (turquoise) are taken. A few drops are placed on the sheet, they are mixed in horizontal masks.
- There will be an island with a tree in the left corner. The first layer of earth is black; ocher and greenery are added on top using the poking method. It is convenient to paint the island with a brush with bristles.
Seascape in gouache
- A tree consists of a trunk and thin branches. First, they are drawn with black gouache - shadow areas; ocher is superimposed on it in some places, imitating light. The leaves are predominantly green, with some yellow in some places.
- There is also a piece of land in the sea - an elongated, uneven oval of black color combined with ocher.
- Ships: dark boat and light sails. The bottom is a thick horizontal line, and the sails can be drawn as elongated semicircles. These elements are created with a thinner brush. A shadow from the boats can be seen falling on the water; it is depicted using whitewash and looks like a tapering zigzag.
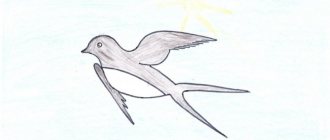
- The picture ends with the image of 2 flying birds: they are drawn in the form of checkmarks.
Master class 2
Drawing lessons for children 6-7-8 years old with watercolors, “Flowers in a vase.”
What you need for work:
- Watercolor.
- Watercolor thick paper.
- Tablet.
- Brushes: large No. 30, medium (for example, No. 6 or 7) and small (No. 1-2).
- Water in a glass.
- Palette.
- Paper napkins.
Flowers in a vase in watercolor
Work progress:
- The paper lies vertically in front of the child, for convenience it is fixed on a special tablet or taped to a flat surface. Using a wide brush, wet the entire paper surface with clean water; While the sheet is wet, you need to draw the main details.
- The vase is depicted in the form of a circle or oval in blue watercolor. A shadow is created on the left side of the vase: blue must be drawn up and down several times, the center remains white as the most illuminated place.
- Flowers. First you need to do a tone fill. To do this, take pink watercolor, diluted with a large amount of water, and use a round brush to place large spots in different places. Yellow, purple and green shades appear in the same way.
- Flower detailing. Use a small brush to add red, orange, blue and deep purple dots on top of the first abstract layer. The flowers extend from the vase and can go up and to the side.
- A shadow falls next to the vase on the left; it can be made faded lilac. The same paint is used to depict the table on which the vase stands in horizontal strokes.
non-traditional artistic and graphic techniques. methodological development of drawing on the topic
Non-traditional artistic and graphic techniques
There are many non-traditional drawing techniques; their unusualness lies in the fact that they allow children to quickly achieve the desired result. For example, what child would not be interested in drawing with his fingers, making a drawing with his own palm, putting blots on paper and getting a funny drawing. The child loves to quickly achieve results in his work, and the non-traditional techniques listed below contribute to this.
With children of primary preschool age you can use:
- finger painting;
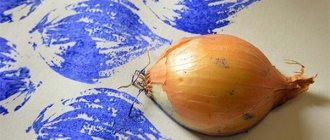
- stamped with potato stamps;
- poke with a hard semi-dry brush.
Children of middle preschool age can be introduced to more complex techniques:
- foam impression;
- imprint with eraser stamps;
- wax crayons + watercolor;
- candle + watercolor;
- leaf prints;
- palm drawings;
- magic ropes.
And in older preschool age, children can master even more difficult methods and techniques:
- blotography with a tube;
- landscape monotype;
- stencil printing;
- subject monotype;
- Blotography is normal.
Each of these methods is a little game. Their use helps children feel more relaxed, bolder, more spontaneous, develops imagination, and gives complete freedom for self-expression. In addition, work contributes to the development of coordination of movements.
- Poking with a hard, semi-dry brush.
Age: any.
Means of expression: textured coloring.
Materials: hard brush, gouache, paper of any color and format, or a cut out silhouette of a furry or prickly animal.
Method of obtaining an image: the child dips a brush into the gouache and hits the paper with it, holding it vertically. When working, the brush does not fall into the water. In this way, the entire sheet, outline or template is filled. The result is an imitation of the texture of a fluffy or prickly surface.
- Finger painting.
Age: from two years.
Means of expression: spot, dot, short line, color.
Materials: bowl with gouache, thick paper of any color, small sheets, napkins.
Method of obtaining an image: the child dips his finger in the gouache and puts dots and specks on the paper. Each finger is painted with a different color. After work, wipe your fingers with a napkin, then the gouache is easily washed off.
- Printed with potato stamps.
Age: from three years.
Means of expression: stain, texture, color.
Materials: a bowl or plastic box containing a stamp pad made of thin foam rubber impregnated with gouache, thick paper of any color and size, potato stamps.
Method of obtaining an image: the child presses the signet onto a stamp pad with paint and makes an impression on the paper. To obtain a different color, both the bowl and the signet are changed.
- Foam imprint.
Age: from four years.
Means of expression: stain, texture, color.
Materials: a bowl or plastic box containing a stamp pad made of thin foam rubber impregnated with gouache, thick paper of any color and size, pieces of foam rubber.
Method of obtaining an image: the child presses the foam rubber onto a stamp pad with paint and makes an impression on the paper. To get a different color, change both the bowl and the foam.
- Imprint with eraser stamps.
Age: from four years.
Means of expression: stain, texture, color.
Materials: a bowl or plastic box containing a stamp pad made of thin foam rubber impregnated with gouache, thick paper of any color and size, stamps made from an eraser (the teacher can make them himself by cutting a design on the eraser with a knife or razor blade.
Method of obtaining an image: the child presses the signet onto a stamp pad with paint and makes an impression on the paper. To change the color you need to take another bowl and signet.
- Wax crayons + watercolor.
Age: from four years.
Means of expression: color, line, spot, texture.
Materials: wax crayons, watercolors, brushes, thick white paper.
Method of obtaining an image: the child draws with wax crayons on white paper. Then he paints the sheet with watercolors in one or more colors. The chalk drawing remains unpainted.
- Candle + watercolor.
Age: from four years.
Means of expression: color, line, spot, texture.
Materials: candle, watercolor, brushes, thick white paper.
Method of obtaining an image: a child draws on paper with a candle. Then he paints the sheet with watercolors in one or more colors. The candle drawing remains unpainted.
- Candle + watercolor.
Age: from five years.
Means of expression: color, stain, texture.
Materials: a bowl or plastic box containing a stamp pad made of thin foam rubber impregnated with gouache, thick paper of any color, a foam swab (balls of fabric or foam rubber are placed in the middle of the square and the corners of the square are tied with thread), stencils made of oiled semi-cardboard or transparent films.
Method of obtaining an image: the child presses a signet or foam rubber swab onto a stamp pad with paint and makes an impression on the paper using a stencil. To change the color, take another swab and stencil.
- Monotype landscape.
Age: from five years.
Means of expression: spot, symmetry, color.
Materials: thick paper of any color, brushes, gouache or watercolor.
Method of obtaining an image: the child folds a sheet of paper in half and on one half of it draws half of the depicted object (objects are chosen symmetrical). After painting each part of the object while the paint is still wet, the sheet is folded in half again to make a print. The image can then be decorated by folding the sheet after drawing several decorations.
- Blotography is normal.
Age: from five years.
Means of expression: stain.
Materials: paper, ink or thinly diluted gouache in a bowl, plastic spoon.
Method of obtaining an image: the child scoops up gouache with a plastic spoon and pours it onto paper. The result is spots in a random order. Then the sheet is covered with another sheet and pressed (you can bend the original sheet in half, drip ink onto one half, and cover it with the other). Next, the top sheet is removed, the image is examined, and it is determined what it looks like. The missing details are completed.
- Monotype landscape.
Age: from five years.
Means of expression: stain.
Materials: paper, ink or thinly diluted gouache in a bowl, plastic spoon, straw (drink straw).
Method of obtaining an image: a child scoops up paint with a plastic spoon, pours it onto a sheet, making a small spot (droplet). Then blow on this stain from a tube so that its end does not touch either the stain or the paper. If necessary, the procedure is repeated. The missing details are completed.
- Leaf prints.
Age: from four years.
Means of expression: texture, color.
Materials: paper, leaves of various trees, gouache, brush.
Method of obtaining an image: a child covers a piece of wood with paints of different colors, then applies it with the painted side to make a print. The petioles of the leaves can be painted on with a brush.
- Monotype landscape.
Age: from six years.
Means of expression: spot, tone, vertical symmetry, image of space in a composition.
Materials: paper, brushes, gouache or watercolor, damp sponge, potato tile.
Method of obtaining an image: the child folds the sheet in half. On one half of the sheet he draws a landscape, on the other he gets its reflection in a lake or river. The landscape is done quickly so that the paints do not have time to dry. The half of the sheet intended for the print is wiped with a damp sponge. The original drawing, after a print is made from it, is enlivened with paints so that it differs more from the print. For monotype you can also use a sheet of paper and a potato tile. A drawing is applied to the latter with paint, then it is covered with a damp sheet of paper. The landscape turns out blurry.
- Palm drawings.
Age: from four years.
Means of expression: spot, color, fantastic color.
Materials: gouache or watercolor, brush, pencil, child’s palm, any paper.
Method of obtaining an image: with his fingers spread, the child places his palm on a sheet of paper and traces it with a simple pencil. Using various lines, the child completes the required drawing. Then he colors the image with paints.
- Magic ropes.
Age: from four years.
Means of expression: magical image, silhouette.
Materials: ropes of various lengths and colors.
Method of obtaining an image: first, the child learns to fold objects of the simplest shape - a flower, an apple, a pear. Gradually he complicates the figures using several ropes. Any image begins with the head. It is necessary to monitor the shape of the body of a particular animal.
- Air markers.
Age: from five years.
Means of expression: bright colors, spray all over the sheet, dot, texture.
Materials: air felt-tip pens, stencils in accordance with the theme, white sheets.
Method of obtaining an image: the child selects a stencil, places it on a white sheet, takes the necessary felt-tip pen, prepares it for work and, observing the rules for the duration of exhalation, blows on it, pointing the felt-tip pen at the stencil; to make a drawing, you need to place several stencils on a sheet, painting them with the desired colors; To finish the drawing, you need to draw the background.
- Sand painting.
Age: from six years.
Means of expression: volume.
Materials: clean sand, PVA glue, cardboard, glue brushes, simple pencil.
Method of obtaining an image: the child prepares cardboard of the desired color and applies the required drawing with a simple pencil. Apply glue and then sand to the drawing. Excess sand is blown away.
Recommendations from psychologists and teachers
Experts recommend following these tips when drawing with children:
- The time for the drawing lesson should be clearly defined. The child must understand when and what is required of him.
Psychologists recommend creating a curriculum for drawing lessons for children
- It is useful to draw up a training program, gradually supplement and complicate it.
- The chosen topics for creativity should be within the child’s area of interest.
- There is no need to do for the child or intrusively tell him how to do it. Explain the topic, show an example of an image or creative technique - the child tries to do the rest himself, as best he can.
- The process may require the parent to maintain interest by commenting on the work and asking leading questions about the plot and characters.
- Often, music is turned on to create an atmosphere: classical or a calm, relaxing melody without words.
Drawing lessons for children should be focused on the child’s age of 6-7-8 years and his development zone. Closer to school and in the primary grades, children are already able to hold attention for a long time, but you should not offer to make an overly complex picture or more than 2 drawings at a time.
With the right approach, attentive attitude and patience, you can instill in your child the desire to develop such an exciting and multifaceted activity as drawing.
And if a little person has not only a desire, but also at least a little talent, such an activity will not only help develop most creative skills, but can also develop into an artistic profession in adulthood.
How to teach drawing to a child from 5 to 7 years old?
At the age of 5 to 7 years, a person’s self-esteem is formed through achievements in creativity and sports. He begins to be proud of himself and become confident in his abilities, which is useful in preparing for school.
The main thing at this age is to praise for any drawing, hang the work on the wall and let the child be proud of his result.
Do not correct or complete the child’s work, praise him for each drawing so that he wants to draw more and more.
Preschool children are restless, so draw for no more than 30 minutes. Do not force the child to finish the drawing unless the child himself wants to finish what he started.
At the age of 5 to 7 years, all drawing techniques are available:
- Watercolor;
- Pastel;
- Sketch;
- Oil painting;
- Pencils;
- Markers;
- Wax crayons.
Do you want your child to develop artistic talent and learn new drawing techniques? Sign him up for an art class. To avoid making a mistake with your choice, follow our recommendations.
Choose several schools and studios that suit your location and price. Visit them so you can feel the atmosphere and talk to the teacher. Ideally, go to his class and watch how he conveys information to the children.
The cost of drawing courses in Moscow and St. Petersburg varies from 1,500 to 15,000 rubles. It all depends on the number of hours. Some courses involve drawing a specific design and last several hours, while others involve diving into artistic techniques over several sessions.
Teaching your child to draw with the help of courses is easier and more effective. The courses awaken the child’s interest in creativity. They are like an exciting adventure, and new every time.
The best way to teach a child to draw is at an art school. However, it is necessary to enroll in it if the child wants to devote himself to a creative profession and develop in this direction.
Tell us in the comments what difficulties you encountered while working with your baby? Share the article on social networks so as not to lose game drawing techniques with your child!
This training may be right for you:
- Best Online Drawing Courses for Kids
- Best Children's Activities in St. Petersburg from 1,500 Rubles
- 10 Best Drawing Courses in St. Petersburg
- Best Educational Activities for Children