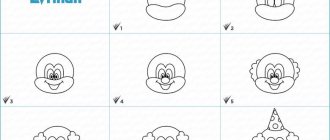
Preparing to Draw
To begin following step-by-step instructions for children, you must first prepare your child for a creative activity:
- In order for the child to be more diligent during this period of time, it is better to initially conduct some kind of active activity before work;
- Careful preparation of the work area will also help to master the master class for beginners. Place the light source on the left, remove everything unnecessary from the table surface so that the child is not distracted.
- All tools also need to be laid out on the surface in advance, this will help you not to look for the desired object while drawing and, again, will not cause you to be distracted. You can involve the child in preparing for the lesson, then this will replace active play;
- Remember that children are just learning everything, so you shouldn’t demand a lot from them right away. While drawing, support your child and answer questions;
- The child must master a simple drawing technique; for this, you should not interfere with his creative process by introducing something or showing him in his drawing. Keep a separate sheet for this, otherwise interest in creativity may fade.
Preview:
Outline of direct educational activities with preschoolers in the senior group.
Topic: "My dream house."
Integration of educational areas:
“Artistic and aesthetic development”, “Cognitive development”, “Social and communicative development”, “Physical development”, “Speech development”.
Objectives: To consolidate the ability to translate your idea into a drawing, depicting a house with colored pencils, independently choosing the format and location of a sheet of paper. (“Artistic and aesthetic development”); Strengthen the ability to navigate the types of residential buildings and the characteristics of the construction profession. Develop imagination, creative thinking, sensory perception, the ability to build in accordance with a plan - a diagram. (“Cognitive Development”); Continue to strengthen children’s ability to compose creative stories and complex common sentences. Enrich your vocabulary: names of construction professions, develop coherent speech (Speech development "); Foster respect for the work of builders. Cultivate a caring attitude towards your home (“Social and communicative development”). Develop coordination of movements (“Physical development”).
Methods and techniques:
Practical: drawing a house, building houses from large and small building materials.
Visual: examination of photographs and pictures depicting the city and village, showing the drawing of various buildings.
Verbal: writing a descriptive story, riddles.
Materials and equipment:
Sheets of paper, paints, photographs depicting various city landscapes, pictures, small and large building materials, diagrams depicting simple buildings made of building material. Shaped blocks of various colors, stripes, small toys, an envelope with a letter, a house, stones.
Forms of organization of joint activities.
| Children's activities | Forms and methods of organizing joint activities |
| Motor | Dynamic pause “Construction” |
| Gaming | D/ exercise “In order to.” Game: "Fairytale City". Construction game "House". |
| Communicative | Writing a descriptive story about my dream house. |
| Reading fiction | Reading a poem about the city. |
| Productive | Drawing a house. |
Logic of educational activities
| Activities of the teacher | Pupils' activities | Expected results | |
| Organizing time | Children talk about the house in which they live. | Arouse interest in the upcoming activity. | |
| Didactic exercise “In order to” Game "Fairytale City" | Children complete a sentence, for example, “The roof is needed in order to...” Children build structures according to drawings. | Attention and thinking develop. The vocabulary is enriched. Imagination, creative thinking, and sensory perception develop. | |
| Dynamic pause “Construction” | Children are divided into teams. A certain amount of large building material is passed from hand to hand. Then they begin to build a common house. | General body coordination, the ability to play in a team, and assemble buildings are developed. | |
| Organize children's independent drawing, assistance, demonstration, reminder. | Children draw their dream house. | The skill of independent drawing is formed, fine motor skills of the hands are developed based on drawing various geometric shapes. | |
| Reflection. Asks questions about the content of the lesson. He asks to tell you about your building. | Children evaluate each other's work. Make judgments. | The ability to evaluate each other's work develops. Coherent speech is formed. |
Learn to draw your dream home with step-by-step instructions.
Every person has his dream home - that ideal place where he and his family would feel warm and comfortable. Many people try for many years to find one. They say that a wish will come true faster if you put it in some kind of material form. Draw the house of your dreams and, perhaps, very soon you will actually live in it.
Materials for work
To know how to draw a house beautifully, you need to decide what will be useful for the job.
The list of materials can be varied:
- Paper or sketchbook;
- Regular pencil and eraser;
- Paints, brushes, sippy cup;
- Markers or colored pencils.
The main thing is to determine what the drawing will be drawn with before work, otherwise time will be wasted searching for the necessary materials.
Drawing a house with a baby
If you need to know how to draw a house easily with a 2-3 year old child, then this master class is suitable for you. It is necessary to take into account the age and restlessness of the child, so it is best to choose a simple design and materials that will make the task easier.
For example, colored pencils with three edges to make them easier to hold in your hand. You can also use wax crayons; they are easy to use and apply quite gently to the drawing.
Young children are not yet very good at figuring out geometric shapes, so a special ruler can come to the rescue. You can trace any shape using a ruler, then the drawing will turn out smoother, and the child will be happier that everything worked out.
In addition, such a process will be useful because while drawing you can voice the names of all the figures, thereby learning it all. If you notice that your baby is tired and starting to get distracted, it is better to interrupt the lesson and continue it later.
Stages of work:
- To know how to draw a house with a pencil, you first need to prepare a ruler. The child will do better and faster if you help him a little, holding the ruler so that it does not slip;
- A4 paper is placed horizontally to make drawing more convenient. All stages need to be explained to the child so that he understands what the house consists of;
- First, draw a small rectangle at the bottom of the sheet, this will be the foundation. Remember that the ruler should not slide, otherwise all the parts will move or be clumsy;
- The walls are depicted in the form of a square, which is located above the foundation.
- Help your child position the ruler correctly, because due to his age he may not understand where each element should be;
- The walls are crowned with a triangle roof;
- At this stage, the drawing with the baby can be completed. If the child is not tired, you can add additional elements in the form of a pipe and a window.
You can draw a single house with a pencil step by step, and all the elements may be different. The roof can be made semicircular, the foundation cannot be drawn. When all the main elements are drawn, the houses are painted.
How to draw a house with a pencil step by step
Step one. We draw a small standard house, as it looks in the village, with a triangular roof. Step two. Let's straighten out the structure a bit, add some formal bushes around it and adjust the edges of the roof. Step three. Let's add design to this hut, a beautiful porch and facade ornament. Step four. Now let’s draw several windows in the front on both floors, as well as a few from the side. You also need some trees in the background and a path to the entrance. This is what my house will look like, what kind of house would you like to build? Draw and attach your work below this article. It will be useful for you to find out more.
Every year the construction industry improves, offering people more and more comfortable and beautiful houses and apartments for living. If you just think about how houses have changed in one century, you can close your eyes and visually imagine how much things can change after some more time. One can discuss this topic ad infinitum. However, not everyone can express their thoughts on paper. Therefore, in today’s article we decided to push our readers to creativity, demonstrating how a pencil drawing of a house of the future can be original and unique. The photo below offers ideas that can be used in creating your dream home, or as a sample for sketching.
Drawings of a house for older children
A child over 5 years old already has spatial thinking, so the task can be complicated. The following instructions will tell you how to simply draw a house with a 3-5 year old child:
- First you need to draw a square, explaining that these are the walls of the house. They draw a triangle on top of the wall and say that this is the roof.
- You can clearly show with an example why exactly these elements are drawn on paper;
- To the right of the main square you need to draw another one, this is the far wall. It is necessary to maintain parallelism of the lines so that the house does not move and turn out clumsy.
- You need to draw a window on the same wall;
- On the wall of the house you need to draw horizontal lines that will represent logs.
- Don't forget to add a pipe to the roof, to the front wall of the door;
- Then only the details remained. You can draw tiles on the roof or boards, add a landscape, fence and grass to the house.
- The drawing is ready, you can also color it with paints or pencils.
For older children, you can diversify the option by drawing the house from a different angle and with a larger number of elements.
GCD move:
1.Creating a problem situation:
Children go into the room.
Educator: Guys, I have important news for you. A video letter arrived at our kindergarten. Let's read it.
The children sit down . View the presentation “Letter from Dunno”
The teacher reads the letter: “Hello guys! Dunno writes to you. I like traveling very much. Today I flew in a hot air balloon and saw your small Motherland. I did not have the opportunity to land, but I saw that the houses in your village are different from the buildings in the Flower City . I really want to get acquainted with rural houses . Can you help me? I'm sure you'll come up with something. Thanks in advance. Dunno."
Educator: Guys, who is the letter from? (Children's answers)
-What is Dunno asking for? (Children's answers)
-How can we introduce Dunno to rural houses ? ( Draw houses and send to Dunno)
.
Educator: You already know that every person has a homeland. “Motherland” mean to you?
?
(Children's answers)
Educator: The place where we were born is the Motherland. We love our home, we feel very good among friends.
(“Everywhere is good, but at home it’s better ”
,
“Everyone has his own side”
,
“There is no more beautiful country in the world - our Motherland”
)
Educator: Each of us has our own home, which we love, in which our dearest and most beloved people live. We will find out which house is yours in a ball game.
Playing with the ball on the court.
Physical exercise: “Hurry up and catch the ball, and what do you call your house?”
(answer options: big, beautiful, cozy, bright, beloved, etc.)
Educator: Look, guys, how many beautiful words we came up with about home!
Examining the layout of the house.
— There are different houses and they are called differently : wooden, brick. How do you understand these names? (Wooden houses are houses built from wood , brick houses are made from bricks)
Teacher for 6-7 year old children: -Houses can also be one-story and multi-story. How do you understand these names: one-story house, multi-story house? (A one-story house consists of one floor, a multi-story house means it consists of two or more floors)
-Name the multi-storey buildings in our village . (Kindergarten, dormitory building)
Educator: And now it’s time to draw pictures for Dunno, he’s waiting for your help. Before we start drawing , let's stretch our fingers.
Finger gymnastics “HOME”
.
I want to build a house , (Hands above your head in a “house.”)
So that there is a window in it, (Hands in front of the eyes “window”)
So that the house has a door , (Palms turned towards you, closed.)
Nearby so that the pine tree grows (Fingers are spread out, hands are pulled up.)
The dog guarded the gate. (One hand is “dog.”)
It was sunny, (Cross your hands, fingers spread.)
It was raining ("Shaking" movements)
Educator: Guys, I ask everyone to choose a place to work: an easel at the table.
Children sit at tables and stand at easels.
Teacher for children 5-6 years old: (independent activity)
— Tell me, what’s on your tables? (album sheets, wax crayons and colored pencils)
.
What will you draw ? (Children's answers)
- You can start drawing .
-Guys, let's remember how to draw with wax crayons and pencils:
-When painting a drawing, you must not go beyond the contour of the drawn image .
-When painting, strokes should be applied in one direction: from top to bottom, from left to right, or obliquely.
-It is advisable to paint over the drawing without gaps.
-When painting, you need to press evenly on the pencil. If you need it brighter, press hard, if you want it lighter, press it lightly.
Baba Yaga's hut
Baba Yaga's hut is also considered a house, which can also be drawn. It does not require a ruler; all you need to do is draw all the elements by hand:
- Draw a pentagon-trapezoid, this will be the roof and the hut itself at the same time;
- Now you need to draw a window on the wall, you can add a hole in the attic. Frame the roof with edging;
- Logs are painted on the sides of the walls, shutter frames are added to the window;
- A pipe is painted on the roof, you can also draw horizontal lines to create the full impression of a log hut;
- All that remains is to draw the chicken legs below. You can add other landscape elements.
Baba Yaga's hut is drawn.
If you have the desire and opportunity, it is better to paint it.