March 22, 2019
Averyanova Sveta
One of the most popular images in the world around us is a drawing of a cat or a photograph of it. Mustachioed purrs are everywhere: on the Internet, on advertising posters, on fashionable clothes for children and adults.
Graceful beauties also attract the attention of famous artists; Leonardo da Vinci called the cat a masterpiece created by nature itself. These words are true: few animals can compare with representatives of the cat tribe in grace and elegance.
For the first time, lessons on drawing Murka cats are usually held in the senior group of kindergarten. In the preparatory group and in elementary school there are also lessons on this topic, only the task is a little more complicated.
Schoolchildren aged 6–8 years must not only depict an animal, but also convey the nature of the movement, make the image accurate and complete. Learning to draw animals with colored pencils is not difficult if you follow a certain algorithm.
Before you draw a cat, you need to decide on the plot. The child will probably want to depict only the face or capture the entire animal, sleeping, in motion, or draw a cartoon character.
It is advisable to first observe the small predator and study its body structure. Ideally, if there is a furry cutie living in the family, if not, you can watch a video or photo. If you determine in advance what shape the paws, head, and torso are, it will be easier to draw a pet step by step.
How to draw a cat's head step by step
The structure of the skull is different in cats and cats. “Boys” have a larger, more massive head, a wide muzzle and not much protruding forward.
The “face” of a female cat is distinguished by the subtlety of its main parts and the expressiveness of its eyes. The shape of the animal's head depends on the length of the fur: in short-haired predators it resembles a triangle, in others it resembles a circle or oval.
Each breed has its own characteristics that need to be reflected in the drawing. Persians and exotics have slightly protruding eyes, and the nose is flattened and is in line with the eyes; in Scottish Fold cats, the tips of the ears point down.
The British breed is distinguished by a short nose and beautiful eye color - from yellow to bright orange, and small ears. The skin of sphinxes is covered with wrinkles, the neck is long and thin.
The method of drawing also matters. A realistic drawing depicts a real animal, as it exists in nature, with many small details present.
In a decorative picture, you can fill the space with patterns, geometric shapes, and fantasy elements. This direction in painting is very popular today.
A step-by-step portrait of a pet cat begins with a sketch of the head.
Step 1
Draw a large circle in the center of the sheet. Increase the volume along the edges with two arched lines. Divide the figure with a straight line into two equal parts - this makes it easier to draw symmetrical details.
Step 2
Just above the center of the muzzle, draw two parallel lines to highlight the eye area. Draw two circles of the same size at an equal distance from the center of the head. The width between the eyes should correspond to the diameter of the drawn circles.
Step 3
To create beautiful mysterious cat eyes, add corners below and above the drawn circles.
Draw two rounded lines at the top of the muzzle. Draw the nose at the top and the lower jaw at the bottom.
Step 4
Remove the auxiliary lines and draw the pupils. In a cat they are located vertically in the center of the iris. From the head, draw two lines down and to the sides and connect at the bottom in a semicircle - this will be the neck and chest of the animal.
Step 5
Draw a triangular ear. Round the cat's ear a little at the top.
Step 6
Detail the image: draw eyebrows, decoration on the neck, draw lines along the contour imitating the fur of an animal.
Step 7
It's time to think about the color of the animal: you can make the cat striped, spotted or monochrome, that is, paint it with one shade. Determine the color scheme of the drawing. To make the eyes glow, outline the pupils with yellow, then paint with the desired color. The outer edge of the iris should be dark.
Step 8
It is advisable to direct the pencil stroke from the center to the edge.
The ability to draw a cat's face with cute eyes will be useful in the next master class.
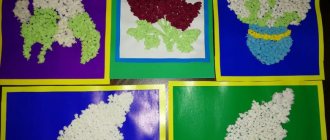
Notes on drawing using non-traditional technique “Fluffy Cat” in the preparatory group
Maria Shcherbakova
Notes on drawing using non-traditional technique “Fluffy Cat” in the preparatory group
Summary of continuous educational activities on drawing in non-traditional techniques in the preparatory group “ Fluffy Cat ”
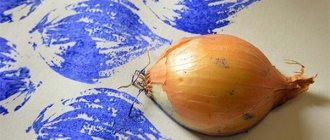
2. Learn to hold a brush correctly when drawing .
3. Learn to put paint on the tip of the brush, then remove the excess on the paper and poke with a hard brush along drawn with a pencil.
4. Continue learning to draw large , position the image in accordance with the size of the sheet.
1. Expand knowledge about pets, instill love for them.
2. Develop children's creative imagination, create conditions for the development of creative abilities.
3. Develop visual skills and abilities, fine motor skills of the hands.
1. Arouse the desire to convey the expressiveness of the image in the drawing;
2. Cultivate accuracy and independence;
3. Foster an emotionally positive attitude towards work.
Materials for the lesson: gouache, palette, jar of water, hard brush, brush stand, wet wipe, landscape sheet, simple pencil.
Preliminary work: project activity on the topic “Why everyone loves cats”
, watching cartoons, looking at illustrations, reading fiction about animals;
games with cat toys , playing with them.
How to draw a sitting cat
Representatives of the cat family are graceful in any position - lying down, jumping, sitting. The anatomy of this animal is unique - its skeleton has more bones than a human's.
How to draw a kisul with a pencil and convey in the process the elegance of movements and the naturalness of the pose? It is necessary to correctly determine the position of each part of the body relative to the others, to maintain their proportionality, observing proportions.
Step 1
Draw the cat's head in the shape of a circle, the body in the form of an elongated figure, curved in the middle, where the back is.
Step 2
Lightly outline the limbs and tail with curved lines. The animal's front legs are usually straight when sitting. The hind legs are bent in two places: in the area of the kneecap and where the shin bone meets the parts of the foot. In this lesson we will depict a cat washing itself, whose front paw is raised.
Step 3
Connect the head and neck. Add volume to the paws and tail in the right places. Mark the arch below the cat's withers. Draw the eyes, ears and mouth.
Step 4
Remove all unnecessary lines and adjust the figure if necessary.
Step 5
Add details to the image: draw pupils, claws, ears.
Step 6
Think about what pencil color you will choose for your cute character. It is interesting that only cats are tri-colored or tortoiseshell; cats with such a skin are extremely rare. The spots can be drawn arbitrarily; the stripes on animals are usually larger on the back and sides, and narrow on the face and paws.
Step 7
Color the image. When using blue, do not press on the pencil, use light shading, then these areas will appear snow-white.
Another option for drawing a cat
Pictures of cats for sketching
Here you can download templates of cats, kittens and kitties and use them for sketching (click on the picture - it will enlarge and download):
Tips for parents
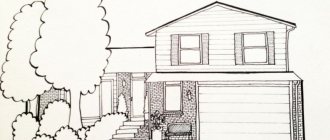
- For young children, simply draw according to the template. In this case, it is enough to complement the silhouette if desired.
- At school, not all children keep up with the teacher’s explanations. If your child prefers to learn slowly but thoroughly, develop a step-by-step drawing scheme at home.
- For kids there are no concepts of “right” and “wrong”. If your child has drawn a blue cat with three legs and a crooked face, do not insist on correcting the drawing. Later he himself will want to draw the way he needs to.
- All visual methods are good for learning. If it is difficult for a child to draw animals, use additional video tutorials on the Internet. You can watch them for free.
- For beginning artists, you can print out pictures and photographs for sketching, and buy coloring books with cats. Coloring is also useful for strengthening the small muscles of the hand.
Summary of the open OOD on drawing in the senior group “Kittens”
Akhmetshina Gulnara
Abstract of the open OOD on drawing in the senior group “Kittens”
Objectives: continue to learn how to draw animals , conveying their characteristic features
— continue to learn how to combine different images, drawing and appliqué .
-continue to teach children how to work with a stencil
- to strengthen children’s ability to use the “poking with a hard semi-dry brush”
-practice in expressively conveying the color and character of the kitten
- strengthen children’s skills to complement images with suitable details.
-develop hand-eye coordination,
-improve attention, memory, logical thinking
-develop creative imagination
- foster respect for animals
Vocabulary work: on the lexical topic, “Toys”, portrait, advertisement
Materials and equipment: Gouache for each child, a sheet of paper, a brush. A thin brush, a glass of water, a napkin, a cassette with music, a kitten mask for each child.
Preliminary work: reading fiction, observing while walking.