Types of folk crafts and paintings
Russian regions are rich and diverse both in their landscapes and in their customs and traditions. Many places even have their own dialect. All this shaped the culture and artistic creativity of every corner of our country. For a long time, different traditions of folk crafts have developed. The most famous include the following:
- Dymkovo, Filimonovskaya, Bogorodskaya toy;
- Gzhel ceramics;
- Vologda and Vyatka lace;
- Tula samovars;
- Rostov enamel;
- Mstera, Fedoskino, Palekh miniatures;
- Zhostovo trays;
- Gorodets, Khokhloma painting.
Each of them is very original and unique, but they all reflect the culture and spirituality of the Russian people.
The most popular ornaments of Khokhloma painting
Before you begin such an original painting of a jug or plate, you need to find out which of the ornaments are most often used in the creative process.
In most cases, craftsmen resort to applying the following:
- grass pattern. The grass in this case only vaguely resembles sedge growing in a meadow. It is applied to products only in black or red, but nevertheless this pattern is perceived as herbal;
- saffron milk cap This is a pattern of individual blades of grass. It is used in the process of framing various kitchen utensils;
- Kudrina. The ornament is characterized by all kinds of curls and rings that unobtrusively encircle berries and flowers. Suitable for painting round objects, as well as flat ones, such as chairs and tables;
- Gingerbread. This is a geometric figure that fits into a rhombus or square. Suns with twisted rays are drawn in the center of the ornament.
What objects are decorated with Khokhloma painting
Traditionally, any household items made of wood were made in this style:
- spoons;
- nesting dolls;
- trays;
- dishes;
- caskets;
- chests;
- barrels;
- boxes;
- spinning wheels;
- handles and handles;
- vases;
- cutting and decorative boards.
In its modern version, when interest in Russian folk motifs is quite high, Khokhloma painting sometimes appears on very exotic surfaces:
- fabric (for bed linen, for example);
- nails;
- keychains;
- lighters;
- screen and panels of a smartphone or laptop;
- body (tattoo and body art);
- cars (airbrushing);
- bags (paper and plastic).
Thus, almost any object can now be decorated with Khokhloma painting.
Khokhloma painting on a plate: step-by-step description
Decorating a plate or wooden spoon with an ornament is not at all difficult, the main thing is to know the basic principles. The drawn elements look colorful and solemn. Even a schoolboy can cope with this task.
What you will need:
- acrylic paints;
- pencil;
- tassels;
- palette;
- disposable plate;
- jar;
- varnish;
- ornament.
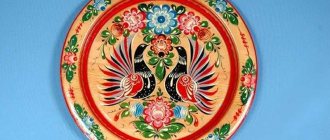
Decorating a plate with an ornament is not at all difficult
Progress:
- Choose a pattern that will be applied to the plate. It could be a rooster, a bird or simple berries.
- Transfer the ornament to a plate.
- Make the bon red.
- Carefully paint all other elements.
- Be sure to make a black rim both on the inside of the plate and along the edge.
- Add droplets along the rim.
- Leave the plate to dry completely in a suitable place.
Apply varnish and let the product dry.
Samples on paper
If you are new to this business and are just starting to master the basics of drawing Khokhloma painting, it is better to practice on ordinary Whatman paper. As exercises for positioning your hand, choose simple elements: berries, leaves.
All of them are based on certain movements of the brush. Even if you later work on the finished pencil outline, the circles and curls should be even. It is better to do them in one go.
If you want to know how to learn how to draw a crested child, it is best to master this technique with him, also on paper. The same type of exercise in the form of leaves and berries quickly gets boring for children, so suggest depicting a round tray, plate, spoon or vase. Make the shape of the object yourself, and give your child the opportunity to decorate the object.
Main differences
All types of Khokhloma paintings on household kitchen utensils have their own characteristics. It is from them that experts or simply knowledgeable people can talk about the creation technique. The name “Khokhloma” is one of the most popular among paintings. Not only experienced artists, but also preschoolers can learn to draw step by step. Khokhloma painting patterns for beginners include:
Grass patterns - a line curved to the side. To get it, you must first press the brush in the center, and then, moving it to the side, gradually reduce the pressure and gradually reduce the thickness.- Leaf is one of the simplest patterns. Mirror blades of grass are drawn, curved outward. All empty spaces are filled with paint of the same color.
- A curl curled like a snail is less common because it is more difficult to draw. It is important to maintain equal pressure on the hand.
- Droplet - the brush is placed at the base of the bristles and slowly turns 180 degrees, slightly moving forward and lifting off the surface. Drawing droplets helps train your hand to press correctly.
- A bush is a few droplets arranged in the form of a fan. A small dot is placed at its base.
Purchasing materials
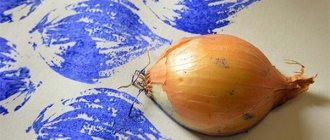
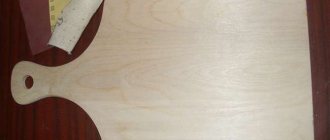
Choose the right base. The shape can be round, rectangular, square, or complex carved. It is better if the board has a hole to hang it on a nail or hook. Avoid using plywood or untreated wood. The surface for applying the pattern must be smooth, without depressions, notches and burrs. The easiest way is to buy a high-quality base at a craft store. If this is not possible, but there is a board ready to size, properly treat the surface with sandpaper. If this is not done, all the unevenness will remain after applying the paint. They can interfere with the perception of the drawing and will interfere with drawing.
Interior design and architecture
The art of Khokhloma painting of wooden utensils, which is called “fiery” or “fiery”, is extremely original, because the products sparkle and shimmer like reflections of flame.
The basic techniques of “gilding,” which made it possible to give dishes an indescribable shine, were known to Khokhloma craftsmen back in the 17th century. These techniques were borrowed from master icon painters who used them in the process of creating icons.
Painted products of Khokhloma masters
However, gold at all times was by no means a cheap material, so silver powder was used to reduce the cost of images of saints. The icon was covered with light varnish made from linseed oil, and then placed in a heated Russian oven. Due to the high temperature, the varnish film became golden-yellow, and the silver shining through it acquired a resemblance to real gold.
When painting wooden utensils, only individual elements of the pattern or small areas of the background were covered with silver. After all, silver is also an expensive metal, although it is cheaper than gold. Only the replacement of silver with tin in the 19th century made it possible to make tableware truly cheap.
Painted Khokhloma dishes
Now, not only individual areas, but the entire surface of the dishes were covered with a thin layer of metal. Nowadays, tin has been replaced by an even cheaper and more accessible material - aluminum.
Khokhloma painting of a box
Product preparation
Wooden utensils turned on a lathe or hollowed out for painting are usually called linen. The linen is made from well-dried linden, aspen, birch or alder wood. The finished turned or hollowed out dishes are thoroughly dried again and only then primed.
Production of “linen” - blanks for future products.
The primer begins with the so-called vapleniya - rubbing liquid clay diluted in water into the surface of the wood. First, the clay is ground well and foreign impurities are removed. The clay-coated product is dried at room temperature.
The next stage of priming is called fitting. The product, covered with a thin layer of dried clay, is wiped with linseed oil - drying oil. Then the product is dried for 4 - 5 hours at a temperature of 60 - 70 * C.
In the old days, peasant craftsmen dried products in a Russian home oven. Before drying, the coals were raked out from the heated oven and the ashes were swept away. As soon as the oven temperature dropped to 60 - 70*, the dishes were placed on boards and pushed into the oven. A thin layer of clay soaked in oil after drying forms a hard shell that closes the pores of the wood and prevents the penetration of varnish and oil, which are used during subsequent processing, into the product.
Then they start drying. Thin layers of drying oil are successively applied to the surface of the product. The master dries the first layer for about two hours, and the second and third layers dry for the same amount of time. The fourth layer is applied more thickly. After this, the dishes are dried in an oven at a temperature of 50 - 60* C.
At the same time, the master carefully monitors the condition of the top layer. You must not miss the moment when the drying oil is almost dry, but will still stick to your fingers, that is, it will be in the stage of the so-called soft tack. The product is removed from the oven and the final stage of priming begins - tinning.
Tinning and artistic painting
When tinning, finely ground tin or aluminum powder is applied with a swab to the sticky surface of the cookware. After drying, the product, which looks like silver, is ready to be painted on.
As you have probably already seen, the classical technology of preparing a product for painting is quite complex and time-consuming. Therefore, novice craftsmen can be recommended to use ready-made cutting boards for painting, which are sold in hardware stores. In this case, simplified priming and tinning techniques can be used.
For example, at the first stage the product is coated with primer No. 138 or 120. In extreme cases, it is quite easy to prepare a primer for wood yourself. Grind pieces of well-dried clay with a hammer and sift the resulting powder through a fine sieve. Mix it with natural drying oil (preferably linseed) until you obtain the consistency of liquid sour cream.
Instead of clay, you can use coloring pigments - red lead or ocher. All of these pigments are finely ground clay powders with varying levels of iron oxide, which determines their color.
Apply the prepared primer to the surface of the product in a thin layer and dry for 24 hours at room temperature. Then sand the piece with fine-grit sandpaper. If cracks or potholes are found on it, then the surface must be puttied with putty PF-002 or its other analogue.
At room temperature, the putty dries in 20 hours, and at a temperature of 50* - within 6 hours. So if you want to speed up drying, use a drying cabinet. Those who want to practice this type of folk art at home can be recommended to use an oven.
The oven temperature can be determined using a small piece of clean white paper. If paper placed in the oven chars after about 1 second, it means that the temperature in the oven is 300-350* (when charring, the paper acquires a brown-fawn color and becomes brittle). If the paper chars after 5 seconds, the temperature reaches 270 - 300 *. After 15 seconds - 250-270*, after 30 seconds - 230-250*, after 1 minute - 200-230*, after 5 minutes - 180-200*, after 10 minutes - 150-180*. At temperatures below 100* the paper does not char. This information will also be useful to you during the subsequent hardening of products in the oven.
Now sand the dried workpiece again and apply a thin layer of light oil varnish to its surface. The varnish spreads well over the surface of the product, forming an even layer and does not leave marks from a swab or brush. The dried varnish film is highly durable and shiny. A thin layer of varnish hardens after 3 hours and dries completely within a day.
The varnish can be diluted with turpentine, thinner or acetone. However, remember that varnish and solvents are flammable, so they should be stored away from sources of fire.
The first layer of varnish needs to be dried for 24 hours, and then a second layer is applied - a thicker one, which is dried until it is soft and tack-free. At this stage, begin tinning the product with aluminum powder, which can be purchased at hardware stores. Usually in a box with aluminum powder there is a bottle of linseed oil.
The powder consists of tiny smooth flakes. Adhering to the varnish, aluminum flakes are distributed on the surface of the product in several layers, forming an impenetrable metal shell. It is convenient to apply the powder to the surface of the product with a spray bottle, and if there is none, with a rubber bulb or soft foam rubber. The product should be treated with aluminum powder over a wide vessel.
Be careful not to leave any gaps on the surface of the cookware. When the product is completely covered with powder, shake off the excess and leave to dry at room temperature for a day. After the top layer has completely dried, the item can be painted.
Khokhloma painting
Of course, you can start directly painting the product only after you have learned how to confidently make patterns on paper using gouache or tempera. But before you pick up a brush, carefully familiarize yourself with the different types of Khokhloma painting and the techniques for performing them.
Experienced Khokhloma craftsmen perform painting without an auxiliary drawing or sample. Taking into account the peculiarities of the form, the master changes color combinations and decorative designs at his discretion. Constantly improvising, each time he finds a particularly expressive solution to the composition. The traditional set of oil paints used in painting is quite modest:
- Red - cinnabar
- Black - gas soot
- Yellow
- Brown
- Green
For each paint you need to have several brushes. Some should be narrow, with long, elastic pile, others should be short and thick. The brush moistened with water has a drop-shaped shape with a thin pointed end. Squirrel and kolin brushes are used for painting.
Khokhloma painting
Types of Khokhloma painting
All patterns used in Khokhloma painting are divided into two main types:
- Horse letter - grass painting and painting "under the leaf"
- Background letter - painting to match the background and "kudrina"
Grass painting is most often simply called grass. Curving whimsically, the strokes of the painting resemble familiar and familiar grasses to everyone from childhood: sedge, white grass, meadow grass... Only on the golden sides of the bowl or brother's will, by the will of the artist, they are fabulously transformed, forming a harmonious ornamental composition.
Khokhloma dishes
Sequence of painting
Herbal painting
Painting dishes with grass begins with making large elements that serve as a kind of outline for the pattern. Large, smoothly curved strokes - leaves, then narrow curls and small strokes - are applied to the surface of the product in a certain rhythm and sequence.
At the same time, the artist constantly strives to diversify the design: the leaves, although seemingly identical, are unlike one another. For example, strokes are applied with varying degrees of pressure and curvature, ending with sharp or rounded ends.
To some extent, herbal painting techniques are reminiscent of calligraphy, borrowed from book copyists. That is, painting is done with pressure on the brush, like a pen when writing. Having touched the surface to be painted with the sharp tip of the brush, gently press the brush and move it forward. And as soon as the required stroke width is reached, the brush continues to be advanced, gradually lifting. At the same time, the smear narrows and becomes sharp.
All other elements of grass painting are performed in approximately the same way. Sometimes the grass pattern is supplemented with a so-called postscript, which makes it even more complex and expressive. The elements of the postscript include simple flowers, spikelets and other plant forms made up of small strokes.
Horse painting under the leaf
Horse leaf painting is also based on the use of plant motifs. The difference is that around the smoothly curved stems are depicted stylized leaves of currants, cranberries, blueberries, viburnum, as well as the fruits of these and other plants.
In addition to black and red paint, green, yellow and brown are also used in “leaf-like” painting. At the first stage of painting, the stem is painted with black paint, and then the arched branches. On both sides of the stem, using a round stamp cut out of felt or birch tinder fungus, circles of berries are applied, which are grouped several times together.
At the next stage, silhouettes of leaves are drawn with a brush. They finish the painting by making a postscript, that is, thin twisted tendrils are drawn between the leaves and berries, onto which very tiny berries and leaves seem to be strung.
Khokhloma. A sample of horse painting.
Painting to match the background
Painting against the background is more complex and time-consuming. Its essence is that around the plant elements of the ornament the background is painted in any one color, on which they stand out effectively in the form of golden silhouettes. Painting of the product begins with drawing a contour drawing.
The next stage is called unsubscription and consists of painting the background with black, red, brown or green paint around the outlined contours. On the surface of the product, golden silhouettes of ornamental motifs are formed, which will look especially contrasting against a black background.
Then comes the drawing of the details, the so-called drawing out. Veins are drawn on the leaves, stamens on the flowers, and the volume of the plant elements is emphasized with strokes. As in horse painting, the work is completed by adding a postscript, but on top of a painted and already dried background.
Sample of painting “under the background” (product on the left).
Kudrina
Another type of background painting - kudrina - is less labor-intensive. The paints applied during painting cover the golden surface slightly, so products painted with curls are always bright and iridescent. The patterns curl on the surface of the product like golden curls.
The patterns of the kudrina are reminiscent of the gold painting of the boyars' chambers, the ornaments of handwritten books of the 17th century, as well as Volga house carvings.
The design begins with the application of a contour pattern, which is formed as a result of smooth and rhythmic movements of the brush. Then paint the background with one or two colors. The decoration is done with sparse strokes, and inside the golden, intricately curved petals, color spots are introduced that are in tune with the background.
Kudrina is an example of Khokhloma painting.
We already know that all types of painting are done on a silver background coated with aluminum powder. In order for the dishes to become golden, they must be tempered. The dried painting is covered with a thin layer of varnish and the dishes are placed in an oven at a temperature of 270-300* C.
Under the influence of high temperature, the oil varnish turns slightly yellow and the dishes become golden. But to obtain a more saturated golden hue, the process of applying varnish and hardening is repeated several times. After repeated hardening, the varnish film acquires high strength.
If the dishes you are making are not intended for hot food, you can do without hardening at all. In this case, the varnish must be tinted with special dyes.
If necessary, you can get any shade of clear varnish, but it is better to use a light-fast orange dye. It is dissolved in a small amount of acetone or alcohol, and then poured into the varnish and stirred thoroughly until the color is uniform.
The product coated with tinted varnish is dried at room temperature for 24 hours. The silver surface, covered with a film of tinted varnish, has the same golden shimmer as when hardened.
Samples of Khokhloma dishes
Pattern selection
Choose a suitable ornament motif. It doesn’t matter whether your Khokhloma painting will be simple or complex. Step-by-step drawing of each element will help you depict any object from a combination of twigs, leaves and berries to an exclusive bird of paradise. You just need to do everything piece by piece from simple to complex. Given the availability of computer technology, anyone can find the necessary image on the Internet, print it, for example, on film, and transfer the contours to a wooden base. It is more difficult to draw lines on a round surface. However, in this case, you can simplify your task by making several stencils of repeating elements.
Elements of Khokhloma for preschool children: step-by-step templates
Even a small child can create a Khokhlo pattern with his own hands, having mastered basic skills . Children's drawings have always been valued and pleased the eyes of parents. Often, an activity such as applique is carried out in the senior or preparatory group of a kindergarten. To create a pattern, it is enough to make a stamp from a tube and paper into which the paint will be dipped. Smaller elements are already painted with a brush, as in the pictures.
Even a small child can create a Khokhlo pattern with his own hands, having mastered basic skills
Drawing with children:
- lingonberry. Using a stamp, red circles are drawn, which do not need to be supplemented with other elements;
- currant. Berry circles are collected near a blade of grass, on which golden dots must be placed with a brush;
- Rowan. Berries are drawn with a stamp, and fairly narrow and elongated droplets are added with a brush, as well as leaves at the base of the resulting bunch. Additionally, you need to make inclusions of gold color;
- raspberries. Six circles are drawn with a stamp, without maintaining a certain distance, but slightly overlapping one on one. Highlights are added using the grass blade technique. Additionally, dots are placed with a brush;
- sepal. Blades of grass are gathered together, a twig and leaves are drawn.
Which color to choose?
You will need paints that are suitable for wood surfaces. The simplest and cheapest option is gouache. However, it does not form a waterproof surface once dry. It is necessary to add PVA glue to it, about a quarter of the volume of pigment, but not every color will respond well to this combination. It’s better not to take risks, but simply coat the finished product with transparent wood varnish. This will protect the drawing from moisture and other adverse factors. Another option is to use acrylic paints. They are waterproof and suitable for wood. Moreover, after such a layer has dried, you can even apply gouache on top. This means that the black background can be done with acrylic, and the pattern itself can be done with gouache.
Buy several brushes with fine tips. Squirrel, kolinsky and synthetic numbers from the first and above are suitable. The quantity and size depend on your design. You will need a thin brush in any case, and you can determine the maximum size visually depending on the planned design.
Features of the technology
It is customary to paint wooden products with Khokhloma: toys, dishes, etc. The finished product can be given as a gift or kept for home decoration. Before you start painting, you need to prepare all the materials and tools. To work you will need:
- a wooden board for cutting food or any other item for the base;
- adhesive;
- gouache or other paints;
- egg white;
- sheets of paper;
- pencils;
- brushes for painting of different thicknesses;
- varnish for fixing the pattern;
- paint brush.
After the above list and Khokhloma painting stencils have been collected, you can begin to work.
Step-by-step master class:
- Coat the wooden base well with egg white and let it soak in a little.
- Prepare a sketch drawing on a separate sheet.
- Cover a cutting board or other object with gold paint and wait until it dries completely.
- Using a pencil, carefully redraw the drawing from the sheet onto the base.
- Color all the ornaments of flowers and berries red.
- Using a thin brush, add curls, leaves and veins.
- Mark the boundaries of the patterns and outline them thicker.
Even though the base was painted gold, the final design should give the impression that the background is still black. The finished product should be allowed to dry, then check and complete the missing elements and green grass. Secure the design with a thin layer of varnish.
Khokhloma coloring page for children
How to work with coloring books Khokhloma patterns.
Anyway, paint it red, black and yellow and live and be happy that children are getting involved in folk art, what more could you want?
Well, you and I understand that everything is not so simple. If we take on coloring, it’s with a clear, realistic goal. I’ll tell you right away - children do not remember the features of these folk toys, paintings, patterns... So we “go through” several classes according to the program, and then six months later ask what kind of hobby or lady this is, one or two people from the class will remember. So let’s not delude ourselves, children do not gain any such closeness to folk roots and origins from looking at toys and utensils and painting templates according to a model.
And therefore we will set ourselves other goals. Of course - the development of hands and eyes. Here there is already something to try for. Now I’ll tell you how I do it.
So, let's take a coloring book with Khokhloma patterns. For example:
First, let's outline with felt-tip pens. Black and red. Khokhloma, of course, is golden, but circling it in yellow along the gray lines is of no use, nothing is visible (although children usually do not notice this).
Circled:
Outlining is a very useful thing. At every opportunity, I try to make sure that the students do not just paint something, but before that they clearly outline the drawing - the children develop a very faithful hand. But now it's time to paint. We will work with either felt-tip pens or colored pencils.
I foresee the question - why use pencils and not paints? After all, Khokhloma painting is the idea. Working with a brush also develops your hands great.
But here I will answer this: I know from experience that this is not an option; you cannot master the features of folk painting with coloring books.
Now I’ll make a lyrical digression on the topic. Once they took us on an excursion to a workshop for painting wooden utensils with Khokhloma patterns. I watched the craftswomen for a long time: some painted right away, without a sketch, relying only on instinct and eye. You understand that the characteristic curls are obtained like this: first, thinly - with the tip of the brush, then pressure - and the stroke expands, then without pressure - again thinly. This comes with experience. With a long experience of constant training. The second category of craftswomen in the workshop acted like this - they drew patterns on the bowls and cups with a pencil and then shaded them, as it were, with a brush. It's a hassle!
I myself, without a drawing, just drew it out of my head (to argue with myself) like this:
But I will paint the finished coloring book with small strokes, because you can’t go beyond the outline:
Using a brush to fill a clearly defined contour is a waste and a profanation of the idea. Yes!
Therefore, let's return to our felt-tip pens - there will be more benefits for your hands.
Don’t rush, first I’ll say parting words that we are now going to train the arcuate movement of the wrist, and then a picture with a lot of curls is selected. You need to paint in an arc, along the curls. If you don't tell your students this, they will quickly color it like this:
Therefore, we show the method of correct shading:
Well, now the main thing is not to rush and not to go beyond the contour:
So we painted the Khokhloma coloring book. The goal has been achieved - fine motor skills have been trained.
And here’s another Khokhloma coloring book for you - for a change you can practice with it.
Marina Novikova told you how to color Khokhloma correctly and usefully.
Tags: folk painting, educational coloring books, Khokhloma, Khokhloma patterns
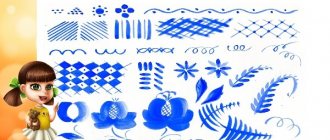
The main elements of Khokhloma painting
There are several “Sedges” (drawn with a slight movement of the brush tip from top to bottom)
- “Blanks of grass” (smears with a slight smooth thickening)
- “Droplets” (a brush with paint is applied to the surface of the product)
- “Whiskers” (a continuous line of equal thickness, twisted into a spiral)
- “Curls” (the same as “antennae”, but with light pressure-thickening in the middle of the element)
- “Bush” (a combination of symmetrically located “sedges”, “blades of grass”, “droplets”, “antennae” and “curls”)
- “Berries” (decorative berries of lingonberry, currant, rowan, strawberry or gooseberry; drawn with a stamp or a brush, and after drying, “enlivened” with yellow color.
A little about Khokhloma
As you know, Khokhloma is a decorative painting on wood. This artistic folk craft originated in the 17th century in villages near the trading village of Khokhloma, Nizhny Novgorod region. In the 20th century, the craft “moved” to the village of Semino and the city of Semenov, where to this day Khokhloma painting is practiced on a factory scale.
A distinctive feature of Khokhloma is its floral ornament, made with black and red paint on a gold background. Naturally, this is not real gold. This effect is achieved when tin powder is applied to the dishes and then fired in a kiln.
Khokhloma painting can be done in two ways. The first is “mountain” painting, when the background is first painted over and a drawing is applied on top. The second is painting “under the background,” when the outline of the ornament is first outlined, and then the background is filled with black paint.
Khokhloma painting is done with a thin brush and only by hand. Therefore, there cannot be two absolutely identical ornaments. They paint a variety of things: dishes, spoons, trays and even some pieces of furniture.