A little history
History indicates that the development of wood studies led to its application on the most unexpected subjects, which included:
- furniture;
- chests;
- sled;
- utensils used indoors.
Most often there was a symbolic character, and the background tones were: green, blue and sometimes black. Particularly popular were and are drawings with specific themes, showing people and animals.
After World War I, art fell into decline, forcing specialists to look for other sources of income. The revival of the popularity of the direction is associated with the name of I.I. Oveshkov, who opened the workshop to the public.
It organized the training of appropriate personnel, which resulted in an increase in those able to process the source code. Involving a new generation in recreating images develops a sense of belonging to the culture of their country and develops artistic thinking on different levels.
Teaching children in kindergarten and primary school
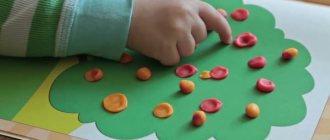
For kindergarten (senior group), painting a board is one of the ways to teach a child fine art and understand it at a certain level. It is preferable to start practice on paper, as it can be used as a sketch that can be transferred to a harder material.
You just need to prepare your brushes and a few spreads from your notebook (for blanks) to get started. Consider aspects:
- paper should be taken in a format close to A4 (in albums or Whatman paper of appropriate size), and for children from five years old, the best option would be to use also less dense sheets for sketches, from which the whole idea will be transferred finally;
- You will need three brushes to get the best result: core brush, squirrel brush and flute brush. The latter is a flat brush used for small strokes that cannot be made with more substantial varieties;
- masters use oil paints in their work, and in art classes for preschoolers (fifth grade can also use templates for training) it is better to teach with gouache. The standard set includes twelve colors, of which you need to take only eight: white, cherry, bright blue, scarlet, yellow, dark green and red. The last 3 must be mixed, and the remaining ones can be used separately.
At a younger age, decorative drawing is easier to demonstrate to teachers step by step (for beginner adults, a similar method of work is also suitable) in the following sequence:
- sketch the diagram in natural size. Minor details are noted that will be carried over to the final version.
- Highlighting the center of the mosaic and the features that will be applied in each section;
- drawing each fragment thoroughly using the specified tools;
- coating the board with varnish - entrust this phase to those who are older.
Educators and teachers need to control the process at the stage of transferring the plan onto the plane in order to prevent paint from flowing out where it is needed, and to eliminate minor errors faster.
The two main sections of the illustration procedure, underpainting and animation, are performed with different brushes (in the case of floristry, shadows are also drawn between them). First you need to paint the background in an even layer, and then start adding details.
The finished product should be dried before varnishing with a transparent product that protects against fading, burnout and dampness.
Fine art lesson plan "Gorodets painting" with presentation, 5th grade
Abstract of an art lesson with a presentation on the topic “Gorodets painting”
Author: Natalya Viktorovna Enova, art teacher of MAOU Omutinskaya Secondary School No. 2 Description: abstract of a lesson in fine arts will be useful for fine arts teachers, designed for children 11 – 12 years old (5th grade). Corresponds to the 5th grade fine arts course curriculum. Textbook edited by B.M. Nemensky, Moscow “Enlightenment” 2020. Lesson topic: Gorodets painting. Type of lesson: combined Purpose of the lesson: to create favorable conditions for the formation of theoretical knowledge about Gorodets painting and the formation of practical skills to perform the main elements of Gorodets painting. Objectives of the lesson: Educational: the formation of theoretical knowledge about the emergence of Gorodets painting, its features, as well as the creation of favorable conditions for the formation of practical skills in performing the basic elements of painting: dots, circles, arcs, drops, spirals, strokes. Educational: continue to develop the skills to perceive and analyze material, answer and ask questions; imagination and perception, as well as attention. Continue to cultivate a culture of workplace organization, accuracy, responsibility, independence, perseverance, love for nature and human work. Developmental: continue to develop the ability to work with art supplies, imagination and creativity, and interest in the profession. Planned results: Personal UUD: - readiness and ability for self-development and self-determination; — formation of motivation for learning; — the ability to set goals and make life plans; Meta-subject UUD: Regulatory UUD:
- goal setting - as setting an educational task based on the correlation of what is already known and learned by the student, and what is still unknown;
— planning — determining the sequence of intermediate goals, taking into account the final result; — drawing up a plan and sequence of actions; — forecasting — anticipation of the result and level of assimilation; — control in the form of comparison of the method of action and its result with a given standard in order to detect deviations from it; - correction - making the necessary additions and adjustments to the plan and method of action in the event of a discrepancy between the expected result of the action and its actual product; - assessment - the student’s identification and awareness of what has already been learned and what still needs to be learned, assessing the quality and level of assimilation; Cognitive UUD: General educational UUD:
- independent identification and formulation of a cognitive goal;
— structuring knowledge; — reflection on the methods and conditions of action, control and evaluation of the process and results of activity; - formulation and formulation of the problem, independent creation of activity algorithms when solving problems of a creative and exploratory nature. Logical UUD:
- analysis;
— comparison, classification of objects according to selected characteristics; — establishing cause-and-effect relationships; Statement and solution of the problem:
- formulation of the problem;
Communicative UUD: - planning educational cooperation with the teacher and peers - defining goals, functions of participants, methods of interaction; — asking questions — proactive cooperation in searching and collecting information; - management of the partner’s behavior - control, correction, evaluation of the partner’s actions; - the ability to express one’s thoughts with sufficient completeness and accuracy in accordance with the tasks and conditions of communication, mastery of monologue and dialogic forms of speech in accordance with the grammatical and syntactic norms of the native language. Teaching aids: 1. Material and technical equipment: gouache paints, round synthetic brush No. 6, squirrel brush No. 3, cloth (cotton pads), sippy cup, palette, album. 2. Didactic equipment: presentation: “Gorodets painting” 8 slides. 3. Methodological equipment: outline. Methods of organizing the lesson: - verbal
- conversation, text analysis, explanation, story.
— visual
– demonstration of the presentation “Gorodets painting” 8 slides.
– practical
– doing exercises.
Methods of organizing a lesson: dialogue, oral presentation, conversation, story, explanation of new material, presentation demonstration. Structure of the lesson: 1. Organizational moment (1-2 min.) 2. Reporting the topic and purpose of the lesson (1-2 min.) 2. Updating knowledge and motivating students (7-10 min.) 3. Practical work (27-34 min.) 3.1.
Introductory briefing (1-2 min.) 3.2. Ongoing instruction and independent work (24-29 min.) 3.3. Final briefing (2-3 min.) 4. Summing up (1-2 min.) TOTAL 45 min. Progress of the lesson
1. Organizational moment (1-2 min.)
The teacher welcomes and checks those present, checks the availability of the necessary tools.
2. Statement of the topic and purpose of the lesson (1-2 min.)
Slide demonstration 1. Teacher: today’s topic of our lesson is “Gorodets painting”.
During the lesson, we will get acquainted with the history of Gorodets painting, and also learn how to perform the basic elements of Gorodets painting: dots, brackets, circles, arcs, drops, spirals, strokes. Having learned how to perform them, you can easily draw compositions of Gorodets painting. 3. Updating and motivating knowledge (7-10 min.)
Teacher: on the banks of the Volga there is a glorious and ancient city, but we will now find out what this city is called. To do this, you need to carefully listen to the history of its origin. Slide demonstration 2. Teacher: according to legend, this city was founded in 1152 by Prince Yuri Dolgoruky. The city was founded as a guard fortress. In those days they called it Small Kitezh. During the invasion of Khan Batu, enemies burned and plundered it. But he, like a Phoenix bird, rebuilt himself. What kind of city is this, who guessed?) Student: this is the city of Gorodets. Teacher: That’s right, Gorodets stood in a lively place, next to the famous Makaryevskaya fair. Demonstration of slide 3. Teacher: barges and ships with cargo walked along the Volga, and horse-drawn carts along the roads. Rows stretched for kilometers, in which trade was conducted in different languages; thousands of shops and shops were overflowing with goods brought not only from all over Russia, but also from other countries. Demonstration of slide 4. Teacher: along the banks of the Volga there was a row of wood chips, where they sold sleighs, tubs, troughs, rockers, and bast shoes made of wood. Residents of Gorodets and surrounding villages, such as Kurtsevo, Koskovo, Akhlebaikha, were famous as skilled carpenters and woodcarvers. Forests provided cheap and varied material from which everything was made: from children's toys and cradles to ships. Demonstration of slide 5. Teacher: Gorodets spinning wheels were especially famous. They were bought with pleasure, largely due to the funny painted pictures on the bottom of the spinning wheel. After finishing the work, the hostess hung such a bottom on the wall instead of a painting. Over time, craftsmen began to paint popular print boxes, toys, dishes, furniture and even parts of the house - shutters, doors, gates. Demonstration of slide 6. Teacher: let’s look at what the Gorodets masters painted on their products and what stages of painting the product went through. Demonstration of slide 7. Teacher: thanks to the famous master Lazar Melnikov, in the 19th century, flower buds, roses, and waterfalls appeared in painting. (The teacher shows color samples on the slide). Teacher: For many decades, masters have been practicing techniques for drawing flowers and have developed certain rules. First, a colored background is prepared (often yellow, since wood was previously painted with onion skins), and the main figures are applied to it in the form of large spots of color. This stage is called "underpainting". (The teacher shows on the slide the first stage of painting - underpainting). Teacher: the next stage is called “shadow”, why do you think this stage is called that? Student: Dark colors are used at this stage. Teacher: That’s right, darker burgundy or blue paints are used here. They indicate the center of the flower and the petals. (The teacher shows on the slide the first stage of painting - shadow). Teacher: the final stage of painting is called “revitalization.” Why do you think this stage is called that? Student: Colors are added to help the flower come to life and become more realistic. Teacher: that’s right, it is after this stage that the whole drawing seems to come to life. “Ozhivka” is done with white or black paint. (The teacher shows on the slide the first stage of painting - revival).
4. Practical work (27-34 min.)
4.1 Introductory briefing (1-2 minutes). Teacher: and now we will learn how to depict the main elements of Gorodets painting the way folk craftsmen do. To get closer to the secrets of painting, to become a master, you need to study. What are the master's students called? Student: journeyman. Teacher: task: complete the basic elements of Gorodets painting: dots, brackets, circles, arcs, drops, spirals, strokes on an album of A4 sheet with gouache or acrylic paints with a squirrel brush. For this we will need: an album, a squirrel brush No. 3, a synthetic brush No. 6, a simple pencil, gouache, a palette, a sippy cup. The teacher checks the availability of the necessary materials and shows an example of completing the task “Basic elements of Gorodets painting.”
Teacher: first, let's divide our landscape sheet into 8 lines, and divide the sheet in half (so that our elements are done neatly and there is enough space for all the elements).
The teacher communicates the criteria for assessing the practical task. Criteria for assessing a practical lesson. A grade of “5” (excellent) is given if the work meets all the requirements for completing the task: all the main elements of Gorodets painting are done neatly, there are no marks on the sheet, all completed elements correspond to the teacher’s description. A rating of “4” (good) is given if all the main elements of Gorodets painting are completed and correspond to the teacher’s description; it is allowed to fail to complete 1-2 elements, and there are blots (not done carefully). A grade of “3” (satisfactory) is given if some elements of Gorodets painting are not completed (exercises 1-2), but the remaining exercises are completed and correspond to the teacher’s description. A rating of 2 (not satisfactory) is given if the main elements of Gorodets painting are not completed or there are gross errors in their implementation (do not correspond to the description). 4.2.Independent work and ongoing instruction (24-29 min.) The work is organized as follows. The teacher says what exercise needs to be done, shows the principle of its implementation, and the teachers perform it. The teacher, while the students are performing the element, talks about it in more detail. After several students have completed the exercise, the teacher approaches each one and checks for the completed exercise. Only after the teacher has checked with everyone, the teachers begin the next exercise. Teacher: perform exercises 1-3 in dark green. The first element is a straight drop. The droplet is universal: it can be a small secondary element of registration, decoration, decoration, or it can be independent - Gorodets fan leaves. The droplet size depends on the pressure applied. Teacher: performing the painting element - triple straight drop (right). To the straight double droplet to the right of it we add the same two elements, but of an even smaller size. Teacher: Performing an element of painting - a triple straight drop (on the left). The element is identical to the previous one, but small droplets are located on the left. The teacher approaches each student and checks for the completed exercise 1. Teacher: let’s do exercise 2. Performing the element of painting - a droplet with a turn to the right. It is performed like a straight drop, but when pressing on the hand, we turn the hand a little to the right. From such droplets various border ornaments are obtained. Teacher: performing an element of painting - a droplet with a turn to the left. It is performed similarly to the previous one, but the turn is performed to the left. The teacher approaches each student and checks for the completed exercise 2. Teacher: let’s do exercise 3. Performing the element of painting - a bracket. It resembles the “droplet” element, but at the end of the element the brush also touches the sheet and is drawn thinly. Teacher: performing an element of painting - a triple bracket. To the leaf element to the right of it we add the same two elements, but of an even smaller size. The teacher approaches each student and checks the presence of completed exercise 3. Teacher: we perform exercises 4-5 in red. Let’s do exercise 4 - an arc (of two types). The edges of the petals of the cups and many other details of the painting will not be complete without this element in the painting, lovingly called by the masters “sickle” or “bracket”. The arc can be simple, steep or flat. The execution of the painting element is a simple arc. We begin to point the brush downwards, pressing lightly. When the strongest pressure is applied to the lowest position, the brush itself will seem to want to rise when turning upward. Complete the hair movement by smoothly lifting the brush from the surface. There is also such an element as a steep arc, which is performed in the same way as a simple arc, but the height of the steep arc is higher. Teacher: performing the painting element - a flat arc. It is performed in the same way as a simple arc, but the height of the arc is shallower and lower. The teacher approaches each student and checks that exercise 4 has been completed Teacher: Let’s do exercise 5 - spiral. First, let's put a point, then from the point we begin to draw a circle, thus twisting our arc into a circle. The teacher approaches each student and checks for completed exercise 5. Teacher: let’s do exercise 6 - period. The scattering of dots converging on “no”, made with the wooden end of the brush, looks especially impressive. Brushes of different numbers produce smaller or larger dots. When performing this exercise, do not forget that the paint should not be thick. Teacher: let's do the exercise dots of different sizes. We put a large point and from it four more smaller points. Teacher: let's do the dots in a circle exercise. We put a dot in the middle, and around it small dots (it looks like a flower). The teacher approaches each student and checks for the completed exercise 6. Teacher: let’s do exercise 7 - stroke. A stroke is not even an element. It creates a “shadow”, emphasizes some detail, and is a decoration for berries, Gorodets bouquets, and centerpieces. The “leaf” technique with the “stroke” and “droplet” techniques give all kinds of leaf options. Let's do the stroke exercise, with a slight movement we make straight lines at an angle. Teacher: let's do the double stroke exercise, it is performed identically to the previous element, but a stroke is added at a different angle. The teacher approaches each student and checks that exercise 7 has been completed. 4.3. Final briefing (2-3 min.). The work is organized as follows: students lay out the completed exercises on A4 sheet of paper on the table.
The teacher asks students to find errors in their exercises and the completed exercises of other students. Students discuss their work. 5. Summing up (2-3 min.)
Teacher: the exercises completed today are very important in order to perform Gorodets painting efficiently and correctly, like any other painting, first you need to draw the main elements of this painting, i.e. Gorodets and then you will not have any problems when performing plant motifs, zoomorphic motifs and others, and when we move on to painting finished products of decorative and applied art, the skills you have acquired today will be useful to you. If you have not mastered any element of Gorodets painting well, for example, you were unable to complete the drop with a turn exercise, then at home you need to continue performing this element in order to gain the necessary skill. The teacher dictates homework: 1. Bring all the necessary art materials: album, gouache, synthetic brush No. 6, squirrel No. 3. Show slide 8. Teacher: thank you for the lesson.
Have a nice day, everyone. Goodbye. Presentation on the topic: History of Gorodets painting
We recommend watching:
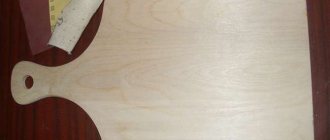
Gorodets painting on a cutting board Gorodets painting on a cutting board. Master class with step-by-step photos Gorodets painting of a cutting board. Master class with step-by-step photos Do-it-yourself panels made of colored paper. Master class with photos “Gorodets patterns”
Similar articles:
Gorodets painting. Master Class
The main plots outlined for the most part
As a rule, they come across works:
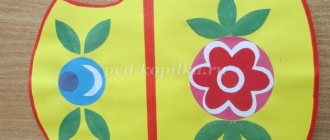
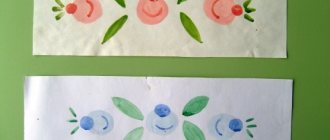
- flowers (rosan, daisies, kupavka). Visualized in the form of a symmetrical bouquet, garland, stripe, wreath or diamond;
- birds (swans, peacocks, roosters, pigeons or cuckoos, depending on the author’s purpose);
- The “tree of life” is the personification of nature. These things contain a lot of components (compounds from plants, birds). The draftsman also draws a horse on the left and right, and occasionally lions, leopards and other exotic things.
Professionals also engage in more advanced types, such as plot painting, where there may be miniatures depicting events in real life or literary works.
Both the interior of a residential building and the streets of populated areas are depicted with the maximum possible number of subtleties. Often in such images you can see elements in the manner of domestic animals located at the feet of the owner. Another feature is the presence of vegetation in the winter landscape outside the building.
Similar crafts are usually embodied in a rectangular configuration, and the edges are decorated with ornaments. There are also round variations, installed on a shelf as decorative plates, the patterns on which are located on the edge.
The box is capable of containing on its edge a few outlines with various situations, the central one of which is placed on the lid or front wall (on the side where the structure opens).
- Decorations for the New Year: decor ideas and options for decorating a house and apartment for New Year's celebrations (135 photos)
- Window decoration - simple ideas and step-by-step descriptions of do-it-yourself window decoration (110 photos and videos)
Diaper cake - a step-by-step description of creating a diaper cake. 115 photos and videos of creating a gift
The description of the life of the peasants reflected the reality of the time period in which the master’s work was carried out as meaningfully as possible. Unusual displays, inscribed in a scene from everyday life, enhance the effect of what they see.
The most important actors are located in the center of the canvas - larger than the rest. Shots of tea parties, feasts, weddings and other events - always with a table where dishes are placed or other secondary objects that reveal the essence of what is happening.
Elements based on folk tales are no less popular and in demand - the plot and characters are recognizable at first sight, and the richness depends only on the imagination of the creator.
Start of image
In order for the drawing to turn out really neat and beautiful the first time, it is not enough just desire and prepared materials. It is very important to learn the technique of applying an image. Here you need to understand how to hold the brush, how to guide it, what movements to use to depict the details of the drawing.
All Gorodets painting is carried out in three stages. The first thing to do is to apply a background onto which the drawing will be superimposed. Next, we carry out the drawing step by step.
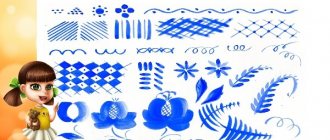
- Underpainting. Large spots of color that will subsequently serve as the basis for the image. These are big figures. For children, the elements of underpainting are very easy.
They are applied in a thin layer and completely shaded. You need to sketch them very carefully so that there are no streaks, sagging or gaps. For a good result, it is better to paint with a flat, wide brush.
- Fabric. Brush number 2 is used. The essence of this stage is to break the underpainting into parts and highlight the details.
- Revivals. This is another technique in the Gorodets technique. Here black and white paint comes to the rescue, which highlight the accents of the picture. This stage is very difficult and requires concentration.
With black and white paint, many dots are applied to the underpainting and fabric, which add brightness and liveliness to the drawing. It is important not to overdo it here, as a large amount of animation can ruin the drawing.
Gorodets painting will turn out very well if you learn how to hold a brush correctly. It should be perpendicular to the surface on which the design is applied.
In this case, the hand should be supported by the elbow and fixed by it, and the hand should remain mobile and free. If it is difficult for a child to hold his hand in this position for a long time, then you can rest it on the little finger. In this hand position it is easier to draw smooth and regular lines.
The last thing in drawing a Gorodets painting is to connect all the elements together step by step. Pictures should be bright and colorful.
This is the main feature of this direction in art. If the child has learned to depict elements well on paper, you can continue and offer to draw on a wooden base.
Where to start
If you decide to exercise yourself or your son or daughter wants to learn it, it is not necessary to attend any courses. It’s enough to start small - find online lessons in a form convenient for you - this can be a text with illustrations, which shows how the work canvas takes on its own shape.
Other modifications are videos, coloring books, stencils, which allow you to clearly understand everything, and ultimately understand it along the way.
When doing work, it is not advisable to rush, trying to apply shades to the surface as quickly as possible - this will only lead to streaks. Use a pencil to outline the outline, but do not apply pressure.
Patchwork - technique and master class for sewing stylish and beautiful sewing with your own hands (80 photos)- Tilda doll - a master class in sewing toys with your own hands. 125 photos of the best toy models
How to make a car out of paper: step-by-step description of how to quickly and easily build a high-quality car (75 photos + video)
Another feature of the operation is the concentration of dark spots on top of light ones. All you have to do is choose the direction in which you are going to create, and therefore you will master Gorodets painting. To improve your skills, you can first select paintings online, and then reproduce your own textures or leitmotifs.
Initially, it is far from perfect, but with constant repetition and honing of the skill, the result will become better, giving the right to trade professionally and on a permanent basis.
Features of Gorodets painting
The main difference between this craft is its content. Each element of the image serves as a storyteller, painting not only a visually appealing series, but also an entire story. The apotheosis of the meaningfulness of Gorodets painting is genre scenes. They are free and quite conventional in nature, sometimes even bordering on caricature. But at the same time, they are very interesting to look at and “read.”
In Gorodets painting, realistic motifs often coexist with idealized ones. The images of animals and birds are very decorative. On painted items you can see lions and leopards, which, naturally, were exotic animals for Russia. But even the usual horse appears on the painted board as a hot, strong, and at the same time graceful animal, his pose is proud and warlike, and he himself appears not as a draft force, but as a royal animal.
It is not uncommon for Gorodets painting to have paired images, elements facing each other.
It is not uncommon for Gorodets painting to have paired images, elements facing each other. Where the plot requires it, the artist uses the motif of a magnificent curtain. The most preferred colors: bright red, expressive green, deep blue, black. The painting is done with a brush; no preliminary drawing is applied. The technique involves both broad strokes and the finest lines, the virtuosity of drawing which requires skill and experience.
Gorodet painting – 65 photo examples
- Paper toys - diagrams, ideas and options for making various toys with your own hands (110 photos)
Dymkovo toy - modern collections, their creation and features of making Dymkovo toys (115 photos and videos)
Knitting openwork patterns - diagrams and step-by-step master class on how to knit an openwork pattern quickly and easily (95 photos + video)