Donut
You will need: plasticine of bright colors, a stick, a plastic spatula.
Master Class
- Roll out a ball of yellow plasticine.
- Flatten the workpiece and press the center with the round tip of the stack-bulk.
- Trim off excess plasticine from the back side.
- Make a cake from pink plasticine.
- Attach the doughnut to the donut base and make a hole in the center.
- Roll plasticine flagella in bright colors.
- Place the flagella in the freezer for 5 minutes.
- Remove and cut the frozen flagella into small pieces.
- Decorate the donut by adding sprinkles.
The plasticine donut is ready!
What types of plasticine are there?
- Let's start with the most common plasticine
, which is familiar to us from childhood. Most often it is domestically produced, from well-known brands. Fortunately, we have now learned how to make it practically odorless, and there are also a lot of flowers. I would give this kind of plasticine to a three-year-old child if he can and knows what to do with it. This is not the first option, but rather the last one worth giving.
Ball plasticine
- Not so long ago, ordinary plasticine labeled “soft”
, but it is not much easier to work with. It will not cause the desire to strain in “lazy” children. I would give it to a two-year-old child: this kind of plasticine is a bit stiff, but if the child is persistent, then he will be able to mold something. - is very popular now :
it is really soft, easy to knead and suitable even for babies if they have stopped putting everything in their mouth. But it has a drawback: it is not suitable for serious structures, because the parts will bend under their own weight.
Wax plasticine
- Recently I saw floating plasticine
, which is suitable for playing in water. There are generally many types on sale, and you can find them with sparkles, some decorative elements, jumping, fluorescent, “smart,” magnetic, sculptural, and so on. There are even foam balls - it is called ball, but it is difficult to classify it as plasticine in the general sense.
Husky
You will need: plasticine of gray, white, black, blue, red and yellow, toothpick, stacks.
Master Class
- Roll a ball of gray plasticine.
- Stack 2 triangles at the top of the ball.
- Attach 2 flat triangles of white plasticine.
- Cover the bottom of the ball with white plasticine.
- Roll out an oblong oval from white plasticine and attach it as a muzzle.
- Roll the nose out of black plasticine and attach it to the muzzle.
- Make eyes from blue, black and white plasticine and attach them to white triangles.
- Make a tongue out of red plasticine and secure it.
- Make the lower part of the mouth from white plasticine and attach it under the tongue.
- Make 2 triangles from gray plasticine and attach them as ears.
- Work out the features of the muzzle with a stack.
- Make a body out of gray plasticine, insert a toothpick and secure the head.
- Cover the dog's belly with white plasticine.
- Roll 2 sausages from gray plasticine and attach them as front legs.
- Make 4 white plasticine cakes and attach them to the paws as shown in the image.
- Roll a sausage out of gray plasticine and mold a crescent-shaped tail.
- Stack the ponytail, adding fluffiness, then attach it.
- Make a collar from blue plasticine, and make a clasp from yellow plasticine, then make holes with a toothpick.
- Draw the ears, muzzle and paws with a stack.
Plasticine husky is ready!
A pineapple
You will need: yellow, green, dark green and any color plasticine, stack, toothpick.
Master Class
- Roll a ball of brown plasticine (you can use leftover plasticine of any color for the base).
- Give the ball a pear shape and make the base stable.
- Roll out a ball of dark green plasticine, then roll it into an oval shape.
- Make a larger cake from yellow plasticine.
- Combine the green and yellow cakes, then roll them out.
- Turn the workpiece over with the yellow side up and draw a grid with a stack.
- Wrap the brown pineapple with a yellow tortilla.
- Trim off excess plasticine and smooth the joints with your fingers.
- Make oblong leaves from green plasticine and cut out the jagged outline.
- Stick the leaves to the top of the pineapple as shown in the image.
Plasticine pineapple is ready! Also check out the champagne and candy pineapple.
Dough and modeling masses
Play dough is now represented by many brands in different price segments. We had all types, so from my experience I can advise you to always check the expiration date: if the dough has been made for a long time, then even the first time it will crumble and flake.
Play dough
There are masses based on plant ingredients - analogues of real dough, but more durable. By the way, their service life is shorter than that of their completely chemical “colleagues”.
Modeling mixtures are usually sold with a variety of molds, cake, ice cream and noodle making machines. You can buy kits like “Mr. Nibbler” or mini-hair salons, where the hair of funny little people is made from dough.
Modeling and polymer clay
There are no fewer options here than with plasticine: natural, polymer, self-hardening, baked, and so on.
Modeling clay is an airy, plastic mass that is pleasant to hold in your hands. It hardens in air. I met her when I wanted to make a cast of a baby’s hand. Ready-made sets were expensive, but, as it turned out, you can order a lot separately. The range of colors is huge, but for children they most often buy white, and then paint the figures.
There is also “angelic” clay, kinetic, and I suspect that this list does not end there.
Panda
You will need: black, white and green plasticine, toothpicks, stacks.
Master Class
- Roll a ball of white plasticine.
- Push through two holes for the eyes.
- Roll balls of black plasticine, then attach and flatten them.
- Roll out a flat oval of white plasticine and attach it to the bottom of the head.
- Attach the black spout.
- Make eyes from white, green and black plasticine, then attach them.
- Make black ears and attach them to the top of the head.
- Roll out a roll of black plasticine, flatten it in the center and bend the ends.
- Roll a ball of white plasticine and glue it to the black blank.
- Connect the workpiece and the head using a toothpick.
- Mold and attach the black lower legs.
- Roll balls of white plasticine and attach them as pads to the paws.
- Draw in eyebrows with a toothpick.
- Roll a ball of black plasticine and attach it in place of the tail.
- Make a bamboo stick from green plate and attach it to the panda’s body.
The plasticine panda is ready! I recommend watching this video!
We sculpt Smesharik Krosh from plasticine. Cartoon. Kikoriki made of plasticine.
Apple
You will need: red, green, black, white and brown plasticine, stacks, toothpick.
Master Class
- Roll out a ball of red plasticine.
- Shape the ball into an apple shape.
- Prepare a strip of brown plasticine and cut fine fringe.
- Make a small indentation in the apple for the stamens.
- Cut a small piece of the stamens, twist them and attach them to the apple.
- Make a stalk out of brown plasticine as shown in the image.
- Make a small indentation in the apple and stick the stem.
- Make 2 leaves from green plasticine and draw lines using a stack and a toothpick.
- Stick the leaves to the base of the cutting, then give them a curved shape.
- Make a droplet of white plasticine, flatten it and stick it to the apple as a highlight.
- Roll 5 balls of green plasticine and form a caterpillar.
- Roll 2 very small balls of black plasticine and stick them on as the caterpillar's eyes.
- Stick the caterpillar to the apple.
The plasticine apple is ready!
Chamomile
You will need: white, yellow and green plasticine, stacks, boule, skewer.
Master Class
- Make a drop of white plasticine, then flatten it into a petal shape.
- Draw a stack of lines.
- Make 20 white petals.
- Roll up the yellow center of the flower.
- Prepare a strip of yellow plasticine and cut through the fringe.
- Stick a strip around the circle of the yellow center.
- Stick the white petals in a circle, placing them in a checkerboard pattern.
- Cover the skewer with green plasticine, leaving the tip free.
- Make a cake from green plasticine and sculpt a receptacle.
- Stick the bud to the receptacle.
- Draw a mesh texture on the yellow center.
- Make a leaf, draw the texture and stick it to the stem.
The plasticine chamomile is ready!
Plasticine production at the factory
Most of the time in plasticine production technology, all components are thoroughly mixed. To begin, petrolatum, paraffin and rosin are heated and added to a large reactor boiler, which in turn is heated by steam. Also at this stage, zinc white is added so that the main pigment better colors the entire mixture. All this is mixed and gradually kaolin (clay) and a pigment component are added there.
Now this whole hot mixture will be stirred for an hour and a half, until an absolutely uniform mass is achieved. After which this entire mixture is poured into a hopper for cooling. In this hopper, a drum rotates, which is cooled from the inside. He dips a little into the plasticine and wraps a solid tape around himself, which hardens almost instantly.
Next, this tape enters the screw press and comes out of it as bars of the familiar plasticine with a wavy upper surface. This procedure occurs in parallel for each color, after which they all meet on a common conveyor, where they are distributed into packages.
Finished plasticine is also tested. They check it as follows: first, knead it for 3 minutes and make a sausage with a diameter of 1 centimeter, after which they bend it into a 90-degree angle; under such conditions, no cracks should form on the bend. Also, plasticine should not be sticky, should not stain the water or tear.
Pendant "Snowman"
You will need: a sheet of cardboard, a simple pencil, scissors, string, tape, plasticine in white, orange, brown, black, blue, purple and green, skewer, stack.
Master Class
- Draw a circle on a piece of cardboard, then cut it out.
- Cover one side of the circle with white plasticine.
- Make oval legs from purple plasticine, then attach them to the bottom of the circle.
- Roll out an oval nose from orange plasticine, then attach it.
- Make eyes and a smile for the snowman from black plasticine.
- Roll 2 buttons from blue plasticine, attach them and use a skewer to make 2 holes in the buttons.
- Roll the purple and blue plasticine into sausages, then form a hat as shown in the image.
- Roll a ball of white plasticine and attach it as a pompom, then use a skewer to create a “fluffy” texture.
- Make stick handles from brown plasticine, then attach them to different sides of the circle.
- Make highlights on the nose and eyes from white plasticine.
- Draw a knitted pattern onto the hat using a skewer.
- Draw lines on the legs as shown in the image.
- Make 3 leaves from green plasticine and roll 3 orange berries, then decorate the hat.
- Attach the string to the back using tape.
The plasticine “Snowman” pendant is ready!
How to make smart plasticine with your own hands?
The most important thing you need to create smart plasticine at home is PVA glue and sodium tetraborate. Sodium tetraborate is sold in every pharmacy and costs a penny. It is also recommended to add some kind of pigment, it can be like food coloring, maybe gouache or even brilliant green. The cooking process itself will not take much time. Pour PVA glue into a convenient container and mix with your dye until the mass is homogeneous in color, then gradually add sodium tetraborate, keep in mind that the more of it, the thicker and denser your “smart” plasticine will be.
Ice cream
You will need: plasticine of bright colors, a spatula, a stack, a wooden skewer, beads and rhinestones.
Master Class
- Roll a ball of brown plasticine.
- Flatten the ball into a flat cake.
- Draw lines with a stack, creating a waffle texture.
- Twist the workpiece to form a cup, then secure the edges.
- Roll balls of bright colors of different sizes.
- Use a skewer to process the halves of the balls as shown in the image.
- Place the balls into a waffle cup.
- Decorate the ice cream by attaching beads and rhinestones.
- Make a cherry and attach it to the top of the ice cream.
Plasticine ice cream is ready! I recommend watching this video!
DIY Making Play Doh Ice Cream Popsicles
Crocodile
You will need: green, dark green, white, black and red plasticine, a glass stack, a toothpick, a napkin with a pattern.
Master Class
- Roll a sausage out of green plasticine.
- Cut the blank in half and create three parts from green plasticine: a carrot, an oblong oval and a ball.
- Take the green oval and make a cut, forming the mouth of a crocodile.
- Slap red plasticine into the mouth.
- Roll the sausage out of white plasticine, flatten and cut the cloves, then attach them to the red plasticine.
- Roll 2 green balls and make eyes by attaching white and black plasticine, then attach the blanks to the crocodile's head.
- Treat the body and head of the crocodile with a napkin, giving it a patterned texture.
- Connect the body and head of the crocodile using a toothpick.
- Roll 4 balls of green plasticine and attach them to the paws.
- Make notches on the paws with a stack.
- Roll a sausage from dark green plasticine, flatten it, cut the teeth and attach it to the back of the crocodile.
- Attach highlights to the eyes using white plasticine.
The plasticine crocodile is ready!
Grape
You will need: purple, brown and green plasticine, glass stack, thin wire.
Master Class
- Make a rope from purple plasticine.
- Cut it into pieces.
- Roll each piece into balls.
- Make a cone out of purple plasticine.
- Cover the cone with grapes, leaving the top part free.
- Prepare a piece of thin wire and cover it with brown plasticine, as shown in the image.
- Draw the lines to create a branchy texture.
- Attach a wire twig to the top of the grape, then stick the grapes around it.
- Make a cake from green plasticine.
- Outline the outline of the leaf and cut it out, then draw the texture.
- Roll out a thin strip of green plasticine, carefully twist it and stick it to the grapes.
Plasticine grapes are ready! I recommend watching this video!
Air plasticine for children, learning to sculpt roses
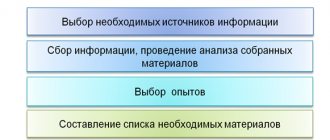
Research project “Home plasticine”
I am 9 years old, I am in third grade. In technology lessons we often use plasticine and make various crafts from it. In this regard, I had several questions:- How many children like to sculpt with plasticine?
- How safe is plasticine for children?
- What does plasticine consist of?
- How to choose the right plasticine when purchasing?
- Is it possible to make plasticine at home?
To answer these questions, I decided to conduct a survey of students in class 3 A of gymnasium No. 3. 29 students from my class participated in the survey.
I think it is not difficult to find a fun activity for a child. But besides entertainment, it should also bring benefits. Plasticine modeling is good for children's development. It allows you to realize your child’s creative ideas just as well as drawing. Moreover, studies have shown that different areas of the brain work when sculpting. There is a lot that can be made from plasticine, the main thing is that you have enough time and inspiration.
It is important that the material is safe for the child and inexpensive. Today, stores have products from different manufacturers, both domestic and foreign. Unfortunately, many types of material contain harmful dyes and other substances. In stores you can now find a huge variety of modeling materials. But you can make plasticine at home yourself. Do you think it's difficult? Not at all, especially since all the ingredients are absolutely available and safe for your children. And I decided to try making plasticine at home
The problem of the research is the contradiction between the benefits of working with plasticine and the environmental problems that arise as a result of the qualitative composition of plasticine.
The goal of my work is to prepare harmless and safe plasticine at home. Accordingly, I must complete several tasks to achieve my goal:
- get acquainted with the history of the appearance of plasticine;
- study the composition of plasticine, types of plasticine. Determine how to choose high-quality plasticine;
- make plasticine at home;
- draw a conclusion based on the results of the work.
The hypothesis will be my assumption that it is possible to make plasticine at home.
Object of study: plasticine.
The subject of the study is the production of plasticine at home.
The practical significance of my work is that the research results can be used in our lives.
1. The history of plasticine
The history of plasticine begins with the controversial issue of authorship of the invention. The German pharmacist FranzKolb patented the model mass he invented called “Plastilin” in 1880, while another contender for authorship, the Englishman William Harbutt, patented in 1899 the non-drying clay “Plasticine”, which he had invented two years earlier. Public opinion still refers to Harbutt as the author. If we take into account that both names and patents concerned masses with almost identical composition and are considered synonyms, then in order to avoid confusion we will call everything plasticine.
The invention of plasticine was the result of Harbutt's many experiments to create an easy-to-use modeling material. Not only artists, but also William’s six children fell in love with “the clay that never dries,” as he initially called it. They filled the house with plasticine castles, ships, battle scenes and fountains. The original plasticine was gray in color. Its exact formula is still a secret, but it is known that it contained calcium salts, petrolatum and stearic acid. It already went on sale in four colors, and was soon released in a variety of bright colors. At first, William planned to use his invention for educational purposes. But, seeing how much pleasure his family got from plasticine, he decided to sell plasticine commercially so that other children could enjoy it. In 1900, Harbutt opened his own factory, which operated until a fire in 1968; production has now been moved to Thailand. Franz Kolb plasticine is also still sold under the name “Munich art plasticine”.
2.Composition of plasticine. How to choose quality plasticine
Plasticine has a special consistency that allows you to make any figure out of it. Rarely does anyone think about what is in it. And this is very important, because plasticine is in close contact with the child’s skin. There is a classic formula for making plasticine, the “backbone”, which is taken as the basis, no matter what type of plasticine is chosen. It includes:
- clay powder, ground to dust;
- beeswax;
- lard of animal origin;
- ceresin;
- dyes;
- petrolatum.
Individually, each element is safe for the child’s health if plasticine is used as intended. This means that, in general, such a creative tool is not dangerous if it is not eaten.
It is important to pay attention to other elements in the composition that are not listed.
They can be harmful. Also, excessive addition of dyes will not characterize the mass from the best side. But the more Vaseline, the better. After all, it makes plasticine softer and more pliable.
Ceresin is a mixture of saturated hydrocarbons. The substance is very similar to wax, odorless. Thanks to him, plasticine has a consistency familiar to everyone.
Choosing safe plasticine
Buying plasticine for children is a responsible matter, because you need to choose not just a material for a hobby, colorful and unusual, but also safe for children’s health. Let's consider a few important points. Tip 1. Read the ingredients! The possibility of buying low-quality plasticine that is harmful to a child’s health is always present, despite the fact that strict requirements are always imposed on children’s products. Safe plasticine is made from natural ingredients (wax, fat, petroleum jelly, starch, etc.), and if you see the words “solvent”, “thickener”, “artificial flavor” or some synthetic components in the composition, then this is a reason refuse the purchase. Tip 2. Smell the plasticine! Yes, yes, just smell it. It is better if the material for modeling does not have a strong or pleasant aroma. The smell may indicate the toxicity of plasticine, and some strawberry aroma may confuse the child and make him think of tasting “candy.” Tip 3. Pay attention to the manufacturer. Sometimes, imported plasticine costs an order of magnitude more than domestic plasticine. However, if you do not see any differences in composition or color, then choose plasticine that is affordable. Also, a well-known name of the manufacturer can give more guarantees that you will purchase high-quality and safe plasticine from him. Tip 4. Pay attention to the recommended age. The age is not indicated by chance. Thus, it is easier for the little ones to master the basics of modeling from plasticine dough. And as you grow older, you will acquire plasticine for the so-called advanced little sculptors. For example, children over 3 years old like modeling kits, which contain various molds, cutters, etc. Tip 5. No traces! Of course, it is not possible to test plasticine in a store. You may have to go through trial and error, but in the end you will find the plasticine that will completely suit your child. Good plasticine should not get very dirty, fall apart, or leave greasy stains. Even if some marks remain on the clothes, they should be easily washed off.
3. Making plasticine at home.
Using Internet resources and additional sources, I found several recipes for making plasticine at home:
1) Consider a recipe for plasticine prepared by heating. To prepare plasticine we will need:
- Flour – 1 glass,
- Salt - ½ cup,
- Cold water - 1 glass,
- Vegetable oil – 1 tbsp,
- Citric acid (or lemon juice) – 1 tablespoon,
- Food coloring (various colors).
In a saucepan, mix a glass of water, half a glass of fine salt, a tablespoon of citric acid and a tablespoon of any vegetable oil. Add food coloring to the mixture and place the pan with the resulting mixture on the fire. We heat our future plasticine until warm, remove the container from the heat and add flour. Knead thoroughly until an elastic, homogeneous mass is obtained. This plasticine is completely harmless to a child, but citric acid and salt give it a sharp, unpleasant taste.
2. The following recipe does not involve heating to prepare plasticine at home:
Classic salt dough
Salt dough is widely used to create crafts of various levels of complexity. Children of any age can work with it. This plasticine is made from natural ingredients that can be found in every home.
Important! This modeling mass is made on the basis of natural products; if a child takes it into his mouth, it will not cause harm to his health.
To make salted play dough, you need to prepare:
- 250 ml water;
- 1 glass “Extra” salt;
- 2 cups wheat flour.
The cooking process is as follows:
- Combine salt and flour in a bowl.
- Then gradually add water and knead the dough.
- To determine the degree of readiness of the plasticine mass, focus on its structure. If the mixture crumbles, add a small amount of water. Add flour to plasticine that is too sticky.
- Form a ball from the prepared mass, make several indentations in it with your fingers. If the dough holds its shape and does not spread, it is ready.
When kneading, you can add a little vegetable oil. Thanks to this component, the plasticine will not dry out, stick to your hands, and a crust will not form on it.
Conclusion
The hypothesis put forward was confirmed; it turns out that you can make plasticine at home, for this you need to know the exact recipe.
Homemade plasticine is very pleasant to the touch, soft, does not stick to your hands, the parts fit together very well, and the colors mix well with each other.
Homemade plasticine is environmentally friendly and harmless, it will not harm the child.
Advantages of plasticine made at home:
It's safe and harmless. Even if the child wants to taste the mass, nothing bad will happen, since all the ingredients are natural. It's convenient and practical. Modeling from homemade plasticine is a pleasure, because it is viscous, plastic, pleasant to the touch and soft. And he doesn’t get his hands dirty, which is also important.
It is not expensive. You can probably find all the ingredients at home or in your nearest store, and they are inexpensive.
It's fast! It won’t take you much time to make homemade plasticine.
Be sure to try making homemade clay! This is cool! Creative success to all!
Fox made of pine cones and plasticine
You will need: pine cone, orange, green, white and black plasticine, stack, autumn leaves.
Master Class
- Make ears and an elongated muzzle from orange plasticine, roll up a black nose and attach all the parts to the pine cone.
- Make a tongue out of orange plasticine, then attach it.
- Make crescent-shaped eyes from white plasticine and attach green pupils.
- Make eyelashes from cuttings - the tails of leaves.
- Attach the eyes to the pine cone.
- Mold 2 legs and a tail from orange plasticine and make cuts with a stack, as shown in the picture.
- Attach the paws and tail to the pine cone.
- Lay out the leaves and plant the fox.
The fox made from pine cones and plasticine is ready!
When to start sculpting
Neuropsychologists recommend giving your child plasticine when he is seven to eight months old. “Have you learned to sit? Let’s sculpt!” - this is the motto of the specialists. It is recommended to choose regular plasticine rather than soft mass for modeling. After all, the goal of the first lessons is to teach the baby to tear off pieces from the “sausages” and feed them to toys.
Tools and molds
I tried to give my daughter plasticine at seven months, but she immediately put it in her mouth, and this was the end of our experiment. The second attempt took place at nine months, and here our classes took longer and brought pleasure to both of us. Since then we have been sculpting a lot and often and have managed to get acquainted with probably all types.
Crow
You will need: plasticine, toothpick, glass.
Master Class
- Roll a small ball of dark gray plasticine.
- Roll a smaller ball of light gray plasticine.
- Flatten the light gray ball into a flat cake.
- Make cuts in a circle.
- Cut off pieces of plasticine to make a star.
- Connect the ball with the star.
- Using a round stack, press 2 holes on the ball.
- Make an oval-shaped bird's body from dark gray plasticine.
- Make the wings of the bird in the shape of flattened drops of dark gray plasticine.
- Make a wavy outline on the wings using a stack.
- Attach the wings to the body.
- Make the crow's paws and attach them.
- Make 3 thin little sausages and attach them to the top of the bird's head.
- Make the eyes of a crow from black and white plasticine.
- Draw the eyebrows of the crow in a stack.
- Attach a small tail to the crow.
- Make a toothpick pattern on the raven's neck.
The plasticine raven is ready! I recommend watching this video!
WE MAKE iPhone X - iPhone 10 FROM PLASTICINE | Video Modeling
MAGAZINE Preschooler.RF
Plasticineography project “Children’s dreams from plasticine”Teacher of MBDOU kindergarten No. 77 V.A. Vystavkina ADMINISTRATION OF THE CITY OF IRKUTSK DEPARTMENT OF EDUCATION COMMITTEE ON SOCIAL POLICY AND CULTURE Municipal budgetary preschool educational institution of the city of Irkutsk kindergarten No. 77
1. General provisions (project name and idea) Project name: “Children’s dreams from plasticine”
Type of project: long-term (1 year), group, educational, research-creative.
Educational areas - artistic and aesthetic development, cognitive development, speech development.
3. Goals and objectives of the project
Project goal: Development of creative abilities in preschool children through plasticineography.
Project objectives:
- Conduct a theoretical analysis of the concepts of creativity and creativity.
- To identify features of the development of creative abilities in children of senior preschool age.
- Organize a subject-development environment in accordance with the set goals and objectives.
- To systematize work with children of senior preschool age on the development of creative abilities through plasticineography.
- Plan work with parents in this area.
- Experimentally test the effectiveness of using the developed technology.
Relevance of the project.
The relevance of studying the problem of creativity is explained by the contradiction that has arisen between society’s social order for a creative person and the insufficient development of the general principles, theory and methodology of creativity. The need for the formation of creative abilities is determined by the fact that it determines the productive orientation of the individual, creative individuality, is the basic determinant of social creativity and contains the conceptual principles of creative training and education. Currently, programs are being developed and implemented to develop creative abilities, thinking and imagination in the educational work of a preschool institution, including game techniques. The problem of making it easier for children to access internal creative resources can be solved by relying on the idea of L.S. Vygotsky about the zone of proximal development. With some external help, any child does much more than he can do on his own. Encouraging creativity is especially important in preschool years. It is the preschooler whose whole life is permeated with fantasy and creativity.
4. Project product: For children and parents: Organization of exhibitions of joint creativity products, interior design in the group and premises of the preschool educational institution. For teachers: Design of mini-projects and presentations: “Children’s dreams from plasticine” , “Plasticineography” , albums. Making a card index of didactic games for the development of creative abilities
2. Project implementation stages:
(algorithm of actions of adults and children in the implementation of project activities, proposed
Exhibition Veronica Alexandrovna.
Preparatory stage (Information-cumulative):
- Selection of methodological and fiction literature for adults and children on the topic of the project.
- Conducting an initial conversation with parents to attract them to participate in the project.
Project stages
Stage 1 -
Selecting a project topic Introduction to the problem situation - the relevance of this project.
Decision-making:
"Children's dreams made of plasticine".
Getting into the problem, figuring it out with the kids
- Is it possible to create your dream using plasticine?
Stage 2 – Setting the project goal
during joint discussion
Formulating the problem (goal) – defining the project product
- conversation with children, what a dream is and whether it can be created using plasticine
- discussing with children different options for its implementation
- suggestions from parents for participation in the project:
photographs of joint creative works using plasticine (parents and children).
Independent determination of the project goal, the motive for the upcoming activity, forecasting the result.
Stage 3 –
Planning
Includes assistance in identifying activities:
Using questions
- What's your plan today?
- What materials will you need?
At the implementation stage, we offer an approximate version of the project. (work samples)
Organization of preparation of materials for the implementation of plans - types of activities. Activity planning.
Stage 4 –
Project implementation
- Developing lesson notes in accordance with children's dreams.
- Providing equipment and materials in accordance with the types of work.
- Providing practical assistance (showing various methods for plasticineography)
- Monitoring the implementation of the project. Collection of information, selection of materials, equipment.
Children's implementation of the project - participation in different types of activities.
Resolving creative disputes, reaching an agreement; mutual learning, helping each other.
Completion of the project
Expected Result.
Children will master unconventional ways of creating compositions from plasticine and drawing with plasticine. Novelty and originality will prevail in children's work. Children will have well-developed sensory abilities, compositional skills, hand coordination, and fine motor skills. Children will be able to complete tasks independently, without the help of a teacher (they choose a topic on their own, know how to plan their work, choose expressive means of depiction, and finish what they have started). Personal competencies will be formed in accordance with the age of the children: increased interest, creative activity, independence, initiative.
Results (project product).
For children and parents: Organization of exhibitions of joint creativity products, interior design in the group and premises of preschool educational institutions. For teachers: Design of mini-projects and presentations: “Children’s dreams from plasticine” , “Plasticineography” , albums. Making a card index of didactic games to develop creative abilities.
– The product of the activity is being prepared for presentation.
– Participate in a playful presentation of the results achieved, – organize exhibitions of their work for parents.
Stage 5 – Reflection
- Creating conditions for children to have the opportunity to talk about their work, experience a sense of pride in their achievements, and comprehend the results of their activities.
- Organizing a joint discussion of the result: progress of work, everyone’s actions, finding out the reasons for successes and failures.
- Awarding of project participants. 1. Conduct a feasible analysis at the request of an adult.
- Express their opinions on the presentation of the project.
- stage – Defining prospects
Joint determination of the prospects for the development of experience - stimulating children to pose a new problem.
The conversation is conducted using three questions:
- What did we want to know?
- How did we cope with the task?
-What else do we want to know and what do we want to learn?
Accept a new problem and prepare to search for new information.
| Next > |