Folk crafts are a type of decorative art that is accessible not only to high-level craftsmen, but also to ordinary needlewomen. Even a child can make a souvenir in folk traditions. One of the most popular images was and remains bright toys, and the most famous of them is a bright clay doll.
The image of a woman dressed up for a holiday, going to a fair. You can make a souvenir from different materials - clay, salt dough and plasticine. Distinctive features of the doll are the characteristic frills and ornaments. The high skirt is decorated with geometric elements - circles, squares, stripes and lines that form a checkered pattern.
Materials for making folk toys
Traditionally, handicrafts are made from clay. But other options are also possible - plasticine and salt dough. In this case, the only difference is in the material; the toy itself (the Dymkovo young lady) is made with your own hands in the same way as traditional models.
In classes with children, when organizing joint creativity, you can choose any of three materials. Each has its own advantages and disadvantages. Modeling the Dymkovo young lady in stages - repeating the same operations.
Clay, the most common material, requires a lot of effort and special equipment, but the products are durable and the most reliable, close to the original.
Children do not really like working with cold, wet and capricious clay, which must be constantly wetted during the work process; they prefer warm and soft plasticine or pliable dough.
From a plastic bottle
Another of the materials at hand, ideal for making a Dymkovo young lady, is an ordinary plastic bottle. For work you will need the following materials:
- plastic bottle;
- plasticine (choice of sculptural or ordinary);
- paints;
- tassels;
- any flour;
- scissors (preferably sharp).
Let's get to work.
- First of all, we prepare the preparation for the future toy. To do this, use scissors to cut off the neck of the bottle.
- Carefully coat the blank obtained on the bottle, without streaks or unevenness, with plasticine.
- We decorate the head from small plasticine balls: we make a kokoshnik, a braid, a wreath. We prepare doll hands from plasticine sausages.
- We complement the doll’s image with plasticine accessories: a bucket, handbag, basket, etc.
- Carefully coat the resulting form with flour so that the paint will adhere well to it later.
- Now the doll can be decorated. However, first you need to paint the workpiece completely white. Only after the white layer has completely dried can you start painting.
- When painting, you can use the basic elements of Dymkovo painting.
- So, the Dymkovo Young Lady toy made from a plastic bottle is ready.
Dymkovo young lady from plasticine step by step
The process begins with preparing the workplace. First you need to take material for modeling. Several options can be used:
- ordinary colored plasticine;
- plain sculptural plasticine;
- polymer clay;
- hardening plastic.
A few items to prepare ahead of time:
- board or thick oilcloth;
- stacks (blades for work);
- product stand;
- acrylic paints (when working with single-color materials).
Manufacturing stages
- The basis of the toy. The Dymkovo young lady begins with a big skirt. First you need to knead a piece of plasticine and roll it into a ball. Then make a depression in the lower part and, gradually expanding it, form something like a cup with thick walls. Continuing to enlarge the hole, at the same time pull the plasticine up so that the bowl looks like an elongated inverted vase. Place on a stand and level the surface of the future skirt. This completes the first stage of modeling.
- The body is made from a piece of plasticine shaped like a cone. A ball-shaped head and handles made in the shape of two friends are attached to the top. The base of the doll is finished. All parts are glued to each other so that the toy looks solid.
- Decorative elements. The characteristic wavy frills are the most recognizable feature; the Dymkovo young lady is adorned with them in abundance. To make them you need to stock up on long strips of plasticine. To make them, you need to roll out a thin layer, like a flat cake, and cut it using a ruler and a special plastic knife into smooth, beautiful long strips.
- Gather each strip in your hands, forming frills, and secure their edges on one side. These elements can be placed on the skirt, in the form of cuffs on the sleeves, placed around the head in the shape of a crown, and they can also be used to form an apron on top of the plane of the skirt.
- Additional decorations include various items. For example, a handbag, a rocker with buckets, a basket, a large roll, small children or a small pet that literally stuck to the owner’s hem.
- A tall hat is often used as an accessory. You need to mold it from a small cylinder, which is attached to the head of the craft. Then fields in the form of folded wavy frills are formed from plasticine strips. Now the Dymkovo young lady made of plasticine is dressed up as expected.
- The finishing touch is the design of the face, which consists of small elements, circles made from balls. It is necessary to attach the eyes, nose, rosy cheeks and mouth.
- If the product is made from colored plasticine, polymer clay or baked plastic, at this stage it is considered finished. When working with plain sculptural plasticine, the doll is covered with acrylic paint.
Crafts - cans or bottles covered with plasticine
Such a craft as a small glass jar covered with plasticine and decorated with natural materials was common during my childhood. Like many other children, I also made myself an original pencil holder from a mayonnaise jar, coated with plasticine and decorated with flowers and patterns from beautifully shaped shells.
Several options for decorating jars with plasticine and other materials
I saw jars decorated in a similar way in my daughter’s class. Each of them is decorated differently, and different materials are used for decoration. Unfortunately, I do not know the authors of these works.
Jar decorated with plasticine and shells
This glass jar is decorated with shell pieces and clear plastic beads in the shape of dolphins. All elements are glued to the can randomly, without a specific sequence.
Jar decorated with plasticine and seeds
This plastic medicine bottle is decorated with patterns of plasticine balls (some of the balls are flattened into circles) and natural material - flowers made from wheat seeds.
This jar is decorated with an ornament made of beads, beads and elements molded from plasticine - flowers and leaves.
Jar decorated with beads and beads
This coffee jar has a Halloween theme - it has a black bugle bead lined cobweb and colorful spiders with a beaded body, beaded eyes and bugle bead legs.
Dymkovo toys. templates for drawing in kindergarten, grades 3-5, coloring pages
How to decorate a jar with plasticine
Materials and tools
In order to decorate a jar with plasticine, you will need:
- plasticine
- a small glass or plastic jar, food bottle, medicine bottle, or even a disposable cup; You can also cut a plastic bottle
- material for decoration: natural material (various seeds, cereals), beads, beads, rhinestones, sequins, small plastic figures, etc.
Stages of work completion
- Cover the side surface of the jar with plasticine. This can be done as follows. - Pinch off small pieces of plasticine and coat the jar with them. When the entire jar is covered with plasticine, level it with your finger using smoothing movements. - Roll sausages of the same color or different colors from plasticine, slightly flatten them and stick them on the jar.
- Lay out patterns from the material prepared for decoration. In this master class these are watermelon seeds. Patterns and the distance between them may vary.
Use Cases
Examples of using such jars:
- for storing various small items
- as a pencil holder
- as a vase, for example, for hand-made flowers from corrugated paper
I also suggest looking at articles about crafts made from cereals or seeds, plasticine, or how to decorate a jar with napkins using the decoupage technique (in this article there are napkins with New Year’s themes, but in the same way you can decorate a jar with napkins with floral patterns, ornaments, etc. )
Yulia Sherstyuk, https://moreidey.ru
All the best! If the site materials were useful to you, please share a link to them on social networks - you will greatly help the development of the site. Posting site materials (images and text) on other resources without the written permission of the author is prohibited and is punishable by law.
Dymkovo young lady made from salt dough
The second most popular material for crafts, which is often used when working with children. It has its own characteristics and advantages. Unlike plasticine, the dough does not deform due to temperature changes, does not become covered with a greasy sheen and can retain its shape for much longer.
There are two main ways to make dough crafts. In the first case, the product is baked in the oven and coated with varnish or egg yolk; in the second, salt is added as a preservative. This ingredient prevents decomposition and deterioration from moisture. The craft retains its shape and firm consistency.
To make the “Dymkovo Young Lady” toy you will need two types of material. The fact is that different components affect density and ductility. The base is made from a stiffer dough, which is suitable for large and voluminous pieces, holds its shape and does not lose its outline. Small finishing elements and decorative frills are fashioned from a more plastic material, which is pliable and suitable for fine work.
From simple to complex
It is commonly believed that plasticine is fun for kids, but this is not at all true. Many adults are just as passionate about sculpting and are willing to spend whole days working on models or sculptures. They are, of course, much more complex, but many can serve as interior decoration and pride for the creator. Products can be very different: they are inhabitants of other planets, fantastic dragons, castles or human figures. Let's consider the option of how to make a person out of plasticine.
Plasticine, a material that is both plastic and heavy at the same time, can cause difficulties. Therefore, all parts must be mounted on a wire frame. It will serve as a “skeleton” for the little man and everything else will be attached to it.
The figure itself also needs to be lightened in order to remove the load. All internal elements of the figure do not need to be made of plasticine. It is necessary to find a suitable material that will be put on the wire frame of a person and become the “skull” and “body”. This can be polystyrene foam, or a paper base well secured with tape. In general, everything that is suitable for this.
We will paste over the finished frame with plasticine. Let's dress our little man in a white shirt and suit. Let's sculpt boots for him and carefully draw all the details on the clothes with a stack: seams and folds of clothes, pockets, creases on boots
We will pay special attention to the person himself: we will carefully sculpt every finger, facial features, curls of hair
The work is done, the figurine will be quite strong and light. All complex work with plasticine is performed using this principle. Many masters create entire collections and compete in skill and share ideas. Perhaps this activity will captivate you too?
Print Thank you, great lesson +19
If creating a doll from plasticine seems like an impossible task, refer to this modeling tutorial. Your doubts about your own abilities will be completely dispelled, because creating a princess figurine is not so difficult. Of course, such work requires perseverance and accuracy, small details are involved, but this makes such activities even more exciting. We invite you and your daughter to spend your free time sculpting Barbie from plasticine.
Believe me, such a toy will make a greater impression on the child than one bought in a store, because it will be created with your own hands. Other lessons on women:
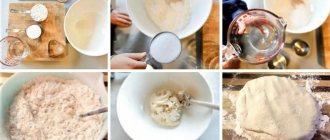
Dough for modeling the base
Recipe and list of ingredients for the base:
- sifted wheat flour, 1 cup;
- fine table salt (not iodized), 1 cup;
- water, 125 ml.
It is necessary to mix the salt and flour in a dry state and only then gradually add water, kneading thoroughly until the water supply runs out. As a result, the mass should be elastic.
From the history of folk crafts
Dymkovka has been around for several centuries. It appeared in the Kirov region, in Vyatka, and at first its production was tied to the ancient festival of Whistle Dance. Initially, the toy was designed to make noise and drive out evil spirits, so it was often a whistle. Over time, craftswomen somewhat changed their approach to making haze. Now they paid more attention to the decorative features of the product. As a result, along with animals, figures of people began to appear, in whose attire the features of the folk style were clearly visible. And now the smoker is a toy with a purely decorative purpose.
Preparing flour mixture for additional elements
Recipe for making dough for small parts:
- flour, well sifted - 1.5 cups;
- fine salt - 1 glass;
- glycerin - 4 tablespoons (tablespoons);
- wallpaper glue or starch - 2 tablespoons;
- water - 150-125 ml.
When preparing the mixture, you can use kitchen appliances, such as a mixer, to make the task easier. You can add food coloring to the dough, and then the manufacturing process will be similar to working with colored plasticine.
All stages of forming elements and sculpting are similar to the classical rules. The dough behaves in your hands like clay and plasticine. For the best result, you should knead the mass with a dense consistency and moderately elastic. In this case, all the frills will not lose their shape, and the body will retain the desired shape.
Characteristic features of animal painting
Each hero has his own painting techniques. Animals are traditionally painted very brightly, even fantastically. A turkey will definitely have a lush multi-colored tail, a horse will certainly be surrounded by blue apple circles, a goat and a ram will sport gilded horns, and ducks’ wings are more reminiscent of colorful frilly aprons.
The figures are painted according to a certain system. First, a wide stripe is applied to the chest, and then narrower stripes are drawn from the chest to the sides. Then the thin lines are intersected by vertical stripes to create a checkered pattern. Skate painting is usually a combination of vertical lines of varying widths and colored polka dots, dots and circles based on contrasting combinations of tones. The painting of goats, deer, and rams is similar to the coloring of horses, differing only in the presence of horns of the appropriate shape.
Birds are painted in a similar way; the main elements of the ornament here are also combinations of dots, circles and lines. They start painting the figures from the chest, then move on to the wings and tail. At the end, subtle and small details were drawn.
The final stage of decoration was the gilding of individual elements. For these purposes, craftsmen widely used gold leaf and patina.
The thinnest plates were carefully cut into the smallest squares, triangles and diamonds. The resulting geometric shapes were attached to the toy using egg whites
Final stage
After the dough craft is molded, it must be dried and coated with paint. First, use a primer, acrylic white, and then paint with the intended elements, geometric patterns and ornaments.
The Dymkovo young lady and other folk toys made from salt dough are a good entertainment option for children and an educational activity that broadens their horizons and develops fine finger movements, which is useful for the development of speech and the formation of a creative personality in general.
Vase “Cat” from a plastic bottle
You will need: a two-liter plastic bottle, a stationery knife, black and pink markers, a can of white paint.
How to make a Dymkovo toy with your own hands: learning to sculpt
Master Class
- Mark the height of the vase by making a horizontal line around the bottle.
- Draw two ears above the line.
- Cut out the cat along the intended contour, carefully and slowly cut out the ears.
- Spray paint the vase.
- Wait until completely dry.
- Draw a cat's face with a marker and color the ears.
A vase in the shape of a cat from a plastic bottle is ready! I recommend watching the video master class!
Crafts from plastic bottles: “Cat” vase. Crafts for the garden and garden from garbage. Video lesson
Watch this video on YouTube