I am glad to welcome you to the pages of the Chest of Secrets blog!
Outside the window the leaves are turning yellow and the rain is dripping, which means it’s time to get creative with the children. The main material for creating masterpieces will be colored paper. Today we will glue it, cut it and fold it so that we get interesting pictures with an autumn theme.
Bright products will be a wonderful interior decoration during themed lessons and parties.
In the first part of the article you will find master classes on making three-dimensional paintings. Towards the end there are interesting ideas for creativity with children.
You can see how to make voluminous paper crafts on the theme “Autumn” here.
Application “Umbrella with autumn leaves”
Why do children need an umbrella in the fall? That's right, you guessed it. Use them to catch a colorful carpet during leaf fall.
We will need:
- colored paper
- glue
- pencil
- scissors
Progress:
Cut out 4 cones from colored paper.
You can make it in different colors. the main thing is one size (any).
Next, we glue the edges of each workpiece.
We take colored cardboard. We glue our parts, connecting them together with the point.
Next we mask the gluing area. We put the cut out leaves into the umbrella.
Templates can be found in the article. Draw and cut out. Glue the handle. And you are a catcher of autumn outfit.
Where to get templates
The easiest option is to draw the outlines for the future application on cardboard yourself. In addition, you can use ready-made templates by purchasing a special set. Such kits include not only several thick bases with printed pictures, but also sheets of colored paper and glue.
If desired, you can also print the pictures using a computer and printer. The children themselves can also take part in making the outline of the future applique.
You won’t have any difficulties tearing the paper; you can turn this activity into an exciting game. If you carefully examine the finished work, it looks like a mosaic. School-age children, when gluing small pieces of paper, leave practically no empty spaces between them. Therefore, their work looks like a real piece of patchwork art. Children do not immediately master the basics of this interesting work, but parents or educators can always come to the rescue.
Application “Tree with leaves” made of colored paper
We have to:
- colored paper
- colored cardboard (thick paper)
- pencil
- ruler
- glue
- scissors
Progress:
Cut out a strip of brown paper 3 cm wide. Place it on a colored thick sheet in the middle.
Use a pencil to mark a point under the top of the trunk. We will cut 7-9 more strips, 2 cm wide. The length may vary.
We coat one edge of it with glue and attach it to the marked point. We twist the branch into a spiral 1-3 times.
We attach the second edge to the cardboard away from the trunk, creating the outline of the crown. None of this is difficult. Glue in any order.
When we are done with the branches, we cover the gluing area with the trunk. Next, take yellow or orange paper.
Let's cut a strip 3-4 cm wide from it. Fold it like an accordion 2 cm wide. Draw a tree leaf on it. Cut them out and glue them onto the branches. Cut from any other paper. Let's arrange a colored carpet.
Volumetric applique on the theme of autumn made of colored paper, templates
Autumn paintings in the form of appliques can be created in different ways. Consider in this version an autumn tree. You can draw it yourself or use a template.
You will need:
- dark thick threads for knitting
- PVA glue
- dry leaves
- pencil
- scissors
- thick cardboard
Progress:
Cut out or draw a tree template. Let's cut it out. Next, glue it to the base using glue.
Take the threads and chop them into pieces.
Then sprinkle the tree trunk with shavings. It turns out to be a real “bark”.
We sprinkle the crown in the same way, only with leaves.
A cutting template is included. Click on the picture, enlarge and copy.
As they say, there can never be too many trees.
Example of tear-off technique
Have you decided to spend a free evening with your child and prepare a gift for dad for his birthday? In this case, choose a picture option, stock up on colored paper, cardboard, glue in the form of a pencil and start creating. We offer a work plan for those who decide to create a “color masterpiece.”
At the first stage, you need to select a background of thick cardboard. If the applique is associated with autumn, you can use blue, white, gray dense material. Pay special attention to its density, since when working with glue, the base will become saturated with it and will not be able to withstand the entire application.
Now you can proceed to selecting a pattern for the future application. Have you decided to make a picture dedicated to late autumn? In this case, you can use a tree or flowers as a base design. First, it is important to draw the outline of the future picture onto the base with a pencil. For example, when choosing an autumn theme, you can mark a tree trunk, branches, and a place for leaves on cardboard. If the application is made by a schoolchild, in addition to the tree, the base depicts birds flying south and the contours of clouds.
The algorithm is similar to coloring different images in a coloring book. But working with pieces of paper does not involve painting, but gluing the fragment with paper of the desired color. In the first task, parents or a teacher can help the child, prepare colored pieces of a certain size for him, and show the child how to properly glue them inside the outline.
First, large pieces are selected, and each of them is glued separately. Then small pieces are used to fill the remaining space in the circuit. Do not forget while working that it is important to select fragments not only by parameters, but also by color. The task of adults is to control that during work the baby does not go beyond the boundaries of the intended contour. Otherwise, the application will turn out untidy and ugly.
Tree made of paper glued on a roll
The applique is made of colored paper. A very beautiful autumn tree that adds mood with its bright colors.
We will need:
- colored paper (brown, yellow, green, red)
- glue stick
- scissors
Progress:
Cut rectangles of equal size from colored canvases. Let's connect each strip into a ring. Next, glue a brown strip onto colored cardboard—this will be the trunk. You can also make grass. Then everything is very simple. We connect the leaves to the cardboard and the trunk in any shape, but to create a silhouette of the circle of the tree crown.
Applique autumn forest from other materials
You can use many materials to create a beautiful and unusual applique. It all depends on the desire and capabilities of the master.
Application from plasticine
Since plasticine is quite heavy, applique requires a solid base, such as cardboard or fiberboard. You can use a disposable plate. You need the softest plasticine so that it spreads easily.
For the background, roll out two green sausages and one light brown one, then assemble them into one sausage without kneading. Tear off pieces and spread where the soil should be.
There is no need to mix the colors into one; let the effect of chaotic spots remain, as if part of the grass has already dried out. Smear blue across the sky, occasionally adding white.
Sculpt or paint with gouache. Roll many 5mm balls in the color of autumn foliage. Each ball must be attached to the base and squeezed to form a flat cake.
Use these flatbreads to fill the space of the tree crown. You can make mushrooms from white and brown plasticine and place them between the trees.
Cereal application
For the “Autumn Forest” applique you need buckwheat, millet, wheat and other cereals. The paper should be thick enough, since you will have to use a lot of PVA glue, and the thin paper will get wet.
It is better to paint the background and contours of the trunks. Apply glue to the tree crowns and sprinkle with cereal. You can use a separate type of grain for each tree or mix all grains together. The work should lie until the glue dries completely.
A craft with seeds is made in a similar way. Pumpkin seeds are painted with gouache in the colors of the autumn palette, and then glued to the base.
To develop children's imagination, invite your child to choose his own materials for crafts. For example, paper can be replaced with fabric or felt. Let your child get acquainted with different textures and materials.
It is in early childhood that the child’s imagination develops most actively. Don't miss this moment and grow a creative person.
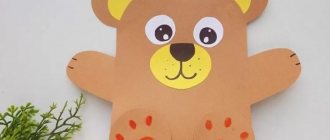
Volume craft for an autumn exhibition in a kindergarten or school
I suggest you pay attention to a very cute inhabitant of the forest. A voluminous hedgehog is performed easily and simply.
We will need:
- colored paper
- pencil
- glue
- scissors
Progress:
Take 2 sheets of black or any other dark paper. Fold them in half together. Let's draw a semicircle at random.
Then we'll cut it out.
Next, take one sheet. It will consist of two equal semicircles. We cut off a strip of about 1 centimeter from one part from the base in a circle. We start carefully from the base a little and then make one part lower in height.
As shown in the photo.
We do the second part as well. To make a ladder.
Then we cut out the needles with scissors.
We place the blanks on top of each other. We glue it with glue.
We'll attach more needles to the side.
Let's draw a face for the handsome forest creature. Let's cut it out. Let's color it with a felt-tip pen. Let's make an apple or a mushroom out of colored paper so that the forest dweller will come home with a gift.
This is such a handsome guy. You can try it on plain paper first. Children will make this craft with pleasure.
Summary of a lesson on appliqué in the preparatory group “Branch with autumn leaves”
Elena Kechaikina
Summary of a lesson on appliqué in the preparatory group “Branch with autumn leaves”
Program content:
1. To strengthen children’s ability to cut out symmetrical shapes from folded paper.
2. Learn to cut a certain number of leaves from a strip of paper folded like an accordion.
3. Learn compositionally, arrange them on a sheet of paper, choosing colors beautifully.
4. Develop aesthetic perception.
5. Cultivate interest in applique classes and accuracy.
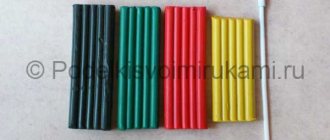
Materials: scissors, glue, strips of colored paper: yellow, red, orange, green, burgundy, lemon. Squares of colored paper (for the vase). Sheets of colored cardboard for the background. Glue brushes, brush stands, rags, oilcloths, felt-tip pens.
Preliminary work: observation and examination of autumn branches, paintings, still lifes.
Vocabulary work: activation of the dictionary: symmetrical, composition, bouquet.
Progress of the lesson.
Today in the appliqué class we will learn how to make a composition on a piece of paper
“Autumn bouquet in a vase” (motif)
1. D/i. "Teremok"
-Whoever names autumn colors for me will go to his place. (yellow colors of leaves, purple color of the sky, gray color of clouds, burgundy maple leaves, orange aspen trees, golden leaves of birch).
2. I see paintings here, in what genre are they made? (still life).
-What are they made of? (vase, bouquet).
-Pay attention to the shape of the vases.
— Tell me, is a vase a symmetrical object? How are they cut?
(Child examines the vase with his fingers and tells a story)
1. First the bottom of the vase, then it is round; then turn it to the neck; cut straight; again a narrow neck; round.
2. Fold the sheet in half and cut straight from the fold; wrap in a circle, narrow neck; cut straight to the fold).
-The vase is located at the bottom of the cardboard sheet.
-The theme of our composition is “Autumn Bouquet”, what should you use to make an autumn bouquet? (from leaves, twigs).
-You can draw the branches with felt-tip pens, but what can you say about the color of the leaves? Their quantity? How are they located on the branches? (right and left). What shape are they? (oval, slightly pointed).
- I will show you a way to simultaneously cut out several leaves of the same color (teacher demonstration).
— On your table, there are stripes of different colors, characteristic of autumn leaves. Each of you can cut out several leaves of the same color and then exchange them, then you will have multi-colored bouquets.
I offer you an algorithm for making an applique to help you.
(children explain).
1. First we cut out the small parts.
2. Then we put it on the background.
3. Spread with glue.
4. Glue the large parts first, then the small ones from bottom to top.
Physical exercise “Travel”.
We walk after each other (walking in circles after each other)
Forest and autumn meadow
Variegated leaves flicker
It’s like butterflies are flying (they pretend to be butterflies, flapping their wings)
One two three four
They flew, spun and sank to the ground (smoothly raise their arms up, spin, squat).
We sit down at the tables and choose a background. Independent activity of children. (turn on the music).
-I like your autumn bouquets, they made the group feel festive!
—What kind of mood do they make you feel? (I liked creating an autumn bouquet; I’m in a good mood; I felt happy; and I’m happy).
- Guys, who cut out the yellow leaves? They turned out so smooth, neat, very similar to the real ones.
- Whose vase turned out to be the smoothest? How did you cut it?
— How did we manage to cut out so many leaves at once? (We folded the paper like an accordion).
-What will we decorate with our works?
Application “Hedgehog in the clearing”
Lying on a dry hillock, a sharp hedgehog boasted that no one could pinch his hedgehog skin.
M. Pridvorov
We will need:
- colored paper
- glue
- scissors
Progress:
We take a sheet of any color, but bright is still better.
Then we glue green grass to it. To do this, cut a strip 3-5 cm wide from green paper. Then make small cuts on it. Let's add volume to them using scissors or a pencil. After that, on the background you have chosen, draw a semi-oval. Cut strips of black paper equal in width.
Calculate so that they are about 12 cm long, no more than 0.6-0.8 cm wide. But even if there is nothing else to worry about. The child will happily cut them out and glue them around the oval.
We make needles in two rows. Let's cut out the body, head, paws.
The head and hind legs are attached to a spring, which we will make from paper.
First fold the edges perpendicular to each other. Then in a checkerboard pattern. We fix the beginning and end of the spring with glue so that the part does not fall apart.
Let's glue the eyes. Let's shape the nose. As a result, the child, with your help, will make a beautiful hedgehog.
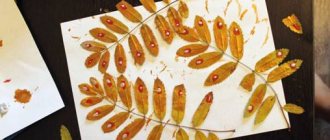
Forest applique of autumn leaves
Working with natural material is quite complicated; it requires preparation and careful handling of fragile leaves. Typically, an application of leaves on the theme “Autumn Forest” is done in 2nd grade.
The material for this craft must be prepared in advance by drying the leaves. To prevent the composition from looking sad, find leaves that retain a bright color after drying. For example, red wild grape leaves or yellow linden leaves.
The collected raw materials need to be laid out with newspapers and weighed down with something heavy, leaving in this form for three to four days. If the material is needed urgently, it can be quickly dried with an iron. To do this, the sheet is placed between two sheets of paper and ironed for ten minutes.
Cut out or draw a tree trunk from paper. Glue the leaves using PVA glue.
Older children can cut the leaves into small pieces and make a craft using the collage technique.
"Amanita"
Kersten T.
Fly Agaric boasted in the grove: “Oh, the dress I’m wearing is beautiful!” Any red hat with fringes will be the envy of anyone!
What would a forest be without this beauty? After all, he is the first one that catches our eye when entering the grove. Therefore, he also needs to pay attention. It's easy to do. The hat folds like an accordion. You already know how to do this very well, but I won’t repeat it. If you don’t know how, please look at the article above.
We will need:
- cardboard
- colored paper
- glue
- scissors
Progress:
We fold the future mushroom cap like an accordion.
Fold it in half. Glue the middle together.
We bend the bottom of the accordion, as shown in the photo. We turn the corners so that everything is neat. We fix them with glue. We turn the workpiece over and connect it to the base. Cut out a leg from white paper.
We make two accordions from the strips. Glue them to the leg under the hat. These are our skirts.
Next we decorate the head with white spots. Decorate with leaves and grass. He turned out to be such a cute guy. We won't put it in the basket, but it's nice to look at.
Volumetric applique “Basket with mushrooms”
We also need a basket. We will collect everything we find in the forest.
For the craft we will need:
- colored paper in two shades
- glue
- colored cardboard
- scissors
Progress:
We cut strips of paper 1.5 x 21 cm wide. Then we divide them into 3 equal parts. We will glue each one into a ring.
Children will enjoy cutting and gluing the blanks.
We will glue them onto the base in a checkerboard pattern. Let's make the first row a semicircle.
There is nothing complicated here, all you need is perseverance. Therefore, adult help will be needed.
Place mushrooms in the basket. Decorate with paper leaves if desired. You can draw it yourself or use templates. They can be found at the end of the article.
Autumn tree for children of the senior group of kindergarten using the quilling technique (paper curling)
You can make a cute three-dimensional tree in the quilling style from paper. It turns out to be a rainbow tree. The number of circles is not limited.
We will need:
- cardboard
- colored paper
- glue
- scissors
- compass
- pencil
Progress:
Cut out circles with a diameter of 8 cm from colored paper.
The more there are, the more magnificent the tree will be.
Let's cut them into a spiral in a circle. Next, we’ll make 3 strips of brown paper, 2-3 cm wide.
Let's twist them onto a knitting needle. Secure the edges with glue. Let's connect them with cardboard - this will be the trunk.
Take a piece of colored paper. We begin to twist each one.
We coat the bottom of the leaf with glue and connect it to the base. So gradually and slowly we will form a multi-colored crown. Glue grass at the base of the tree. Let's sprinkle some leaves. Next, turn on your imagination and create your masterpiece.
Jobs for kids
A simple applique made from torn pieces of paper can be done even by children of 2-3 years of age. At such a young age, not all children know how to use scissors, glue, or make beautiful and straight lines. To show your child’s creative abilities at this time, the ideal option would be applique and mosaic made from torn pieces of paper. The baby's fingers will develop, and in the future he will not have difficulties with writing skills.
Origami maple leaves (step by step instructions)
Making cute leaves is very easy and simple. The most important thing is to be with the children. Then decorate any room (kindergarten, school or nursery) with your crafts. With step-by-step instructions and photos you can do it very easily and quickly.
Attached is a step-by-step diagram of folding a maple leaf.
We will need:
- 3 square leaves 8.5×8.5 cm
- glue
Progress:
We can make squares of any size.
Let's take one copy. Fold it diagonally. Next, we unfold it to its original state.
Then fold the wings in half towards the middle of the fold.
Turn the craft over at an acute angle downwards.
We remove the resulting tail inside the pocket.
Fold the top corners towards the middle. It turned out to be small triangles. Let's bend them back and put them inside. The result is a figure familiar to us - a rhombus. Bend the top corners down. One piece is ready. Next we’ll make a few more of these blanks. Let's connect them together and secure with glue.
To ensure that the parts keep their shape well, they can be glued onto a dense round base. Don't forget to make a leg. The maple leaf is ready. You can also use them to make a crown for the autumn holiday. Only for this you need to make a rim out of paper and connect everything together.
Autumn vytynanki - leaves for windows for kindergarten and school
We use cutting out silhouettes from paper for autumn crafts. You can also make postcards for Teacher's Day. They decorate glass windows, walls, mirrors. Connect to glass using tape. They look very beautiful when hanging from the ceiling on threads.
This is such beauty on the glass of window frames.
Fantasy is limitless and thanks to it such masterpieces appear. They help you see the world better. In rainy weather, when there is heavy rain and slush outside, everyone will feel comfortable in a decorated room. And if the children did it partially or completely with their own hands, it’s doubly nice.