How to make a duck from plasticine
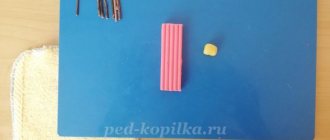
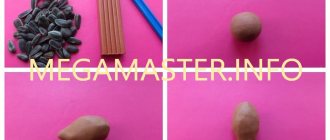
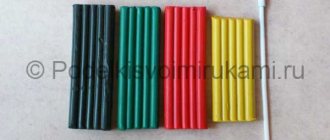
Step 1. Now we will prepare the mass for sculpting the bird. Roll two large balls of brown and burgundy and two small balls of orange and green.
We form a streamlined body from a brown ball. Flatten it slightly to make the craft more stable.
Step 2. Pinch off a piece of burgundy plasticine and use it to create a tight, short neck with a small head at the end.
Step 3. Place the neck on the rounded side of the body. We smear the edges of the workpiece with our fingers and draw the outline of the feathers with a stack or knife. Give the neck a curved shape.
Step 4. From flat drop-shaped blanks in green and burgundy tones we create a pair of small wings.
On top we stick details of the same shape in a brown shade. We cut through the texture of the feathers on the wings.
We stick them on the sides of the body. After attaching the wings, draw the feathers at the tip of the tail.
Step 5. Next we make two shallow holes for the eyes. We stick green and black cakes onto the white balls and glue the eye blanks into the recesses.
Step 6. We form a flat wide beak from orange plasticine. We fix it in the center of the face. We bend its tip slightly upward.
Step 7. Create a small tuft on the top of the head.
Using a skewer, draw several eyelashes and eyebrows above the duck’s eyes. We also draw the feathers on the neck and base of the wings.
The plasticine duck is ready.
Step 8. Now it can be supplemented with several details to create a beautiful composition. Ducks are very fond of various bodies of water, which are one of the main conditions for the existence of these birds. So let's create a small lake in which she will swim with her tiny duckling. We create a little duckling from yellow plasticine.
Training, education and development are the three pillars on which the pedagogical process is based. Any activity with children should have a threefold goal. If we are talking about the youngest children of preschool age, then classes with them are carried out in a playful way. One of these types is modeling. In the course of such work, a child can be taught to recognize colors, shapes and sizes of objects, develop his spatial imagination and finger dexterity, and instill in him determination and perseverance.
This article provides a master class on sculpting a duckling from plasticine. In the process of creating a miniature copy of poultry, teachers or parents can talk about their benefits for humans and foster a humane attitude towards animals. After the lesson, children will develop the skill of creating standard parts from plasticine, for example, cakes, balls and sausages, and they will learn to combine them into a single product.
Children's master class on plasticineography "Fidget Duckling"
Elena Varakina
Children's master class on plasticineography "Fidget Duckling"
Read also: Classification of coping strategies
Children's master class on working with plasticine “ Fidget Duckling ”
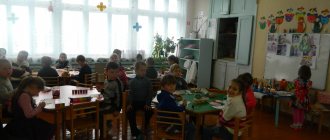
plasticineography technique Hello! Today we, the children of the 2nd junior group No. 5 “Pochemuchki”, want to show you a master class on plasticineography “ The Fidget Duckling ”. Plasticineography is a very interesting and fascinating technique for working with plasticine . It consists in the fact that we paint over the drawing inside the outline not with paints and gouache, but with small balls of plasticine . Also, work can be done not only in the form of gluing small balls onto a drawing, but also by smearing plasticine along the contour of the drawing . plasticineography with great pleasure .
Step-by-step instruction
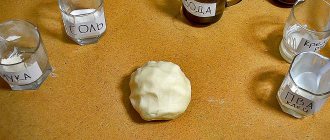
- Prepare the main color for work and the tool. The yellow mass should be thoroughly kneaded in your hands.
- The prepared soft mass can be immediately divided into slices of different formats. The largest piece will be used to sculpt the head, three smaller pieces will be used to create the body and wings of a domestic bird.
- On the ball head, press two triangular holes with a stack. Also knead a small piece of orange plasticine in your hands.
- Insert white cakes into the holes - these will be blanks for the eyes, it is advisable to make them large. Make a beak from an orange piece and attach it to the head.
- Place blue cakes on the white cakes first, then black cakes. After that, add small white highlights.
- Stretch the small piece intended for the body into an oval. Press one side of the oval with two fingers, highlighting the tail. Using the sharp side of the stack, apply stripes to the ponytail.
- Insert a match into the front. Lift the tail slightly up.
- Press the remaining two flatbreads on top onto the board with your fingers. Squeeze on both sides with your fingers, releasing droplets-wings.
- Using a stack, apply the same pattern to the wings as to the tail.
- Glue the wings to the body.
- Prepare orange balls for the paws, press them down with your fingers.
- Make the resulting cakes triangular. Apply 2 strips on each in a stack, highlighting your fingers.
- Attach the legs to the body.
- Add a head to the match.
Summary of a modeling lesson in the middle group of the kindergarten "Duck"
Lesson in the middle group.
Modeling “Duck” Purpose: to teach children to sculpt an object consisting of several parts. Tasks: 1. Reinforce sculpting techniques: separate parts from a whole piece and maintain their size when sculpting, roll the dough between your palms, connect the parts, pressing them tightly against each other, practice using the technique of pinching and pulling; 2. Develop fine motor skills of the fingers. 3. Develop the ability to work in a team, causing a positive emotional response to the overall result. Materials and equipment : salt dough;
boards; napkins; for each child); lake is a mirror; duck mask hats for each child; toys - poultry; musical accompaniment; “Worms” marmalade to encourage children. Progress of the lesson.
Educator : Hello, guys! Children : Hello! (The voices of poultry are heard). Educator : I was just about to feed my poultry. Will you help me? Children : Yes Riddles Clucks, clucks, calls the children, gathers everyone under his wing. Children: Chicken Teacher: Well done, guess another riddle: Red paws, pinches your heels, Run without looking back! Children : goose! Educator: And you guessed this riddle! Well, now you can’t guess: She walks in the rain, She loves to cut grass! “Quack! "Shouts, It's all a joke, Well, of course it is... Children: Duck! Educator: Well done, guys, here's another riddle. Amazing child! Just out of diapers He can swim and dive, like his own mother. Children : Duckling! Educator: Well done! So you guessed it. This is a duck and ducklings. They are not in the yard, they probably went to the lake. Let's go look for them. The teacher and the children approach the table on which the lake is decorated. They surround him from all sides. One duck swims on the lake). Educator : Look, guys, the duck is swimming alone, you can see the kids are hiding in the grass. The mother duck felt lonely and began to call them. “Quack-quack-quack! ", but the ducklings do not respond. Mother duck asks you to help find her ducklings. Let's help her! How can we help her, guys? Children : ... you can make ducklings... Educator: of course, you can make ducklings! But first, let's play with you a little. The ducks came out into the meadow, (we walk like ducklings) - Quack-Quack-Quack! A cheerful beetle flew by - Zhzhzhzhzh! (we wave our arms - wings). Geese arch their necks - Ga-Ga-Ga (circular rotation of the neck). The feathers are straightened with the beak (the body turns left and right). The wind swayed the branches (we swing our arms raised up, Sharik also growled - Rrrrr (hands on the belt, bend forward, look in front of us). The reeds whispered in the water - Shhhhhhhhh (raise your arms up and stretch, And again there was silence - Shhhhhhhh... (crouched) Educator : Well done! Now sit down at the tables, we must help the mother duck. Educator: Look, children, what parts does a duck consist of? Children : Head, body. The head is smaller, the body is larger. The head is round, and the body is oval. Educator : What do you think, what is this? Children: Beak, tail. Educator: Well done! First you need to divide the dough into two parts. One piece of dough, which is larger, will be the body; a smaller piece will be the head. To sculpt the body of the duck, we need to take a piece of plasticine, which is larger, and roll it into an oval in your palms. Then we also sculpt the head, only with a ball. Next, we connect these two parts, pressing them tightly to each other. But very carefully so that the shape does not break. Then we, guys , by pinching, we make a beak on the head of the duckling and pull it back a little, and on the body, where the tail should be, we pull it out. Look how I do it. Our duckling is almost ready. Is he missing some eyes or something else? Children: Wings. Educator : Look, you have cereal (what kind of cereal) in your plate - buckwheat, make eyes out of it for the duckling. Carefully! Where the eyes should be, press the grain. (Music sounds, children start the lesson). Educator: Our duck in the pond is really looking forward to her ducklings! (Providing individual assistance to children) (Children finished work) . Educator: Now, guys, let’s go and put all the ducklings on the lake. Our duck is one, but there are many ducklings! Let's count them guys, see if they all returned to their mother! Children count: 1;2;3;4;5;6;7;8;9;10. You guys are great, you did a great job! Look how happy the mother duck is! And the ducklings are happy too, they have returned to their mother! Everyone has fun, and so do we! Educator: So that our guests also have a good mood, let's dance for them together with our duck and ducklings. Please, everyone, stand around the lake, and I will put on duckling hats and masks for you. Now listen to the music and repeat all the movements after me. (Music sounds. Children dance the dance of little ducklings) Educator : What a great fellow you are! Me and the duck thank you for the wonderful dance. And the duck also wants to thank you for returning the babies to her! She handed you the treat. Now let's not bother our duck and ducklings, let's go play.
We recommend watching:
Summary of educational activities for children with parents in the middle group. Do-it-yourself doll Summary of a lesson on speech development on the topic “Toys” in the middle group Methodological development of GCD for the development of communicative activities in children of the middle group Synopsis of a game lesson in mathematics in the middle group of a preschool educational institution
Similar articles:
Lesson in the middle group “Winter clothes”
Math lesson notes “Number 1”. Middle group