Design - assembly of new
From the Latin “construction” - assembling something new. Paper design has several directions that are closely interrelated. Children's paper designs can be:
- design according to a model;
- design according to form;
- designing according to a theme or design.
The simplest type of design: according to the model . This option can and should be used when working with younger preschoolers, introducing them to colors, shapes and types of paper, as well as teaching them how to use scissors. This technique is based on referring to an example - a model. Kids are invited to look at a finished sample of the product and compare it with the finished parts on the tables. This is the simplest type of design, and by mastering it, children learn to repeat the drawing they see. Kids learn to assemble parts into a whole, and also master techniques for working with glue and scissors.
Designing according to form involves consolidating the ability to work according to a model. In other words, when a child receives assignments, he does not yet know the final result, but can assemble the desired composition based on the shape of the blanks. This design option is available to preschoolers 4-5 years old. Before starting to work with blanks, the adult shows several options for the finished product. Leaves these pictures within the child's visibility. After finishing work with the details, children's paintings can be placed next to the samples.
The most difficult thing in working with paper is designing on a given topic . It presupposes that the child has the ability to work with paper, compose compositions and select materials. For example, you want to create a painting dedicated to autumn. Together with your child, before designing, you look through the finished autumn paintings. Together with your child, you choose paper of a certain color and mark the position of future parts of the picture based on it. In form-based design there is no dependence on workpieces. The child relies on his imagination, learns to combine colors, shapes and creates his own composition from paper.
Of course, designing from paper with a child is a labor-intensive process, especially if we are talking about a 2-3 year old child. First of all, an adult must remember that the game in such activities is primary, the result of working with paper is secondary. Do not scold your child for crooked parts or incorrect grip of scissors. Don't expect any artistic design from the finished product. With a 2-3 year old child, you can cut out strips of colored paper, make a simple design out of them, and be sure to praise the child for the result.
My daughter loves to cut. For a child her age (3 years old), the cutting process is much more important than the result obtained. My daughter enjoys cutting strips, circles and triangles. If she gets the figure she has in mind on the first try, there is no limit to her joy.
I usually prepare a sheet with a marked sample, as well as templates, which my daughter and I trace together on paper. It is convenient for a three-year-old child to cut with small scissors with rounded ends. My daughter’s favorite details in paper construction are: garlands of Christmas trees, people, butterflies, etc. With age, the primacy of play gives way to artistic intent. A 4-year-old child can independently evaluate the proposed composition, as well as choose the right colors for spare parts. The game continues to be an important element in children's paper construction, but now it is not the goal that is played out, but the completion of the task.
Lesson notes on paper construction.
Lesson notes on paper construction.
Subject:
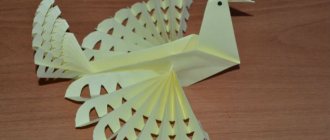
Designing animal figures from paper. Origami.
Target:
Summarize knowledge, skills and abilities in the technology of constructing animal figures from paper and cardboard using the origami technique. Improve methods of marking materials, consolidate knowledge of safety precautions when working with scissors and glue. Unite children’s work with a common idea (a fairy tale) and turn it into a collective work. Develop aesthetic taste, imagination, memory, coherent speech. Foster hard work and a sense of teamwork.
Object of labor:
Making heroes of the fairy tale Teremok.
Materials:
Whatman paper, houses (for building a tower), colored paper, glue, scissors, origami instructions.
Basic operations:
Marking materials, cutting paper with scissors, folding paper into fairy tale characters.
During the classes
Organizing time.
Introductory conversation.
Today our labor lesson will take place in a fabulous workshop.
But we will make the fairy tale with our own hands, and only then show it.
What kind of fairy tale we will get today, you must guess for yourself by guessing from the riddles of its heroes.
Puzzles:
This little animal lives in a hole, underground, and is gray and very nimble. We found out this………………Mouse.
(I place the mouse on the board)
Green frog and her name is ………………… Frog (I put the frog on the board)
He was white in the snowy winter, In the summer he changed his clothes. The oblique animal has become gray, whoever finds out let him name....... Hare (I put a hare on the board)
The red-haired cheat, deceives cleverly. The mouse is afraid of her, And the bunny is a naughty girl, Even though she lives in the forest, Steals chickens from the village………. Fox (I put the fox on the board)
Who wanders in the cold winter, angry and hungry?……………Wolf (I put a wolf on the board)
Brown, clubfooted, In winter he sleeps in his den, smacking his paw………….Bear. (I put a bear on the board)
- In what fairy tale did these heroes live together?
Teremok.
3. Setting the goals and objectives of the lesson.
What technique were used to make the fairy tale characters? (origami)
— What is the origami design technique?
1 student:
Origami is the art of making figures by folding a rectangular sheet of paper with minimal use of scissors and glue.
2nd student:
This art originated long ago in China and has now spread to all countries.
Today we will make heroes of the fairy tale “TEREMOK” and decorations for the fairy tale – the forest.
Team work.
4. Getting the job done.
Reminder about working with paper.
1 student:
Paper is very vulnerable. It can wrinkle, tear, get dirty.
And also - there is always a shortage of it, especially in color. Therefore, it must be handled with care and sparingly.
Reminder about working with scissors.
Organization of the workplace, safety precautions
Before you start designing with paper with your children, you should make sure that the workplace is properly organized. Check that all the necessary tools are available on the children's table: scissors, colored paper, a glue stick, or PVA glue with a brush, a simple pencil, a white base sheet, or a sheet of thick cardboard.
Attention!
- scissors for working with paper should have rounded ends;
- for small children, you should choose small scissors with comfortable ears for your fingers;
- if you plan to work with PVA glue, prepare a small container and a special brush for it, so it will be more convenient for your child to distribute the glue over the surface of the product;
- Do not use materials that leave a colored mark on your hands or have a specific odor! Don't risk your baby's health.
Before starting the lesson, make sure that the work surface is sufficiently illuminated and prepare an apron and sleeves for the child. This way you will protect your clothes from glue or from accidental “cutting through”.
Various paper construction techniques
Children's paper construction is of particular importance for preparing a child for school. The sooner you turn your attention to this type of applied art, the faster your baby will learn to distinguish between materials, see an integral composition in detail, and also learn to hold scissors and a pencil firmly in his hand. With children 2-3 years old, use the simplest techniques. Something like: gluing colored squares and triangles onto a sheet of paper, making pictures from these figures, constructing simple patterns. One of the available design methods for kids is folding shapes from paper blanks, or origami .
Origami is the oldest paper construction technique. It allows you to concentrate the baby’s attention, develops memory, trains thinking, and also promotes the development of fine motor skills, which are closely related to the subsequent ability to write and affects the development of the baby’s speech.
With children 2-3 years old, you can make paper figures of animals, a flashlight, or a boat. Older children can master complex origami shapes, such as folding a crane or a lotus flower.
Another interesting technique for children's paper construction: tearing and crumpling . This technique at first glance is quite primitive, but in fact it has several developing aspects. Tearing paper into small shreds, or crumpling a large sheet into a ball is the development of fine motor skills of the fingers, as well as a way to relieve accumulated stress.
Using this technique, you can create three-dimensional paintings, mosaic paintings, or unusual collages. Crumpling and tearing are available to children from a very early age, but older preschool children also enjoy working with this technique.
An unusual, but very bright and favorite paper construction technique for children is format construction . This is practically the creation of a three-dimensional figure from template blanks. There is one feature in format design: multi-layering of parts.
What does it mean? Each detail has up to three to five copies, in a larger format. Parts may copy the shape of their predecessor, or may have some of their own characteristics.
One of my favorite paper crafting techniques for kids is paper sculpture . It is based on several methods of working with paper. This includes creasing, cutting according to templates, and even creating a figure in papier-mâché style. Children of all ages love paper sculptures and willingly engage in this type of paper construction.
Paper lamps from the studio “Papier à Êtres”
Papier-mâché horse. Our master class is at this link.
The most surprising, and in a sense, pleasant thing: almost all paper crafts that you create with your child can be successfully fit into the interior of his room.
Paintings of the same theme - on the walls, three-dimensional figures can be adapted for useful functions. For example, a snowman made of crumpled and pressed paper can become a good stand for a cell phone, or a glass - a paper sculpture - can be a stand for pencils and pens.
In other words, children's paper construction is not only entertaining. It has a positive effect on your child’s mental development, develops skills in working with tools, paper and shapes, and also serves as a good decorative material for organizing the space of a child’s room.
Abstract of the GCD on paper construction "Basket" in the preparatory school group
Kolosanova Natalya Dmitrievna
Abstract of the GCD on paper construction "Basket" in the preparatory school group
Goal: creating a three-dimensional paper craft “Basket”.
Tasks:
— improve constructive skills;
- strengthen the ability to background a sheet of paper with wax crayons;
- teach children to fold the sheet in different directions, ironing the fold line well, and make cuts;
— complement the craft by drawing small details;
- develop children's creative abilities and imagination;
— develop fine motor skills, strengthen the muscles of the hands and fingers;
- cultivate accuracy, perseverance, and the ability to complete the work started.
Preliminary work: observations at the dacha, in the garden at the work of adults, all possible assistance in harvesting; conversations about the benefits of vegetables and fruits; didactic games “Guess the taste”, “Gather the harvest”, “Describe, we will guess”; plot-role-playing game “Vegetable shop”. Backgrounding sheets of paper with wax crayons.
Materials: half a landscape sheet, colored paper for cutting out flowers, scissors, glue stick, wax crayons.
GCD move.
1. Organizational moment. Introductory conversation.
The teacher draws the children’s attention to thematic pictures “People’s work in autumn.”
- Guys, what time of year is it now! (Autumn) That's right, autumn! Autumn is a very important time of year. In autumn, everyone works: birds, insects, animals. People also work very hard to prepare for the harsh winter.
- Remind me, please, how people work in the autumn in the fields, orchards and vegetable gardens, in their dachas? (They harvest vegetables and fruits, after harvesting they plow the fields, dig up the beds to preserve the harvest and stock up on vitamins for the winter, and make preparations).
We always have plenty of harvest at our dachas! The secret of such successful fertility is, of course, great love and care for the land, soil, water and, of course, hard work. No wonder they say: “Labor feeds a man, but laziness spoils him.”
In the dachas and gardens, the harvest has ripened and needs to be harvested, and for this you need one very important and necessary thing on the farm. Guess the riddle and find out what it is.
Collect vegetables from the garden,
What should you take with you?
They go to stores with a bag,
At the dacha we need - ... (baskets).
Probably everyone in the household has this necessary thing, but our dolls, bears and bunnies do not have baskets in the play corner.
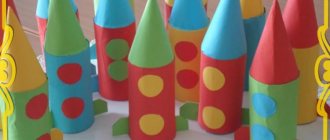
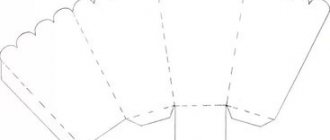
- Let's make baskets for them. Look at the basket I made (showing a sample, explaining the sequence of work).
- We will make a basket from a square. We background the sheet with wax crayons (you can do this the day before during the storage process).
Cut a square from a rectangular sheet.
The next task is to divide the side of a square into four equal parts. To do this, divide the square in half, and then, each halves in half again, bending towards the middle line. We fold the basic shape of the door. Turn the workpiece over and do the same with the other side. Now our square is divided into 16 squares.
We make cuts in the top and bottom rows, as if separating the outer squares. We coat the resulting “ears” with glue, fold and glue the basket.
For the handle, glue a strip of paper to two opposite sides. We decorate the handle with a flower. The basket is ready.
Before we get started, we need to prepare our pens.
2. Finger gymnastics “Basket of vegetables”.
Basket of vegetables
Children hold their palms in front of them.
The girl Zina
Vegetables in a basket. (Make a “basket” from your palms).
There's a pot-bellied zucchini here
He fell on his side. (Bend your thumbs inside the “basket”).
Pepper and carrot
We placed ourselves cleverly. (Fold your index and middle fingers inward).
And beans and cucumber. (Fold the ring and little fingers. You get two fists pressed against each other).
Well done Zina! (Thumbs up).
3. Independent productive activity of children. Designing paper crafts “Basket”.
Educator: Well done guys! You did a good job with your hands, stretched your fingers, and now everyone will make their own basket, and we will give them to the dolls.
The children get to work. The teacher helps as needed, gives individual recommendations, and provides the necessary assistance.
While doing work, a minute of physical exercise is carried out to relieve tension.
4. Physical education is carried out.
Oh, what a harvest, (children stand facing in a circle)
Collect quickly. (with your right hand perform a grasping movement and lower your hand to the other side)
Dig up potatoes from the garden (imitation of digging a vegetable garden)
So that everything is in order.
Pick cucumbers quickly (bend over, touch the floor with your right hand, bend over again, touch the floor with your left hand)
To eat them quickly. (imitation of “chewing a cucumber”)
Cut the cabbage, salt it (chop the cabbage with your palms)
Give mom and dad a treat. (move your arms alternately to the right - to the left)
Pull out carrots, radishes (imitation of pulling out vegetables)
Bow low to their waist. (tilt your torso forward, move your right arm away from your chest to the right)
Ay, what a harvest, (put your hands to your temples, shaking your head)
You load it into the cart. (spread your arms to the sides, directing their movement towards you)
5. Summary (reflection).
- Guys, let's put all the work on the table and see what kind of toy baskets you have made.
Children and the teacher examine, discuss and analyze the finished work, discussing whose work they liked the most and why.
Well done boys! You did a great job. Dolls and toy animals will be happy to receive such wonderful baskets as a gift.