How to draw fish? Several variants
The walls of the nursery, the bathtub, and the doors can be decorated with images of fish, aquatic plants, and sea animals. But how to draw fish if such a design idea comes to mind? It is not necessary to make the drawing one hundred percent naturalistic. It is quite possible to use stylized images of fish.
We use children's drawings for design purposes
Making drawings is not difficult at all. First, you need to draw pictures with a pencil on paper that will appeal to both the baby and the artist-designer himself. Then you can cut them out and paste them on the wallpaper where appropriate. By the way, it is quite possible to involve the children themselves in the drawing process, since many kids can draw fish. What a pleasure it will be for little people to take part in the design of a nursery or bathroom!
How to draw fish decoratively?
Decorative drawing differs from naturalistic drawing in that the depicted objects look fabulous, they often have features inherent in people: smiles, funny facial expressions, freckles or eyelashes. Our fish will only be rewarded with a smile and chubby cheeks, the rest will be as close to reality as possible. Since children cannot draw fish that look like real, living ones, many details are still drawn schematically.
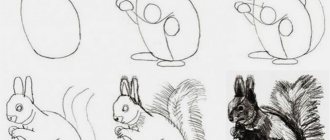
Master class “How to draw a fish with a pencil”
- First, draw an oval on paper.
- Then one end of the oval is slightly narrowed and sharpened - the tail will be located there.
- At the end opposite the tail, a mouth is drawn on the oval with a smile, which “ends” with plump cheeks - they are depicted using an arc.
- Then you should draw the eyes. They can be placed either inside the oval body or made protruding, like the eyes of an aquarium telescope fish.
- Smaller circles painted in black are placed in the eyeballs - these are the pupils. It turns out very beautifully if there are small white circles in the black pupils - highlights.
- The tail and lower pectoral fins of the fish are best depicted using ovals. Moreover, the visible lower pectoral fin can end in an arch, similar to the one with which we depicted the “cheeks” of the fish.
- The upper fin can be drawn as an oval, or as a “fence” - it all depends on the desire and taste of the artist.
- The fins and tail should be shaded.
- Now the gills should be emphasized with an arc, and the body of the fish should be “covered” with scales.
How to draw a goldfish with a pencil
The aquarium goldfish is universally loved. Children love to draw it. Sometimes they add a small crown to her, and the result is the heroine of Pushkin’s fairy tale - the Golden Fish, who grants wishes. You can draw a goldfish in the same way as a regular one, but keep in mind that this species usually has a luxurious, veil-shaped double tail. The eyes of a goldfish can also be positioned in the usual way, or be slightly bulging. If you decide to depict a goldfish more believably, then you should notice its difference from other fish, such as a small “hump” at the top of the body and a rather voluminous tummy. The line outlining the goldfish's belly curves quite sharply in the back half of the body.
fb.ru>
Final touches
Summary of educational activities on drawing in the middle group “my city”
How to draw a three-dimensional goldfish? Just shade it correctly. It is recommended to do this using a pencil with a hard lead. In this case, the sheet of paper will not get dirty, and the drawing will not be smeared or lose clarity. But don't choose pencils that are too hard. They can even rip through paper. Strokes should be made without strong pressure, neatly and clearly. How to draw a goldfish and give it volume? Start shading from the head. Many professionals recommend doing it this way. However, you can easily start shading from any other part of your drawing. Identify the darker parts first. Start shading with them. This will be much more convenient. The dark areas should be the bottom of the abdomen, the base of the fins and tail, and the top of the head. Ready. As a result, you should get a charming goldfish that looks so much like a real one swimming in an aquarium. As you can see, everything turned out to be not at all as difficult as you might think at first. Now you know how to draw a goldfish with the most ordinary pencil.
How to draw a fish step by step: for the little ones
Even younger preschoolers can create a cute fish: even a three-year-old child can draw it
It is important to explain correctly, and then a new “masterpiece” will appear in your collection of your beloved child’s crafts.
As you can see, the fish is very easy to make.
How to draw a beautiful fish?
Even a 4-5 year old child who already has some drawing skills can portray an exotic fish.
Agree, the fish is simple, but it turned out beautiful! If you show how to draw a fish with a pencil step by step, the child will be delighted, because he was able to draw such a wonderful drawing with his own hands under your strict guidance!
How to draw a goldfish?
Children's favorite fairy-tale character, the goldfish, is not so easy to portray, but it is quite possible.
All that remains is to decorate our goldfish with felt-tip pens or colored pencils. If desired, you can decorate it with a crown.
Easy to draw fish
Drawing a fish is easy. Even a small child can cope with such a task. You just need to ask mom or dad for help and follow the instructions we provide here. To get started, take pencils, markers and white drawing sheets. Let's start the process!
- Draw an arc just above the middle of the sheet from left to right. At the end of the arc, draw a large check mark. From the starting point of the arc on the left, draw the same arc, but with a downward slope, i.e. "upside down". At its end, draw a large checkmark in a mirror version in relation to the first checkmark. Connect their ends with an arcuate line - this will be the tail of the fish. A good, beautiful tail should be no less in height than the fish’s head.
- On the left side of the picture, the head is highlighted with a rounded line. This line is the gill plate, it is drawn thicker. Along the arc to the right of the head we draw a fin with a wavy line. We depict the lower fin on the lower arc; it should be approximately half the size of the upper one and located to the right of the center of the fish. At the border of the head and body of the fish, in the area of its gills, 2 more fins are drawn in the form of two drops. The details of these elements are drawn with small lines.
- On the head, above its center, an eye is depicted in the form of a neat circle. In its middle, with a smaller circle, draw a pupil, which is completely shaded with a black felt-tip pen.
- At the point from which we began to draw the upper and lower arcs, the mouth of the fish is depicted. If you manage to portray a smile at the same time, it will be top class!
- Immediately behind the line that separates the fish's head from the body, scales are depicted in arcuate lines. These arches should end in the ponytail area, which is complemented by details in the form of several horizontal strokes.
- In front of the fish, just above its mouth, you can draw several circles of different sizes. These are bubbles.
We got a wonderful fish. But to give it a more attractive look, the drawing needs to be painted in different colors. If you have an aquarium, then the young artist can choose the most beautiful fish and transfer its color to his drawing.
- The tail can be colored with an orange felt-tip pen; it will give the image a beautiful golden tint.
- For the upper fin we will take a red felt-tip pen, and for the lower fin we will use a pink one.
- At the very beginning, the scales can be colored from top to bottom with yellow, the next row with green, then with blue, blue, violet, red and orange felt-tip pen. The bubbles in front of the fish can be made blue, and their outline outlined in blue.
Children's drawing is completed! It was really easy!
Learn to draw swordfish
- The body of the fish is a sword, long and flexible. Therefore, take an elongated oval as the basis of the body, and draw a curved axis inside it. And, repeating its lines, outline the body of the animal.
- Draw a needle-shaped horn in the middle of the fish’s forehead, a small eye on the head and a narrow, deep slit in the mouth.
- The tail should be shaped like a moon.
- Draw the dorsal fin like a horn.
- The fins on the belly are small and teardrop-shaped.
- To draw fish in color, choose pencils in blue shades.
- Shade the upper half of the body with rich blue. And shade the belly only slightly, leaving it almost white.
- Also make the fins and tail bright blue.
Abstract of OD on drawing “The Tale of the Fisherman and the Fish”
Nadezhda Rusina
Abstract of OD on drawing “The Tale of the Fisherman and the Fish”
Goal: to evoke a desire to convey the semantic relationships of a plot-pictorial composition through artistic expression.
Basic knowledge, skills and abilities of children: they know the content of “ Tales of the Fisherman and the Fish ”
A. S. Pushkin;
can tell and describe its main characters, depict episodes from a fairy tale on paper , demonstrate good technical literacy;
know how to work with gouache and watercolors, use a palette; know and distinguish between cold and warm colors and their shades.
Preliminary work: examination of illustrations with a variety of fish , familiarization with reproductions of paintings by the marine painter I.K. Aivazovsky; reading " Tales of the Fisherman and the Fish "
A. S. Pushkin; watching the cartoon of the same name; musical and theatrical activities; working with gouache and watercolors; performing practical exercises on the palette; consolidation of knowledge about colors and their shades.
Equipment and materials: audio recording of sea surf, background music; samples of drawings for a fairy tale ; presentation “Views of the sea”
; white sheets of paper; palettes, gouache and watercolors; a simple pencil; brushes
Learn to draw different fish
How to draw a goldfish
The goldfish has luxurious fins and a tail. And the body is almost regular oval in shape. First, let's draw the body and outline the gills. Let's finish drawing the fins and tail, they are quite wide.
Shade the fins and tail
We will pay special attention to drawing the scales. They are the ones who give the fish such a mysterious shine
In the center of the body the scales are larger, closer to the sides - smaller. For coloring we select different shades of yellow.
The ancestor of the goldfish was the silver carp. This new breed of aquarium and pond fish was developed in China almost a thousand years ago. In 1611, goldfish were brought to Portugal. These beauties were brought to Russia only three hundred years ago. Since then, goldfish have been one of the most popular aquarium and pond inhabitants.
How to draw a goldfish with a pencil step by step
Goldfish – picture for coloring
How to draw an angelfish fish
The angelfish has an almost square body. Therefore, the basis for the drawing is a circle, and the axes intersect in the center of the circle. We draw the body of the fish in relation to them. We draw the fins of the angelfish, they look like wings. The tail of the angelfish is also unusual.
Let's complete the details - the eye, the mouth, add volume to the fins
When coloring the fish, pay attention to the unusual shape of the stripes on its body.
The angelfish is a very beautiful and elegant fish. She settled in aquariums almost a hundred years ago. Angelfish are peaceful - they easily get along with other inhabitants of “glass houses”. Scientists believe that angelfish have quite developed intelligence.
Draw an angelfish fish with a pencil step by step
While coloring the picture of this drawn aquarium fish, pay attention to the unusual shape of the stripes on its body. Picture of a drawn aquarium fish angelfish for coloring
Picture of a drawn aquarium fish angelfish for coloring
The goldfish is the main character of the fairy tale in the verses of our great Russian poet Alexander Sergeevich Pushkin, “The Tale of the Fisherman and the Fish.” Everyone knows this wonderful fairy tale from childhood. This is one of the few fairy tales that mothers read to us from early childhood. Pushkin’s magical lines are remembered and stored in our memory for the rest of our lives... The goldfish was not just a fish, but a sea sorceress. She granted three wishes. An old man caught her in the blue sea and she wanted to fulfill his three wishes. But the old man, at the behest of his harmful wife, the old woman, demanded a lot from the fish; she became angry and stopped fulfilling their wishes. Here we will teach you how to draw this magical fish step by step with a pencil and then color it.
Stage 1. Draw the contour lines of the fish. The rounded upper part, which tapers towards the middle of the leaf with its two edges, passes into the contours of the caudal fin. On the head of the fish we will draw two intersecting curves. Two curves extend from the middle of her body - these will be the ventral fins.
Stage 2. Now we will begin to design the figure of the fish according to the initial sketches. We draw lines from one end of the body, then outline the widened part - the head - and then narrow the line down.
Stage 4. Now we draw two eyes along the curve on the muzzle. They are quite large, surrounded by eyelids. And above and below the line of the mouth we make lips. The fish's lips are plump, the upper ones seem to be raised, the lower ones seem to be lowered.
Stage 5. Let's complete the design of the eyes. We draw round eyes with glare of light reflected in them. We show eyelashes on the upper eyelids. There are cute raised eyebrows above the eyes. You need to draw a crown on the head of the Goldfish. First, we draw a double curved line and from it upward the teeth of the crown, decorated with balls at the ends.
Stage 7. Draw the ventral fins. There are two of them. They are located in front under the head. The shape resembles curved leaves. On the side of the body we draw one larger fin - this is the pectoral fin. You need to show strokes on the fins - these are thin fin rays.
Stage 8. It’s the turn of the caudal fin. The Golden Fish has it, as it were, divided in two. It starts from the end of the body and goes down, branching in two directions. It should also show with strokes the fin rays - thin bones that support the fin itself.
Stage 9. Now we need to finish drawing another pectoral fin. It goes symmetrically to its paired counterpart (in our case it is shown just below the fish’s chin). And behind her back is a large unpaired dorsal fin.
Stage 10. This is what your fish should look like.
Stage 11. Let's color our beautiful Goldfish.
Similar drawing tutorials:
They come in big and small, green and red, dangerous and not so dangerous. They swim in almost all bodies of water on our planet, in lakes, rivers, seas and oceans. Yes, today we will figure out how to draw a fish.
Preview:
Organized educational activities in the preparatory group of the compensatory orientation of the NGO “Artistic Creativity”: Drawing
The Tale of the Fisherman and the Fish
Materials: white sheet of paper, watercolor paints, foam sponge, brushes, napkins for each child.
Methodological techniques: demonstration and explanation of the teacher, questions to the children, game situation, musical accompaniment, reminder of drawing techniques, observation of the children’s work, individual explanation, analysis of the work of the teacher and children.
Preliminary work: introducing children to the technique of drawing “on a wet” sheet, reading a fairy tale by A.S. Pushkin “The Tale of the Fisherman and the Fish”, examination of illustrations for this work, examination of pictures and photographs depicting sea inhabitants.
Progress of organized educational activities:
— We will draw “on a wet” sheet.
- Now I’ll read you an excerpt from a fairy tale, and you guess it.
“An old man lived with his old woman by the very blue sea.”
-This is a fairy tale by A.S. Pushkin "The Tale of the Fisherman and the Fish".
-That's right, listen further:
“They lived in a dilapidated dugout, the old man was catching fish with a net, the old woman was spinning her yarn. The grandfather was kind, the old woman was calm, and they had peace and harmony in the house. And nature was calm: blue sky, calm sea.”
-Guys, what color do you think the sea was?
-And in this calm blue sea lived a kind magical “golden” fish, but she did not live alone, who else lived in her magical country-underwater kingdom?
-Does the water in the sea move?
-Moves when the wind blows, ships sail.
-How to convey the movement of water in a drawing?
-Waves on the surface of the sea, and in the depths the algae are swaying, the sand is pouring, the fish are moving.
-Look how I will draw the sea. I wet the sheet with a sponge from left to right with quick movements. With a wide brush I draw a line on top of the sheet, and the paint spreads down, etc. And you will draw a strip and lift the leaf vertically so that the paint also drips off. Let the paint dry a little, and we will paint the inhabitants of the underwater kingdom with a thin brush. We draw algae, sandy bottom and all the inhabitants of the magical sea country. If you want, you can depict the fairy-tale palace of the “golden” fish in your drawing. The children do the work, the teacher observes the drawing, and conducts an individual demonstration if the children have difficulty.
When all the guys have finished drawing, put the leaves on one large table, you get an “underwater kingdom.”
-What a huge calm blue sea we have. And the inhabitants of the underwater kingdom move calmly in the water among green algae. And because the sea is peaceful, calm and there are a lot of goldfish, they are all so bright and beautiful. When I look at your drawings, I feel that goodness is triumphant in this magical land. And the old woman and the old man have peace and harmony. The old man also catches his fish, and the old woman spins yarn. And everything is just beginning, and the whole fairy tale is yet to come.
How to draw a fish with a pencil :: child with a fish with a pencil :: Drawing
How to draw a fish with a pencil
Summary of drawing nodes using the unconventional “Dymkovo horse” technique in the middle group
When drawing any body of water, be it an aquarium, the sea, etc., fill it with fish. They have the most diverse structure and color of the cover, however, some stages of drawing are common to all these aquatic inhabitants.
Instructions
1. Prepare the materials needed for work. Arrange the sheet in a way that is convenient for you. If you are drawing only one fish, it is better to position the sheet horizontally. Choose which representative of the aquatic world you will portray, because each fish has its own unique body structure. To do this, you can look at photographs on the Internet. You can also draw a fabulous fish, which does not exist in nature.
2. Using a simple pencil, make a sketch. Start directly with the body of the fish. Each one has a different shape: triangular for aquarium fish, round for hedgehog fish, oval for most fish, or serpentine for murrena. Draw the desired geometric shape just below the middle of the sheet. Then mark the head on the body, delimiting it from the body with an arcuate line. If the lines you draw do not triple you in their direction, do not rush to erase the drawing. Use light strokes to create the path you want and only then edit with an eraser.
3. Mark the fins. Usually the top fin looks much larger than the bottom fin. In tropical and aquarium fish, these processes often have very bizarre shapes. Draw the fin at the sketching stage as a triangle. Mark the tail of the animal in the same way. Next, make a clarifying drawing.
4. Start drawing from the head. Mark the eye (if you are drawing the fish on one side). Then draw the mouth (if you are drawing a fairy-tale version, then the mouth should be drawn well - it can resemble human lips). Then refine the head fin, which is located a little further than the eye. Give it the desired shape, draw stripes along its length. Do the same with the other fins, especially the tail. If something confuses you in the drawing, you can refer to the photographs.
5. Move on to shading. Use light strokes to cover the entire fish. Then, using a piece of paper, you can shade, but not everywhere. Leave light areas slightly touched. Using a sharpened pencil, outline the scales on the fish's body. After this, shade the shadow parts of the body and use an eraser to draw in the highlights.
Video on the topic
KakProsto.ru>
Easy drawing of a pike
We've sorted out the bright and fabulous fish, now let's try to draw a pike. Almost every person has seen a pike, some even caught it while fishing. To work you will need a pen and colored pencils. Let's draw:
- First, draw a long oval at the top, with a sharp left edge. We add another similar oval to it in the lower part. We supplement them with lines and get the volume of the silhouette. In the center we add many small and sharp teeth.
- Starting from the top edge of the sketch, we begin to draw out the body. Draw the eyes in the form of circles. We draw the fins and finish drawing the body. At the end of the body we show a wide tail. We detail the fins and tail, and show shadows on these parts.
- In the upper left corner we draw a thread, at the end we draw a hook and show on it the bait that the pike is chasing. Against the background of this sketch we draw algae. Once you've finished drawing, you can start coloring.
- Use a yellow marker to place dots on the body. Use a green pencil to color the back of the fish. We color the fins with a pink pencil. We make the mouth and belly of the pike gray. We paint the bait with a red pencil. We color the algae green, and show the water around the picture in blue.
The picture is ready.
After studying our material, you not only learned how to draw fish with a simple pencil step by step for children, but you will also be able to draw other similar pictures with different silhouettes.
On the topic: methodological developments, presentations and notes
Summary of organized educational activities. Educational area “Reading fiction”. Topic: “Reading a fairy tale by A.S. Pushkin "The Tale of the Fisherman and the Fish". Goal: introduction to the fairy tale.
A game drawing lesson for children of the middle group based on the fairy tale by A.S. Pushkin “The Tale of the Fisherman and the Fish.” Goals: Continue to teach children to draw using the poking method using a foam rubber tampon. Secure.
What a miracle these fairy tales are. Application based on the fairy tale by A. S. Pushkin “The Tale of the Fisherman and the Fish.” On the occasion of the memory day of A. S. Pushkin, we decided to arrange an exhibition of children's works dedicated to the work of the poet. For this purpose h.