A way to depict a drawing for any age
Any child can learn to draw, which depends little on his natural capabilities and abilities. First of all, you need to approach the learning process correctly. This is the task of adults: to develop the child’s creative potential. If you want to interest a novice artist, introduce him to unconventional drawing techniques.
One of these methods is grattage. This drawing technique can be introduced to children of any age, as it is convenient and interesting to perform. For younger children, the basis for drawing is done by adults; older children can do it independently.
The whole process is divided into three main stages. Each of them will be interesting for children. Such activities develop children’s imagination, attention, perseverance, and the ability to finish what they start.
Working on drawings allows children to learn about the world around them and expand their horizons; the child accelerates the development of fine motor skills and attentiveness several times. Scratching is a good way for older children to express themselves and develop intellectual capabilities.
Hello dear viewers.
My name is Alexandrova Natalia Nikolaevna. I am a preschool teacher. I conduct drawing classes with preschool children. I introduce children to a variety of art materials and master different drawing and painting techniques. One of these drawing techniques is the “Scratching” technique. The very origin of the word “Grattage” is French, which in translation means to scrape, scratch. Therefore, there is another name - scratching. Wax crayons are traditionally used as a color layer, which is why this technique is sometimes called waxography. Works made using this technique resemble engravings.
Preparatory stages of drawing
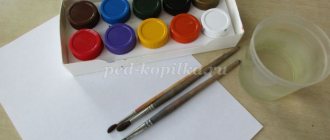
Before you start using the grating technique, you need to prepare your equipment. For the lesson you will need:
- cardboard (preferably white);
- candle or wax;
- brush (preferably thick natural);
- wax crayons;
- ink or gouache;
- a piece of foam rubber;
- sharp object (toothpicks, crochet hook, pen with out of paste).
The first stage of drawing is performed by the child. Using colored crayons or paints, the cardboard is painted over. This can be done in one color, or you can decorate it with multi-colored spots. In many ways, the choice of color and the number of spots depends on what kind of pattern will be scratched out.
Therefore, the final option should be considered at the initial stage. It is advisable to choose contrasting and bright colors that will later harmonize with black. If you take colored cardboard at this stage, then this drawing stage can be omitted, since the base already has the required shade.
You can skip this step, and then the result will be a black and white image, which also looks very beautiful.
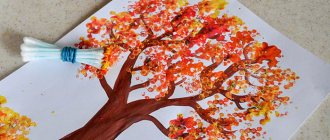
The next step in the grattage technique is coating the painted cardboard with wax. To do this, take an ordinary candle or a piece of paraffin (wax) and rub the entire surface. It is very important to perform this action carefully, and this must be monitored.
The last preparatory stage is applying gouache to the wax layer. There is a little secret here that allows the paint to absorb well and in the future not reach out to the young artist’s hand and stain it.
In a separate bowl, dilute the required amount of gouache with shampoo or soapy water.
Apply the prepared paint with a wide brush in one direction. Gouache may smudge. If this happens, then after the first layer has dried, a second one is applied.
Even if the preparatory processes are carried out by adults, it is very important for children to explain what is being done and why, so that later they themselves can easily and correctly make the basis for a drawing made using the grattage technique.
Table: fragments of lesson notes on drawing using the grattage technique
| Author and title of the lesson | Progress of the lesson |
| Savchuk L. “Flowers for the fairy” Senior preschool age | Guys, today I invite you to go on a trip! Want to? (Yes). And where exactly, you will guess for yourself when you listen to my story: “This is an unusual, magical country. Along the streets of which smart girls with brushes and boys with pencils walk, fidgety painters run around, and sheets of paper proudly walk. The sun is shining brightly, the sky shimmers with all the colors of the rainbow, the emerald grass rustles underfoot. And all the houses are colorful.” - What country is it? (Risovandia) That's right, guys. She really is magical! Why? (Everyone who gets there becomes a wizard). - Remember, we have already been there and learned a lot. What exactly? Recall with the children what they learned in previous lessons (painting apples using the wet layer of paper technique, drawing a fairy meadow using the monotype technique and a printed hard brush: drawing various images using the blotography technique, drawing a saxaul tree by blowing a blot with a tube). |
| - Oh, look, and here is a letter (show a large, beautiful envelope). From whom? From Fairy! Do we lament what she writes? (Yes). “Hello dear guys! I learned that you are traveling around the country of Risovandia and have already learned a lot. Help me please! I decided to have a flower ball. Where can I get them in winter? There is only hope for you! Draw them, and I will bring them to life and decorate my palace with them. Thank you in advance, my good wizards! I am sending you paper and brushes. Your Fairy." (You can read the letter accompanied by music). — Shall we help the good Fairy? (Certainly). Then let's get to work! - But what is it? Someone crumpled the letter and stained it. (Change envelopes while reading the letter). I don't understand anything! (pulling out black paper and pointed sticks instead of brushes from the envelope). What's happened? Look, there's another letter here. I wonder what's in it... “Oh, you decided that you won? Not here - that was! I am the great Lapsus-Tyapsus! I am 120 years old, but in these 120 years I have managed to do so many nasty things that someone else wouldn’t do in two hundred. I like to do nasty things, I'm harmful and nasty. I'm evil and despicable! Do you see what I turned the paper and brushes into? Try to draw something beautiful... Ha ha ha! Let's see what you can do! Lyapsus-Tyapsus." - That's it, neither hello nor goodbye! What should we do, guys? How to help Fairy? (Children's assumptions). | |
| - Well, we don’t have any other paper anyway, but we can draw with sharp sticks! Show how to scratch with a pointed stick. - Look, we hold the stick like a pencil, and scratch the flowers with strokes on the paper and the black will disappear. It turns out? (Yes). That's good! Flowers can be drawn in a vase, in a meadow, or simply arranged beautifully throughout a sheet of paper. - Well, what's the matter? (Yes). Then go to your seats and get to work! The Good Fairy is waiting for our help! | |
| Independent productive activity of children with musical accompaniment. As the activity progresses, monitor the correct execution and, if necessary, recall the method of drawing flowers using the stroke technique. Place the finished works on one table, admire them, and note the most expressive drawings. | |
| Quote from: https://www.maam.ru/detskijsad/konspekt-nod-po-obrazovatelnoi-oblasti-hudozhestvenoe-tvorchestvo-netradicionaja-tehnika-risovanija-gratazh.html | |
| Pochanina E.A. “Space Landscape” Preparatory group | 1. Organizational part Teacher: - Guys, guess where we are going now? Riddle: It is black as night And the stars in it cannot be counted There are many planets and constellations There are many in it What kind of place is this? The question arises And everyone will answer After all, this is……………………….(space) That’s right, children, we Now let's fly into space. How do you imagine space? (the guys' stories - a lot of stars, different planets, meteors, comets, the sun, the moon, etc.). Teacher: Now we’ll find out if this is true in space |
| Game: “Space Travel” Teacher: Guys, I will be your main commander. The chairs will be rockets. — Astronauts, put on your spacesuits. Take your seats in the rocket. Attention, there are 5 seconds left before the start. Let's start counting down the time. Five, four, three, two, one... Start! Children imitate the sound of engines (u..u.. .u..). Attention! Crew, we're about to land. Teacher: We are already in space. Are you experiencing overload? Commander's assignment. Lean back, press against the back of the chair, tense the muscles of your arms and legs, pretend to be a person in zero gravity. (Children pretend) Attention!!! Look carefully through the ship's windows, what interesting things do you see there? Children's answer: Our planet, stars, moon, satellites, comets, etc. Attention!!! The rocket is landing. Fasten seat belts. Congratulations! Here we are in space. Be careful, you have to tell the inhabitants of planet earth everything you see (children get up from their chairs, legs spread wide, walk around the group, carefully look around). Teacher: And now it’s time to say goodbye and Commanders to return to their places! Let's start, let's go to the ships. Attention!!! The countdown begins: Five, four, three, two, one…. Start! (Children imitate the sound of engines -u.. .u.. .u.. .u.. .u) Teacher: We’ve returned from the flight. Our brave pilots. | |
| Did you enjoy traveling? You have seen a lot of interesting things, you will have something to tell earthlings about, and it will be even better if you not only tell, but also draw a cosmic landscape. We will draw in an unusual cosmic way on special sheets with sharp sticks. — Guys, who knows what this method of drawing is called? (scratches, or otherwise scratches) | |
| 2. Practical part: - Guys, before you start drawing, think about the content and composition of your drawing. Think about what you will draw large and what small. And in order for some objects (rocket, planets, sun, etc.) to appear more voluminous, you need to scratch the entire surface. Children take sheets of paper, shelves, sit in a position convenient for each child on the floor, at the table (children work independently). Musical compositions of the group “Zemlyane” are played. | |
| 3. Summary of the lesson Exhibition of drawings. Teacher: What did you want to talk about in your drawings? A child reading V. Tatarinov’s poem “Cosmonaut” I will build a rocket and go on a long journey. I will choose the best star And on the way, of course, I will remember my sweet home And the five-pointed stars above the Kremlin. Where the planets circle, my ship will pass. The sunny people will make friends with me there. And the local boys will meet me, I will sing them a song about our native land! | |
| Quote from: https://dohcolonoc.ru/cons/4601-razvitie-tvorcheskikh-sposobnostej-detej-posredstvom-tekhniki-risovaniya-grattag.html |
What is grattage
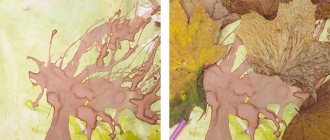
Waxography is an ancient technique of making images using scratching. Modern grattage (French gratter - scrape, scratch) refers to the scratching of a design on a sheet of paper or tablet, which is covered with a thin layer of wax and ink. Currently, this is a common professional method for creating graphic artistic compositions. With its help, you can achieve precise strokes and create a spectacular look with minimal effort.
Drawings using the grattage technique gained great popularity at the beginning of the last century. Then in Russia they began to actively practice the technique of gratography, which they began to use to realize expressive and fantastic works. The works of M.V. became especially popular at that time. Dobuzhinsky and Lithuanian graphic artist D.K. Tarabildene. The latter illustrated the book “One Hundred Folk Ballads” using this technique.
Scratching a pattern on a black background involves using any sharp object of suitable diameter. Traditionally, quill pens, wooden sticks, and unfilled fountain pens are used to scratch out strokes and images. The essence of the modern scratching technique is as follows: a thick layer of wax is applied to thick paper or a sheet of cardboard, which is then covered with black ink. When a layer of ink is scratched with a sharp object, strokes are formed on the black background, the color of which will match the color of the wax base.
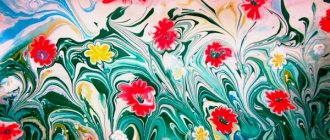
To create a black and white image, a white sheet of paper needs to be covered with wax and ink, and to get a spectacular multi-colored design, the backing is made from several colors of wax crayons. Let's assume another option - first, the base should be painted over with watercolors, setting the color context of the future drawing, then covered with wax and painted with ink. The result will be a colored scratch paper.
It is no coincidence that grattage became popular at the beginning of the last century, because then such qualities as simplicity, originality and conciseness were valued. It was possible to create drawings on a black background with a halftone effect using scratchboard using contours. This technique is often found in magazines and newspapers of the time. If the printing quality of those works was mediocre, then among the advertising products there are masterly examples that show the skill and wide range of scratching possibilities.
Even today, scratching is a unique drawing technique that is actively being introduced into preschool development programs. Scribbling for children is a relatively simple way to create drawings that has great learning potential. It introduces the baby to the basics of composition, develops fine motor skills and imagination, gives an idea of the physical properties of ink, wax and paints, and also has a comprehensive effect on child development.
- French press for tea and coffee - how to choose and use
- Ingrown toenail - treatment
- How to cut your hair at home yourself