Mimosa is clearly associated with the spring holiday, International Women's Day. Nowadays, giving a sprig of mimosa on March 8 is no longer so relevant. But once upon a time this plant was brought to all major cities in unimaginable quantities. In general, mimosa is one of the varieties of acacia. In total there are about 1200 species. They mainly grow in Africa, South America and Australia. African varieties have thorns. This is where their name Akis (Greek) comes from - meaning “edge”. By the way, in France at the end of February every year there is a festival in honor of mimosa. It was introduced in the 19th century and has since been found throughout the south of this country. Many people believe that silver acacia is a shrub. It is not always so.
Sometimes the acacia reaches 25 meters in height. Its bark is smooth and dark gray in color. The tree is spreading and evergreen. Covered with bright yellow fluffy balls, and under them there are small silver-green leaves. One of the accessible ways to admire a fluffy tree is to depict it on paper. We will talk about how to draw a mimosa. Let's look at several ways that will allow every person (both the baby and his parents) to feel like a real artist.
Children's master class. Drawing with cotton swabs in the middle group “Mimosa sprig”
Korneeva Valentina
Children's master class. Drawing with cotton swabs in the middle group “Mimosa sprig”
On March 8, the children and I drew “
Mimosa Sprig ” with cotton swabs . After all, no gift is more valuable than one that is made with soul and with your own hands.
— introduce children to an unconventional drawing technique - drawing with cotton swabs ;
— teach how to draw small flowers using cotton swabs .
- teach how to draw with gouache using a cotton swab ,
- develop interest in unconventional images on paper,
- develop a vision of the artistic image,
- develop fine motor skills of the hands,
- develop a sense of composition,
- consolidate knowledge of flowers ,
- evoke emotional responsiveness.
- looking at illustrations of spring flowers ,
- conversation about the coming time of year and the upcoming holiday,
- memorizing poems and songs.
— cotton buds.
Thank you for your attention!
Drawing with cotton swabs with children 2-3 years old “Mimosa Branch” “Mimosa Branch”. Drawing with cotton swabs. Conducted by Sysoeva Lyubov Viktorovna Age group: first junior Non-traditional drawing.
Children's master class on the application “Mimosa sprig for mom” Materials for the master class: a set of colored self-adhesive velvet paper, a glue stick, scissors, a simple pencil, a template. Children's master class on drawing with cotton swabs in the middle group for Mother's Day "Heart for Mommy" The most important and most important holiday is approaching - Mother's Day. This holiday appeared recently, but has already become firmly established in our lives. Summary of a lesson on drawing with cotton swabs “A sprig of mimosa for mom” in the second early group; synopsis of a lesson on visual arts using an unconventional method of drawing “A sprig of mimosa for mom” in the second early group. Kornilov. Lesson notes for the younger group. Unconventional drawing with cotton swabs and poking “Snowflakes” Educational field: “Artistic and aesthetic development.” Integration of educational areas: “Cognitive development”, “Speech. Fly agaric. Drawing with a non-traditional technique - with cotton swabs GCD for drawing “Amanita” non-traditional technique (with cotton swabs) Purpose of the lesson: to continue to introduce non-traditional visual arts.
Non-traditional drawing with cotton swabs in the 1st junior group “Cup with red polka dots” Non-traditional drawing in the 1st junior group with cotton swabs “Cup with red polka dots” Educational area: “Artistic and aesthetic.
Non-traditional drawing of “Fruits and Vegetables” with cotton swabs Drawing is one of the leading activities of children attending preschool educational institutions. It promotes knowledge of the environment.
Source
How to draw a mimosa step by step?
Drawing a mimosa on a piece of paper is not difficult at all. But the process requires some patience. How to draw a mimosa with a pencil step by step? To begin, prepare a sheet of paper, colored pencils, an eraser, hard and soft pencils. Designate a place for flowers and leaves. Using a simple hard pencil you need to draw the contours of the stain. It can be of any shape. It all depends on your imagination. Next, the place where the balls will be located needs to be circled with a circle of any shape. In the place where the leaves will be, you should draw straight lines in different directions. Thinner lines should emanate from them. In the areas intended for flowers, you need to draw a lot of circles and use zigzag strokes to give them volume. Drawing leaves is even easier. On the small lines coming from the branch, draw short strokes. Things will go faster if you draw strokes without lifting your hands, in a zigzag manner. This way you need to display all the leaves.
Summary of the lesson on drawing with cotton swabs “A sprig of mimosa for mom” in the second early group
Natalia Kornilova
Summary of the lesson on drawing with cotton swabs “A sprig of mimosa for mom” in the second early group
Summary of the lesson on visual arts using an unconventional drawing “ A sprig of mimosa for mom ”
in
the second early group .
• Develop aesthetic perception; learn to create a composition by placing an image over the entire surface of the sheet.
• Learn to draw a mimosa by dipping a cotton swab ;
• Fix the skill of applying paint close to the branch , nearby, thickly, but clearly, so that each flower is visible ;
• Develop creativity and artistic taste;
• Develop thinking, imagination, speech, attention;
• Develop the ability to listen to teachers’ speech
• Foster in children the desire to bring joy to a loved one.
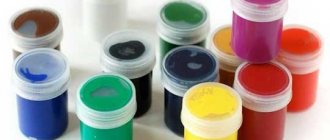
Equipment: Katya doll, vase with mimosa sprigs drawing sheets , gouache, wet wipes, cotton swabs .
Preliminary work: conversation about the upcoming holiday of March 8, showing illustrations depicting spring flowers , reading poems about spring.
Integration of educational areas:
March 8
How to draw a mimosa on a postcard? Everything is very simple here. A sprig of mimosa can be made in the shape of the number “8”. To do this, you need to draw a three-dimensional figure eight on the top side of the postcard with a simple pencil. Further from the number you need to draw branches on both sides. They will look better if you make them asymmetrical. On the drawn figure eight, you need to depict mimosa balls using yellow gouache. Next, take light brown paint and fill the space between the balls with it. Then color the branches green. The postcard is ready. All that remains is to write a congratulatory verse.
"Mimosa branch." Drawing with cotton swabs
Natalya Solomatina
"Mimosa branch." Drawing with cotton swabs
Unconventional drawing “ Mimosa branch ”
.
Secondary speech therapy group No. 2
Teacher Solomatina Natalya Nikolaevna
Implemented educational field “Artistic and aesthetic development”
.
Integration of educational areas: “Speech development”
,
“Cognitive development”
Non-traditional technique: drawing with cotton swabs .
Goal: to introduce children to an unconventional drawing technique - drawing with cotton swabs ; teach how to draw small flowers using cotton swabs .
Objectives: teach how to draw with gouache using a cotton swab ; develop interest in unconventional images on paper; develop a vision of the artistic image, form a sense of composition; consolidate knowledge of flowers; develop the articulatory apparatus and fine motor skills of the hands; evoke emotional responsiveness.
Preliminary work: looking at illustrations of spring flowers, talking about the coming season and the upcoming holiday, memorizing poems, songs, drawing on a free topic .
Vocabulary work: yellow, golden, fragrant, tender, bright
Summary of the lesson on drawing with a cotton swab “Mimosa for Mommy” (second junior group)
Olga Nikolaenko
Summary of the lesson on drawing with a cotton swab “Mimosa for Mommy” (second junior group)
Develop aesthetic perception; learn to create a composition by placing an image over the entire surface of the sheet.
• Learn to draw a mimosa by dipping it with a cotton swab ;
• Fix the skill of applying paint close to the branch;
• Develop creativity and artistic taste;
• Introduce the flower “ Mimosa ”
, its structure;
. Expand children's understanding of plants and animals in the spring;
• Develop the ability to listen to the speech of teachers and children;
• Fix in speech words denoting color (yellow, green)
• Instill in children the desire to bring joy to a loved one
• Strengthen the ability to perform movements in accordance with the text.
Integration of educational areas:
"Educational area"
,
“Cognitive development”
,
“Socio-communicative development”
,
“Speech development”
,
“Artistic and aesthetic development”
,
“Physical development”
Material and equipment:
Teddy bear; real mimosa ; pictures of mimosa ; yellow gouache diluted with water in saucers, wet wipes, “Spring”
Conversation about the upcoming holiday of March 8, looking at greeting cards, reading poems about mom, singing (listening)
songs about mom.
Mimosa in watercolor
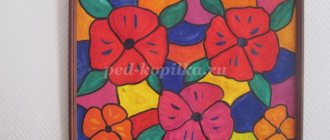
Mimosa flowers are very small and resemble fluffy flowers. They are collected in chic tassels, and the branches look bright and delicate. It is customary to give such bouquets in the spring for International Women's Day; you can also make all kinds of applications, crafts or create drawings. This tutorial shows you how to paint a Mimosa design in watercolor. We must try to convey the color of this unusual plant. It has oblong leaves reminiscent of pine needles, dense bunches of inflorescences consisting of bright yellow lumps. Mature mimosa flowers are darker, and those that have barely bloomed are greenish. It is necessary to use watercolor paints from green to brown to show bouquets of different saturations. Now about how to draw flowers.
For the drawing lesson you will need:
- sheet;
- paints;
- brush (necessarily thin at the end);
- black fine liner;
- water;
- simple pencil.
How to draw a mimosa step by step
A pencil is necessary to outline all the details of the drawing. Show the twig, leaves (move aside the fringe-like strokes), outline the circles - inflorescences located close to each other.
Using the thin tip of the brush, begin to draw the leaves. Use light green paint. Draw a Christmas tree and also draw a stem.
Now soak the brush in light yellow paint and highlight all the round mimosa inflorescences.
Apply a darker green shade to the tip of the brush and go over the leaves again, do the same in the flower area, but use a darker yellow paint.
In some places, add brown spots and dots on the inflorescences.
Once the drawing is set, you need to work out the existing details. Go over the leaves a third time, a third time with a darker shade and continue highlighting the flowers, outlining the circles.
Make the drawing more vibrant. Go over all the lines again, don’t forget to fill the gaps between the leaves and inflorescences with twigs and green hairs.
When the drawing dries, highlight the darkest areas again.
A beautiful mimosa branch has already been drawn in watercolor, but you can additionally highlight the lines with a black liner. Draw the bunches of fluffy creatures with wavy chaotic lines and add dots in the darkest places. Go over the leaves, duplicating the strokes made with watercolors, and show the stem, which you have drawn in dark green. The “Mimosa” watercolor drawing is ready.
Drawing with cotton swabs with children 2–3 years old “Mimosa Branch”
Lyubov Sysoeva
Drawing with cotton swabs with children 2–3 years old “Mimosa Branch”
«mimosa branch»
.
Drawing with cotton swabs .
Conducted by Lyubov Viktorovna Sysoeva
Age group: first junior
Unconventional drawing “ Mimosa branch ”
.
Implemented educational field “Artistic and aesthetic development”
.
Integration of educational areas: “Speech development”
,
“Cognitive development”
Non-traditional technique: drawing with cotton swabs .
Goal: to introduce children to an unconventional drawing technique - drawing with cotton swabs ; teach how to draw small flowers using cotton swabs .
Objectives: teach how to draw with gouache using a cotton swab ; develop interest in unconventional images on paper; develop a vision of the artistic image, form a sense of composition; develop the articulatory apparatus and fine motor skills of the hands; evoke emotional responsiveness.
Preliminary work: looking at illustrations of spring flowers, talking about the coming season and the upcoming holiday, memorizing poems, songs, drawing on a free topic .
Vocabulary work: yellow, golden, fragrant, tender, bright