Summary of GCD in fine arts in the middle group “Drawing the human figure”
Mnatsakanyan Marina
Summary of the GCD in Fine Arts in the middle group “Drawing the human figure”
Goal: teach children to draw a human figure .
Educational: learn to draw a human figure , adhering to the correct proportions; show in the drawing the structure of the human figure (head, torso, legs, etc.)
;
continue to introduce the main parts of the body; consolidate knowledge of geometric shapes .
Developmental: develop the ability to hold a pencil correctly and perform simple actions with it; develop fine motor skills of the hands; diligence; desire to draw .
Educational: cultivate neatness and perseverance; desire to learn new things; interest in the result obtained.
Equipment and material: demonstration board, marker, pictures of a person .
Handouts: sheets of paper, pencils (for each child)
.
Preliminary work: conversations with children about the human , about the functions of parts of the human . Looking at pictures of a person . Making riddles on the topic: “Parts of the human ”
.
How to draw a person in motion
Middle school students know a lot about the rules for placing an object in space, taking into account perspective. For students in grades 5–7, it is advisable to start a drawing lesson with an analysis of the structure of the human figure. This is necessary in order to correctly convey the proportions in the drawing, to professionally depict parts of the body, otherwise the real person in the picture will resemble a mannequin. Despite the fact that the anatomy of the human body is studied later, at this age children already have an understanding of the skeleton, muscles and joints. View changes (opens in a new tab)
The first step in building a sketch step by step is determining the proportions. In adults, the length of the body from the top of the head to the hips is usually equal to the length of the legs. The height of the head fits into the distance from the chin to the beginning of the thigh approximately 3 times. This figure is lower in children and adolescents. The length of the legs of a harmoniously built person is equal to the height of the head multiplied by 3.5–4.
You can depict a person depending on the angle or location of the object and the artist. The main positions are in full face, when the sitter is facing the viewer, in profile - when the person depicted is located from the side, half-turned or half-front, in which the face is not completely visible.
Step 1
The pencil drawing begins with a sketch of the head and torso in the foreground.
The spine is the basis of the entire figure; it can be outlined with a curved line. The large joints of the shoulders and pelvis are schematically depicted as circles. The sketch lines are drawn easily, without pressure.
Step 2
At the next stage, the upper and lower limbs are drawn. The elbows are located at waist level, the length of the humerus is equal to the length of the ulna, the knees are in the middle of the leg. The more accurate the sketch, the better the movement will be conveyed.
Step 3
Now you need to build muscle. The most voluminous part of the forearm, thigh and lower leg is located in the upper third; closer to the joint, the limbs gradually narrow. It is easier to depict the body in the form of two ovals.
Step 4
Particular attention is paid to the hands and feet. They are also depicted schematically, imitating the skeleton of the limbs. The foot should be longer than the hand.
Step 5
After drawing all parts of the figure, the extra lines are erased. The silhouette is given the necessary outlines: sharp corners are smoothed out, the sides become sloping, body parts are connected by curved lines.
Step 6
When depicting a face, you also need to maintain proportions. The height of the forehead is equal to the distance from the eyebrow line to the tip of the nose and from the tip of the nose to the chin. The distance between the eyes is equal to the length of the eye. The ear is depicted just below the eyebrow line. To make a girl smile, the corners of her lips need to be slightly raised. At this stage, you can sketch the hairstyle.
Step 7
The more details there are in the drawing, the more realistic it will be. You need to draw clothes, shoes, accessories and other elements that create a bright image. Strands of hair can be highlighted with separate lines.
Step 8
You can color the drawing using colored pencils or paints.
Lesson summary for the middle group “Drawing a Person”
Yulia Rakhmatullina
Lesson summary for the middle group “Drawing a Person”
Purpose: To train children in depicting a person .
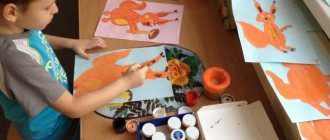
Educational. Teach children to draw a person with watercolors, conveying the characteristic features of appearance.
Developmental. Develop the ability to draw a person in a certain sequence;
Educational. To educate: accuracy, perseverance, interest in the result obtained; educational interest in the defenders of the Fatherland.
Creative. Develop children's creativity, cultivate emotional interest in the result of their work;
Preliminary work. Examination of illustrations of soldiers, educational activity about the defenders of the Fatherland; conversations about the Russian Army, about the branches of the military, about the Motherland, about the Fatherland; reading fiction; listening to musical works dedicated to the army and defenders of the Fatherland.
Materials and equipment: 1/2 landscape sheet of paper, watercolor paints, a simple graphite pencil, a sippy cup (for each child), brushes, napkins (for each child, a sample drawing, a picture of a military man .
Progress of the lesson.
(the guys are sitting at the table on their chairs)
- Guys, what holiday is coming soon? (February 23)
-On this day, you and I will congratulate our dads, grandfathers, brothers and our boys, future Soldiers.
- What can you give? And what wishes can you wish for?
(Children suggest what to give; one option is to draw a postcard with warriors .)
Before you start drawing, you need to do finger exercises.
There are five fingers on my hand
Five grabbers, five holders.
To plan and to saw,
To take and to give.
It's not hard to count them:
One two three four five!
The teacher shows the sequence of drawing a man in military uniform .
Children draw a portrait on a postcard. The teacher pays attention to technical skills, if necessary, attracts children to the flannelgraph - to clarify the location of individual parts
2. Then we draw the body, arms, legs.
3. Then we draw the hands, cap, boots.
(rotation in front of the chest with arms bent at the elbows)
They sat quietly in the clearing,
(sit down, hands to knees)
And they flew again.
4. Draw in the eyes, eyebrows, nose, and mouth with a simple pencil.
—Which postcard did you like the most?
Tell me again what holiday is coming soon? Dads and grandfathers will be happy with such gifts.
All the work is good, we tried our best!
Summary of an open integrated lesson (drawing, the world around us) in the middle group: “Spring Forest” Purpose: To form in children a desire to get acquainted with, emotionally perceive works of fine art, and notice expressiveness.
Summary of a lesson on fine arts activities in the middle group “Decorative drawing” “Deer - branchy antlers” Decorative drawing Program content: introduce the gingerbread industry of Russia. Learn to decorate a figurine. Lesson summary for visual arts in the middle group. Drawing with gouache paints “A rocket flies into space” Educational objectives: Continue to teach children to convey in the image not only the basic properties of objects (shape, size, color, but also characteristic ones.
Summary of a lesson on unconventional drawing in the middle group “Leaves”. Technique: drawing on a wet sheet Prepared by PDO: Sigareva S.V. Objectives: • Teach children to draw in an unconventional way “on a wet sheet” • Continue to develop technical skills.
Summary of a lesson on cognitive development with children 4–5 years old in the middle group “Human Organs” GOAL: to educate preschool children about the internal structure of a person. Objectives: teach children to distinguish and name parts of the body and internal ones. Summary of a drawing lesson in the middle group. Drawing the Chuvash ornament “Jug” The lesson was prepared by the teacher Okruzhnaya Nadezhda Pavlovna MBDOU “Kindergarten No. 19” Kanash, Chuvash Republic Goal: To introduce children to.
Notes for the lesson “Drawing a hedgehog” in the middle group Notes for the lesson “Drawing a hedgehog” (middle group) Objectives: to consolidate the names of wild animals and their habitats; learn to compare, transfer.
On the topic: methodological developments, presentations and notes
Summary of a drawing lesson in the senior group, based on the Russian folk tale “The Snow Maiden”.
Program content: Continue to teach children to draw a human figure in motion, observing the proportions of body parts, conveying the beauty of ballerinas through color, movement, smooth lines and emotions. Developed
LESSON SUMMARY ON DRAWING A PERSON (MIDDLE GROUP), TOPIC: “PORTRAIT OF THE SNOW MAID” Technique: Drawing with gouache paints. Program tasks: Learn to draw a human figure, conveying the shape of the part.
Summary of a lesson on art activities (non-traditional drawing with elements of appliqué) in the nursery group “Herringbone” Chernikova Valentina Petrovna. Goals: To introduce children to non.
Summary of a lesson on drawing a person “Snow Maiden in a Fur Coat” (middle group) Purpose: • To arouse children’s interest in a fairy-tale image, the desire to convey it in a drawing; • To teach children how to create.
SUMMARY OF A DRAWING CLASS IN A MIDDLE GROUP ON THE TOPIC: “THE SNOW MAIDE”.
I offer you a summary of a lesson for children of the preparatory group (6-7 years old) on the topic “A little boy.” This material will be useful to teachers of the preparatory group.
Source
Summary of a lesson in the middle group of kindergarten on the topic “The human body. Geometric figures."
Lesson plan for the middle group of kindergarten
View the contents of the document “Lesson summary in the middle group of kindergarten on the topic “Human body. Geometric figures.""
Lesson summary for the middle group:
“Drawing the human figure using a combined method”
— Learn to draw a human figure, adhering to the correct proportions (the length of the legs is equal to the length of the torso with the head).
— Strengthen the skills of painting a limited surface.
— Continue to introduce the main parts of the body and their functions (head and neck, arms and legs are attached to the body and can move).
— To consolidate knowledge about quadrilaterals, the ability to compare lengths using the application method.
— Develop logical thinking and creative imagination.
— Cultivate accuracy, perseverance, and a desire to learn new things.
Equipment: demonstration material: magnetic board, crayons, doll, set of geometric shapes on magnets for drawing a human figure; handouts: sheets of white paper, sets of geometric shapes in envelopes, colored pencils.
Progress of a drawing lesson in the middle group:
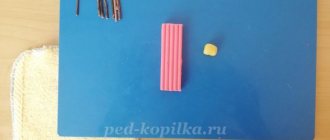
— There is an envelope in front of each of you. Look and tell me how you can name everything that is there in one word. (Geometric shapes, quadrilaterals)
— How many squares are in your set? Show me the square. (One)
— What other figures are there in the envelope? (Rectangles)
- Think about how you can make one long narrow rectangle from two narrow short rectangles? (Attach short sides to each other)
- Make a rectangle like this on your desk. How many more similar rectangles can be made from your set of shapes? How much in total? (Three more. Four in total)
- What can you say about the length of these rectangles? Compare. (Identical, equal in length)
How can you use a square and a wide rectangle to make one long rectangle? (Attach the square to the short side of the rectangle)
- What can you say about the length of this and the other four rectangles?
(Identical, equal in length)
- Did you know that if you add up all these quadrangles in a certain order, you can get an image of a human figure? (Further story about the structure of the human body is accompanied by a demonstration on a doll and teaching on a magnetic board of geometric shapes indicating parts of the body)
Conversation between a teacher and children about the human body
The head is on the neck. The neck is movable, so the head can tilt forward and backward, and rotate from side to side. Our arms bend and unbend, we can lift them forward, up, to the sides. We use them to grab objects and hold them. We move with the help of our long and strong legs. Thanks to our legs, we stand and walk, run and jump. The legs end in feet. Our feet are designed in such a way that we can easily stand and walk, leaning on them. The neck, arms and legs are attached to the torso, the largest part of the body. The body can bend forward and backward, to the sides, and rotate from side to side.
- Let's check how our body works. Who wants to do some physical education? (Physical exercise of children's choice).
- Now let’s remember how we made the figure:
— Arms and legs are the same in length;
— The length of the legs and the length of the body with the head are also the same.
— Try placing similar figures on your tables. If you trace them along the contour with a pencil and paint over them, you will get a wonderful drawing. (Children lay out with the help of the teacher, outline, color).
Source
II. Human body proportions
The unit of measurement of the human body is the head. In Western art, men are typically 8 heads tall, while women are slightly smaller at 7.5 heads. In reality, the human structure is usually closer to 7 heads, not to mention other types of structure, because the proportions can be very different.
However, the 8-head model (shown in the picture) is very useful for beginners because it makes the basic parts easy to remember:
- Head;
- Nipples;
- Navel and elbows;
- Perineum and wrists;
- Fingers and thighs;
- The lower part of the kneecaps;
- Lower part of the calf muscles;
- Soles of feet.
Female body structure
Below are the main differences between the male and female proportional body.
- The body consists of an oval, soft shape;
- The shoulders are narrower than the hips (the hip joints are outside the pelvic area);
- Elbows at waist level;
- Fingers mid-thigh;
- Legs taper inward from the hips (more pronounced taper than in men).
Male body structure
- The elbows are at waist level, but the man's waist looks much lower;
- Fingers mid-thigh;
- Legs taper inward from the hips (less pronounced taper);
- Men are generally taller than women;
- The body consists of a trapezoid, angular in shape;
- Shoulders are wider than hips (hip joints are inside the pelvic area).
III A little reminder
Here are some drawings
, with which you can remember the proportions. Visualization will help you when you come to scaling joints and limbs.
The level of the knee is equal to the level of the elbow, and the level of the toes is equal to the level of the heel.
From shoulder to buttocks. The shoulder is level with the knee, fingers start from the level of the buttock.
Heels never protrude beyond the line of the buttocks.
The palm of the hand reaches to the shoulder.
When the arm is bent, the size of the palm is placed from the wrist to the crook of the arm.
When the arm is extended, the size of the foot fits from the wrist to the elbow.